Open topic with navigation
(continued from Graphics and Layouts)
BackOffice Management Functions
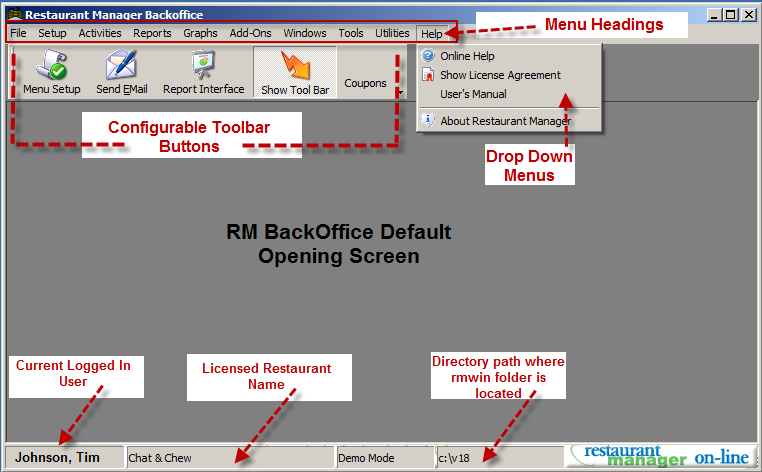
The Restaurant Manager BackOffice Module offers many management functions that help you run your business, analyze your sales and maintain your POS System in top working order. As described in the chapter on Configuring a New System, the BackOffice Module is used to setup and control the operation of the POS Module(s) and workstations. Once a system is fully configured and operational, the BackOffice Module is also used to execute Management Functions and to print Reports.
Users typically access the BackOffice Module from the computer that serves as the Manager Workstation. In systems where the BackOffice Module has been defined as an External Program, the BackOffice Module may also be run on POS Workstations.
Every time the BackOffice Module is launched, users will be prompted to login using their Employee Password. The drop down menus and icons displayed at the top of the BackOffice Screen help users navigate the many available setup forms and BackOffice functions available.
Launch the BackOffice Module
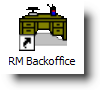
To open the BackOffice Module users may either double click on the desk icon:
Or use standard Windows procedures to access the Restaurant Manager directory (usually C:/rmwin) and then launch RMWIN.exe.
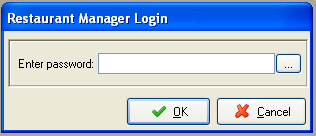
Restaurant Manager Login
Access to the BackOffice Module is controlled by an Employee Password prompt that cannot be disabled. The prompt is referred to as the “Restaurant Manager Login” and appears automatically every time the BackOffice Module is opened:
The Security Level and Administrator status associated with the employee who logs in controls the Setup Forms and other BackOffice operations the user will be able to access.
The Master Password and the rarely used Daily Password may also be input at the Restaurant Manager Login prompt. When the Master Password is used, however, the operator will not able to access any operations protected by an Administrator Password prompt. When the Daily Password is used, the operator gains temporary access to the Employee Admin Password form which allows re-definition of Administrator Password that may have expired.
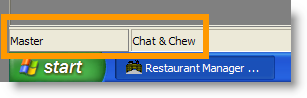
The type of password used to access the BackOffice Module is always displayed above the [Start] button at the base of the screen. The partial screen shot below is an example of what you would see at the lower left of the screen if someone used the master password to access a system licensed to a restaurant called Chat & Chew:
The Restaurant Manager Login prompt can be manually recalled using the Login New User option under the File menu on the Menu bar if a different user wishes to take over operations of the BackOffice Module.

The BackOffice Screen and Menus
The Restaurant Manager BackOffice module is where most all programming is done. Menu programming, station setup, labor programming, guest checks, payments are examples of functions configured in RM BackOffice. The RM BackOffice is defined by menu headings on the menu bar containing sub headings. The headings and sub heading contain Setup forms and functions used to program and manipulate BackOffice and POS functions and data. In addition, you will find customizable quick buttons on the toolbar for easy access to various setup forms.
BackOffice Drop-down Menus
The various system configuration and management options that comprise the BackOffice Module are accessed via drop down menus that appear across the top of the main screen of the BackOffice Module

You will find nine menu headings on the top of the RM BackOffice menu bar. Each heading contains a drop down menu that is activated when clicking on it. Below is a list of the headings:
File- this heading is the home for several functions used for general login/out purposes and major database manipulation. Detailed information is covered in the File topic.
Setup- this heading contains most of the setup form that are used to configure you system. Setup forms for menu, labor, and station configuration are found in the area.
Activities- this heading contains applications used more for daily purposes. Session information, bulletin board editing, e-mail functions, and edit login data are a sample of function found here.
Reports- this heading contains only two functions: a link to RM Reports and Server Reports.
Graphs- this heading contains the Sales Graphs setup form.
Add-Ons - this heading contains the setup forms for separate modules Guest Accounts, Frequent Diner program and Customer databases.
Windows- rearranges the windows currently displayed on screen, use the standard Windows options listed on this drop down menu
Tools- Allows access to a text viewer and Restaurant Manager On-line program.
Help- Contains general information like Users manual, License Agreement, etc.
Below is the RM BackOffice Opening Screen:
File- Setup Forms and Functions
This section only covers the setup forms accessed under the File drop down menu of RM BackOffice module:
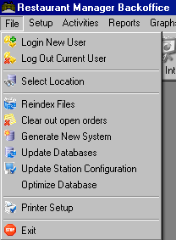
- Login New User- In its default configuration, Restaurant Manager immediately prompts for a password when you try to enter RM BackOffice Module. You can access this option to change the user password you used during the original login. If this option is grayed out, all password prompts have been disabled.
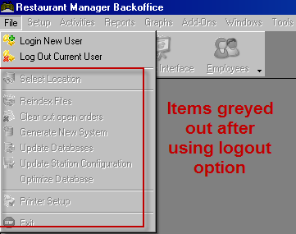
- Logout Current User- Use this option for added security when you must leave your desk but do not wish to exit RM BackOffice Module. When this is done, all other options except “File” and “Help” are grayed out.
- Select Location- If your system is set up to manage multiple locations from a central office, use this option to access a different location. (See the Central Manager Manual for more information.) On rare occasions (and only after consulting with a certified Restaurant Manager Reseller) you may wish to make changes to your system via one of the following options from the File drop down menu.
- Re-index Files- If your system does not seem to be working smoothly, one or more of the index files may be corrupted. As long as the POS Module(s) are closed, you can never go wrong trying to fix your system by re-indexing the files. This function can also be access in the RMWIN folder using RMINDEX.EXE.

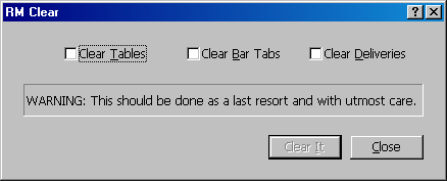
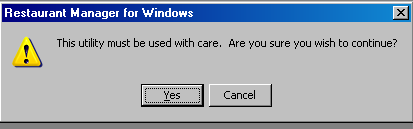
- Clear Out Open Orders- This function should be used with great care. Using this function will close out all open orders under the POS Module which field is checked. This function is typically used if a session does not close, a server cannot run a revenue report or log out, etc because of an open check that cannot be found. It is recommended that you run Re-index before using this function. Using this function will void the check and erase any information affecting various reports. This function can also be access in the RMWIN folder using RMCLEAR.exe.
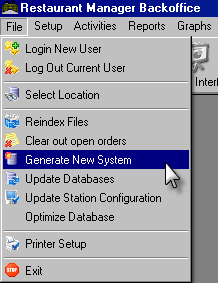
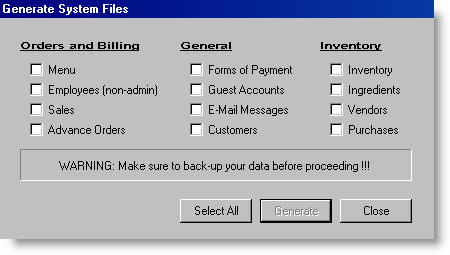
- Generate New System- This operation allows you to delete specific categories of data such as sales data, employee data, menu data, etc. If you have installed your Restaurant Manager™ POS System with the , you may use this operation to delete the sample data while maintaining the default configuration settings. However, due to the erasure of critical data it is highly recommended the Generate New system be password protect with the highest available security level.
This operation is also useful if you use your system for training when it is first installed. Use this function when the initial training period is completed and you would simply delete the sales rung up for training purposes.
NOTE: If you put the system in Training Mode for training sessions, there is no need to generate a new system before the “go live”.
Before generating a new system you should always back up your data to make sure you don’t accidentally delete data you may need later. For instance, when you generate a new system, employee login data will be lost. If you have been using Restaurant Manager for time keeping, you will want to have data backup. The procedures for generating a new system include multiple prompts reminding you that to back up your data because the procedure cannot be undone. This function can also be access in the RMWIN folder using SYSGEN.exe.
- Deleting System Data- Follow the instructions below to delete one or more categories of data from your Restaurant Manager™ POS system. This process should only be done by your reseller.
NOTE: If you wish to delete data in a more selective way, see the section on Adjusting Sales Reports or the various sections on deleting transactions, employees, menu items, etc.
- Follow standard procedures to back up all system data.
- Click on the File drop down menu in RM BackOffice Module and select the Generate New System option:
- Respond [Yes] to the following prompts that appear in succession:
- Select the categories of data you wish to delete from the following form
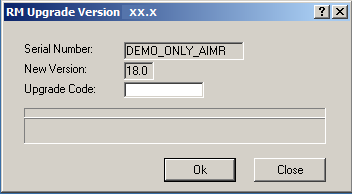
- Update Databases- Update Databases is used when installing a new version of Restaurant Manager software. It is best to have all stations down, no running executables (except RM BackOffice and Security.exe), all employees logged out, and the session closed. In addition, it is also suggested that you have a complete back of the RMWIN folder. You will also need the Upgrade Code from ASI to complete this. More detailed instruction for version upgrades can be found on the ASI website under Dealer Support > Tech Support > Tech Notes and Manuals. This function can also be accesses in the RMWIN folder using NEWVER.exe.
- Update Station Configuration- Updating the Station Configuration is a program used if a station configuration gets corrupted for any reason (running Newver.exe). This executable is typically not run directly from the RM BackOffice. Instead you want to run the following command from a DOS prompt: RMWIN /FIXCONFIG". Then select File->Update Station Configuration. It is strongly recommended that you back up all .scr files before executing this command.
- Optimize Database- This is a utility that will synchronize dbf and dbt files. This can also be found in the RMWIN folder as LEANDBT.exe.
- Printer Setup- Although most of the devices in your system must be configured from the Station Configuration > Devices, you must configure the report printer from the Printer Setup Form.
- Exit- Click on this option to exit RM BackOffice Module of your Restaurant Manager system.
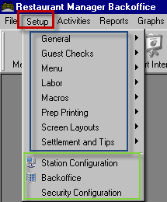
Setup (Heading) - Setup Forms
The Setup Heading is home to most of the program where you will do configuration. There are 9 subheadings and three station and RM BackOffice configuration areas. The sub headings group particular setup forms relevant to the title. Setup forms for Menu, Guest Check, Payments, and Employee programming are all found under the setup heading under their relevant subheading.
Station Configuration is where devices such as guest check and kitchen printers, pole displays, fingerprint readers are setup or enabled. The station configuration also contains setup filed that control behavior of the POS. prompts for customer counts, customer information, and advanced seat management are configured here.
Additional RM BackOffice security is configured under BackOffice Configuration and Security Configuration. You will need an Administrator password to access these function. The BackOffice Configuration is the setup form where you can add a security level to heading and sub-heading menus, in addition to each setup form or program function. The Security Configuration where the master password parameters are defined.
General
The setup forms under the General heading will allow the user configuration of several functions such as Alerts, Button Colors, Contests, Deletion Codes, and Store Info etc. The completion of some of these forms may be required to complete the functionality of other programs. As an example: the form fields under Store Information in the “Other Settings” are required to send Alerts or reports via e-mail. Further, the some Alert fields under “Alerts” will need to be filled in to complete messaging via ASI’s Write-On handhelds and/or remote e-mail.
- Alerts- In systems configured with wireless handheld devices, this setup form is used to define standard messages or “alerts” that can be sent to the handheld devices. For more information on handheld alerts as well as other types of alerts, see the section on Messages, Alarms and Alerts.
- Button Colors- This function allows the user to customize the appearance of buttons colors and text. Shadow, pane, highlight, down, and text colors can all be manipulated.
- Contest- If you wish to reward employees who are motivated to “up-sell” or push particular menu items, then you must access the Contests Setup Form and identify the menu items or menu groups you wish to track as part of the contest.
- Deletion Codes- When an item is deleted from an order after being sent to the kitchen the system always prompts the user for a reason. Use this setup form to define standard deletions codes can be used to track item deletions.
- Reason for applying coupon- Coupons can be used for many reasons besides simple discounting. Example, a coupon may be used for manager meals or to record spillage. Use this form to configure a list of possible reasons why an item is being discounted. The data entered in this form will appear as a prompt at the POS when a coupon is applied. Note: the option "Prompt for reason when applying" must be enabled for each applicable coupon in the Coupon Setup Form. The "Consumed" option is used to distinguish items that are consumed versus those that are not. For the types of discounts where the item (or items) are consumed or wasted, place a check mark in the “Consumed” field of the corresponding row. Note: the consumed option is only relevant if using RM Inventory.
- External Programs- Many programs, including RM BackOffice Module of Restaurant Manager, can be accessed from POS Stations. The External Programs setup form is used to configure the applications that may be opened from the POS Station(s).
- Redundancy- Access this form to setup the info needed to perform redundancy. See Implementing Redundancy in Restaurant Manager.
- Session Notes- If you wish to append a notation to a sales session when the session is closed that might explain the sales volume that day, use the Session Notes setup form to create a set of pre-defined notes such as “rainy day”, “school holiday”, etc.
- Slideshow Screen saver- Access this form to customize a slideshow screen saver for Restaurant Manager. See Slide Show Screen Saver.
- PCall- The PCall Setup form is used to enter data when using the “Notify” function button in the Hostess module to call a guests cell phone informing them their table is ready.
- Store Info- The user to whom the Restaurant Manager POS System is licensed is hard coded into this Setup Form. You may access the form to add address information on the licensee. This setup form is also used to add Cover Item counts frequently used in nightclubs or comedy clubs. Tip rates percentages that determine tip declaration minimums are configured in the named field. External E-mail information is programmed in the SMTP fields located under the “Other Settings” fields” for remote reporting. section on Store Information Set Form for more details.
- Station Names Setup- Use this Station Name Setup Form to customize POS stations names. Sometimes it is easier to relate to station names rather than station numbers when doing station configuration or customer support. Example: a POS station with the name "Bar Station" is easier to identify compared to Station 1.
The numbers of rows appearing on the form auto populate according to the number of the system's licensed stations. Click on the Store Name cell associated with the Station Number column to edit the name of a POS Station. Use the [Add] button to add another if necessary. New rows can only be added in numeric sequence. Remove the station names by clicking on the Station Name cell and use the [Delete] button on the form. Note: using the [Delete] button on the last row of the form will remove the entire row.
The station names entered in this form will appear as entered in:
- Station Configuration form on the station list
- Under the Enable\Disable tab (station name column)of the Method of Payment Form.
- Lower left corner of the POS Status screen
Guest Checks- Setup Forms
There are two ways to manipulate data on a guest check. The simplest way is to use the “Standard Guest Check Editor”. This form field allows the user to change the length and the width of paper being used, the number of copies being printer, and a field to change check messages on the guest check. The Configurable Guest Check Editor is a setup form that allows the user an enhanced method to manipulate a guest check. Information can be arranged in an enumerable amount of formats and can be defined by revenue center. More information on this topic is covered under: Guest Check and Receipts.
- Configurable Guest Check Editor- The setup form changes the default format of the detailed and condensed customer receipts. You need only access this setup form to customize the message that prints at the base of the guest check. More information is covered under the topic: Guest Check and Receipts.
- Standard Guest Check Editor- Access this form to create a customized message that prints at the base of guest checks and sales receipts and to make margin changes as to paper size and number of copies.
Menu- Setup Forms
The menu subheading contains the setup forms used to manipulate most menu item related functions. You can create and delete menu items in “Menu Setup”, create “Combo Meals” and “Combo Sizes” for quick service establishments, or create a more intuitive menu at the POS using “Adjective Setup”, “Menu Navigation”, or “Custom Groups”. The “Pizzas” Menu module and time sensitive menu setup using “Meal Periods”,” Price Schedules” or Group Schedules “can also be found under the “Menu” Sub heading. Setup fields such as “Category”, “Meal Periods”, and “Group Types” can help define how information will appear on reports using the RM Reports module.
- Adjective Setup- Restaurant Manager has two adjective concepts: Simple and Regular. Menu Items may be described by adjectives like “Small”, “Medium”, or “Large” that affect the price of an item and serves an example of regular adjectives. Regular modifiers are more complex to set up as they are most commonly linked to a pricing scheme. Simple Modifiers are usually not connected directly to an item and are most commonly associated with modifiers. Examples of simple modifiers are “NO”, “WITH”, “EXTRA”, “LITE”, etc. Adjective names are defined on this setup form as one step in the process of menu implementation.
- Category- The category form allows the end user the ability to either create menu categories for greater reporting capabilities. Fried Foods, Premium Steaks, and Deli Sandwiches are examples of categories that may contain items spread though different menu groups but pose a need for a specific report. A category can be applied at the menu group or item level in “Menu Setup”.
- Combo Meals- Defining Combo Meals allows you to charge a special discounted price for certain items when they are ordered in combination. The Combo Meal Setup Form is one of multiple setup forms used to configure your system to process Combo Meals.
- Combo Sizes- Defining Combo Meals allows you to charge a special discounted price for certain items when they are ordered in combination. The Combo Sizes Setup Form is one of multiple setup forms used to configure your system to process Combo Meals.
- Containers-If you sell certain menu items by weight and use the scale interface to generate the price of these items, you must access this setup form to define the tare weights of the containers in which the items are weighed. The containers defined in this setup form will be applied at the menu item level in the Menu Setup under the “Advanced Tab” of a menu item.
- Counters Setup- Counters is an program that tracks menu items sold. Unlike ordinary menu reporting, counters allow you to track by ounces, lbs, or other customizable measuring units and reports in real time. See the section on Counters for detailed setup information. Counters is an additional module.
- Course Types- Configuring your system with “Coursing” allows you to sort Prep Area output by course type. Courses are applied at the menu item level in the Menu Setup under the “Advanced Tab” of a menu item. The Course Type Setup Form is one of multiple setup forms used to configure your system with coursing. More on Coursing can be found at: Courses
- Custom Groups- Use the Custom Groups setup form to display menu items from different menu groups together on the Order Entry Screen as if they were in a single menu group. See the section on Custom Groups for more information.
- Group Schedules- To make certain menu groups available/unavailable during specified time frames, access the Group Schedule setup form.
- Group Types- You must access this form when defining a new system to link the Tax Tables to various menu items as well as to create categories for use in sales reports. See the section on Group Types for more information.
- Meal Periods- If you are using the “Sales Statistics Report” to analyze sales sessions but wish to further break down the session sales statistics by time periods such as Breakfast, Lunch and Dinner, etc. use this setup form to define the appropriate meal periods.
- Menu Navigation- If you wish to display buttons representing the most commonly accessed menu groups along the right side of the Order Entry Screen, use this setup form to select the menu groups to be displayed. See the section on Menu Navigation Bar for more information.
- Menu Setup- The Menu Setup Form is comprised of multiple setup forms that may be used to define menu and modifier items, pricing and a host of other item related features as described in the chapter on Menu Setup.
- Pizzas- Access this form to create a pizza menu with separate options for Size, Crust, Combos, Toppings, Modifiers and Misc options. See Pizza Definition.
- Price Schedules- Access this form if you have defined multiple prices for each menu item and wish to automate the change from one to another. See Price Levels.
Labor Setup Forms and Functions
The Labor sub heading contains the setup forms the end-user will use to add/ delete employees, define job types, and setup the training mode. The Job Classification setup form is pre-configured but can be changed. Job Classifications are used in conjunction with the Employee setup form. It is in the Employee setup form that Job Classifications are applied as well other data.
- Employees- The Employee setup form is where Names, Passwords, Security Levels, pay rates and Job Classifications are programmed. Other important employee data such as Phone numbers, addresses, are created. Employee data must be entered here before an employee can log in or perform other POS functions.
- Job Classifications- Access this form to define the various positions held by your staff so that you can implement time keeping and payroll functions. See Job Classification.
- Training Mode- Access this form to setup the directory to store data while in training. See Training Mode.
Macros- Setup Form and Functions
Macro Buttons execute a user-defined series of operational steps. To make your system as efficient as possible, it is highly recommended that you define Macro Buttons for any commonly executed operation that involves multiple steps. All macros are created at the POS using the Macro button at the POS located under the Misc Functions button. Additional Station Macro functions can be found under RM BackOffice > Setup > Screen Layouts.

- Station Macros- This setup form is one method to take previously created macro buttons and assign them to different stations. You can use this setup form to arrange the order of how the macros appear at the POS. This function can also be achieved using POS Function button Layouts found in RM BackOffice > Setup > Screen Layouts.
- Macro Library- This setup form allows the end-user to change text, color, or bitmap images of Macros.
Prep Printing Setup Forms and Functions
The different types of printers, paper, or labels may require a custom layout. Additionally, some establishments may have specific requirements demanding print/format customization. The Prep Printing Setup Forms are where the end-user can manipulate print layouts for both label and remote printers. Prep printers in kitchens, bars, etc, are examples of remote printers.
Some establishments may want to take advantage of the Time Send function that Restaurant Manager offers. The Time Send Delay setup form is where you can set pre-determined time intervals.
- Label Format- In systems configured with the Quick Service Module you may use this setup form to define the layout of ID labels that may be are affixed to each item in the order. For more information see the link on Printing Labels on Prep Printers under Tech Notes in the ASI Web site.
- Printer Templates Editor- Access this form to customize kitchen printouts. See Remote Printer Template Setup under Tech Notes in the ASI website.
- Time Send Delays- If you wish to take advantage of the “timed send” feature, access this form to define the most commonly used delay intervals so servers can more easily specify when the order should be sent to the kitchen as they place each order. The Times Send function must be used in conjunction with POSLINK.
Screen Layouts- Setup Forms and Functions
Restaurant Manager allows great flexibility for how POS screens are laid out. Fine Dining, Quick Service, Night Clubs, and Pizza Delivery establishments demand more of certain functions than others. POS Function Buttons can be easily moved into between MISC Function screens into Order Entry Screens for easier access. In addition, some function buttons may have no relevance to an establishment and can be removed from site using the POS Function Button Layout setup form. With Restaurant Manager, an end-user can even custom tailor function buttons and macro layouts for each station using the POS Function Button Layout setup form
Some establishments may want to customize the table layout on the POS Table Status screen to match they way tables are actually laid out. The Table Layouts setup form is where you can configure table layouts while also defining revenue centers and other criteria that can be used in conjunction with the Hostess Module. End-users can achieve a more graphical table layout using bitmaps in the Image sets Setup form.
Another Order Entry Screen area that can be customized is View Check Area. Using the POS View Check Layout function will allow you to arrange, disable, or size the columns shown in the View Check Area.
- Image Sets- In systems configured with the Table Service Module you may use the Image Sets setup form to define the various bitmaps displayed on the Table Layout Screen. Restaurant Manager comes with pre-configured bitmaps reflecting Square, Rectangular, and Round tables or various sizes. Other bitmaps included show bar décor, stools, and plants. Additional images can be added if needed. Images are applied in Table Layouts.
- POS Function Button Layouts- Access this form to setup the layout of your POS function buttons. Function buttons and Macros can be used to move between the MISC Function screen and various Status screen s making the system more intuitive for the end-user. You can also use this setup form to create password protection for each function.
- POS View Check Layout- Use this setup form to adjust the layout the left side of the Order Entry Screen where details about the active order are displayed.
- Table Layouts- If your system is configured with the Table Service Module, use this form to create the table display. Decor, like bars, plants, and doors can be added using Image Sets. Tables can be given names using alias’ adding to customization and Revenue Centers can be defined for reporting purposes. More information can be found under the subject: Table Layout Screen.
Settlement and Tips- Setup Forms and Functions
The Settlement and Tips sub heading is home to setup forms that help determine payment methods, certain cash drawer functions, discounts, coupons and a various other categories affecting settlements. Setup forms such as Discounts, Group Discounts, Coupons, and Special Gratuities affect the total amount due on guest check settlements. Certain fields in Method of Payments, Paid Outs and Denominations setup forms will affect cash drawer behavior and settlement. Foreign Currency may be used by accounts whose business relies heavily on foreign tourist trade (Version 18 supports multiple foreign currencies via Method of Payment form). Revenue centers will help determine certain reporting data, misc prompts, how taxes are applied, price levels, and some guest check printing functions.
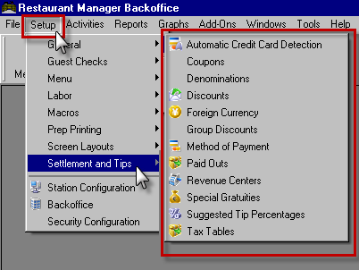
- Automatic Credit Card Detection- If you are using the optional module RMCCWIN you may want to enable “Auto Detect Credit Card Type” in Station Configuration and use this setup form to define Credit Card range numbers inherent to Credit Card Companies. When setup the correct card type will be automatically found regardless of which credit card type is selected on the settlement screen at the POS.
- Coupons- This setup form is used to implement coupons, discounts, and a variety of other type of promotions that businesses may to increase customer traffic.
- Denominations- Use this setup form to define denominations used in cash drawer declaration. “Declare by denomination” must be the chosen method in the “Cash Declaration Mode” in Station Configuration.
- Discounts- You may use the Discounts setup form to create pre-defined percentage discounts that can be applied to entire guest checks or individual items on each check.
- Foreign Currency- If you’d like to configure your system to accept more than one currency, access this form to define exchange rates (Version 18 supports multiple foreign currencies via Method of Payment form).
- Group Discounts- Special discounts and promotions such as “2 for 1” discounts, etc must be defined on the Group Discounts Setup Form.
- Method of Payments- You need only access this setup if you wish to add/delete the eleven forms of payment that are pre-configured with your system. Payment types programmed here will appear in the “Settlement” screen at the POS. You can also add security to each form of payment, force printing receipts for each form of payment
- Paid Outs- Access this form to define standard lines of text that can be used to tag any non-sale transaction from the Cash Drawer. Paid In standard text lines are programmed here as well. Initialization of cash drawers must be enable in Station Configuration for Paid In/Outs to work.
- Revenue Centers- Use the Revenue Center setup form to define multiple revenue center names and to configure certain features like “prompt for phone number” or “automatic gratuity”, etc. Each revenue center is programmable to have distinct properties necessary for reporting and POS behavior.
- Special Gratuities- Access this form only if you have already activated “Special Gratuities” in Station Configuration. Use the fields in this form to determine varying gratuity amounts for each different Menu Group Type. Special gratuities are typically used in Country Clubs, restaurants with banquet facilities, or similar venues.
- Suggested Tip Percentages- If you wish to print a suggested tip amount on the guest check, use this setup form to define the percentage of the suggested tip(s) and then access the Guest Check Editor to print these amounts on the Guest Check. Tip percentages can also be listed on a credit card receipt when enabling the function Print Suggested Gratuity Amounts on Credit Card Receipts in Revenue Centers.
- Tax Tables- You MUST access this form when configuring a new system to define the tax rates applicable to the various items sold in your establishment. Dollar thresholds, percents, rounding, and tax types (including Canadian) is configured in Tax Tables. VAT (Value Added Tax) taxes that are essentially inclusive in the price of an item are also configured in this form. Taxes setup in this form will be applied in other areas such as Group Types and Revenue Centers.
Station Configuration- Setup Form
The Station Configuration form allows you to customize the operation of each POS Workstation in your system. Adding devices, enabling optional modules, controlling prompts and a whole host of other functions are programmed within this form. This topic will be covered in more detail under:
- BackOffice- Setup Form- The BackOffice Setup Form is where you can add security levels to most functions, modules, and setup forms. Under the report tab there are additional settings for reports.
- Security Configuration Setup Form - Use this setup form to change the Master Password and it security parameters.
Activities- Setup Forms and Functions
The Activities Toolbar heading contains functions used on a daily basis. End-users can Open/Close Sessions and view session data under the Session Folder. You can edit employee timekeeping using “Edit Login Data” and setup pay period options under “Payroll Options”. Transmitting information to employees can be done using “Send Email” and “Bulletin Board” functions.
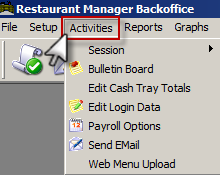
Session
The Session sub-heading contains the function to let you manually open or close a session. A session is a period of sales defined by user operations and reporting needs. You can have several sessions in one day or a session that crosses over the midnight timeline. The other two sub headings under Sessions are information driven functions.
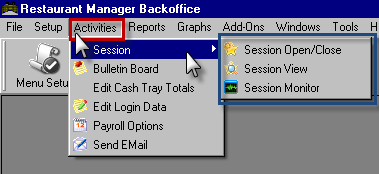
- Session Open Close- The Session Open/Close function allows the user to end a session or begin a new one. Sessions can be opened/closed automatically, manually from the POS, or manually from RM BackOffice using this function.
- Session View- Session View/Edit is a function the end-user can use to view sales data for current and past sessions, edit session bank deposit amounts, and reprint checks, etc. Payment type and revenues centers may be changed at the individual order level
- Session Monitor- You may monitor the current Sales Session in real-time a graphical screen.
- Bulletin Board- Use this function to post messages to the Bulletin Board in the Table Service POS Module.
- Edit Cash Tray Totals- Use this option to edit cash trays that have been finalized. Users can edit fields- Start Cash, Paid Outs, Paid Ins, Ending cash, and Total Non-Cash.
- Edit Login Data- This option allows the user to change Login times, Log Out times and dates, pay rates, job types, tips (declared, paid in or out) and break times.
- Payroll Options- This setup form controls pay period durations, overtime parameters, and the function to manually calculate overtime for a pay period.
- Send Email- Use this function to send e-mail to individual employees or groups of employees. Use this function to send email over the internet or within restaurant Manager's internal program. When using internal email, employees can retrieve messages when logging in at the POS or by manually retrieving messages using the E-mail function located under the Misc Functions of any Main Status screen. The internal email is ideal for sending daily specials to employees as well other informative topics.
- Web Menu Upload- use this option to access the Web Menu upload form when using On Line Ordering (optional module). The settings under this form aid in uploading menu item or systems changes to the Web Ordering UI.
Reports- BackOffice Function Heading
The reports heading is home for two reporting options. The Report Interface is where more comprehensive reports covering sales, labor, and customer data. The Revenue option in the menu heading allows an additional method for a user to retrieve an employee’s revenue report.
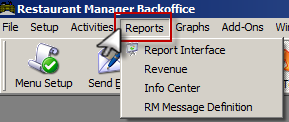
- Report Interface- Use this option to access the RM Report Module. This function is usually placed on the RM BackOffice toolbar by default.
- Revenue- This option is used to retrieve a revenue report from RM BackOffice. This function is also available at the POS Station located typically under the “Misc” function buttons.
- Info Center- Use this option to access the RM InfoCenter reporting tool. RM InfoCenter provides data in a graphical format and allows for customizing reports within its parameters. See the section on RM InfoCenter for additional information.
- RM Message Definition- Use this option to access the RM Message Definition Form. This form is used to configure triggers and recipients for RM Alerts.
Graphs- BackOffice Function Heading
This option leads to the RM Sales Graph. Various sales, customer, and labor data can be graphically presented using this function.
Add-Ons- BackOffice Function Heading
This menu heading contains certain modules that must be purchased separately. The Accounts & Gift Cards module is used to setup in house guest accounts and gift cards. This function must be used in conjunction with certain third party club interfaces. The Customer Street Database is used in conjunction with both certain delivery functions and the Frequent Diner Program.
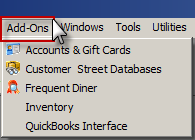
- Accounts and Gift Cards- This sub-heading accesses the add-on module’s Accounts Setup form. Here you can add or delete customer guest accounts, gift cards, gift certificates, or other account types where you allow customers revolving or static credit. You can also setup security, print, expiration options as well name and enable/disable accounts.
- Customer Street Databases- This subheading allows the user to define automatic delivery charges and street databases for delivery. Customer information, used in both delivery and the frequent diner programs, can be added or changed under the Customer database tab. Settings for customer listings, mailing labels, and reset both purchase totals are found under the Customer Functions tab.
- Frequent Diner- Use this function button to access the Award Program setup form. Within this setup form you can program both manual and automatic awards.
- Inventory- Use this link to access the Inventory Setup form. RM Inventory is an additional module.
- QuickBooks Interface- Clicking on this menu option redirects the user to the Restaurant manager Quickbooks interface.
Windows- BackOffice Function Heading
To rearrange the windows currently displayed on screen, use the Standard Windows options listed on this drop down menu.

- Cascade- When you have multiple windows open, you may want to arrange them such that you can see all or parts of each window. Cascading the windows stack them so that each window title bar is visible.
- Next Window- Allows user to toggle to next screen
- Previous Window- Allows user to toggle back to previous screen
- Show Tool Bar- Enables/Disables Toolbar Icons leaving just the top toolbar menu headings
Tools- BackOffice Function Heading
The Tools heading contains function that allow the end user to view information found outside the RM BackOffice module.
File Viewer- From the “Tools” pull down menu, you can access files outside the Restaurant Manager system without exiting Restaurant Manager The text for this manual, for instance, can be viewed without exiting the RM BackOffice Module.
Click "Tools" menu and click the “File Viewer” option to access the Text File Viewing Setup Form.
Restaurant Manager Online- This page will bring you the latest information from ASI. By using the “Back” button contain in the upper left hand corner of the screen, you can access the Restaurant Manager website proving an internet connection has been established.
Custom Buttons
This function allows users to add executable programs to the tool bar. Instructions can be found under the topic: Adding Exterior Programs to Toolbar
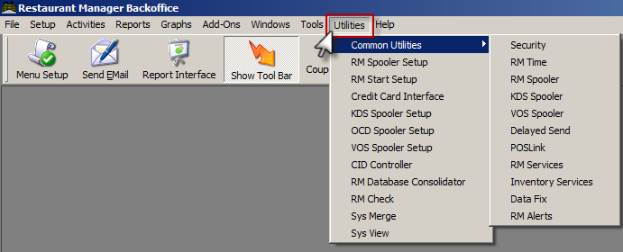
Utilities- BackOffice Function Heading
The options under this menu heading links the end user to various setup forms and executable files. Options under the Common utilities sub menu contain common executable files (.exe) needed when using certain programs. Most of these executables may already be programmed to run automatically during a computer starting process. The setup forms listed under the Utilities menu are used to control the behavior of the executable programs. Example, the RM Spooler Setup Form is used to configure prep area and guest check printers: RM Spooler is the service needed to process data sent to printers. Most of the items under this menu heading should only be used by authorized Restaurant Manager resellers. Extreme caution should be taken before altering data via the setup menus. It is highly recommended the setup forms and unused executables be password protected insure a smooth running POS system. Note : some of the items listed under this menu heading may require the purchase of an additional module and hardware.
 R
R
Common Utilities
Below is a list of the programs found under the Common Utilities sub menu and a brief description of their functionality.
- Security- use to manually start the Security executable. This Security.exe is used to check for the presence of the Security key (dongle).
- RM Time- use to manually start the RM Time program. RM Time is used to synchronize the time on station computers to server computer
- RM Spooler- use to manually start the RM Spooler program on the server computer. RM Spooler is needed to process prep area tickets (and guest checks on single station installs).
- KDS Spooler- use to manually start the Kitchen Display System (KDS) program. The KDS Spooler is used to process prep area tickets to remote monitors.
- VOS Spooler- use to manually start the Video Overlay System (VOS) program. The VOS Spooler is used to process orders when monitoring activity at one or more POS stations via a separate camera system.
- Delayed Send- use to manually start the Delayed Send program. Delayed Send is used when timing order sent to prep area printers. This application must be active when using the Delay Send POS function button.
- POSLink- use to manually start the POSLink program. POSLink is used for a variety of functions including the timing of orders sent to prep area tickets and processing Web Orders
- RM Services- use to manually start the RM Services program. RM Services is used to process orders via the web or Write-On handheld units
- Inventory Services- use to manually start the Inventory Services program. Inventory Services is used to reconcile items rung at the POS to the Inventory Module.
- Data Fix- use to initiate the Data Fix program.
- RM Alerts- use to manually start the RM Alert (rmalertd.exe) program. The RM Alerts program is used to execute the sending of reports and messages after pre-configured criteria have been triggered.
Utilities
Below is a list of the programs found under the Utilities menu and a brief description of their functionality.
- RM Spooler Setup- use this link to access the RM Spooler setup form. This form is used to configures certain hardware parameters for both prep area and guest check printers
- RM Start Setup (aka Central Program Control)- use this link to access the RM Start setup form. This form is used to configure which Restaurant Manager executables (and non-RM programs) should initiate when a computer starts up.
- Credit Card Interface (aka RMCCWIN)- use this link to access the Credit Card Interface. This program is used to configure credit card processing and needs to be running at all time to process credit cards. Require Credit card Processing Module.
- KDS Spooler Setup - use this link the access the Kitchen Display System (KDS) Setup Form- This form is used to define the parameters of kitchen display monitors.
- OCD Spooler Setup- use this link to access the Order Confirmation Display (OCD) Setup Form. OCD's are typically used in establishments with drive through lanes. The OCD Setup Form is used to configure the parameters of the display.
- VOS Spooler Setup- use this link to access the Video Overlay System (VOS) Setup Form. This form is used to define the parameters that control program.
- CID Controller- use this link to access the Caller ID (CID) Setup Form. This form is used to configure CID settings controlling how information is display on Caller ID button at the POS and communication (com port) parameters. This interface also acts as a spooler and must be running to process caller information at the POS.
- RM Database Consolidator- use this link to access the RM Database Consolidator Form. this form is typically used to sync the RM database file with programs like Crystal Reports (CR version 8 of before).
- RMCheck- use this link to enter the RMCheck File Integrity Check Utility. This utility is typically used if reports are out of balance due to data corruption.
- Sysmerge- use this link to access the System Configuration Merger (Sysmerge) Utility. Sysmerge is typically used when converting a demo system to a live system. Dealer can view documentation on the dealer website for specific instruction on using Sysmerge.
- Sysview- use this link to access the System View Utility. Sysview displays system information including modules enabled, serial number, licensed number of stations, etc. The same information can also be viewed under the "About Restaurant Manager" option under the Help Menu.
Help- BackOffice Function Heading
The following is a list of options contained under the Help menu:
- Online Help- this option links the user to the Restaurant Manager web based manual. This manual is the most up to date version and requires access to the internet.
- Show License Agreement- Displays End User Agreements and verifies licensee.
- User’s manual- this option provides a link to user’s manual. This is a PDF version and is located in the rmwin directory. This version of the manual is current with the build. Use this version if internet connection is not available.
- About Restaurant Manager- Displays serial number and current version installed. This form also lists all license information including modules purchased, restaurant name, licensed station etc.
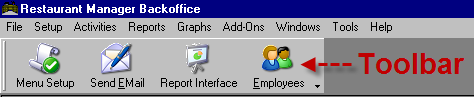
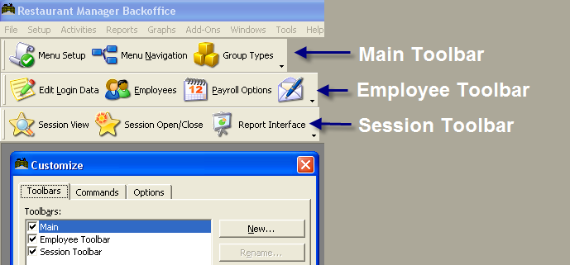
BackOffice Toolbars
By default the BackOffice Module is configured with a single toolbar known as the “Custom” toolbar. As the name indicates, you may customize this toolbar by adding icons that link to frequently used Setup Forms and Dialogue Boxes. The Custom Toolbar may also be removed from the screen using the “Show Toolbar” option on the Windows drop down menu:
Below is a screen shot of the tool bar. By clicking on the arrow to the right of the button command on the toolbar, you will produce a drop down menu “Add or remove Buttons”. In the “Add or remove buttons” settings, you can remove any current button commands immediately. To add functions you must go to “Customize”. You can also reach the “Customize” settings by right clicking anywhere on the toolbar.
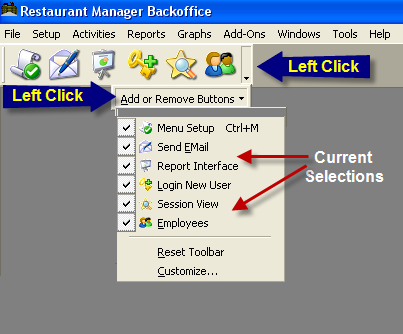
Removing Current Functions
You can remove any available option by moving the cursor over your selection and left click on it. The check mark in the box next to your selection will be removed along with the icon/text in the toolbar. The button command in the display list will still be present. Any selection will remain located in the “Add or Remove” display until the toolbar has been reset using the “Reset Toolbar” option.
Adding Selections to Main Toolbar
Using the steps described above to enter the Toolbar Menu, click on the “Customize” option on the bottom of the toolbar option display and the click on the “Command” tab. The Command tab has two columns: Categories and Commands. Please note the “Default” category has no commands listed.
Adding a button to the toolbar is easy. The categories list in the command tab reflects the same default menu options located above the toolbar in the RM BackOffice screen. Select the category to which your button command is located. You can now select the button command you wish to move to the toolbar. You may have to scroll down to find the button command. Once you have found the button command, move it to the toolbar by left clicking and drag it to the desired position. The button command can be dropped between any current button command on the toolbar or at the ends. You will notice the separator lines between the button commands on the toolbar when dropping in the new button. RM BackOffice has the capabilities of add up to, if not more, 30 button commands to the toolbar.

In the above example, we moved “Custom Groups” into the toolbar bar.
Restaurant Manager also allows gives the end user the ability to bring menu headings into the toolbar and create sub-menus. In the next screen shot, we dragged the “Menu” command from the “Setup” category into the tool bar.
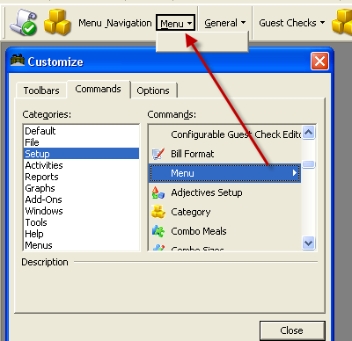
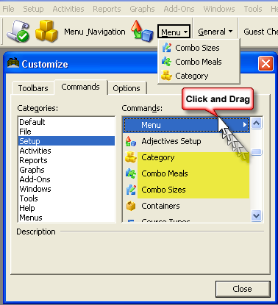
By default, menu headings are empty. You must bring additional button commands into the new heading on the toolbar. Filling menu headings is achievable using one of two methods. You can either grab a button command and drag it into the menu heading or drag it onto the toolbar first and the menu heading. In the example below, we created a new menu heading on the tool bar called “Menu” and then dragged additional button commands in the menu located in the “Customize” screen.
Adding a Custom Tool Bar
Adding a custom toolbar allows the user to add another row of function commands or to group commands on a single toolbar. We can add a custom tool bar by going into the “Toolbar Display” option screen and choosing “Customize”. Click on the “New” option in this box to bring up the “Add Toolbar” box to type in a name. By default, “custom 1” will display when adding your first custom toolbar. After adding the name, go to the “Command Tab” to add command functions. Follow the same steps described earlier in the section: Adding Selections to Toolbar

Note: do not remove the check next to the main tool bar until you have created a second tool bar.
Note custom toolbars can be renamed, disabled, or deleted in the “Customize” form. Simply taking the check out of the box next to the toolbar name will disable the toolbar but will still be available for future use.
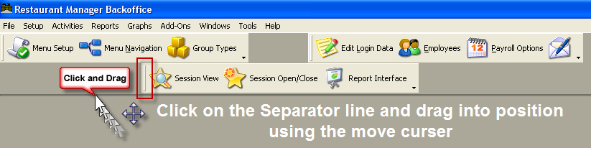
Moving Toolbars
In the screen shot below, we have set up three groups of toolbars. The amount of area used when adding toolbar rows can be significant. This may not be a desired effect when accessing different RM BackOffice functions, e.g. Menu Set-Up.
Toolbars are movable by moving the cursor over the separator line on the side of the toolbar. Once the “move curser” appears, you can left click and move it into a new position. Toolbars can be positioned on multiple rows or within a toolbar single row.
Editing Toolbar Icons
The icons listed in Toolbars are customizable. Icons are customizable during the process of adding a button or after the fact. After dragging in a button command into the toolbar, you can right click on the icon to access the icon option settings. You will have to re-open the custom toolbar setting form for the ability to right click and change button setting again.
In the button setting form, you will find the following:
- Reset- This function will return the command buttons to the default style settings automatically
- Delete- Allows user additional method to remove buttons from tool bar
- Name: - this field enables the end-user to change the text on the toolbar function.
- Begin a group- Inserts a separator bar between images
Warning- changing the name on the text may adversely affect technical support
Displaying Text on Toolbar Icon
You may enable or disable the text appearing on toolbar icons the BackOffice form. Access the form by going to Setup > Backoffice > Reports Tab. Enable the option "Show toolbar button's captions" if you want to display text below the toolbar button.

Customizing Toolbar Behavior
Toolbars are further customizable by using some of the universal settings located within the toolbar “Customize” form under the “Options” tab. Here is a brief description of the field and their uses:
- Menu show most recently used commands first- When enabled, by clicking on the toolbar function, only the last used function will appear.
- Show full menus after short delay- used in conjunction with above option, when enabled the rest of menu options will stay hidden for 3-5 seconds. If disabled, the categories under the menu will stay hidden until the menu is opened using the arrow down function below the text/icon.
- Reset my usage data- this will delete “Most recent commands” from history.
- Large Icons- the size of icons/text of the function bar will resize smaller when disabling.
- Show Tooltips on Toolbars- When enabled, a pop up box will appear describing the function name when moving the cursor over the icon.
- Show shortcut keys in ToolTips- keyboard shortcut commands will appear when enabled. This may have limited functionality (.i.e. it may not occur on every function).
- Menu animations- function provides ability to change drop down behavior for menus.
Adding Exterior Programs to Toolbar
Restaurant Manager allows the end user to add an exterior program to the RM Toolbar. You can add programs like Excel, Word, and RM InfoCenter for convenient access.
Starting in RM BackOffice, open the “Tool” menu located at the top of the screen, and select “Custom Buttons”. In the “BackOffice Custom Buttons” form, click the [Add] button and type the name of the program you will add in the button text field. Click the ellipsis button to the right of the “Executable” field and enter in the programs path. You can add parameters and security level in the respective fields if needed. Click on the [OK] button when finished. You will receive a prompt instruction you to restart RM BackOffice.
You will need to follow the instruction in the section “Adding Selections to Main Toolbar” to add the new function to the toolbar. The new function will be located under the “Commands” tab in the “Default” category.
View Session Data
From the View Session Data screen you can view data from all Sales Sessions, including a current open session. You can also edit the Revenue Center to which a particular transaction has been assigned, change Bank Deposit amounts, exclude certain transactions from Sales Reports, or re-print guest checks.
Activities > Session > Session View
Session Information
The section on the upper left displays all the sales sessions in your RESTAURANT MANAGER database. Use the scroll bar at the base of this section to view 38 columns of data relating to each session. Use the scroll bar at the right of the section to view the various sessions OR use the Search By session # button.
Sales Information
The section on the lower left displays all the orders generated during the sales session highlighted in the Session Information area above.
Use the scroll bar to the right of the Sales Information area to view the various orders generated during this sales session. Or, to quickly find a particular order, you may type the order number in the Search by Order # field at the upper right of the screen and then click on the  button beside this field.
Use the scroll bar at the base of this section to view 42 columns of data relating to each order.
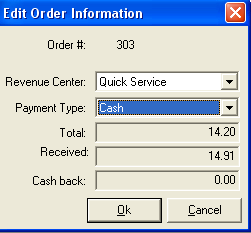
You may double click on any transaction to call up the Edit Order pop-up screen below which is useful for editing key data fields or tagging a transaction.
Note: The "Allow item editing in Session View" option (Setup > BackOffice> Reports tab) must be enabled to make edits permanent.
Edit Order Pop-up Screen
You may wish to edit any of the following data fields
- Payment Type
- Revenue Center
- Total
- Received
- Cash Back
Print Check
From the session view screen locate the order of interest and press the “Print Check” button.
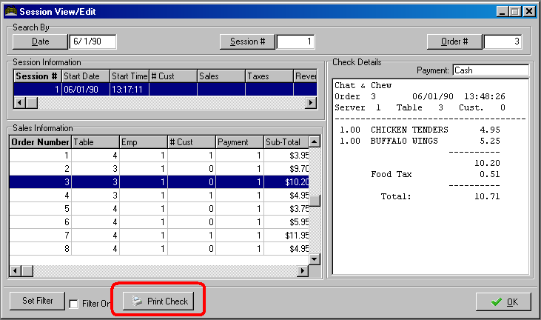
The check will be printed on the device defined in the “MASTER” station configuration.
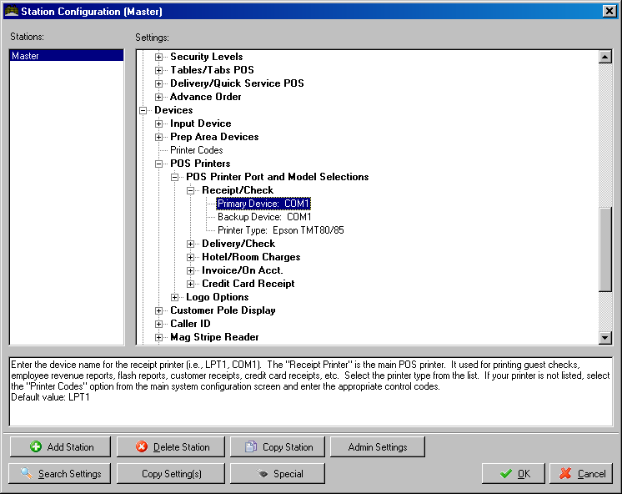
Note- you are not permitted to print checks from the back office unless they are first settled from the POS program.
Filtering Buttons
Find Session- Type a Session Number in the white field beside this button and then click on the button to highlight a particular sales session on the Session List.
Find Order- Type an Order Number in the white field beside this button and then click on the button to highlight a particular order within the Sales Session that appears beside the Find Session button.
Set Filter- Click on this button to access the Session Filter screen from which you can filter the orders from a particular session that are displayed in the Order List. If you decide to filter the Orders List, you must be sure to mark the [FILTER ON] checkbox, too.
Session Filtering
From the Session View/Edit screen you can filter the orders that are displayed on the Order List in the Session View screen. Use the column headings to find an order or a particular amount, all orders handled by a particular employee, etc. Information is sorted in ascending or descending order when clicking on a column header. You can also filter by clicking on a heading and using the down arrow to choose specific data information.
Activities > Session > Session View > Received Column
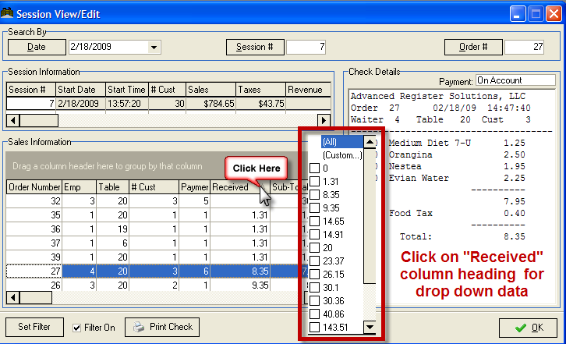
You can also filter date by dragging a column heading into the “drop area”:
In the example above, we dragged the “Emp” column heading into the “drop area”. Click on the (+) next to an employee name to obtain more detailed information for the employee.
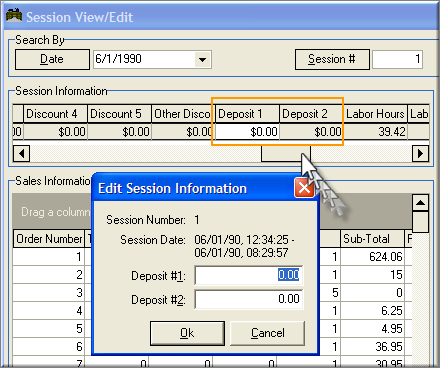
Changing the Bank Deposit Amount
Restaurant Manager allows you to record up to two bank deposits at the close of each Sales Session. If you did not record the Bank Deposit Amount when closing of a Sales Session, or if you recorded the wrong amount, you may edit the amount from the Session View Screen.
Click on the “Activities” drop down menu and select the “Session View” option.
Locate the session for which you wish to change the Bank Deposit Amount(s) by either:
- Typing the session number in the field in the middle of the screen and clicking on the [SESSION] button …OR
- You can enter a date in the files on the left side of the screen and then select the [Date] button.
- Move the control on the horizontal scroll bar located on the bottom of the Session Information section to the right) until the Deposit Columns are visible.
- Double click on the deposit amounts you wish to change and type in the new amounts.
End of Day (EOD)
The End of Day process is just one of several different methods RM can close a business session (Session). The EOD is configurable to allow user intervention or processed automatically. The main purpose of the EOD function is to insure several criteria are met before closing a Session adding accuracy to financial numbers. In addition, EOD has the capabilities to aid closing employees’ complete routine tasks by having task list appear or having reports run automatically.
The EOD program will allow you the choice to close orders or leave them open. You can customize cash tray options and employee log out procedures including the option to Edit Login Data for accurate labor figures. If using Mercury Payment Systems you can compare RM CC batch information to Mercury Batch information before settling a batch to eliminate errors. The EOD program can also be programmed to run a report to validate the session closing procedures where done properly and include messages to remind closing staff of pending chores that must be performed.
Running EOD
Running the EOD function is achievable using one of three methods: manually at the POS station, from the RM BackOffice, or run automatically using a scheduler.
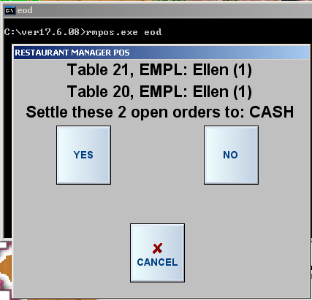
- Manual- running the EOD process can be programmed to run manually at the POS using the [End of Day] button located in the [MISC] menu of the “POS Main Status” screen. The process can also be set-up to run at the POS using the “External Programs”. This method must be set up in RM BackOffice using the command - rmpos.exe eod.
- Automatic- the EOD process can be programmed to run automatically utilizing a scheduler. A .bat file must be created, using a .bat file containing the command- rmpos.exe eod and best placed in the Rmwin folder.
- From office computer- the EOD process can be run on an office computer using a .bat file configured with the same command listed above.
EOD Set-up Location
EOD can be found in RM BackOffice > Setup > Station Configuration > Miscellaneous > End of Day. By default, when you execute "RMPOS EOD" it will take on the station configuration settings of station 1 and immediately start the end of day process. The EOD process can be custom tailored to run differently at each station by changing the station configuration settings for each station. Keep in mind; this only applies to running the EOD process manually at the stations.
EOD BackOffice Setup
The following sections explain the various settings used to control the prompts during the EOD process.
Open Orders
- Process Open Orders- In the EOD Menu under “Open Orders” there is a field- “Process open orders”. Open orders are configurable to close in the current “Session” or left open and transferred to the next “Session”. If this field is disabled (left unchecked), 24 Hour Mode must be enabled if you choose to transfer open orders to the next session. Please note enabling 24 Hour Mode will open a new “Session” immediately. If this field is enable orders are process using one of three methods using the next field- “Settle open orders to:”
- Settle Open Orders To- When “Process open orders” is enabled, you may choose one of three methods to close orders under the “settle open orders to” field. Choosing cash or void to settle open orders will automatically close all open orders using the chosen method. If the “Manual” method is chosen, all open orders must be closed outside the EOD process. Regardless of which method chosen, if a payment has been previously applied to an order but has not been closed out, the EOD process will halt and the order will have to be closed manually.
- Ask before settling open orders- If this option is enabled, a prompt will appear asking the user if they want to close the open transactions using the method chosen in “Settling open orders to”. Answering “Yes” to the prompt will continue the EOD process. Answering “No” will cause the EOD process to halt. The order must be closed outside the EOD process and the process must be re-initiated. No prompt will appear at the POS if the option is not enabled.
- Print Guest Check for open orders- Guest checks for all open orders will print out to the local receipt printer when enabling this option. If left enabled, checks will not print out. The “Re-print” function at the local POS is used if guest checks are need after running the EOD process.
- Continue on error- If this option is disabled the EOD process will halt if an error occurs during while processing open orders. An error is definable as being unable to settle one or more transactions when the settlement method is “Cash” or “Void”. If enable, the end of day process will continue if an error occurs while processing open orders. This setting has no effect if “manual” is the method chosen to settle open orders.
Cash Trays
- Check for open cash trays- The EOD process will halt if this option is disabled. Cash must finalize outside the EOD process. If enabled, the EOD process will look for open cash trays. Any open cash trays can be settled using the “Cash tray finalization method” settling.
- Cash finalization method- This option allows using one of two methods to finalize a cash tray: manual & automatic. If “Automatic” is chosen, the system will automatically compute the ending cash and non-cash totals and declare them for you. If “manual” is chosen, you will receive a prompt allow you to declare the ending balance for each. The system will follow the prompts for cash drawer declaration settings set up under “POS Cash Drawers Setup” in “Station Configuration.
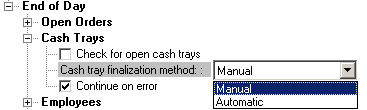
- Continue on error- Enabling this option allows the EOD process to proceed if an error occurs. If this option is disabled, the EOD process will halt if an error occurs while closing cash trays/cash tray.
Employees
- Clock Out Employees- When enabled, this function will clock out all employees during the EOD process. The clock out times reflect the current day and time when the EOD process. This option must be enabled to utilize the “Edit login data” option in the EOD process. The 24 hour mode will have to be enabled if you want to employees punched out and in at the same time.
- Prompt before clocking out employees- When this option is enabled, a prompt will appear during the EOD process informing the user the employees are still logged in.
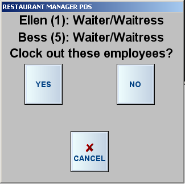
- Edit login data- This function allows for employee time adjustment during the EOD process. Enabling this option will display the “Edit Login” screen for each employee automatically logged out during the EOD process.
- Continue on error- Again, this option will determine if the EOD process will continue if an error should occur in regards to employees logging out. If this function is disabled, the EOD process will halt if one or more employees fail to log out.
Credit Card Batch
- Compare RM Batch to CC Batch- Currently, this option only works in conjunction with Mercury. Do not enable this if using other CC processing. Check this option if you wish to compare the RM credit card batch to the Mercury credit card batch. In the perfect world, they should always match, but in the event of a discrepancy, the end of day process will find the discrepancies and display them in the end of day report. Note, this option works for Mercury Payment Systems only AND you must check the option "Save CC Info in payment file". Provided both these conditions are met, the end of day process will query the credit card system and compare each credit card transaction to ensure that it matches with the credit card information (card #, and amount) stored in RM.
- Compare pre-auth and tip amounts- Check this option if you wish to compare the pre auth amount and tip amount of each credit card transaction. If this option is not checked, then only the transaction total is compared. For example, if this option is NOT checked, then a transaction with $20 pre auth, and $5 tip would match a $21 pre-auth with a $4 tip since both transactions total $25. If this option is checked, then these transactions would be flagged as a problem and included in the end of day report.
- Important Note: Credit Card Pre-Authorization is supported with Mercury (MPS) only. Attempting to do Credit Cards pre-auths with PC Charge or Datatran may result in undesirable results. Credit card pre-authorization provides the ability to capture and authorize a credit card at the beginning of a sale.
- Continue on error- This option determines whether the end of day process will proceed if it detects a discrepancy between the RM credit cards and the on actual credit card batch.
Session
- Close session- Enabling this function will prompt to close a session during the EOD process.
- Suppress prompts during session close- Enabling this option will suppress prompts that would occur in the normal “Session Open/Close” command.
Special Commands
This option allows the user to execute commands before and/or after the EOD process. Commands such as running reports, having helpful daily reminders in the form of text messages appear, etc. may be run using executables or batch files.
In the screen shot above, we have entered an executable to print EOD reports using RM Reports before the EOD process. In addition, we entered a .txt message command utilizing a .bat file at the end of the process. Below is the text message:

EOD Log Reports
To view the end of day log for a specific session, choose [MISC] from the main POS status screen, and choose the option “View EOD Logs.” A prompt allows the option to specify a session number, and the end of day report displays on screen. The report is printable by choosing the [Print] button on the report screen.
Note: A list of EOD log reports may also be found in the Rmwin directory (EODxx.log)
Open and Close Sales Sessions
You can open or close a session from the RM BackOffice Module as well as from the POS Module. To open or close a session from the BackOffice Module:
- Click on the “Activities” drop down menu.
- Select the “Session” option followed by the “Session Open/Close” option.
Proceed with the operation just as you would if you’d begun the operation from the POS Module, answering each prompt that appears on screen.
Select a Location or Store
If your system is configured to manage multiple locations, click on the "Select Location" option in the "File" drop down menu to indicate which store you wish to monitor.
Re-index Files
If your system does not seem to be working smoothly, one or more of the index files may be corrupted. You can never go wrong trying to fix your system by re-indexing the files.
To re-index files simply click on the “File” drop down menu and select the “Reindex files” option.
Change Date & Time
Restaurant Manager displays the current date and time on the top of the Status Screen in the POS Module. This information is simply read from the internal clock on the station computer. To adjust the date or time, please consult the user’s manual that came with the computer. RM Time will pick up the time and broadcast it to the stations running RMPOS. This will only affect the RMPOS program and not the actual station computers. It is highly recommended that you change time between sessions when no one is logged into the system.
Exit BackOffice Module
To exit the BackOffice Module:
- Click on the "File" drop down menu.
- Select the last option, "Exit".
Backup System Data
It is important to have a backup of data in the event of computer failure due to extreme circumstances (i.e. flood, fire, virus etc). ASI recommends that you have an independent backup procedure outside of the redundancy system. Recording backup data can take many forms. A second drive can be installed on the rmserver or perhaps the data can be zipped and placed on small removable flash device. Off site data storage services are another option. It is recommended that data be backed up and stored off-site at a place you are comfortable with.
It is also recommended you back up the rmwin folder before performing an extra ordinary procedure. Examples of this may included mass menu changes, installing patches, version upgrades, etc. You will have a good working data base to return to if for some reason something unforeseen should happen.
(continued in Messages Alarms and Alerts)