
(continued from Adding Online Ordering To The Restaurant s Web Site)
This section details the setup needed for the store computer to communicate with the Web OO Portal. Communications between all computers is essential. The sections under this topic cover:
Make sure the following has been installed on the server computer (RMServer).
Communication between the Online Ordering Server and Restaurant Manager POS occurs via RMWSERVICES, and POSLINK. . RMWSERVICES facilitates communicating orders from the online site to the restaurant.
The following are the procedures to setup the Web Load function used to upload menu and configuration changes and additions to the OO Admin Portal.The Web Load Setup Form is accessed in the RM BackOffice Menu Setup Form by selecting a menu item > Online Ordering Tab >Generate Web Menu > Web Service tab. Fill in each field described below:
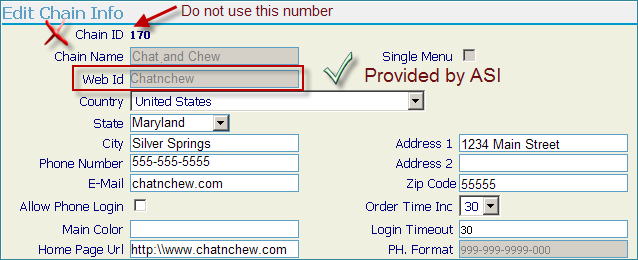
Chain Connection ID = Chain Web ID provided by ASI (not the numeric Chain ID.) The Web ID can be retrieved from the Edit Chain Info form on the Admin pages. (see screen shots below).
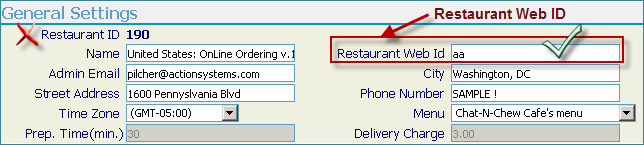
Restaurant Connection ID = Restaurant Web ID, not the numeric Restaurant ID. (If you have forgotten it can be found under the Restaurant Setup from the General Settings Form under the Admin pages, below.)
Admin Username: Administrator name provided by ASI
Admin Password: Administrator password provided by ASI
Connectivity Test (Local site “sees” OO host At ASI)
Click on the [Test Connection] button. This should result with a “SUCCESS” to ensure a successful RMWIN menu upload. This means that the RM PC/Server can “see” or connect to the Online Ordering portal that you created earlier. For any error, consult the ASI Knowledge base.
RM PC/Server Connectivity Test (OO host At ASI “sees” local site)
For Online Ordering to work the restaurant server must be accessible from the outside world. If you are using a firewall you will have to modify the NAT to associate the fixed IP to the server’s local IP. To test connectivity to the restaurant, login to the OO Admin pages:
If it is setup correctly, you’ll see Url used:
http://xxx.xxx.xxx.xxx./soap/IEmployeeOps Where “xxx.xxx.xxx.xxx” is the RM Servers Public IP address.
TEST RESULT – “SUCCESS” this means that the Online Order portal can “see” the restaurant’s RM PC/Server. (In the image above the test is a “SUCCESS” but orders will NOT be taken because the online employee is NOT logged in…………)
Not working? See the Troubleshooting Section
PC/Server Software Installation Procedures
IIS is no longer required to run for Online Ordering to operate OO for v.17. If you need to restart the RMSoapServer, issue the following 2 commands from a CMD prompt:
NET STOP RMSoapServer
NET START RMSoapServer
NET STOP RMSoapServer
NET START RMSoapServer
Since RMServices now runs as a Windows Service, it will automaticallystart when the server is rebooted.
You should always see the RMSoapServer icon in the system tray when it is running. You cannot exit the RMSoapServer service via the GUI. You must enter the NET STOP command to stop it. Closing the GUI simply minimizes the service to the tray.
Step 1: Shut Down all Applications
Shut down all applications on the PC/Server before going to the next step.
In addition to this, if you are installing the ASI Write-On Handheld Server on an existing Restaurant Manager system:
Step 2: Install/Upgrade RESTAURANT MANAGER Software
Install the RESTAURANT MANAGER software per the instructions found in the Restaurant Manager Installation Guide. (If you are using an existing RM database, select “upgrade” vs. “full install”.)
For Online Ordering to work the restaurant server must be accessible from the outside world. If you are using a firewall you will have to modify the NAT (Network Address Translation) to associate the fixed IP (public IP) to the server’s local IP.
Test the connectivity to the restaurant by

If this message does not appear, try reinstalling the WOPKG fullsetup if you’re having server side errors (e.g. html, xml errors). After re-installing, test the WOPKG by
The following is a list of potential problems with connectivity and possible solutions. If the below solutions do not work: open a support ticket or email support@actionsystems.com.
The failure of the connectivity test could occur for several reasons. Some of the possible reasons are list below:
The following is a list of steps to be taken to determine where the problem lies. The next two sections outline actions to be implemented using both internal and external network testing for when a Connection error occurs.
A “Connection Error” means that the OO server located at ASI offices, cannot “talk” to the restaurant’s PC/Server.
If the steps outlined in the Connectivity Test fails try the following steps when PC/Server returns the correct screen but still can’t connect from Web
The result returned should present a web page like show below:

If the internal testing succeeds and you still receive a Connection Error, you may have either a firewall or a port-forwarding issue. Out next step is to connectivity from outside the local network and do the following:
Admin Page Ordering Routing Settings
If internal testing works and the port and firewall settings are confirmed to be correct we can check the setting in the Order Mode Routing for RM Advance Order:
- Scroll down to Order Mode Routing
- Press the Select option next to RM Advance Order and press Test. Proceed to step


If you get a “Server Error” message similar to (shown below), the employee is not logged into to the Restaurant Manager POS s/w at the location noted in the IP address on this screen.

Verify that the site has the proper Upgrade Code for HH by making sure the HH module exists in Sysview (if the site did not have handhelds before). If not, contact ASI for the proper code.

(Above is an image of the SYSVIEW that shows at “least one HH”)
To install Internet Information Services on Windows 2003:
Then make sure that the DLL files are there also, do this:
Under Windows 2003 Server, it is configured to not allow unknown web server applications. Use the following steps to insure proper setup:
You can also allow specific DLL's to run by using the "Add a new Web Service extension" task listed in that same screen. (i.e. rmhandheldserver.dll)


