Open topic with navigation
(continued from Table Service Module)
Hostess Module
The Hostess Module is an optional program. ASI’s Hostess Module provides the end-user the capability of managing same day guest reservations and waiting lists for walk-in customers.The program is best suited to handle same day walk-ins and reservations. The Hostess module should not be confused with a Reservation Module.
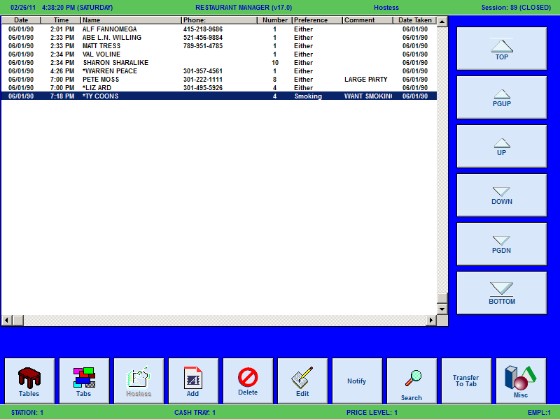
Hostess Module Status Screen

Though the management for both guest reservations and waiting lists are very similar, the employee in charge or “host” plays a very big role in prioritizing the assignment of tables and the Hostess Module serves as the right tool to maximize table turn-around.
Miscellaneous Considerations
- You may want to consider adding a keyboard on mouse to the main hostess station. If not, you can enable the On Screen keyboard if POS realty dictates.
- Adding the Automatic Recall Order function to work in conjunction with the customer database.
- Implementing an award program in conjunction with the customer database.
- Use the Notify function (PCall) to let customers know their table is ready via a recorded message to their cell phone
Configuration Settings for Hostess Module
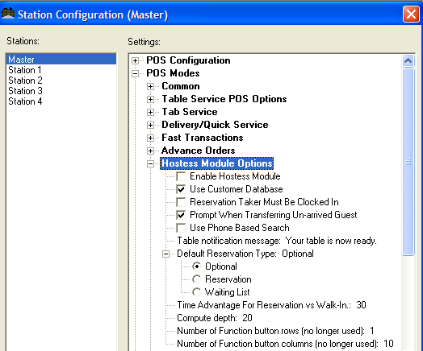
Below are the configuration settings to be considered for the Hostess Module:
- Enable Hostess Module- This option must be enable of the stations if you wish to use the Hostess module.
- Use Customer Database- Enable this option if you wish to link reservations to the customer database. When taking a reservation (or putting someone on the waiting list), the customer is stored using their unique customer ID (or phone number). This information is automatically transferred to a table or tab when the reservation is transferred
- Reservation Taker Must Be Clocked In- Enable this option if you want to force your employees to clock in before taking reservations.
- Prompt When Transferring Un-arrived Guest- When transferring a reservation to a table or tab, this option will provide a warning prompt if the guest has not been marked as "arrived."This avoids accidentally transferring the wrong reservation.
- Use Phone Based Search- This option determines whether searches are based on phone number or customer name when trying to locate a reservation. If the default search mode is “By Phone” (enabled), entering a blank phone number reverts back to the “By Name” search mode.
- Table notification message- Now setup using the PCall function
- Default Reservation Type- This option determines whether new entries are classified as reservations or waiting list:
- Optional- If you choose Optional, the system will display a prompt asking the host if the entry is going to be treated as either a “Reservation” or a “Waiting List”. Note this classification is important for the Time Advantage for Reservation vs. Walk-in option may affect the order in which people are seated.
- Reservation- If set to “Reservation”, entries will not be adjusted to the “time advantage” set.
- Waiting List- If set to “Waiting List”, entries will be adjusted to the “time advantage” setting as well as the fields “Date” and “Time” is grayed-out.
- Time Advantage for Reservation vs. Walk-in- This is the time preference (in minutes) given to reservations versus walk-in customers. For example, if a person makes a reservation at 7:00 PM, they will be seated before a walk-in customer that arrives at 7:00 PM. The time entered here is the amount of time preference afforded to reservations. So with a time advantage of 15 minutes, a 7:00 PM reservation is given precedence over any walk-in customers after 6:45 PM. But if a walk-in customer puts his name on the waiting list BEFORE 6:45 PM, he would be seated before the 7:00 reservation. Note: the reservation must be marked as "ARRIVED" in order to be given seating preference. Also, the hostess can override this by not following the seating order suggested by the system.
- Compute Depth- The "Compute Depth" defines the number of entries computed by the Hostess module when executing the "COMPUTE" function. For example, if the compute depth is 20, then the "COMPUTE" operation will show the next 20 tables that are expected to become available (in chronological order). A small "Compute Depth" results in faster operation, but fewer computed entries.
- Number of Function Row/ Columns- Adjust the number of rows and columns in Back office under POS Function Buttons Layout.
- On Screen Keyboard- Allows complete touch screen operation for entering customer information (i.e., keyboard not required). An alphanumeric keyboard is displayed on screen to enter customer information and access the street database.

Function Buttons Unique to Hostess Module:
You will want to add, remove, or place security settings to the functions buttons below using the Function Button Layout Form.

- Add-Use this button to add an entry (i.e. Guest Arrived) to the reservation list. Pressing this button will affect the Reservation Data Screen to appear. You must first select the reservation to be edited on the Reservation List Area. You can select the reservation using the navigation buttons on the right side or by directly touching the reservation on the Reservation List Area. Once the reservation has been selected you can press the Add function button. Proceed with the entry of the reservation data as accurately as possible.
- Edit- Use the Edit function button to edit or to add data to a reservation entry. You must first select the reservation to be edited on the Reservation List Area. You can select the reservation using the navigation buttons on the right side or by directly touching the reservation on the Reservation List Area. Once the reservation has been selected you can press the Edit function button. Select he “Cust. Data” button on the Reservation Data Screen to change the customer ID or phone number.
- Delete- Use this function button to delete a record for cases where a wrong entry was entered, the reservation was canceled or a customer walks-out. .You must first select the reservation to be deleted on the Reservation List Area. You can select the reservation using the navigation buttons on the right side or by directly touching the reservation on the Reservation List Area. Once the reservation has been selected you can press the Delete function button. After doing so, the reservation entry is deleted from the list.
- Search - Use the Search function button as an alternative to locate a reservation if there is a full list with an extreme amount of entries. Using the Search function will prove less time-consuming compared to use the navigation buttons to sort through the list. The search function will differ depending on how your stem is configured:
- Notify-Use the Notify Function button when the customer is ready to be notified. First you must, select the customer name for the customer display list. When pressing the [Notify] function button after the customer has been selected, the call process will begin and you will receive an onscreen window confirming the process. The number called will be the phone number entered in the "Notify Via" field of the Reservation Data screen. The Notify function can also be found in the Compute screen. The Notify function is an extra feature available on a subscription basis. You will need to setup an account with ASI before using this option.
- Compute- The “Compute” function matches the entries of the reservation list against the available tables on the floor and based on the smoking preference, number of persons in the party and also displays when occupied tables are going to be available. The table durations, Min/Max Customer Counts, and smoking preference can be customized in the RM BackOffice Module under Setup->Screen Layouts>Table Layouts.
- Transfer to Table- The Transfer to table is another method allowing the end user to assign a reservation to a table.Where the “Compute” feature may be the standard operation the host/employee will perform, there may be times that a more direct control of the table assignment is needed. Example: the system will not recognize when two tables are physical pushed together for a large table Rather, the system will only recognize the individual tables seating capacities. You will want to utilize the Transfer to Table function in this scenario
Pressing the “Transfer To Table” button moves the current reservation selection (highlighted) entry to a table. A table selection window will be opened for the host/employee to select and the processes of opening a table is initiated, including possibly, recalling of the last order if configured. When finished, the reservation record is automatically removed from the list.
- Transfer to Tab-Selecting the “Transfer To Tab” button initiates the process of opening a tab and the removing the reservation entry from the Reservation List Area.
This is a powerful feature the host may employ to keep the customer waiting in the bar, have a few drinks until a table can be assigned or maybe, even while waiting for other people in the party. Thus, instead of being bored from waiting, he’ll be taking his time in the bar and have a good time. Another thing the host can do to make the guest satisfied.
- Compact- As the Hostess Module operations are being processed from day to day, the reservation file that keeps record of all the reservation entries may have grown quite large that may result in possibly slowing down the operations.
Notifying Customers
Restaurant Manager provides an option to call a guest’s cell phone when their table is ready using the [Notify] function button on the Main Status Screen of the Hostess Module. The setup, including a configurable automated message, is done in the PCall Setup form (RM BackOffice Module > Setup > General > PCall). The Notify function is an extra feature available on a subscription basis. You will need to setup an account with ASI before using this option.
Notify Function (Hostess Module)
The process of customer notification via cell phone is fairly simple. Pressing the [Notify] function button at the base of the Hostess Main Status screen or in the “Compute” screen will produce the Customer Reservation screen. It is in this screen we will enter the customer’s cell phone number in the “Notify Via” field. When the customer is ready to be notified, select the customer name for the customer display list (main body of Hostess Module screen). Press the [Notify] function button after the customer has been selected. The call process will begin and you will receive an onscreen window confirming the process.
PCall Setup Form
The following information will be used to fill out the fields in the PCall setup form:
- URL- this information will be provided by ASI
- Voice ID- enter “0”
- Call Number- Enter the number of the restaurant- this is the number that will appear on the customer’s caller ID
- Message- Type in the message you wish the guest to receive (i.e. you table is ready). The message will be received as an automated audio text.
- Rest ID- this information will be provided by ASI
- Rest Password- This number will be provided by ASI.
Hostess Module operations are details in the section: Point of Sale Operations: Hostess Module
(continued in Tabs Module)


