(continued from Management Functions)
There are two types of alerts functions available with the ASI Write-On for iPod Touch: Management Alerts and Text Alerts. The primary function of the Management Alerts feature is to help you monitor restaurant operations, such as employee’s productivity, table activity, overtime conditions, etc. This type of alert is passive: the system will monitor data and send an alert to the Write-On device when a trigger threshold has been achieved. The second, Text Alerts, allows employees to summon or send a message to a particular employee (i.e. manager) from the POS. Messages to be sent can be preset or manually typed in.
The alerts functionality is not restricted to the Write-On for iPod Touch application. There are many uses and application for Alerts. This documentation will be limited to the Write-On uses only. More information on full functionality of Alerts can be found in the document: RM Alerts User Guide
RMAlertd (.exe) is an executable application needing to be running at all times on the server (i.e. rmserver). Only one copy of RMAlertd should be running in the store. RMAlertD.exe” should be added to RMStart.exe as a process at startup.
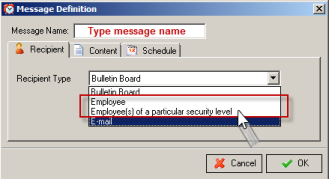
Management alert setup is performed in the RM BackOffice and in the RM Message Definition Form (rmmsgdef.exe).For each alert you must set the reference or trigger value. This value is used to determine whether an alert should be generated. For example, if the dollar amount of deletions is set to 20, then the alert will be generated if the dollar amount of deletions is equal to or greater than 20 dollars.
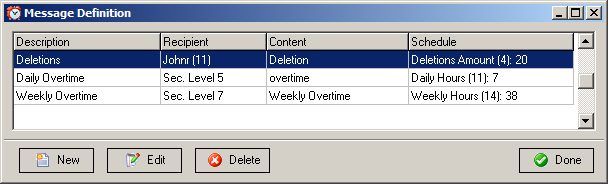
RM Message Definition Form (rmmsgdef.exe).
RMMsgDef (.exe) is the form where you create recipients and alerts received and the triggers to initiate the alerts.
The opening screen of the Message Definition form is shown above. The form is broken down into four columns. The information shown in the display area corresponds to each tab in the Message Definition Editor. The display area shows:
Columns
There are four columns at the top of the Message Definition Form:
Buttons
There are four buttons at the bottom of the Message Definition Form:
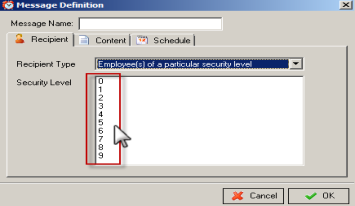
Using the [New] button at the bottom of the Message Definition form (pictured above) will trigger a new screen where you do the actual setup or editing of the message. At the top of this form you have a field where you can name the message (pictured below) The name entered here will be used to identify the message on the Message definition form.
The Message Definition Editor has three tabs which are defined in the following three sections.
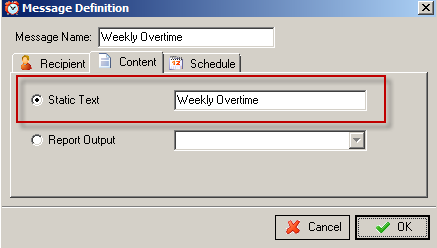
- Content (Report Format)- the Content tab has two fields: Static Text and Report Output. There are two options but you will only use the Static Text option for Write-On alerts. After selecting the radio button next to “Static Text”,- type a message in the field to the right (i.e. Deletion amount, # of Void Checks, VIP Customer, etc.). The message typed in the field currently has no function other than an alert requires a content message.
- Schedule (Trigger) - Alerts and messages can be setup to send based upon a preset list of definitions. The alerts types available under the Schedule tab are also listed in the RM BackOffice under Setup > General > Alerts. It is in this RM BackOffice Module Alert Setup Form where specific computed alerts can be disabled.
The Trigger Setup section under the Schedule tab has two fields: Trigger type and Value. Click on the “type” drop down menu to select a pre-configured trigger type. The trigger types are as follows:
Weekly Hours- Use this field to set a trigger based upon hours worked in a week.This trigger is use to report overtime alerts Weekly hours, however, always report from the current day back to 12:01a.m. of the same day of the week as pay_start field column found in Config.dbf in the rmwin directory and configured in RM BackOffice > Activities> Payroll Options
It should be noted that the field setting in the Alert Setup Form in RM Backoffice take precedence over the value field settings in RMMsgdef. It is recommended you use the Alert Setup Form to define values. More information on the RM BackOffice Alert Setup Form can be found in the document: RM Alerts User Guide.
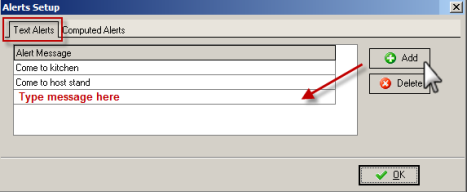
Text alerts are programmed in the Restaurant Manager BackOffice Module and accessed by selecting Setup > General > Alerts. Configurable messages are added under the Text Alerts tab in the Alert setup form. The alert messages defined under this tab are for POS to Write-On devices only. You can add a message simply by clicking on the [Add] button on the form and type the text under the “Alert Message” column.
Alerts on Write-On for iPod Touch
By default the alerts are “passive”, and are only displayed on the Write On device. Text alerts are sent to the Write On device automatically. Alerts may be viewed at the time they are sent or may be reviewed at a later time.
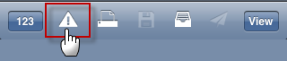
After being sent, the Alert icon on the bottom toolbar will flash. You can view the alert by pressing the flashing icon
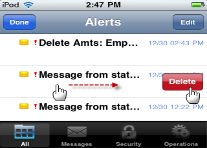
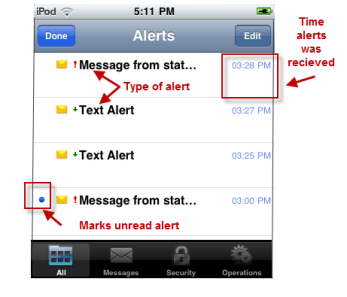
Once in the Alert window, select the message or alert from the list to read. Note that Alerts will be sorted in the order they were received newest alert to last. The time the alerts is sent is found the right of the alert. Alerts with blue dots to the left of the folder indicate the alert has not been read. The different kind of alerts are defined on the alert row in bold text (i.e. message form station and text alerts). Use the [Done] button to exit the Alert screen.
Messages will be saved until they are manually deleted. Alerts are deleted by swiping your finger left to right across the alert and the pressing the delete button.
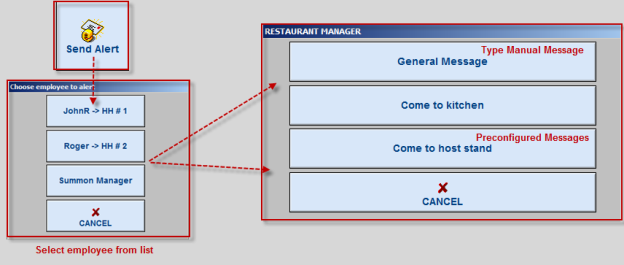
Text alerts allows employees of a certain security level to summon any employee logged into a Write-On device regardless of their location in the restaurant. Preconfigured text alerts may include messages “Come to kitchen” for when an food order is ready or “Come to host stand” to see if a server can take another table. If a manager is logged into a Write-On device, they can be summed to a station to perform a deletion or check out an employee.
Text alerts can be pre-configured or manually typed in. The function is performed using the [Send Alert] button typically found under the [Misc] Function button found on the Main Status screen. The [Send Alert] button may be moved to the Main Status screen if used on a frequent basis. In addition, security levels may be assigned to the [Send Alert] button limiting access to this function to certain employees. Please consult the Restaurant Manager Manual section covering Function Button Layouts if you are unsure how to move this button.
After selecting the [Send Alert] button, you will be presented with a list of employees logged into all Write-On devices. Continue by the process by selecting the employee you wish to send the text alert to. After selecting an employee, you will be lead to a new window with pre-configured text messages. You may either select a pre-configured text message or select the “General Message” option to manually type a message.