Previous Topic "Message Definition Editor Form"
The recipient tab allows you to select the recipient type. The information on the recipient tab will change depending on the recipient type selected. You have four choices available:
- Use the drop down menu to select an existing recipient on the list.
- Use the "Edit e-mails" button to add a new email recipient or edit an existing recipient.
Restaurant Manager automatically assigns the recipient ID number when adding a new recipient. However, you must click on the ID row and enter in the recipient name and e-mail address in the corresponding cell listed in the columns. You must also select the format in which the message will be sent. The options are as follows:
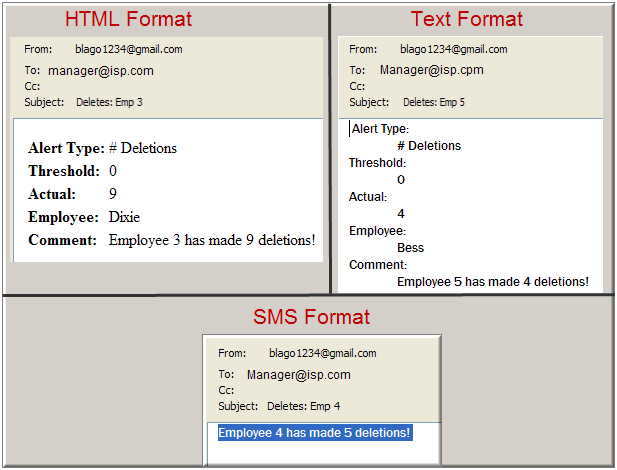
The format chosen here does not have an effect on reports sent from the report module. Rather, it affects how the text will appear when using pre-configured triggers after configuring the system to send alerts via RM Trigger. Some devices and software receive information differently. You should choose the format which best fits the recipients method of receiving standard alerts. Below is an example of how the different formats would affect the same alert received via Outlook.

Not all cell phones are setup to receive e-mail. However, most are capable of receiving text messages. You can send alerts with standard text by entering in the cell phone’s number followed by the carrier provided domain name (i.e. 5555555555@phoneco.net). Each carrier has different domains and may have different domain text. You can look up a list of Carrier-provided SMS to e-mail gateways here: SMS Gateway- Wikipedia.
You may want to send a message or alert to multiple recipients. Example: you may want the kitchen chef and purchasing manager to receive and item sales report on a daily basis. For efficiency purposes, you will want to create a single recipient named "kitchen" but assign multiple email addresses to the recipient. Use the following steps to assign multiple email addresses:
Click "Edit e-mails"under the Recipient tab on the Message Definition form.
Click the "Add" button in the E-mail Recipient window if creating a new recipient. To add to an existing recipient, click the E-Mail cell on the ID row you want to edit and the click the ellipsis button. Note: the ellipsis button will not appear until you click the ID row.
Click "Add" in the Email edit window to add a line for each email recipient you wish to add or delete.
Click "OK" twice to return to the Recipient tab on the Message definition form.
An alternative method to an email address is to click on the email cell on the ID row and tye the email address. Multiple email addresses must be separated by a comma (,) .
Next Topic "Content Setup Form (Report Format)"