For a POS or prep area (kitchen or bar) printer to route properly in RM, we must add the printers (setup in RMSpool) in the RM BackOffice program. Adding printers in RM BackOffice is done within Setup >Station Configuration > Devices. POS printers (receipts) are programmed under the heading POS Printers > POS Printer Port and Model Selections. Prep Area printers are programmed under the heading Prep Area Devices.
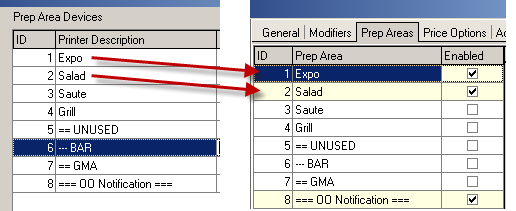
Sometimes referred to as “make printers”, prep area devices (printers) are exactly what their name suggests. Prep area printers are used to send orders to the kitchen, bar, or other areas where products are prepared. This type of device is not to be confused with POS Printers that are typically used for printing various types of guest receipts (guest checks or credit card).
Before configuring prep area printers, it is recommended that you install a proprietary Printer Spool, RMSpool that comes with your Restaurant Manager software. If you have started with the default configuration of Restaurant Manager, you must disable demo mode in Station Configuration so that printer output is no longer directed to the screen.
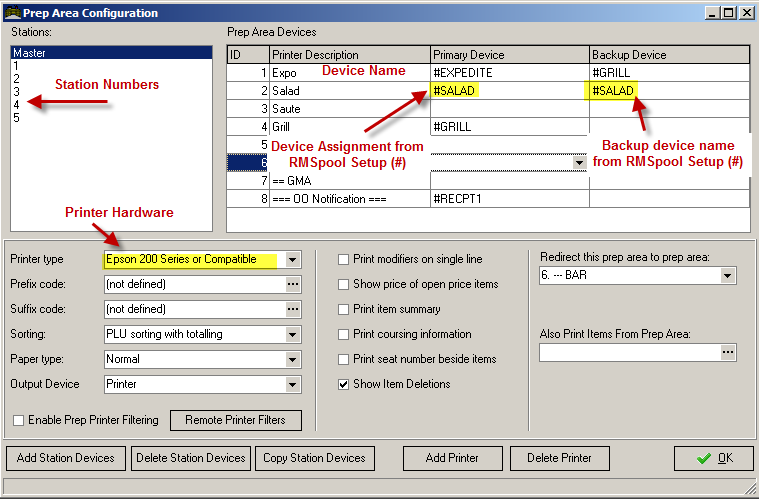
You can attach up to 99 prep area devices to any given POS Workstation. The options for configuring each prep area device are the same. But you may configure different POS Workstations with different prep area devices. Most settings that control the configuration of prep area devices appear on the Prep Area Configuration Setup Form.
Configure each Prep Area Device settings below for the station highlighted on the Stations List:
The codes must be entered in ASCII decimal format. If your printer manual lists control codes in hexadecimal format, you must convert the codes to decimal format before entering them here. If you do not need this function, clear the codes (all 256's).
None- You can choose to implement no sorting at all, in which case, menu items should appear on the prep area output in the same order that they appear on the Order Entry Screen (i.e. in the order in which they were entered.)
No sorting with totaling- Select this option if menu items should appear in the same order that they appear on the Order Entry Screen with the exception that items ordered in quantities greater than one are only listed once with a quantity alongside.
PLU sorting with totaling- Select this option if items should be listed in ascending order by their PLU number as specified on the Menu Setup Form. The quantity ordered is displayed alongside each item. Like menu items will be consolidated on prep ticket if the modifiers are identical.
Seat Number with totaling- Select this option if items should be grouped according to the seat and totaled if more than one of any item is ordered. This sorting option will only work if your system is configured with Advanced Seat Management.
Seat Number with no totaling- Use this option if items should be grouped according to the seat.
Chef Summary with totaling- Select this option if like items should always be consolidated, even if they have different modifiers and if modifiers should be consolidated, too. While “Chef Summary no totaling” keeps the modifiers separate. The following sample shows “Chef Summary with totaling:”
- Chef Summary with no totaling- Select this option if like items should always be consolidated but if modifiers should always be displayed in quantities of one.
Paper Type- The default value for paper type is "Normal". The only time you should change this setting is when you wish to print special labels that can be affixed to the packaging of each item, usually in carry-out- or delivery establishments. See the section on label setup for information on additional setup forms that control this feature.
Output Device- This setting is set to the “Printer” option by default. In businesses that use kitchen displays instead of printers, this setting allows you to indicate the type of display allows you to use define Use this setting to indicate the type of prep area device you are defining. Choose "Printer" for standard remote printing, "RM Prep Display" to use the Restaurant Manager kitchen display which displays the entire order at once after the server touches the "SEND" button, "Real Time KDS" if using MicroPlus MPAD to send items on the fly, "General Message Area" if you wish to use a portion of the POS touch screen to display prep area output.
Enable Prep Printer Filtering- Activate this setting if you wish to filter prep area output according to the configuration setup on the Remote Printer Filters form below.
Remote Printer Filters - This setting allows the user to determine when and, under what conditions a specific remote printer is enabled. For example, you could enable an expediter printer to print only items from orders linked to the DELIVERY revenue center. Or you could enable a bar printer to work only during happy hour, etc. See the section on Prep Area Filtering for detailed instructions.
Print modifiers on a single line- By default, modifiers are printed on separate lines beneath the base menu item. To print the modifiers on same line as the base item, check this box. This causes modifiers to be printed on the same line as the base item. If there are too many modifiers to fit on a single line, they are printed on additional lines as necessary. When activating this setting you should also define abbreviations for the modifiers themselves in the Prep Area Description field on the Menu item Setup Form.
Indicate other remotes with items- Restaurant Manager can print a message to let you know if items have been sent to other prep printers. For example, if items are sent to the “Cold Printer” and the “Hot Printer,” a message is printed at the bottom of the “Cold Printer” that items have also been sent to the “Hot Printer” and vice verse. Check this box to enable this feature.
Show price of open price items- Check this box to print the open price of an item on a prep-area printer for the selected prep printer.
Print item summary- Activate this setting if you wish to print a summary at the top of the kitchen ticket which shows the items without modifiers.
Print coursing information- Activate this setting if you have defined courses on the Menu Course Type Setup Form and wish to print coursing information on the prep area output. Coursing output is also controlled by the Sorting options described above.
Print seat number beside items- Activate this setting if you wish to print the seat number alongside each item that is sent to the prep area devices. If you activate this setting it is recommended that you also enable the Advanced Seat Management Feature.
Show Item Deletions- Activate this setting if prep area output should include items that have been deleted from an order after being sent to the prep area(s).
POS Printers are typically attached directly to POS Workstations and can be used to print guest checks, sales receipts and credit card receipts as well as POS reports such as Employee Time Slips, Flash Reports, etc. You may also configure Receipt Printers to serve as back-up printers in the case that certain prep area devices fail.
You may use the Report Module to customize the POS Reports that print at the POS Printers. And you may use the Guest Check Editor to customize the format of the guest checks and sales receipts printed by the POS Printers.
The Station Configuration Setup Form includes options for interfacing your Restaurant Manager POS System to different models of POS Printers. At any given POS Workstation, you may default to different POS Printers when printing receipts for special payment types such as credit cards, on-account charges, and hotel room charges. You may also default to a different POS printer for transactions linked to a “Delivery” Revenue Center.
Use the Search Settings button on the Station Configuration Setup Form to locate and configure the following “POS Printer” settings for the station highlighted on the Stations List.
Restaurant Manager allows you to define up to five different POS Printers. The "Receipt/Check Printer" highlighted in the screen shot above serves as the main POS Printer and is the only POS Printer which will print POS Reports.
There is no need to configure alternative POS Printers unless you wish to print certain guest checks and sales receipts at POS Printers that are not physically located near the POS Workstation. Each of the POS Printers listed below the Receipt/Check Printer will print a guest check or sales receipt when a transaction meets the specified criteria:
Receipt/Check- This is the printer that will print guest checks/ receipts. The number of guest checks printed can be configured in RM Back Office using the Standard Guest Check Editor. The ability to print a guest check can be defined by a revenue center, form of payment or within the Receipt/Check settings itself. The receipt itself can be configured using the Configurable Guest Check Editor.
Delivery / Check- This POS Printer will print transactions defined as Delivery transactions, based on a Revenue Center configuration.
Hotel / Room Charges- This POS Printer will print sales receipts for transactions that are settled using the “Room Charge” form of payment.
Invoice / On Account- This POS Printer will print sales receipts for transactions that are settled using the “On Account” form of payment.
Credit Card Receipt- This POS Printer will print credit card receipts. If you wish to print credit card receipts you must also enable the “Print Receipt” setting under the Credit Card Interface heading on the Station Configuration Setup Form.
For each of the POS Printers listed above you may use the following settings to indicate the port to which each POS Printer is attached and the type or model of the printer you are using:
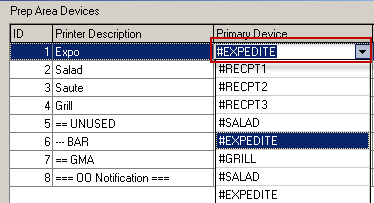
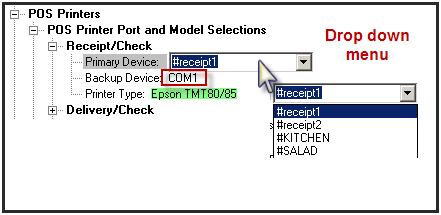
Primary Device- Use this setting to type in text that describes how the device is connected to the system (i.e., LPT1, LPT2, COM1, and COM2). Alternatively, if you are using the Restaurant Manager Print Spooler, enter the name of the spooler printer, prefixed with the pound (#) sign.
Backup Device- Use this setting to type in text that describes a Backup Device where POS Prep Area output should be re-directed if the Primary Device fails or if the printer runs out of paper, etc. You should follow the conventions used in naming the Primary Device. It is highly recommended that you do not use the same printer used as the primary device: it is advisable that you leave this blank instead.
Printer Type- Use this setting to identify the model of the printer by selecting the appropriate option from the drop down list. If your printer model is not listed, use the Search button at the base of the Station Configuration Setup Form to locate the Printer Codes setup form and enter the appropriate control codes from the printer manual or select the “User Defined” option which includes predefined printer codes that work with most printers.
If you are using thermal or other types of printers capable of printing graphics, you may wish to print the restaurant logo on the Guest Check or Sales receipt. To do so you must first activate the Logo Options on the Station Configuration Setup Form:
Load logo into printers at start-up-Use this setting to configure the Restaurant Manager system to load a bitmap of the logo into the printer each time the system is turned on.
Load Bitmap File- Use this setting to identify the location of the logo bitmap file. It is recommended that the bitmap file be stored in the rmwin root directory (i.e. C:\rmwin)
Logo sizes should not exceed 400X200 in size. Monochrome (black & white) bitmaps must be used when using thermal printers capable of printing only black.
After activating the Logo options you must also access the Guest Check Editor to format where on the page the logo should appear.
Next Topic "Credit Card Server (RM Gateway Supplemental Setup (RMCCWIN)"