RM Maps Interface
12/10/2018
Restaurant Manager offers two map interface options: Map Point and Google Maps. Map Point is available for version 19 and backwards. Google Maps is available for Restaurant Manager builds version 19 dated December 2014 and later. The main difference between the two mapping programs is Map Point must be purchased and no longer supported by Microsoft where Google Maps is mostly free (depending on consumption). The RM Map interface is ideal for establishment with delivery and must be purchased separately.
The following a the requirements need to use the RM Map Interface:
Google Map Requirements
Map Point Requirements
Windows Media Player 11 (for Map Point only)
Map Point 2012 (for Map Point Only)
Enable Map Interface
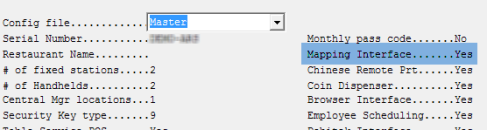
Make sure you have purchased the RM Map interface and/or have it enabled. You can check if the interface has been enabled within the RM Back Office Module and click Utilities > Sysview. The Mapping interface option should have a "Yes" next to it if the module has been purchased.
If using Map Point, make sure you have both Map Point and Windows Media Player installed on the rmserver computer. Follow the manufactures instructions to install Map Point and Media Player 11. After installing Map Point, copy and paste the executable in RM Start
Google Maps requires an API key. API keys are not provided by Restaurant Manager. Either the end user or reseller on behalf the end user must set up the Google Map account. When you setup a Google Maps account, you will be required to enter a credit card for a deposit in case you use map and directions requests that extend beyond the monthly credit limits. Use the Google Map API Cost Calculator to determine the cost of map and direction requests against the credit limit. The credit limit is determined when you sign up for a Google Map account. You will need a Google Map account to obtain the necessary API key.
Estimating Google Map API Cost
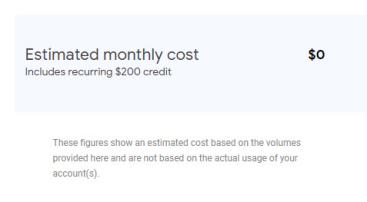
You might want to estimate the cost of using Google Maps before using. In most cases, there will not be a charge as Google allows for a credit of against Map and Direction requests before it charges the user. Example, if your business averages 100 deliveries a day, Google Maps, over a 30 day period, would calculate this as 6000 maps and 3000 direction requests. This figure falls well short of the $200 monthly credit allowance. You are encouraged to use the Google Maps Pricing Calculator found here:
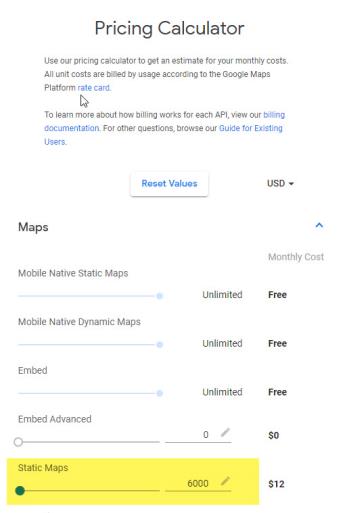
The two fields you will use to calculate the cost are Static Maps and Directions. Note: At the POS, if you pull up both directions and a map, Google Maps will count this as one request for directs and two requests for maps.
In the Maps section, use the Static Maps field to estimate the cost. Enter the number of monthly deliveries multiplied by 2. Example: if you do 100 deliveries a day, that would translate into 3000 deliveries over 30 days. Multiply the average deliveries by 2 and the number you would enter is 6000.
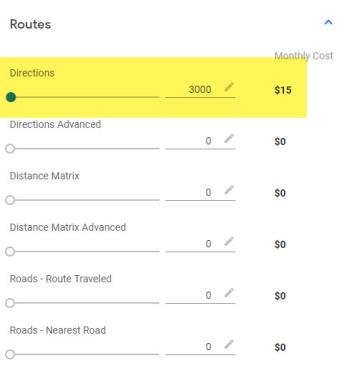
In the Routes section, use the Directions field to estimate the cost. Enter the number of monthly deliveries. Example: if you do 100 deliveries a day, that would translate into 3000 deliveries over 30 days. The number you would enter is 3000.
In our example, 6000 Static Map requests is estimated to cost $12 a month and the 3000 Direction requests would cost and estimated $15. The total estimated monthly cost is $27 which is well below the $200 monthly recurring credit.
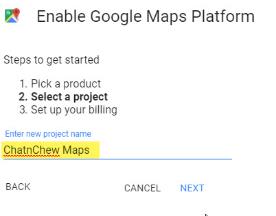
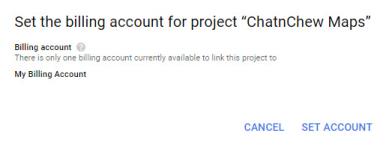
To get an API key using the Google Cloud Platform Console found here. You will be asked to provide a credit card to secure your account and should have this ready. You will be asked to perform the following steps during the setup process:
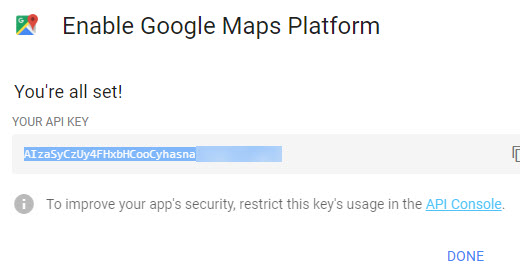
When you have finished, your API key will be presented. This code will be used in the RM Maps Setup form. You can record the key or keep the screen open to copy and paste in RM Maps Setup form.
Note: You may want to save the link to the Google Maps Platform. From this page you can monitor usage in the Overview section.
Setup for RM Maps in Restaurant Manager is minimal. Use the directions in the following section to configure
Station Configuration Setup
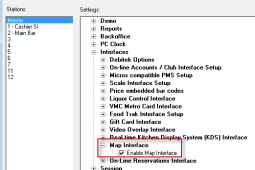
The first step is to enable the Map Interface. In the RM Back Office module go to Setup > Station Configuration > Interfaces > Map Interface> enable the “Map Interface” option. This option should be enabled on every station using the Delivery Module.
Add RM Maps to RMStart
RMMaps.exe must be running for the interface to work at the POS . Therefor, you must add RMMAPS.exe to the list of RM Start Up applications to the server computer. You can access RMStart setup in the RM Back Office Module by clicking on Utilities > RM Start Setup and the do the following:
Note: If using Map Point, Microsoft's Map Point program must be running on the same computer as RMMAPS.exe (typically the rmserver computer). It is recommended that you also add the Map Point executable to the list of applications in RMStart. When doing so, make sure you have Map Point start before RMMAPS.
Store Address
RMMAPS will get attempt to get directions to delivery locations with the store/restaurant's address as the starting point. Therefore, it is important that the store address information is accurately entered in the Store Info Setup Form . This form is found in the RM Back Office Module by clicking Setup > General . Store info > General Information Tab. The address information should have been entered when the system was initially setup up but it is extremely important that all information including State and Zip has been entered accurately.
Add Function Buttons
Directions via RMMaps is accessible in two ways: The "Info" function button and clicking on the drivers button on the Driver list in the Delivery Module. The drivers button is hard coded and does not require additional setup. However, the Info function button is not hard coded. If not already present, you will want to add the "Info" function button to the default Delivery Module screen. This button is added in the POS Function Button Layout Setup Form in the RM Back Office Module (Setup > Screen Layouts > POS Function Button Layout).
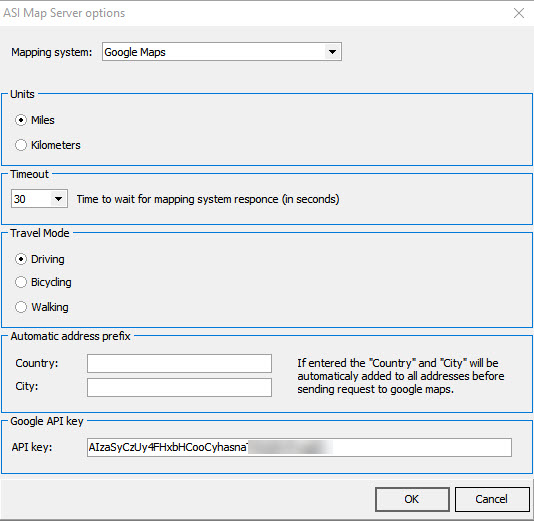
Below is a list of options that are used to configure RMMaps. All settings are universally used across the system: there is no way to configure POS stations to behave differently (i.e. Map Point on one computer and Google Maps on another). ASI Map Server options are found in the RM Map Server (RMMAPS.exe) > Setup > Options.
Mapping System- Enable either Map Point or Google Maps.
Unit- the default setting is Miles. Change to Kilometers if you are in a country that uses metric measurements.
Travel Mode - Available for Google maps only. Default setting is Driving. The Bicycling or Walking options may be used in metro areas where delivery is in a close proximity and delivery by car is not used.
Timeout- The default setting is 30 seconds. This setting is used determine the amount of time the system is allowed to find directions before timing out. Delay times leading to time outs can be attributed slow internet connections or faulty address input by employees.
Automatic address prefix- these fields are blank by default. These fields are used in countries that do not use the United States Zip Code or City address conventions. (i.e. Ireland).
API Key - enter the API key you obtained from the Google Map Platform. Make sure the key you type in is correct and do not attempt to put in a fake key number. Bad data entry will result in freezing RM Maps making it unusable. For accuracy purposes, it is recommended that you copy and paste the key in the provided field.
The map interface is accessible in RM on the following places:
Getting Directions via Info Function Button
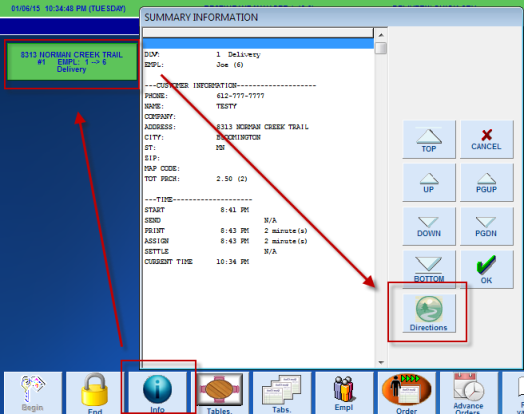
Use the "Info" function button on the “Main Status” screen at the POS to display a screen that will allow the user to get directions. This method will allow directions to only one location at a time. This method is best used at establishments that do not utilize directions on a frequent basis, e.g. every driver trip. Use the following steps to access directions:
Note: If you have set the printer output to screen, you will not be able to see the “Print” button when the turn by turn directions are displayed on the POS.
Getting Directions via Driver Name Button
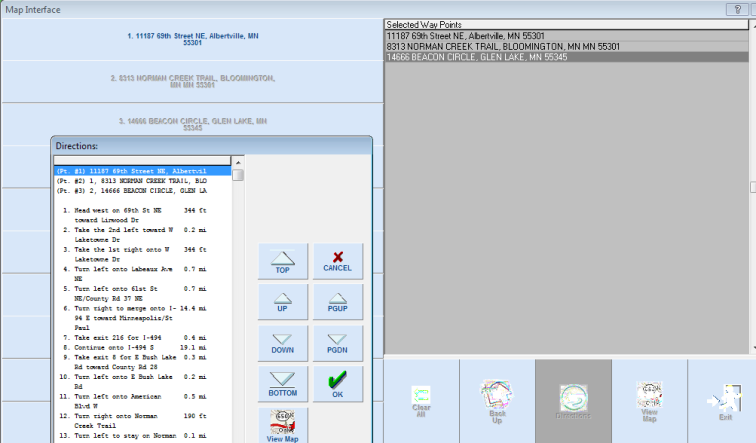
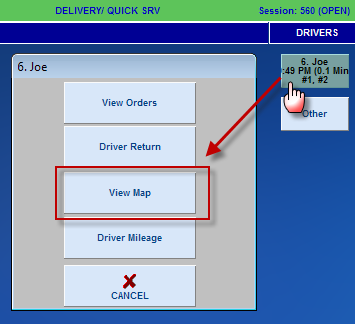
Another method of getting directions is incorporated at the point when drivers are assigning orders and can be used to get point to point directions for one or several locations. In the Delivery Module Main Status” screen, after orders have been assigned to a driver, touch the Drivers name under the “Drivers” column. A display screen will appear offering four choices. Choose the [View Map] option.
In the “Map Interface”, the store's address will appear at the top of the Address List on the left. Touching an address on the left will place it in the Selected Way Points window on the right. Addresses will appear on the Selected Way Points windows in the same order as addresses selected on the left. The order in which you select addresses is important as this will be the same order as the directions between way points will be printed. You must select the store's address if you want this part of the directions. Use the"Back Up" button to remove the last selected address or the "Clear All" button to remove all direction and start over. If needed, you can use the "Manual Entry" button to add a address to the Selected Way Points list for a address that is not related to a delivery. Press the “Directions” button when you are ready to view directions. After pressing the Directions button you will have the option to view directions on the screen or send to printer. Use the "View Map" button to view a map on screen (map cannot not be printed).