(continued from Choosing the Appropriate Input Mode)
One of the key differences between entering an order from the ASI Write-On for iPod Touch and a fixed POS station is in the order in which the items are entered. In a typical order cycle, the server will first take the drinks, prepare and serve them, and then take the appetizers and entrees, going around the table seat by seat. If the server is using a fixed station, she then re-enters the order, typically entering the appetizers first so that they come out before the entrees at the kitchen printer, making the cook’s job that much easier. This process is essential if a common preparation printer is used for both entrees and appetizers. If separate printers are used, the order in which the items are entered is less critical. If the Write-On device is used to take the order, it is impractical to sort the items after they have been entered. A better approach is to have the program sort the items before they are printed at the prep-area printers. In Restaurant Manager, this is accomplished by first defining the Course Types the restaurant uses (typically Appetizers, Entrees, Beverages and Desserts), tagging each menu item with a course, and enabling the printing of course information at the prep area printers.
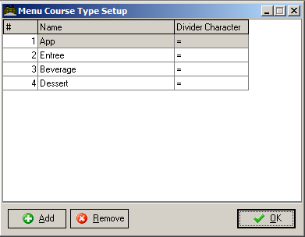
Menu Course Definition-Menu courses can be defined in the Restaurant Manager BackOffice Module by going to Setup->Menu->Course Type. Click on the add button and type the name of the course in the available (highlighted ) cell. Be careful to put the course in the proper order.
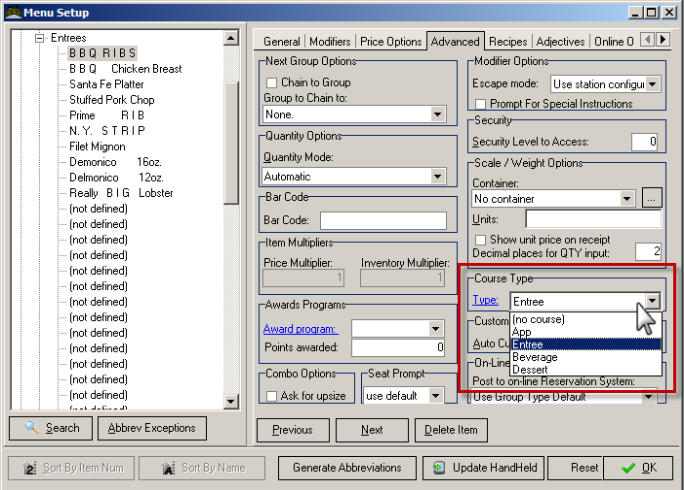
Tagging Course to Menu Item- To tag items with a course type go to Setup->Menu->Select an Item->Advance Tab. In the "Course Type" section, use the drop down menu on the "Type" field to add a course.
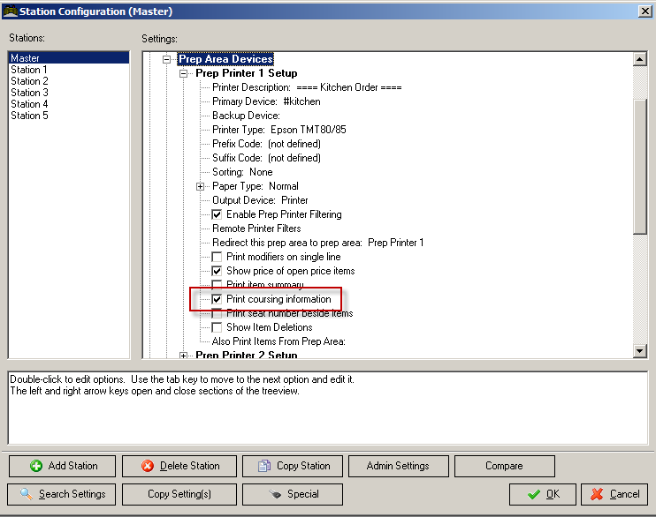
Enable Coursing- To enable course printing at a preparation area: printer check the box at Setup->Station Configuration >Devices >Prep Area Devices >Prep Printer x (i.e. Kitchen) > and enable the Print coursing information option. This must be enabled for each station the Write-On device is assigned to.
If your business has different offerings for different times of the day, you can take advantage of Restaurant Manager’s Menu Group Scheduling feature to schedule when each item can be accessed & rung up on the Write-On device. This means that the user is only working with items actually available on the current menu.
If you plan to use this feature, organize your items into groups that can be enabled/disabled according to the type of service (lunch, dinner, happy hour, etc.) Items that can be ordered at all times must not be mixed with time dependent items.To define Group Schedules: in the RM BackOffice Module go to Setup->Menu->Group Schedules
In the example screen above, the Lunch service is set to daily, starting at 11 am and ending at 2pm.
Note that the Schedule Frequency option allows you to program group availability for recurring days, weeks, months, and specific days.
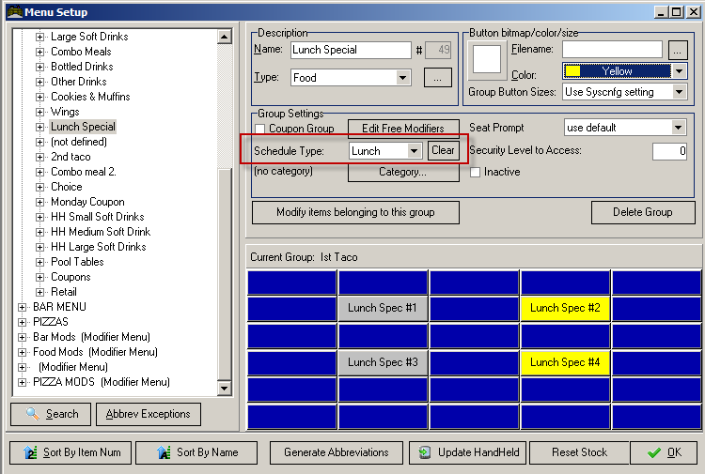
Once you’ve defined the group schedules go to the menu setup form and assign the schedules to the desired groups. In the example screen below, the Lunch Specials group has been assigned the Lunch Schedule.
Choosing Suitable Menu Item Descriptions
It is very important to realize that entering items directly at table side using abbreviations really does require you to think differently when programming the menu. For starters, you do not need to worry about how to navigate to a menu item, since you are identifying the item directly via its abbreviation. For example, to enter a “N.Y. Strip Steak”, you don’t first pull up the “Entrees” group and then locate (or page to) the “N.Y. Strip Steak” button; instead, you simply enter its abbreviation, “nys”. It is that easy! In general, when programming a menu item you should always ask yourself the question: “What is the most efficient (shortest) way to write down the item/modifier?” You should also “unlearn” all the touchscreen techniques, such as providing shortcut buttons to other groups to speed up the data entry process. These shortcut buttons are completely unnecessary when referencing items via its abbreviation.
Deciding on a suitable menu item description is a simple matter when it comes to the ASI Write-On for iPod Touch. The general rule of thumb is to use the same words used in menu presented to the customer, eliminating unneeded extra words, and placing designated sizes at the end of the description (see below). This makes it easier on the server when learning the abbreviations. For example for “New York Strip Steak”, NYStrip Steak, for “Stuffed Pork Chops”, you could simply use Stuffed PorkChops.. A common item found on most menus "Cup Soup of the Day" is an excellent example of an item with both unneeded words and is designated with a size. For this item we might program the menu item description to read "Soup of the Day- Cup". Typically the Abbreviation Generator will skip the words "of: and "then". As a rule of thumb, the size of items should follow the main wording. The resulting abbreviation would be "SDC".
One last consideration is the length of the description. The length of the words used will affect how much of the description will be shown in the Order and selection windows. It is best to program a menu item and then test it on the Write-On app. You can also take into consideration the use of the Fixed Font and Fit Text settings found under the General Commands "Options" menu.
Note: If the item description is cut off, you can always see the full name by use of the [View]screen.
In general, it is best to add the size qualifier of an item at the end of the description. So, for example, if you offer Coke in three sizes, small, medium and large, you would create the three items as follows.
Similarly, if you offered aDelmonico Steakin two sizes 12oz and 16oz, you would program the descriptions as:
In some touchscreen environments one finds it convenient to repeat frequently used base items on several screens. This results in the undesirable effect of the same item appearing on the Write-On device multiple times. To avoid this, simply remove the abbreviation for all the repeated items save one.
Choosing Suitable Modifier Descriptions
The guidelines for programming Modifiers are similar to those used for programming items. The user will access modifiers by going into a modifier mode, at which point the abbreviations entered will search for modifiers, not base items. So, for example, if the use enters “LL” as a base item, the corresponding base item might be “Lynchberg Lemonade”, whereas if entered as a modifier it might correspond to “LiteLettuce.” Thus it is important that modifier descriptions are clear when read independently from any other modifier. For example, you want to stay away from using a single group for your “no” and “extra” modifiers, containing “dummy” modifiers labeled “”Extra” and “No” used to define the meaning of the subsequent modifiers entered. This is an acceptable technique if you are using Group List Mode , since you can enter all your “no” and “extra” items without switching screens, but it is an unsatisfactory method when using abbreviations, since you need two steps for every modifier of this type (first the “no” or “extra” entry, then the actual modifier.) A much better approach when using abbreviations is to make the adjective (“no”, “extra”) part of the modifier. Thus all the “no” modifiers are prefixed with “no” (no salt, no butter, no spice, etc.) and all the “extra” modifiers are prefixed with “xtra” or “x” for short (xtra sauce, xtra cheese, etc.) In practice this means creating two menu groups, one for the “nos” and another for the “xtras.”
The normal sequence of events for generating abbreviations is as follows:
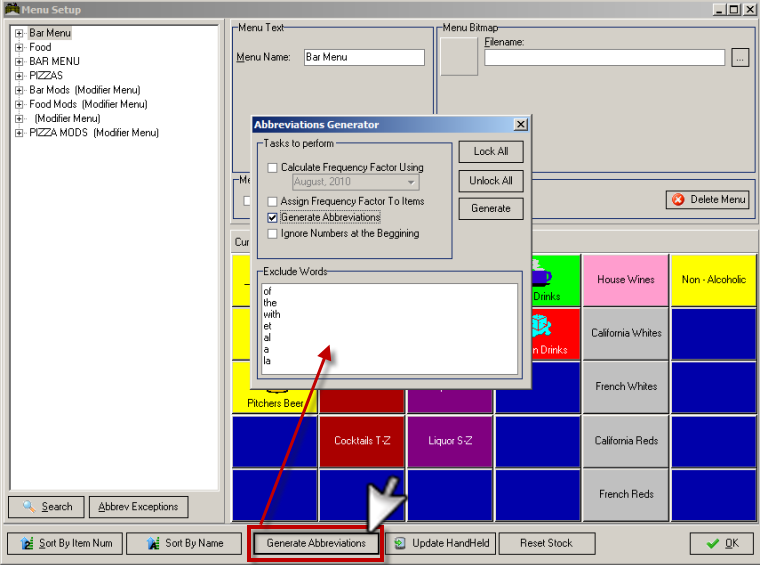
The assignment of abbreviations to menu items and modifiers is automated by use of an abbreviation generator. The abbreviations are determined according to the rules in Appendix I. Access the abbreviation generator by clicking on the Generate Abbreviations button at the bottom of the Menu Setup screen within the Restaurant Manager BackOffice Module:
Note: If this button is not visible, make sure the handheld option has been enabled under the master station configuration.
Entering/Modifiying Abbreviations Manually
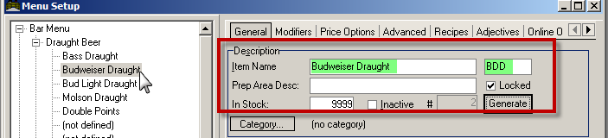
Manual menu abbreviations must be programmed for each individual menu item. This is ideal when adding a single new menu item or adjusting an existing abbreviation connected to a menu item. Abbreviations are manually added or adjusted within the Menu Item Setup Form contained within Menu Setup Form of the Restaurant Manager BackOffice module.When creating manual abbreviations the rule of thumb to follow is: us the first letter of each word, and then successive letters of the last word". Example: Steamed Shrimp should be abbreviated as "SSH".
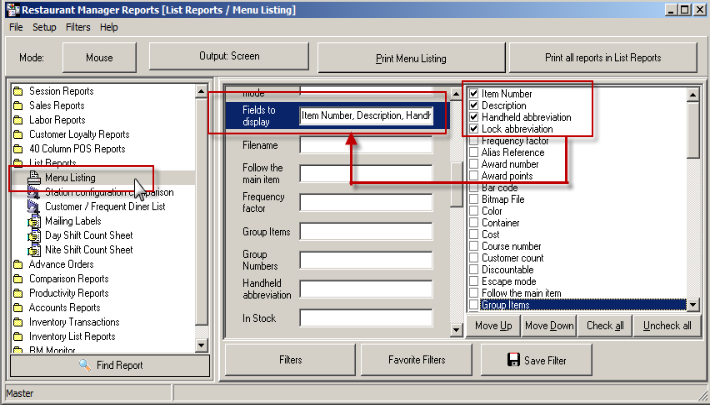
A list of menu items and their abbreviations is available within the Restaurant Manager Report Module using the Menu Listing Report. This report can easily be found using the “Find Report” button at the bottom of the report form and typing in the name of the report in the “Search For” field.You will want to use the “Fields to Display” filter to limit the information displayed on the report. Some of the Fields to display” options you may consider using are:
The report is capable of showing menu items with and without menu item abbreviations. The following filters can be used to affect the information displayed on the report”