(continued from Planning Your Menu)
This section only contains information pertinent to owners and managers. Please see the Users Guide for general information on how to use the ASI Write-On for iPod Touch and for server functions.
The Write-On for iPod Touch has many configurable options you may wish to consider. These options include choosing input method, seat prompts, and the way information is displayed on the screen. The options are accessed within the Write-On software application by tapping the [Cmd] button and selecting [Options] from the list in the Item List window (upper right window of screen).
Configuring options for the Write-On for iPod Touch application is a fairly intuitive process. Simply select the option from the “User Settings” list, select one of the options within the settings for the change you wish to affect. Once making your selection, tap the [User Setting] button on the upper left corner of the screen and then tap [Done] to return to the user screen to see your changes. The following is a description on each option will affect the Write-On device.
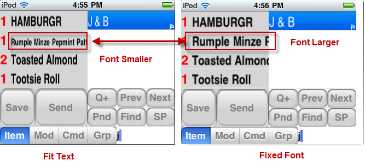
Input Method: Sets default input mode for entering items/modifiers. The keyboard mode is used when using abbreviations and is the default setting (abbreviation input). However, in cases where the menu is simple (1 to 40 items), few free modifiers are used, and special instructions are not required the Groups List Input mode can be used. In this mode the user first selects a group to enter items.
Ask for Seat Num…:Affects seat prompting. This is typically used at restaurants using runners. However, entering seat numbers at the time of taking an order makes it streamlines the check splitting process. There are three options to choose from:

When unforced or forced options are enabled, the amount of seat numbers displayed in the Selection Window reflects the maximum seat number field configured in the Table Layout form of the Restaurant Manager BackOffice Module. However, using the [Customer Count] command under the “Cmd” options will also affect the number of seats displayed on the Selection Window.
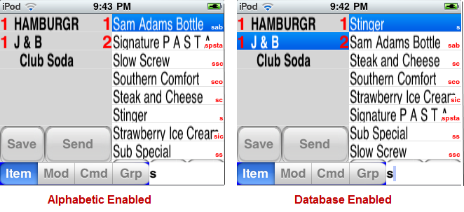
Right List Sort- This option affects the way items are listed in the Selection Window. There are two options to choose from:
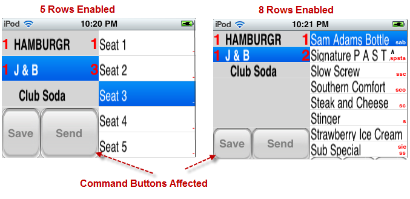
List Box Rows- This option allows for the number of rows to be displayed on both the Selection and Order Entry Windows. The settings for this option are 5, 6, 7, and 8 rows. The greater number of rows displayed will show more menu items in both selection widows. Lower numbers or rows may make it easier to select menu items displayed in both windows. Keep in mind that both Order Window commands and Speed buttons appear in the Order and Selection Windows (respectively) and take up row space.
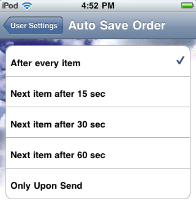
Auto Save Order- The settings under this option determine the amount of time for when items on the order are saved. The default setting is “after every item”. This setting will aid the user in retrieving a complete order as it was entered when performing “Recover Order”. You should only change this setting if you are experiencing device performance issues (i.e. slow screen refresh rates).
Allowed Dining Area: Restricts access to tables to those in the designated dining area. See the Restaurant Manager Manual for more information on Dining areas.
Defining the Write-On Device’s Properties
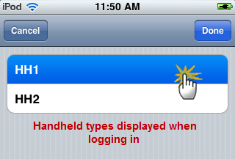
By default, all handheld units use the Master Station configuration to determine behavior (i.e. prep area and guest check routing). However, each Write-On iPod device is capable of emulating certain behaviors of a fixed POS stations via station configurations). Upon logging into the Write-on application, the employee will be prompted for which handheld type they wish to use. Configuring multiple handheld types is optional, and may not be appropriate for most installations. The only reason to use more than one handheld type is if you want some handhelds to use a different station configuration behavior.
Example Uses
Using RM Services Control Panel
The RMServicesCPL (aka RMSoapServer Control Panel) is where you will define the behavior of each iPod unit. Here is a brief list of some of the behaviors control in RMServicesCPL
Within RMServicesCPL you can also define how the names of the Write-On units will be displayed on Alerts and how groups are listed when using Group Mode.
RMServices always needs to be running on the fileserver (rmserver) so finding it should be easy to find. RMServicesCPL is an executable file (.exe) that runs as a service and can be found in the Windows systray. You can access RMServicesCPL by clicking on the RMServices icon in the systray typically located in the lower right corner of your Windows screen.See Appendix 5 if having difficulty finding RMServices on Windows 7 or 2008 server.
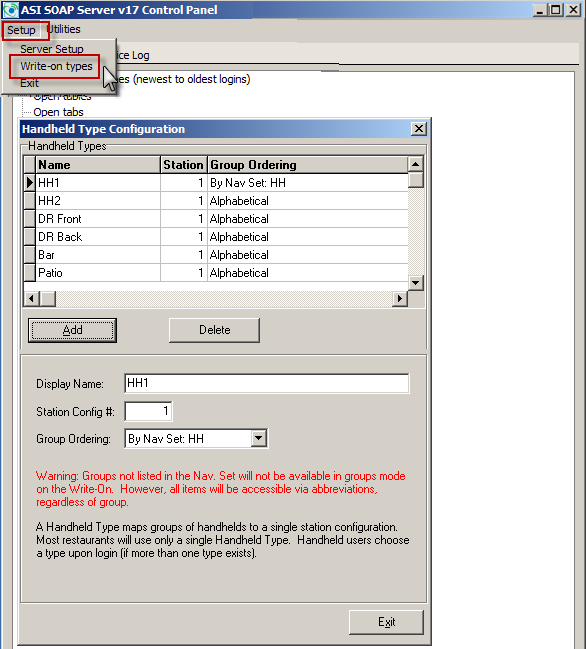
Within the ASI SOAP Server window, click on Setup and then Write-On Types. Your next screen will be the Handheld Type Configuration form.
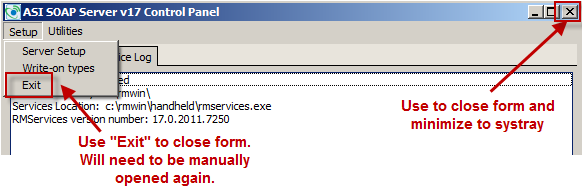
Use the “X” button in the upper right corner to close the control panel and leave running in the systray. Use the “Exit” option (Setup > Exit) to completely close the form. Using the “exit” option requires manually restarting the RMServicesCPL. Therefore it is recommended you make the RMServicesCPL.exe easily accessible (i.e. place a shortcut on the desktop).
Handheld Type Configuration Form
At the top of the Handheld Type Configuration form is a grid that displays the properties assigned to an Write-On device. The columns on the grid show the name, Station Configuration, and the Group Ordering assignment. When using this form to assign properties to the Write-On unit a row for each device will be displayed after being added. Properties for Write-On devices may be added or deleted using the [Add] or [Delete] buttons located just below the Handheld Types grid. Data entry for each Handheld Type is entered in the field boxes below the Add and Delete buttons. The entry fields are: