Last Topic "Executive Summary"
The following areas must be considered for proper implementation in a PCI-Compliant environment.
Remove Historical Cardholder Data
Sensitive Authentication Data requires special handling
Set up Good Access Controls
Properly Train and Monitor Admin Personnel
Key Management Roles & Responsibilities
PCI-Compliant Remote Access
Use SSH, VPN, or TLS 1.2 or higher for encryption of administrative access
Log settings must be compliant
PCI-Compliant Wireless settings
Data Transport Encryption
PCI-Compliant Use of Email
Network Segmentation
Never store cardholder data on internet-accessible systems
Delivery of Updates in a PCI Compliant Fashion
Historical data must be securely deleted (magnetic stripe data, card validation codes, PINs, or PIN blocks stored by previous versions of the software) . Removal of historical data is absolutely necessary for PCI compliance and to satisfy the PA-DSS requirement 1.1.4.a (Remove Historical Sensitive Authentication Data –PA-DSS)
Certain log files created in prior version up to version 15.1 may contained sensitive, unencrypted card data. These log files pose a serious security threat and are listed below:
To prevent a security breach after an upgrade, it is imperative that these log files be deleted from the main RM folder as well as any backup folders, drives, CD’s, tapes, or any other backup media. These files should be deleted BEFORE upgrading to version 15.1.
ASI provides a utility called CCPurge.exe that erases these log files. In addition, CCPurge will erase any credit card information stored in database files PMT<mmyy>.DBF. CCPurge.exe can be downloaded from ASI’s web site, and should be executed in the main RMWIN folder as well as any backup folders.
Note: after upgrading to RM version 19, the system will continue logging to the above mentioned files. However, all credit card information is masked and therefore does not pose a security risk. Hence, once a system is upgraded to version 19, these files can be retained only in the live rmwin directory on the system without posing a security risk.
The following guidelines must be followed when dealing with sensitive authentication data (swipe data, validation values or codes, PIN or PIN block data):
Collect sensitive authentication data only when needed to solve a specific problem
Store such data only in specific, known locations with limited access
Collect only the limited amount of data needed to solve a specific problem
Encrypt sensitive authentication data while stored
Securely delete such data immediately after use
PA-DSS 2.1 states "Software vendor must provide guidance to customers regarding purging of cardholder data after expiration of customer-defined retention period."
The following guidelines must be followed when dealing with cardholder data (PAN alone or with any of the following: expiration date, cardholder name or service code):
A customer defined retention period must be defined with a business justification.
Cardholder data exceeding the customer-defined retention period must be purged.
In addition, you must take steps to prevent inadvertent capture or retention of cardholder data. There are areas outside Restaurant Manager software that may capture typically are the OS paging system or system restore files. The section on OS Settings addresses this topic.
Restaurant Manager provides several options for logging credit card information. Restaurant Manager will automatically purge cardholder data. The end user may define a reasonable business period to retain cardholder data. At the end of the period Restaurant Manager will purge the data at session open. Please note that Restaurant Manager will not allow cardholder data to be retained more than 99 days. The options are located in Restaurant Manager BackOffice Module using the following steps:
Click "Setup" > "Station Configuration" > "Admin Settings" button
Enter complex Administrator Password when prompted
Click "Miscellaneous" > "Credit Card Authorization Setup"
Each option is described below:
Credit Card Copy/Paste Options
Note: credit card data is masked at the POS when using the options below.
Security Level to copy a credit card to the clipboard - This option defines the security level required to copy a credit card to the clipboard. Note: in order to copy credit cards from settled transactions, you must enable the option "Save CC Info in payment file." The system will only prompt for this password if it is HIGHER than the password required to access Misc, CC Options
Security Level to paste a credit card to the clipboard - This option defines the security level required to paste a credit card from the clipboard.
Timeout for credit card copy/paste operation(minutes) -This option defines the number of minutes that a credit will be available for pasting after it is copied to the clipboard. To avoid abuse, you should set this to the smallest possible value, just enough time to allow completing the desired operation. Typically, 2 minutes should be ample, but the value can be increased up to a maximum of 30 minutes. Note: in order to copy credit cards from settled transactions, you must enable the option "Save CC Info in payment file"
Allow pasting credit card once only - This option applies to the credit card copy/paste operation. If this option is enabled, then credit cards are removed from the clipboard after they are pasted in the settlement screen. Therefore, cards that are copied to the clipboard can only be pasted once. But if this option is not enabled, then cards that are copied to the clipboard will stay there until they time out
Copy to clipboard when deleting (normal settlement) - Allows copying credit card number to clipboard when deleting a credit card during normal settlement.
Copy to clipboard when deleting (revise settlement) - Allows copying credit card number to clipboard when deleting a credit card during revise settlement
Processing Options (Credit Card logging)
SAVE CC INFO IN PAYMENT FILE- This option is provided to facilitate locating and/or fixing credit card issues arising during the course of business. For example, if a customer calls to dispute a charge. Card numbers are saved in the database PMT<mmyy>.DBF. The stored card numbers are masked to reduce the security threat, but it is still advisable to retain the card information for the minimum time necessary (i.e., for as long as there is a business need, but no longer).
NUMBER OF DAYS TO STORE CC INFO- Use this option to limit the number of days Restaurant Manager will retain credit card information in PMT<mmyy>.DBF. Card information older than the number of days specified in this option, are purged at the beginning of each session (i.e. business day). Set this to a value that represents the business need to store this info, but no longer.
CUSTOMER/FREQUENT DINER CREDIT CARDS
SAVE/RESTORE CUSTOMER/FREQUENT DINER CREDIT CARD INFO- This option can be used to save and restore credit card information for repeat customers. It is primarily useful in delivery-style operations where customers place their order by phone and give their credit card information verbally. If you choose to enable this option, you must decide how long you wish to retain unused card information. Refer to the next option.
NUMBER OF DAYS TO KEEP UNUSED CARD INFO- This option defines how long the system will retain credit card information after a customer’s last order. If a customer does not order again for the number of days specified, their credit information is automatically purged from the system.
The default setting is 90 days. Although you can enter a larger value, it is recommended that you set this option no bigger than 365 (1 year). Set this to a value that represents the business need to store this info, but no longer.
SAVE/RESTORE SWIPED CARDS- This option controls whether “swiped” credit cards are retained for future use. Note that PCI standards dictate that POS systems cannot store full credit card swipes or track 2 information for any reason what so ever. Therefore, only the card number and expiration are stored for future use. That means if the card is used in the future, it will be processed as a manually entered card, and hence will be subject to higher fees. If you expect the cardholder to present the card on future visits, it is preferable to set this option to “NO” and swipe the credit card on each future visit in order to obtain the best discount rate on future credit card transactions.
AUDIT BUTTON PRESSES- This option logs button presses to the credit card audit file CCAUDIT.TXT. None of the information is sensitive therefore it does not compromise credit card security when this option is enabled; however, it can result in a LOT of stored data; therefore, this option should only be used when additional diagnostics are required for troubleshooting purposes.
There are several Windows settings that must be configured to prevent the system from inadvertently capturing credit card (PAN) information. The main objective is to reduce the threat of the possibility of maleware stealing PAN information in virtual memory. This is done by clearing the system pagefile. sys at shutdown, disabling System Management of PageFile.sys, and disabling system restore. These settings only need be configured on all computers with an MSR attached or where credit data is entered manually. The following instructions are for Windows 7.
Windows has the ability to clear the Pagefile.sys upon system shutdown. Doing so will purge all temporary data from the pagefile.sys (temporary data may include system and application passwords, cardholder data (PAN/Track), etc.).
NOTE: Enabling this feature may increase windows shutdown time.
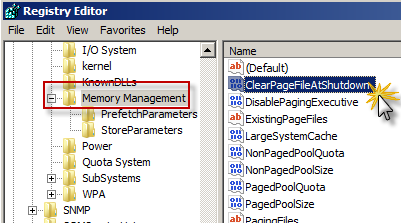
Click on the Windows "Start" and in the search box type in "regedit".
On the program list, right click on regedit.exe and select "Run as Administrator"
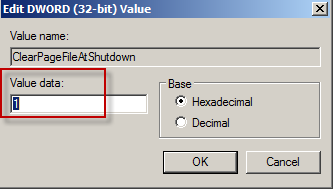
Click OK and close Regedit
NOTE: If the value does not exist, right click on the Memory Management folder, select "New" on the drop down menu select "DWORD (32-bit or 64 bit depending on OS) Value" and add the following:
Value Name: ClearPageFileAtShutdown
Value Type: REG_DWORD
Value: 1
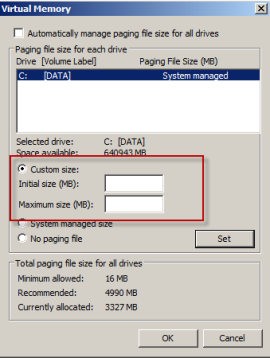
You will want to disable memory page swapping to the hard drive. The following steps will show you how to tweak virtual memory settings in Windows by disabling (pagefile.sys).
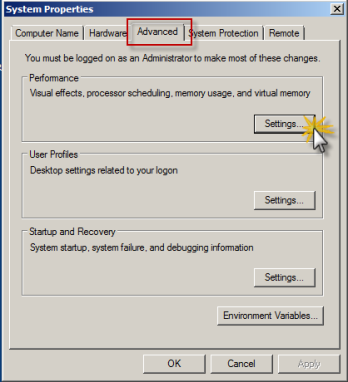
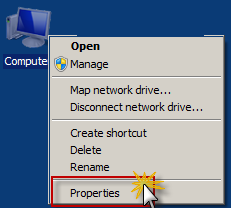
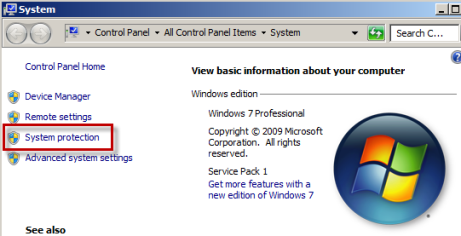
Right Click on Computer > Select "Properties"
Select "System Protection" on the top left list
Select the"Advanced" tab and click "Settings" under Performance section
Uncheck "Automatically manage page file size for all drives"
Select "Custom Size"
Enter the following for the size selections:
Initial Size - as a good rule of thumb, the size should be equivalent to the amount of memory in the system.
Maximum Size - as a good rule of thumb, the size should be equivalent to 2x the amount of memory in the system.
Return to default windows screen by clicking "OK" three times
Reboot the computer
Note: you may want to increase the size of your RAM to counter the effects of disabling pagefile.sys
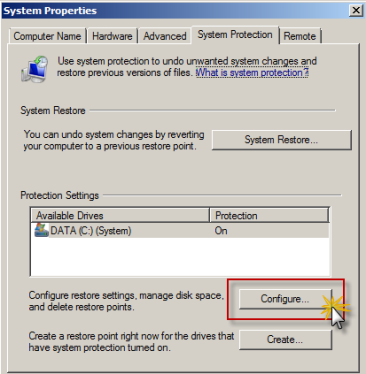
The following steps describe how to disable system restore points. This is critical as a system restore point may
inadvertently capture cardholder data if it is not disabled and compromise your PCI DSS compliance.
Right Click on Computer and Select "Properties" on the pop up menu pop up.
Select "System Protection" on the top left list.
Click "Configure" under the System Protection tab.
Click to enable "Turn off system protection", click "Apply", and then click "OK" to close System Protection window.
Click "OK" to close System Proprieties window.
Reboot computer.
In Restaurant Manager since version 15.1, all sensitive information such as passwords and credit card data are encrypted using a Triple-DES encryption algorithm. Like any other encryption algorithm, Triple-DES uses an encryption key to encrypt and decrypt the data.
The encryption key is securely stored in the file KEY.DES, located in the RMWIN working folder. It is important that this file not be deleted or tampered with as it will cause all encrypted data in the system to become un-readable. You should also make sure to include this file in any system backups. Restoring a backup without this file would cause passwords and stored credit cards to be un-readable.
To ensure that credit card information is not compromised, ASI recommends changing the encryption key at least once per year.
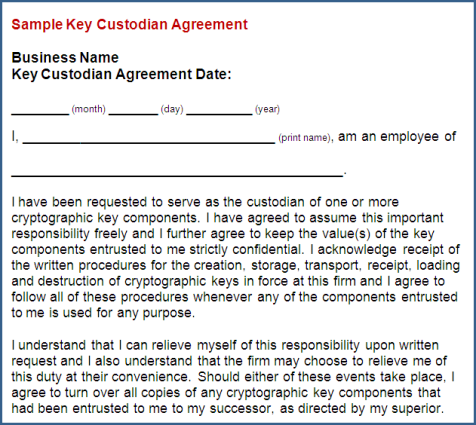
A sample Key Custodian form for key custodians to acknowledge that they understand and accept their key custodian responsibilities must be signed. A sample of a Key Custodian Agreement is provided below:
The following key management functions must be performed per PCI DSS:
Generation of strong cryptographic keys.
Secure cryptographic key distribution.
Secure cryptographic key storage.
Cryptographic key changes for keys that reached the end of their cryptoperiod (for example, after a defined period of time has passed and/or after a certain amount of ciphertext has been produced by a given key), as defined by the associated application vendor or key owner, and based on industry best practices and guidelines (for example, NIST Special Publication 800-57.
Retire keys when the integrity of the key has been weakened.
Replace known or suspected compromised keys.
If retired or replaced cryptographic keys are retained, the application cannot use these keys for encryption operations.
Manual clear-text key-management procedures require split knowledge and dual control of keys.
Prevention of unauthorized substitution of cryptographic keys
Restaurant Manager encrypts cardholder data on versions 15.1 to 19. The following must be done on these versions:
All cryptographic material (encryption keys and encrypted cardholder data) must be securely removed.
To render data irretrievable you must: run the ccPurge.exe. This is an automated process in Restaurant Manager when performing upgrades on RM versions prior to 15.1.
This removal is absolutely necessary for PCI DSS Compliance
Re-encrypt historic data with new keys by using the process of generating a new key described below:
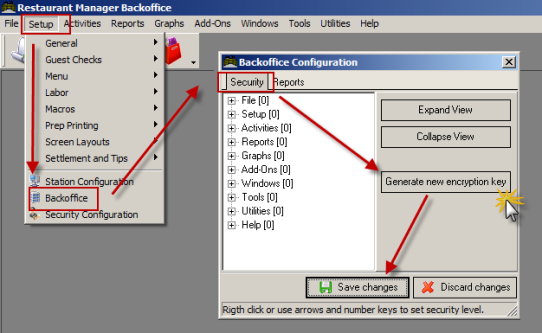
The session must be closed
Open Restaurant Manager Back Office Module
Click "Setup" and click "Backoffice" on the drop down menu.
Enter Administrator Password
Click Security Tab on Backoffice Configuration window.
Click "Generate new encryption key" button.
Important: It is mandatory that you generate a new encryption at the initial installation of the Restaurant Manager software and then at least once a year thereafter.
ASI Resellers, end users, and third party participants (i.e. outside network specialists) are advised to control access using unique usernames and PCI DSS compliant complex passwords, to any servers/computers, and databases with payment applications and cardholder data.
The PCI DSS requires that access to all systems in the payment processing environment be protected through use of unique users and complex passwords. Unique user accounts indicate that every account used is associated with an individual user and/or process with no use of generic group accounts used by more than one user or process.
PA-DSS 3.2: Control access, via unique username and PCI DSS-compliant complex passwords, to any PCs or servers with payment applications and to databases storing cardholder data.
PA-DSS 3.1.a: You must assign strong passwords to any default accounts (even if they won’t be used), and then disable or do not use the accounts.
Authentication credentials are not generated or managed by Restaurant Manager. Instead, authentication credentials used by the payment application are provided for by Restaurant Manager. For both the completion of the initial installation and for any subsequent changes (for example, any changes that result in user accounts reverting to default settings, any changes to existing account settings, or changes that generate new accounts or recreate existing accounts), the following 10 points must be followed per PCI 8.1, 8.2, and 8.5.8-15:
The application must assign unique IDs for user accounts. (PCI DSS 8.1)
The application must provide at least one of the following three methods to authenticate users: (PCI DSS 8.2)
a. Something you know, such as a password or passphrase
b. Something you have, such as a token device or smart card
c. Something you are, such as a biometric
The application must NOT require or use any group, shared, or generic accounts or passwords.(PCI DSS 8.5.8)
The application requires passwords to be changed at least every 90 days (PCI DSS 8.5.9)
The application requires passwords must to be at least 7 characters (PCI DSS 8.5.10)
The application requires passwords to include both numeric and alphabetic characters (PCI DSS 8.5.11)
The application keeps password history and requires that a new password is different than any of the last four passwords used. (PCI DSS 8.5.12)
The application limits repeated access attempts by locking out the user account after not more than six logon attempts. (PCI DSS 8.5.13)
The application sets the lockout duration to a minimum of 30 minutes or until an administrator enables the user ID. (PCI DSS 8.5.14)
The application requires the user to re-authenticate to re-activate the session if the application session has been idle for more than 15 minutes.
These same account and password criteria from the above 10 requirements must also be applied to any applications or databases included in payment processing to be PCI compliant. Restaurant Manager, as tested in our PA-DSS audit, meets, or exceeds these requirements for the following additional required applications or databases:
Verifone's PCCharge
Verifone's PAYWare PC
Datatran
Note: These password controls are not intended to apply to employees who only have access to one card number at a time to facilitate a single transaction. These controls are applicable for access by employees with administrative capabilities, for access to servers with cardholder data, and for access controlled by the application.
The following sections outline how you can configure Restaurant Manager to meet PCI DSS requirements
All passwords in Restaurant Manager since version 15.1 are encrypted. In previous versions, it was possible to use DBU, or other database utility to view passwords stored in Employee.dbf and Config.dbf, these passwords are now encrypted. If DBU (or other utility) is used to change any of the passwords stored in these files, those passwords will be rendered unusable until they are reset.
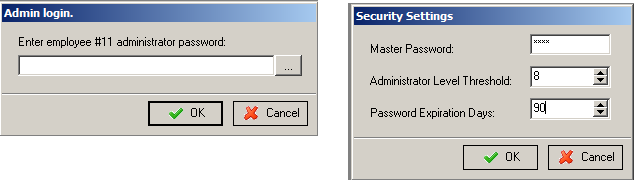
The “Master Password” in Restaurant Manager allows access to all back office as well as Point of Sale functions. It is highly recommended that the master password not be used (PA-DDS 3.1c & PCI DSS 8.5.8). By default, the Master password on a new system is 0000. When setting up a new system, you should change the Master password to something other than the default value. It is also recommended that you change the master password at least every 90 days.
Because the master password is encrypted, the program PASS0000.EXE, must not be used as in previous versions to version 15.1. After upgrading from a version prior to v15.1 and if the executable remains: it should be removed from the system. If you do execute PASS0000.EXE, or otherwise manually change or corrupt the master password on the system, it will render the master password unusable. (PA-DDS 3.2c). If this happens, you will only be able to reset the master password with assistance from ASI Tech Support. Open a help desk ticket with the subject, “Reset v19 master password”.
Since version 15.1, Restaurant Manager relies on the concept of Administrators. They have access to settings and operations normal users do not. Those items include:
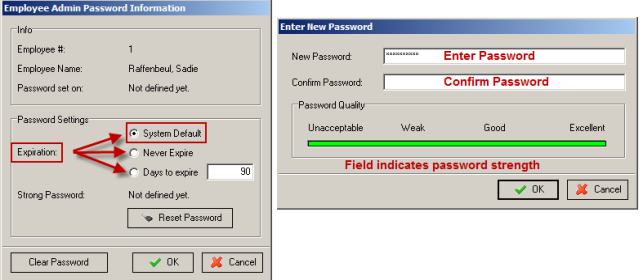
Set or Change master password, located in Setup -> Security Configuration screen. User must also be a level 9.
Set or Change other employee’s administrator password, accessible using “Edit Administrator Password Info” button in Employee Setup. User must also be equal or higher security level than the one being changed.
Modify PCI Security Configuration settings, in new Setup -> Security Configuration. User must also be a level 9.
Access the BackOffice Configuration screen.
Access sensitive credit card configuration settings in RMCCWin.
Add or Delete employees from the database.
Choosing these options in the Restaurant Manager BackOffice or RMCCWIN will cause an admin password prompt to appear, or a notice that the user does not have adequate permission.
Admin passwords are set in the Restaurant Manager BackOffice under Employee Setup, click on Edit Administrator Password Info”.
NOTE: It is always the Administrator password of the LOGGED-IN user that is required. This can be confusing when an admin is trying to change the Administrator password of another Administrator. It is their own password that should be entered, not the one of the employee he is editing.
NOTE: You are allowed only six attempts to enter an administrator password. Failures to enter the correct administrator password will block additional attempts for thirty minutes (PCI DSS 8.5.13 & PCI DSS 8.5.14)
A “strong” password is an industry term to denote that the password is complex enough to reduce the chances of it being guessed using brute force methods. The rules for strong passwords are:
MUST be 7 characters or longer (PCI DSS 8.5.10)
MUST contain both letters and numbers (PCI DSS 8.5.11)
Should contain both upper and lower case letters
Should contain symbols (e.g. characters above numbers on keyboard)
Password should not be similar or contain the same numbers found in the employee password.
The last 2 are not required, but add additional password security, and make an admin password quality “excellent”.
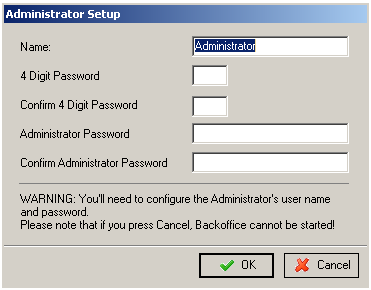
After installing Restaurant Manager, start Restaurant Manager BackOffice (rmwin.exe) and you will be immediately prompted to create the first Administrator account, a level 9 user with access to all PCI-sensitive settings in the system. ASI recommends this account be a user tied to the reseller. It is from this user account that the reseller can continue configuring the credit card settings, and creating additional Administrator passwords for store personnel.
Resellers may wish to restrict the level 9 security level for reseller use, and have store personnel be level 8 and below. Administrators, by default, are defined as level 8 and above, configurable from within Restaurant Manager BackOffice.
Admin passwords expire in 90 days by default. After expiration, the user can no longer gain access to the admin restricted areas of Restaurant Manager. That user needs to have his password reset to regain administrator access.
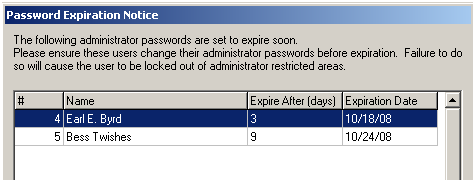
EXPIRATION WARNING: The Restaurant Manager BackOffice program will warn of impending administrator password expiration upon BackOffice login. If any administrator passwords will expire within the next 10 days, or have already expired, an expiration dialog will appear listing the employees affected.
If admin passwords are forgotten, or left to expire, they will need to be reset. That can be done through the following means:
By a fellow admin- Another admin at equal or higher security level who does still have access can change the password of the user whose admin password is unusable.
By the reseller – If all store administrators have forgotten their password or let them expire, then the reseller’s own admin user can be used to reset the admin password of the highest security level store employee to allow them to regain admin access.
By calling ASI – If all admin users have lost access, the only way to regain access is to call ASI Tech Support and get the Restaurant Manager Admin Daily Passcode and follow the instructions given by the ASI technician
After retrieving the Daily Passcode:
• Re-start Rmwin and enter in the code into the password field when prompted.
• Go to “Employee- Setup”, select the employee, and click on the [Edit Administrator Password Info] button to change the admin passcode.
Password fields left inactive for a period of 15 minutes will automatically time out. You will have to begin the process again if you exceed the time frame of inactivity (PCI DSS 8.5.15).
NOTE: New passwords cannot be the same as the last 4 passwords (PCI DSS 8.5.12).
To be PCI compliant:
The default Password Expiration Days MUST be set to 90 or lower. 90 days is the default setting (PCI DSS 8.5.9).
All administrators MUST have their Expiration setting set to “System Default”. This is the default setting.
Note that Restaurant Manager allows expiration settings other than what PCI requires. This is to accommodate sites and countries that are not required to be PCI compliant (e.g. sites that do not accept credit cards). It is the responsibility of resellers, and ultimately store management to ensure that the store uses PCI compliant settings if required.
It is the restaurant site's responsibility to institute proper personnel management techniques for allowing admin user access to cardholder data, site data, etc. You can control whether each individual admin user can see credit card PAN (or only last 4).
In most systems, a security breach is the result of unethical personnel. So pay special attention to whom you trust into your admin site and who you allow to view full decrypted and unmasked payment information.
If the application enables logging and does not provide any configurability of the logging function, then provide guidance as follows:
PA-DSS 4.1.b: Restaurant Manager has PA-DSS compliant logging enabled by default. This logging is not configurable and may not be disabled. Disabling or subverting the logging function of Restaurant Manager in any way will result in non-compliance with PCI DSS.
In addition, any third party software used for remote access or credit card processing must have logging turned on and configured per PCI DSS 10.2 and 10.3 as follows:
Implement automated assessment trails for all system components to reconstruct the following events:
Record at least the following assessment trail entries for all system components for each event from PCI DSS 10.2.x:
PA-DDS 4.4.a and 4.4.b: Restaurant Manager facilitates centralized logging.
Restaurant Manager logs all administrator login attempts whether successful or not. Logging is recorded in the "pwlog.dbf". The log file records the following information:
Application name trying to access (RMWIN, RMPOS, RMCCWin, etc).
Password date- the date the password was used
Password Time- the time the password was used
Password station- the station the password was used (note: "0" is used when using the password from the server computer).
Password Success- True if successful, false if unsuccessful
Required Password- logs the specific security level need to access application (i.e. security level 0-9)
Login Employee- employee number of employee initiating process
Employee Password Number- Employee number belonging to password used. Note: there may be a difference from the Login employee and the Employee Password number. Example: Employee 2 may have activated the POS Main status screen but it would take employee 2's password (and security level) to complete a function.
Password Buttons- Restaurant Manager logs the keystrokes of functions performed at POS.
Note: removing the "pwlog.dbf" from the rmwin directory will render your system PCI on compliant.
Restaurant Manager version19 has a reporting function for logging the use of Administrators password used at the POS, RM BackOffice module, and RMCCWin. Use the "Admin Login Attempts" report in the Restaurant Report Module for reporting purposes. The "Admin Login Attempts" report is included in the report module by default and is found under the Session Reports folder. Run the Report using the following steps:
Open the RMReport Module
Use the report Interface icon in RM BackOffice Module
Use the RMReports icon (Start > All Programs > RMWIN folder).
Enter Password when prompted
Double click "Session Reports" folder and navigate to "Admin Login Attempts" report.
Use the "Date" filter in middle column to select a report date range.
Note: use other filters (i.e Empl#) to limit data displayed as necessary.
Make sure Output is set to "Screen" and click "Output: Admin Login Attempts" button.
The report will appear on the screen. Click the "Diskette" icon in the upper right corner of the screen
Choose the destination and select the format you wish to save the report as using the "Save as Type" field. You can also rename the report in the "file name" field if necessary.
Note: You can choose "Printer" as output type in the RM Report Module to print the report to a printer. In this case, skip steps 6 & 7.
Next Topic "Services and Protocols"
Proprietary and Confidential Information