(Previous Topic: Requirements)
Setup Process
POSQBi should be set-up to communicate properly with QuickBooks as well as to see if the necessary RMPOS files are available. Once communication has been established between the two software programs, you need to map the Restaurant Manager data to the appropriate account in QuickBooks.
Setting up the interface (POSQBi) may be the most cumbersome portion when operating the interface but don’t be perturbed as once it is set-up, you may need to change the settings only when necessary.
The following steps below summarizes the setup procedure:
- Getting QuickBooks and Restaurant Manager (POSQBi) to communicate.
- Understanding the POSQBi interface
- Mapping Sales, Tax, and Employee data from Restaurant Manager to QuickBooks
Establishing QuickBooks & Restaurant Manager Communications
Establishing communications between the two software programs is essential. The four steps below will guide you through the initial setup process. Following these steps will make the transfer of data a relatively seamless process.
- RM BackOffice Setup- configure permissions to access the QuickBooks interface
- Install Restaurant Manager POSQBi executable- POSQBi executable short cut installed on the computer where QuickBooks resides, needed to open the form
- Registering POSQBi with QuickBooks- allows the POSQBi to communicate with QuickBooks
- Configuring Access to QuickBooks- grants access rights to QuickBooks and establishes certain communication parameters( i.e. employee data)
RM BackOffice Setup
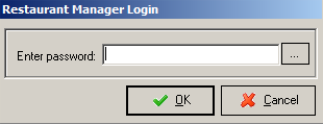
You will be prompted to enter a password the first time you try to open the POSQBi interface. The POSQBi interface is subject to the same password and security level parameters as any other Restaurant Manager program (i.e. Report Module). Therefore, you have to set the security level to access the POSQBi interface in the station configuration (RM BackOffice Module) and configure employees to have access to the POSQBi interface using security levels.
Employee access- It is recommended that you add any account or office manager in the Employee Setup Form in the RM BackOffice Module. Give special consideration when adding employees and assigning security levels. Example, an account should not have to login to the POS prior to accessing the POSQBi interface. To avoid this, you would want to give then a security level when clocked equal to the station configuration security level to access the interface.
Configure Access Security Level- The security level needed to access the POSQBi interface in configured in the RM BackOffice Module using the following steps.
- In the RM BackOffice Module access the station configuration form by clicking on Setup> Station Configuration
- In the Station Configuration Form click on the Admin settings button and enter the administrator password. Do not confuse this password with the standard four digit employee password.
- Click on the “Miscellaneous” branch on the Station Configuration Settings tree and then click on the Interfaces menu heading. This is followed by opening the POSQBI Interface menu heading.
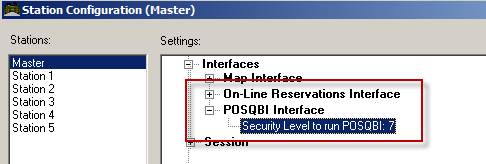
Enter the security level in the Security Level to run POSQBi option. The security level entered in this field should be equal to those employees with restricted access. Example- if managers have a security level of six and you do not want to grant access to the QuickBooks interface set the security to “7”. The security level entered here will have to match the security level assigned to a specific employee in the Employee Setup Form.
Install the POSQBi Executable
The first step in the setup process is to install the POSQBi executable (.exe) file on the computer where QuickBooks resides. This is as simple as placing a short cut to the POSQBi.exe on the computer screen. You will have to map the where the rmwin folder resides on the QuickBooks computer prior to creating the short.

Registering The Interface To QuickBooks
- The next step in the setup process is to register the restaurant Manager interface with QuickBooks. This task is performed within the POSQBi interface. Using the following steps:
- After installation, open the POSQBi interface by clicking the POSQBi shortcut on the desktop. You will be prompted to enter a password. Enter the four digit employee password for employees who have been granted access permission.
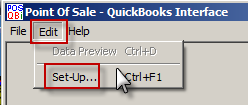
- In the Point of Sale- QuickBooks Interface, click on the Edit menu option on the top of the window and choose the Set-up option.
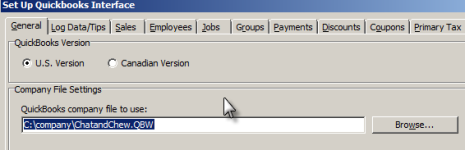
- Under the General Tab, enter the path of where the restaurant’s qbw resides in the “QuickBooks Company File” . The “qbw” file is the store’s company file in QuickBooks. In our example below, the store qbw file is stored in the local c drive: c:\company\chatandchew.qbw
If you are not sure where this file is located, you can open QuickBooks, click on File > Open or restore Company> Open a company file (new window) > Click on [Next], and then use the drop down menu to locate the path of qbw file.

- While under the General Tab configure the following options and then click the [Save Settings]button
- Choose the country version
- Select the Open Company File mode Option
- Click on one of the tabs in the interface to produce the following prompt:
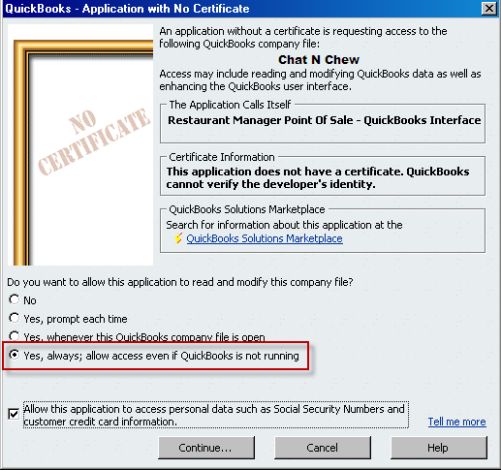
This message is to inform the user that an integrated application is trying to access the QuickBooks company file
- In the QuickBooks Application with No certificate window select the “Yes, always; allow access even if QuickBooks is running” option.
Use the following steps if the following message appears instead of the QuickBooks Application with No Certificate window.
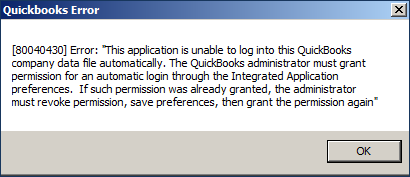
- Exit from the POSQBi Interface
- Open QuickBooks
- Reopen the POSQBi Interface
- Click on Edit and the Setup
- Click on another tab (i.e. LogData/Tips tab)
The QuickBooks Application with No certificate window should appear in a few seconds.
Configure QuickBooks Preferences
There are several options in QuickBooks you need to configure for gaining access to QuickBooks and proper employee data if you wish upload employee timekeeping data from the Restaurant manager POS system. To accomplish this you need to configure these settings on the QuickBooks side. This is accomplished by opening QuickBooks and using the following steps to address:
- Access to the program via Integrated Applications
- Matching the ways names are listed under the Payroll & Employee options
- Configuring Tracking Time options
Note: Make sure that you are running QuickBooks in single-user mode to be able to make these preference changes.
Integrated Applications
For the interface to work efficiently, POSQBi should be given access to the QuickBooks company data file. For this to happen, you need to configure QuickBooks to allow access to the company file any time it is POSQBI interface is executed . Use the following steps in QuickBooks to allow such access:
- In QuickBooks application user interface, click on Edit->Preferences.
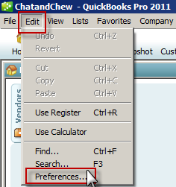
- Click on the Company Preferences tab.
- Click on the Integrated Applications icon on the Preference list (left side of window)
- As the list of applications is displayed, make sure that a check is shown where the application Restaurant Manager Point of Sale – QuickBooks Interface.
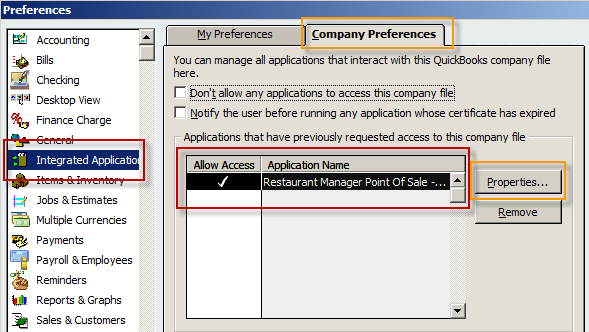
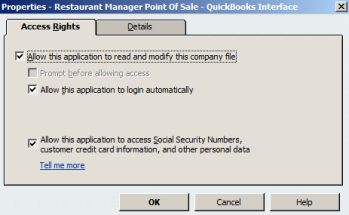
- Once the application is selected, click on the Properties button. Once the dialog is displayed (see image below), select the Access Rights tab. Once the dialog is displayed , do the following:
- Check on Allow this application to access this company file so the interface (POSQBi) would always have access to the open QuickBooks company data file.
- Check on Allow this application to login automatically so the administrator doesn’t have to respond to the prompt when the interfaces accesses data.
- On Login as: selection box, click on the user name want the interface to use (i.e. Admin) when accessing QuickBooks data.
- Check on Allow this application to access Social Security Numbers and other personal data to allow the interface (POSQBi) to access employee personal data including the employee’s Social Security Number (SSN). This step is only necessary if the interface (POSQBi) is to be used to send employee time log data to QuickBooks.
- Click Ok to close the Properties dialog.
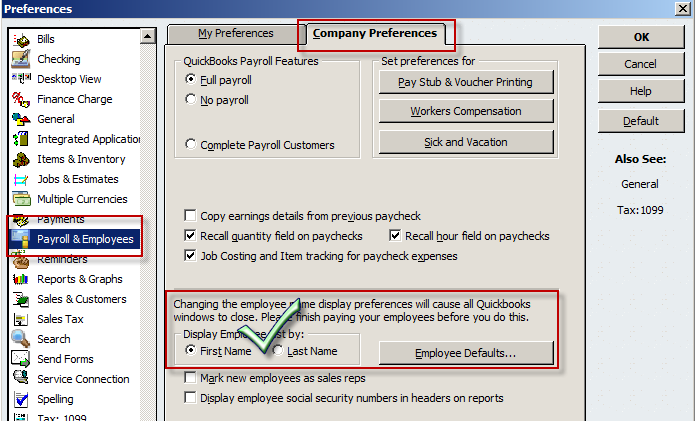
Payroll & Employee Options
The following steps are only necessary if the interface (POSQBi) is to be used to send employee time log data to QuickBooks. In addition, these steps may not be necessary but is provided to make sure that the interface runs properly with the first name first as the typical RMPOS install and/or demo data will be.
- From the Preferences form, click on the Payroll & Employees icon on the Preference List.
- Click on Company Preferences tab.
- On Display Employee List by: select on First Name. The steps 6-8 is not necessary but is provided to make sure that the interface runs properly with the first name first as the typical RMPOS install and/or demo data will be.
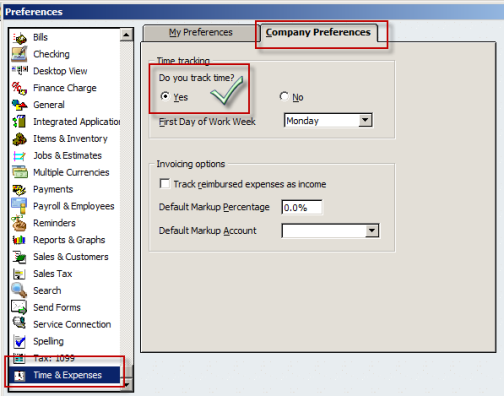
Time Tracking Options
The following steps are only necessary if the interface (POSQBi) is to be used to send employee time log data to QuickBooks. From the Preferences dialog:
- Click on Time Tracking icon.
- Click on the Company Preferences tab.
- On Do you track time, select Yes.
- Then click Ok to close the Preferences dialog.
.