) on any table that requires special attention or where the system discerns that the order is not being processed properly.
(continued from BackOffice Management Functions)
There are a variety of ways to display special messages on the POS touch screens. The system can also be configured to email reports and other alerts to specially authorized cell phones or email accounts. And in systems configured with the Write-On Handheld application, you can also configure the system to send alerts and messages to the Write-On Handheld equipment.
Two areas outside of the Pos where you can send messages and alerts are:
The following features allow you to display special information on the Table Service Status Screen:
) on any table that requires special attention or where the system discerns that the order is not being processed properly.
In the screen shot below the red Alert Icon appears on tables 8 and 20 while the name of VIP customer, Jerry Turner is displayed on table 51. In the upper right there are five messages on the bulletin board.

And an e-mail message has just popped up for the employee, Tom, who is currently logging onto the system:
![]()
In the Delivery POS Module you can configure your system to alert you when orders are not assigned to a driver for delivery within a specified period of time.
The Bulletin Board can be used for a variety of purposes. You can post specials, 86’d menu items, and employee reminders. The In Stock Qty function on the menu setup can even post and remove out of stock items on the bulletin board. You can add a message to the Bulletin Board on the POS by going into RM BackOffice and accessing Activities on the menu bar and then selecting Bulletin Board.

The Bulletin Board is split into three sections:
Message # - The number associated with a message. The list of numbers is sequential and show messages in the order they were entered. The only way to start form 1 again is to delete all messages and start from scratch.
Bulletin Board Message- This is where the message is entered. The maximum amount of characters shown at the POS is 36. The actual amount of characters shown varies on screen display setting. You can overwrite a current message by clicking on the row containing the old message and typing over it.
Ref # - any numbers in this column are generated by the POS when an item is out of stock. The number in this column refers to the PLU number a menu item.
There are three buttons at the bottom of the Bulletin Board form:
Add- You this button to add a new line to add a message. New line will always be added at the bottom of the list.
Delete- You can delete an entire message row by first selecting the row and then hit [Delete].
Clear All- This function erases all messages from the Bulletin Board
OK – Click this button to accept changes and exit the form.
You can add a new message by clicking on the [Add] button and type your message on the new row. You may also type over an existing message just by clicking on the row and typing. This is ideal for daily special that change on a daily basis and you want to keep them in the same position at the POS. Click [OK] and your message will be sent to the POS in just seconds.
If the Bulletin Board is used on a frequent basis, you may want to consider moving it to the tool bar
The both the internal and external E-mail function of Restaurant Manager can be used for a variety of functions. You can send messages regarding meetings, work assignments, and notes of praise. With internal E-mail you can send daily specials with detailed description that the server can print out.
The internal E-mail function of Restaurant Manager should not be confused with e-mail sent over the internet. Both internal and external E-mail's must be sent from the RM BackOffice Module to any employee previously defined on the Employee Setup Form. However, internal e-mail automatically notifies staff that they have e-mail whenever they log on at a POS station. Staff can read internal e-mail at any time using the [E-mail] function button located under the [MISC] functions of the POS Main Status screen. External E-mail is sent
The external e-mail function of Restaurant Manager sends email over the internet to an individual's email account. This requires the employee to have an email account. Employee email account information is entered in the Employee Setup Form. The external email function requires additional setup in the Store Information Form.
The form has three distinct sections:
The form has three buttons on the bottom of the form:
Activities > Send Email

You can access e-mail messages from the Main Status Screen of the POS Module in one of two ways:
- Keep
- Delete
Select the one of the three methods that best suits your needs. If more than one message is waiting, e-mail messages will automatically appear in the sequence they were sent.
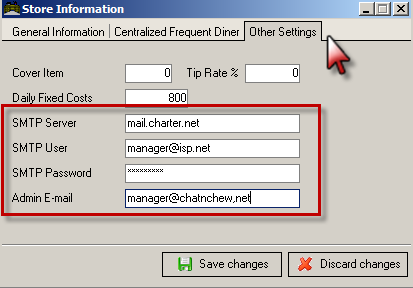
You will need to set up your SMTP information or e-mail account in the RM BackOffice if you are planning on sending alerts or reports via e-mail. Currently, Restaurant Manager external email does not support the use of non-smtp and http (webmail) accounts such as AOL and Hotmail. Most businesses connected to the web via a hosting company (ISP) are usually provided with an SMTP account. You will need the information provided by ISP or email provider for e-mail setup in the RM BackOffice.
The data fields for the SMTP setup are found under Setup > General > Store Info > Other Settings tab. The SMTP information is the same used in setting up any standard e-mail program such as Outlook or Outlook Express. It is important to note the computer running RMAlertd.exe does not need mailing program: Restaurant Manager handles the messaging internally.
RMAlertd (.exe) is an executable application needing to be running at all times on the server (i.e. rmserver) or the computer running the e-mail account application (i.e. smtp account). Only one copy of RMAlertd should be running in the store. RMAlertd.exe” should be added to RMStart.exe as a process at startup.
Note: RMAlertd.exe is the same executable needed for RM Alerts.
The fields we are interested in are at the bottom of the “Other Settings” tab.
Note: some SMTP settings may be case sensitive.
You can test your setting using RMAlertsd.exe > Setup > Send test e-mail.
Restaurant Manager has the capability of monitoring the progress of a table. One method is to measure a configurable time where no items have been added to a table. If no items have been added to a check a warning symbol will appear on the table. Upon seeing this warning, managers or other employees can then take the appropriate steps to guarantee excellent customer service.
Your POS system can also monitor the number of minutes an active order at a table has not been printed or settle. If you know your average turn time, you can configure the amount of time you want the POS system to calculate and then send a warning that will appear on the table. Once again, upon seeing the warning, staff can take the appropriate measure to deal with the situation.
Configuring the time period before a warning should appear at the POS is achieved in the Station Configuration under POS Modes > Table Service POS options. Use the [Search Settings] and type “# Mins”. This process will lead you to the configuration options:
# Mins for no items entered alert – enter the number of minutes you feel is an appropriate time period before the alert is activated. Entering zero will disable the option.
# Mins for printed/not settled alert- enter the number of minutes you feel is an appropriate time period before the alert is activated. Entering zero will disable the option
Depending on the alert, once an employee takes the appropriate action (i.e. add an item or print a check) the alert will disappear from the table.
You may also configure the actual alert. Your system comes with a warning bitmap. However, you can add a custom warning in the form of a bit, place it in the rmwin folder (i.e. C:\rmwin) and use the following configuration setting:
Alert Bitmap- Click on the option to trigger the browse function. Select your image and accept by pressing [Open].
Using the GMA is another alternative to send messages to stations. However, the drawback to this method is that it will take up screen space. By activating the General Message Area, you have also activated the “texting” or “short message sending (SMS)” feature of RMPOS. This feature, being POS time enabled, scans for new messages sent to a station every five (5) seconds.
Messages can be sent from any station to one or all stations while the messages that could be received could come from any station.
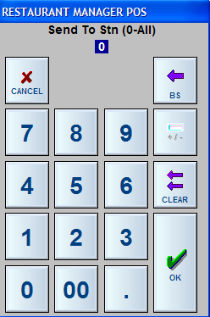
Sending text messages is very simple to any or all stations. Just double-click (or double touch) anywhere on the General Message area and the POS keyboard appears (see screen below). Compose your message and then click/touch “Ok”, specify the station number where the message is to be sent to by clicking/touching the POS numeric keypad, click/touch “Ok” to send the message.
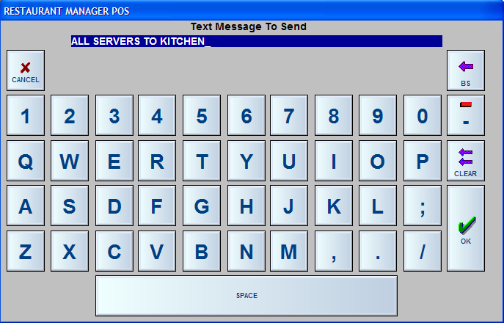
To broadcast a message to all stations, just send to station 0 (see screen below) and the message will be sent to all the stations including the station where the message originated.
More on GMA configuration can be found under the topic: General Message Area
The POS station allows sending alerts directly to a handheld unit. Alerts are useful if you need to notify the on-duty manager of something, or if you need to call him to authorize a password secured function. There are two ways to initiate an alert – you can select the [Send Alert] function button from the [MISC] options of the main POS screen, or you can press the [Get Approval] button on the password entry dialog (shown below).

The “Get Approval” button only appears if you are using 1 or more handheld units in your establishment.
After selecting the “Send Alert” option, the POS program will display a list of active handhelds and the person using them.

After selecting the person you wish to alert, ASI displays a selection of alert messages:

You can choose one of the pre-defined messages, or choose “General Message” to type in a new one using a pop-up typewriter.
Each POS station is capable of intercepting text messages from an outside source. The POS program (RMPOS.exe) scans for text messages every 10 seconds or so, and if one is found, it is displayed on screen. To send a message to a POS station, you must create a text file named POSMSG. <nnn>, where <nnn> corresponds to the POS station number. For example, if you want to display a message on POS station 1, you must create a text file called POSMSG.001. When station 1 sees that file, it will display its contents and wait for the operator to press OK to acknowledge it.

You will want to create a notepad text document in the working RMWIN folder. Where this is not necessary, it will make it easier to send the document because the file path will be saved. For our example we will name the document posmsg.001 (for station one). You can create a separate txt document for each station number if needed. For convenient access, you may want to put a shortcut to the document on the desk top.

Open up the text document and type in the desired message:

Send the message to the POS station by going to File > Save as > with the notepad editor and type parenthesis around the file name. The message will not send as a text file: the parentheses will block an extension from being added. You may repeat the process to send to different stations by changing the numbers (001) at the end of the file name.

Restaurant Manager has created a system where alerts can be automatically generated from the POS and sent to a variety of sources including personal e-mail addresses, cell phones, and WO handheld units. This functionality allows you to manage your business while off property.
If using e-mail, addresses and passwords must be configured in the Store Information form. Pre-configured messages, recipients, and triggers are programmed in RMMsgDef.exe.
Detailed setup information can be found under separate documentation: Alerts User Guide