Most Restaurant Manager POS Systems are configured to use the [SEND] button on the POS Order Entry Screen for communicating with a variety of prep area devices, including 40 column printers and kitchen video or KDS. In Quickservice operations you may even use a portion of the POS touch screen to display prep area output so that staff working alongside cashiers may continue to view an order even after the cashier has settled it and moved on to another customer.
The following parameters can determine which prep area receives output about a given order:
Prep Area Output always includes the menu items and modifiers on the order as well as the order number and information on the employee that sent the order. You can use the Printer Templates Editor to include much more information in the prep area output. You can also use the Printer Templates Editor in tandem with special Prep Area Device settings to determine the best way to organize the output before it is sent.
When configuring your system with prep area devices it is necessary to run a special utility called RMSpool. In addition, you should use the following setup forms to configure the prep area devices and control prep area output:
Any one POS Workstation can send prep area output to eight different prep area devices. Each POS Workstation could, theoretically send this output to different prep area devices. This configuration is most common in multi-floor establishments with separate dining rooms and kitchens on each floor. In this instance, you must be sure the prep printers connected to each POS station correspond to one another. In other words, if Printer #3 in the downstairs kitchen is in the salad area, then Printer #3 in the upstairs kitchen must be in the salad area, too.
Any single menu item may be sent to up to four different prep areas. Use the Menu Setup Form to define the prep areas appropriate to each menu item.
You can also configure some prep area devices to receive output on all the items on an order when only one of the items on the order was specifically directed to that prep area device. In other words you can configure prep area output to include items that are not themselves directly linked to a give prep area.
Linking Modifiers to Prep Areas
Most modifiers are configured to follow the menu items they modify to the prep areas defined for the menu item, itself. However, you may configure some modifier items to print independently of menu items or you may even use the modifier to steer a menu item to a particular prep area.
Occasionally there may be a need to rout prep ticket to different prep area printers based on time or location. Example, your restaurant may have two kitchen areas making all items off the menu based on a certain location in the restaurant. In this example you may want to use Prep Area filtering based on table numbers if you want your system to route orders automatically. You may also use "Steering" modifiers to prompt for a prep area on the fly if you no not want the system to automatically route orders.
You may use Prep Area Filtering to make the prep area a variable of the Revenue Center, the time of day or the table which placed the order. This is useful if you send same menu items to different prep areas from different stations. An example: you have an upstairs and a downstairs bar and want to route orders based on revenue center per station thus eliminating the need to setup different menu items. You can also use time or tables to achieve the same results as revenue centers.
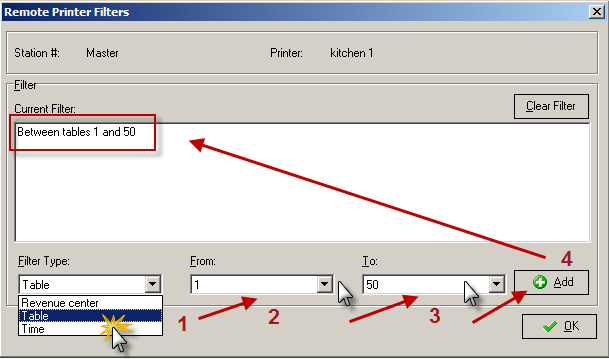
Once the prep area printers have been configured and added to the menu items effected, you will need to go the Setup > Station Configuration. On the Master station go down to Devices > Prep Area Devices select the printer you wish to affect and expand the menu tree by clicking on the (+). Click on the on the ‘Enable Prep Printer Filtering”. Next select the “Remote Filter Filters” to access the setup form.
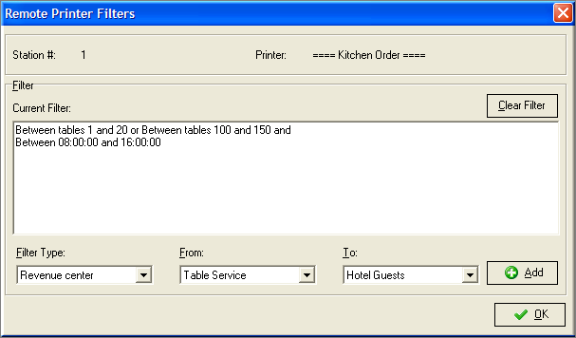
The Filter Type will always default to “Revenue Center”. Click on the down arrow next to the field and select from among the three options:
The filter options for the “From:/To:” fields will change depending on the Filter Type selected.
Restaurant Manager allows for the possibility of a range filters and a combined use of filter types. In the example above, items sent to the kitchen printer from station 1 will only be accepted between table 1-20 and 100-150. In addition, orders that printer will only be accepted form 8:00 AM and 4:00 PM.
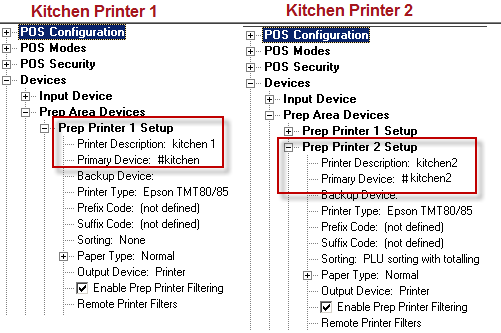
Lets look at a scenario where we have two kitchen and two bar prep area printers. In our example we want both food and beverage items to send prep tickets to different prep area printers based on tables. First, you need to create separate four prep area printers in station configuration (wording optional):
Below is an illustration where we have set up two kitchen printers. In our example, you would need to create two bar printers as well using Prep Printers Setup # and 4.
After setting up all the necessary basic prep printer options as needed (primary device, printer type, etc.) continue to the "Remote Printer Filter" option. The filters used below would be used for prep printers associated with 1-50 (i.e. kitchen 1 and bar prep 1).
You need to use different table number filters for order sent from tables 51 and above for both the kitchen 2 and bar prep 2 prep printers.
Note: You will need to copy these filters for every applicable station.
After defining the prep area printer in the Station Configuration, add the printers to all menu items affected. In our example we would adjust all food items by adding both kitchen 1 and kitchen 2 under the prep area filters in the Menu Item Setup form. For all bar items add printers bar prep 1 and 2 to all bar items under the prep area filters in the Menu Item Setup form. These steps can be expedited using the "Modify items belonging to this group" option.
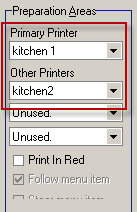
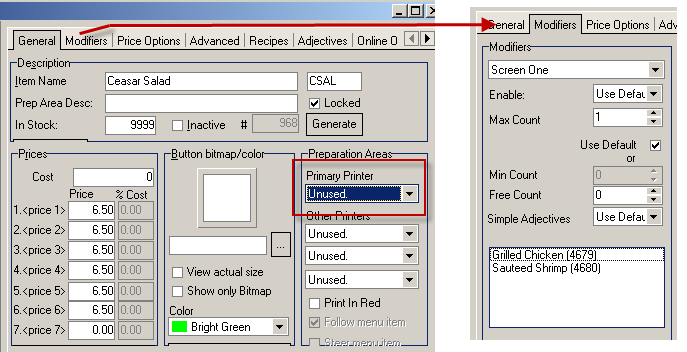
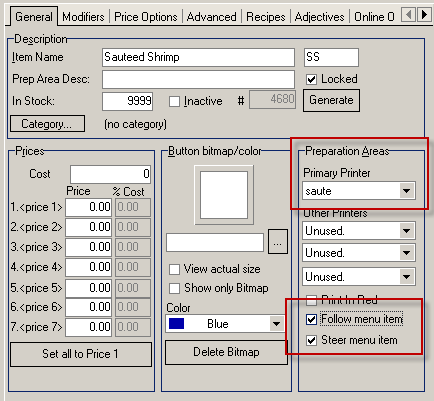
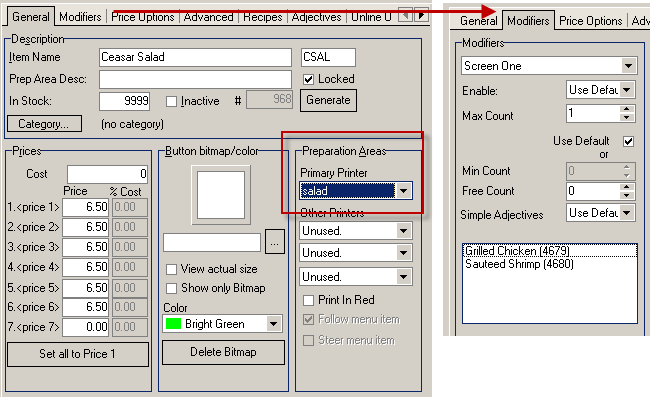
For some menu items, the preparation area may depend on the modifier(s) chosen. For example, a Caesar Salad is prepared at either the grill station, or the saute station depending on if it is made with grilled chicken or sauteed shrimp. These may be in different areas of the restaurant and may have a different remote printer. In this example, you can use the modifiers “Grilled Chicken” and “Sauteed Shrimp” to steer the menu item to the appropriate remote preparation printer.
To create a “steering” modifier, define the modifier as usual, and check the option “Steer Menu Item” in the modifier set up form. If this option is checked, then the remote printers that are chosen for the modifier are ADDED to the remote printer(s) of the menu item.
In the example of the Caesar Salad, you would not designate any remote printers for the Caesar.
For the modifiers “Grilled Chicken” and “Sauteed Shrimp” you would check the option “Steer Menu Item” and designate them to go to the Grill and Saute prep printers respectively. Enabling the option "Follow Menu Item" will make the selected modifier appear on the prep ticket directly under the menu item. You may choose to disable the option if you are simply steering a menu item.
Note that the option to “Steer Menu Items” is additive; that is, when the POS system encounters a modifier that steers the menu item, it will send the item to the prep area defined by the modifier IN ADDITION TO sending it to the usual place. So in our example we want the Caesar Salad to go to the Salad prep printer were the salad will be assembled and the Grill and Saute prep areas will only prepare the chicken or shrimp. In this scenario we would have the main menu item go to the Salad printer in addition to the modifiers steering to the appropriate prep area.
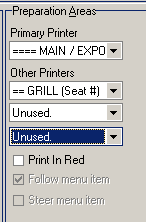
Restaurant Manager provides the option to print items from other preparation printers. This feature is especially useful for coordinating food preparation. It allows the cook to see not just what he needs to prepare, but things that are being prepared at other stations throughout the kitchen.
To configure this option, go to RM BackOffice >Setup >Station Configuration >”Also print items from prep area”. For each prep printer, select the other printers that you want printed
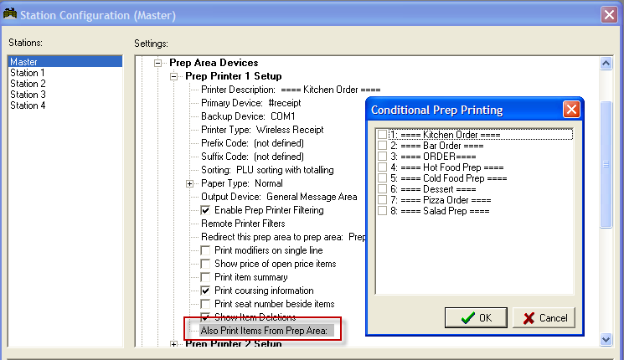
In the sample screen shot above, the “Cold Food Prep” printer is configured to also print items from the “Kitchen” printer. If there are no items for the “Kitchen,” then nothing is printed, but if there are items, then it will print those items in addition to the items going to the “Kitchen.”
These settings control general behavior of sending menu items to prep printers. Specific Prep printers setting are controlled in the Station Configuration under Devices > prep Area Devices.
Note: this option requires the inventory control module.
Though the “optional” send does give more flexibility, it suffers from several drawbacks. First, it is possible for servers to forget to send orders to the kitchen resulting in extra delays before the customer gets their food. Secondly, it is possible for employees to print the check or access the settlement screen without sending items. After collecting money from the customer, the “un-sent” items can be deleted without manager approval and the employee can pocket the extra money. By making the “Send” operation mandatory, you can avoid both these scenarios. To enforce mandatory “Send”, check this box
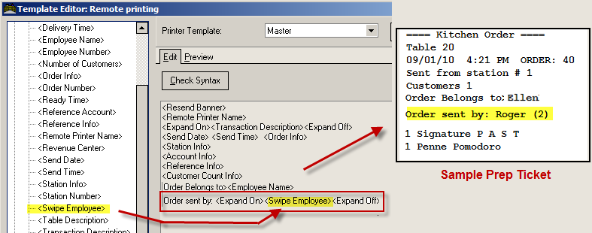
Some establishments like to know on a prep ticket which employee placed an order. The employee placing the order may be different than the employee who owns the table in a scenario where employees share all the tables/tabs in the restaurant, so any waiter or bartender can add items to any order. In the past versions of RM, only the employee name assigned to the order (employee who first opened the order) printed on the prep ticket. RM has added the ability to print the employees name on the prep ticket of who placed the order. This is now accomplished using the keyword “<swipe employee>” in the Remote Printer Template Editor.
Note: Enhanced Password must be enabled to use this function
The swipe employee keyword can be found under the Standard Keyword list found in the Remote Template Editor (RM BackOffice Module > Setup > Prep Printing > Printer Templates Editor). Next, select the Printer Template you wish to add the swipe employee keyword to. Place the keyword in the Edit pane by placing the cursor in the location you wish the keyword to appear on the prep ticket and double click on the <Swipe Employee> option from the Standard Keywords list on the left. Click on the "SAVE" button when finished. If necessary, repeat this step for each printer template.
You may wish to consider using additional wording in the Remote Printer Template Editor to clarify then difference between the employee who sent the order and the employee who owns the check. You can do this by manually typing wording in front of the <employee swipe> keyword parameter. Examples might be:
Other keywords such as Expand On/Off and (or) Red On/Off should be considered to further accentuate the difference.
Your restaurant may wish to print the price of all non-zero priced items on the ticket. Restaurants implementing this functionality usually do so for price verification due to theft concerns. Restaurant Manager allows printing the price of all non zero priced items of the prep ticket when you do the following:
The outcome on the ticket will appear similar to below:
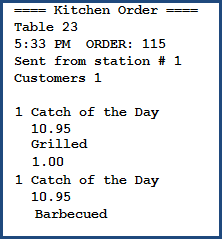
Observe in the picture above that zero items such as "barbecued" will not print a price.
Note: If you order two items with the same modifiers, but the modifier prices are different, they will still be sorted/totaled on the remote printer. Same modifier pricing may differ due to price adjust, price level shift, or open pricing. Here's an example to clarify. Let's say your order is:
|
1 T-Bone |
$9.99 |
|
$0.50 |
|
1 T-Bone |
$9.99 |
|
$0.25 |
Assuming you have sorting enabled items will appear on the remote printer ticket as follows:
2 T-Bone
$9.99
w/ Baked potato
$0.50
This is a known issue but will not occur when the price of the base item is different for whatever reason. When the base item price is different, they should show up separately on the remote printer.
The Remote Printer Template Editor allows you to customize the prep area output with all sorts of data related to a given order. For instance you may (or may not) wish to include the Revenue Center or the customer name in the prep area output. The configuration options on this Setup Form work in tandem with additional prep area device configuration options on the Station Configuration Setup Form to allow you to fully customize prep area output.
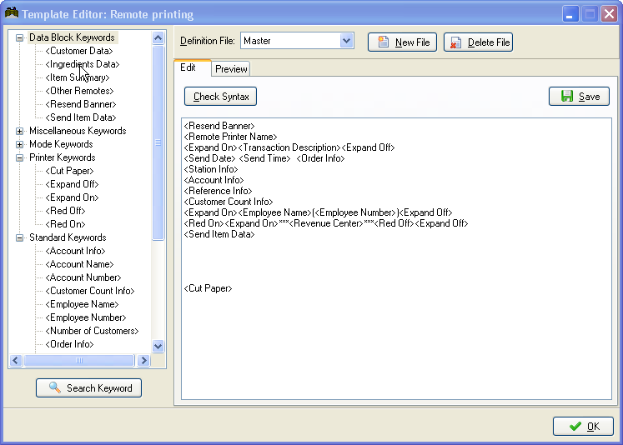
The setup form above identifies various data fields with “keywords” that can be used to insert each type of data into a template for prep area output. Keywords are special symbols that would get expanded or translated by the Keyword Expansion Engine into the value the keyword represents. .By clicking on any of the keywords listed on the left side of the form you may insert the keyword into the prep area output template.
You may also type directly on the body of this setup form to insert text “as is” into the template. On the following example,
Table <Table Description>
The above contains both the text Table as well as the keyword <Table Description>. In this case, this may be converted into prep area output that reads
“Table A-1”
The keywords are grouped into five (5) types, namely: standard, printer, data block, mode dependent block and miscellaneous keywords.
Keywords of this group are those that would most likely be included in the definition file and the values that these keywords get expanded to always take into consideration the state of the items currently being sent. Like, for different groups of item sent, the keyword <Send Time> would naturally have different value.
These are printer related keywords that gets expanded into printer command codes, usually, most of these codes are not printable. These printer keywords are configurable via the BackOffice “Printer Codes” under Setup >Station Configuration >Devices.
The keywords <Expand On> and <Expand Off> that commands the printer to turn on and off expanded printing belongs to this group.
Keywords of this group expand not only to a single value but to a whole block of text or data and may add single or multiple lines to the remote printer output.
Take for example the following data block keyword
<Resend Banner>
This gets expanded to:
=======================================
================ RESEND ===============
================ RESEND ===============
================ RESEND ===============
=======================================
On some keywords, like <Sent Item Data>, it’s behavior on totaling, modifiers, coursing, etc. is still going to be controlled by the station configuration settings.
These keywords are not list on the Keyword list but still can be used. These are special and advanced keywords and should always be used in pairs that doesn’t expand to anything but controls whether or not the keywords that are defined inside the keyword pair are to be expanded or not.
Take for example the following definition line entries
<If Table>
Table Service: <Table Description>
</If Table>
If in table mode, will get expanded into
Table Service: Rnd-4
But will not expand to anything if not on table mode.
These keywords are useful if you want to add comments and embedded keyword codes.
<# bold printing capability sample>
<27><33><8>Bold: ON
<27><33><0>Bold: OFF
Would get expanded into
Bold: ON
Bold: OFF
The 1st line, it being a comment “<#>” keyword, is ignored but the 2nd and 3rd lines are expanded properly, showing both texts in bold and normal print, respectively.
Please take note that some of the printer codes need to be printed does not take effect unless they are placed as the first codes for a line.
For a detailed description of this powerful feature as well as a list of all the keywords supported by the Keyword Expansion Engine, please download and read “Tech Notes for Remote Printing Using Template Based Definition File”.
The following keywords have been added to the remote printer template and can be readily used for displaying to screen, to printer and for the General Message Area:
<Check Total Info> - expands to the current check total text
<Check Total Amount> - expands to the current check total
For more information on setting up the remote printer as well as the list of other keywords, refer to “Remote Printer Template SetUp” documentation in the Tech Notes section of the reseller area.
While most of the information you might wish to include in the prep area output can be configured on the Printer Template Editor, there is some data that must be configured elsewhere. If you wish to include any of the following data in the prep area output, use the [Search Settings] button on the Station Configuration Setup Form to find and activate the following settings:
Show price of open price items- Use this option to include the open price of an item in a prep-area output for items that are configured with Open Pricing.
Print item summary- Activate this setting if you wish to include a summary at the top of the prep area output which summarizes menu items without modifiers.
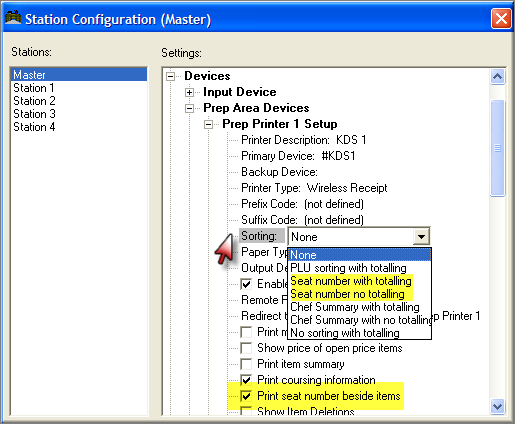
Print coursing information- Activate this setting if you have defined courses on the Menu Course Type Setup Form and wish to print coursing information on the prep area output. Coursing output is also controlled by the Sorting options described below.
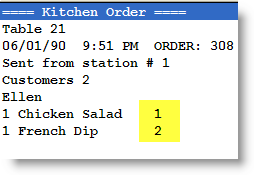
Print seat number beside items- Activate this setting if you wish to print the seat number alongside each item that is sent to the prep area devices. If you activate this setting it is recommended that you also enable the Advanced Seat Management Feature.
Show Item Deletions- This option controls whether items already sent, then deleted, will show on the prep area ticket.
Prep Area Output can be sorted differently depending on the prep area device as well as the station from which the output is sent. The sorting options below can work in tandem with coursing information if you have enabled coursing on your system. You can define the ideal sorting parameters under the Prep Area Device section of the Station Configuration Setup Form:
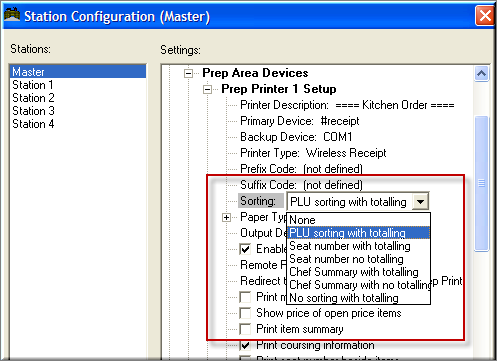
The Station Configuration Form offers the following options for sorting prep area output:
Coursing is a feature that allows you to sort prep area output by courses such as “Appetizers”, “Entrees” and “Desserts”, etc. It is a feature most commonly used in Table Service Restaurants. This function can also be used to organize item as tickets as to where they are made. Instead of using coursing terminology (e.g. Entree) you can use word to describe prep areas (i.e. salad station, saute, broiler, etc.).
Coursing does not override but, rather, complements other sorting options. When coursing is enabled, items are first grouped by course with a separator line between courses. Other sorting options are applied to the items in each course.

To configure your system to implement coursing, you must:
![]()
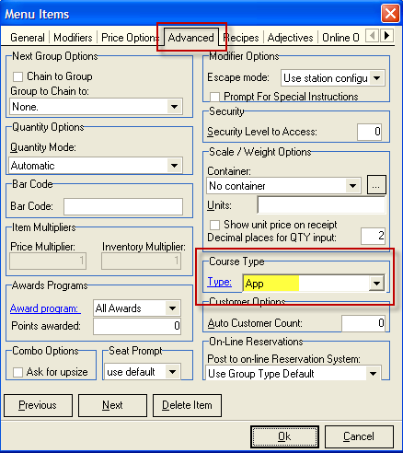
When defining course names, pay attention to the order in which they are entered. This determines the order in which courses are printed on remotes. After defining all course types, you must assign a course type to each menu item. The option for choosing a Course Type is located under the “Advanced” tab in Menu Setup.
Manual Course changes allow changing the default course of an item. For example, if someone orders a Caesar Salad and wants it served as an entree rather than an appetizer. Manual course changes are done from the Order Entry screen of the POS. To make a manual course change, first tag the items of interest, and then choose the “Change Course” option under MISC. You may need to scroll the “view check” area to the right to see the new course designator.

If coursing is used extensively in your operation, you can reconfigure the Order Detail Area of the Order Entry Screen so coursing information is always visible.

Many Chinese restaurants have chefs that do not read or speak English. For these establishments, it is necessary to print the kitchen orders in Chinese. Usually, the waiters and waitress are fluent in English, therefore the POS program can display English menu items, but they must be converted to Chinese when printed on the kitchen printer.
Because Chinese has no alphabet and there are literally tens of thousands of unique characters, the Chinese language cannot be represented using a single byte (8 bits), but instead a 2 byte (16 bit) representation is required. There are a number of standards for representing Chinese characters. Some of the more common are GB, which is most popular in mainland china, Big 5 which is the standard used throughout Taiwan and Hong Kong and Unicode which is the newer Windows standard. Though Restaurant Manager is not specifically tied to any of these standards, ASI has tested and validated the use of the Big 5 character set.
In order to print Chinese characters on kitchen printers, two issues must be addressed. First, you must have a means of entering the Chinese characters into the menu setup program in Restaurant Manager back office. Secondly, the printer must support the Chinese character set. These issues are discussed below.
Note: Chinese remote printer is an optional module of Restaurant Manager. In order to implement Chinese in the kitchen, you must purchase the foreign language remote printer option.
There are a number of software packages that support the Big 5 character set. The recommended software package is Asian Suite 2000, which is manufactured by Unionway Corp. Though Asian Suite is capable of GB as well as Unicode, you must use the Big 5 character set to be compatible with the SP2000 printer discussed below.
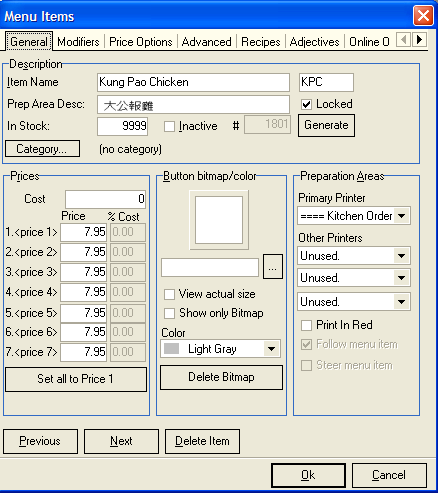
Menu items are entered as usual; however, Chinese characters are entered in the “Prep Area Description” field. The Point of Sale will display the English “Item Name” which will also be printed on the guest check, but the Chinese description is what is sent to the remote printers.
Obviously, you must be proficient with the Chinese language to use any Chinese software package. If your end-user is proficient with Chinese word processors they can enter the Chinese descriptions themselves. They can purchase the Asian Suite 2000 software from Unionway at http://www.unionway.com. As of March 10, 2009, the cost for the single user version is $139. In order to enter Chinese characters, you must purchase the “Foreign Language Remote Printer” option.
If you have difficulty viewing Chinese characters on screen, try clicking on another edit field, then back to the “Prep Area Desc “field to refresh the display. The cause of this problem is not known, but may be operating system dependent (seems to be a problem on Win 2000 and Win NT, but not Win 98 or Win ME).
Alternatively, ASI provides a menu translation service. The service is offered at an hourly rate of $120 with a $200 minimum charge. Typical Chinese menus can be translated in 2-3 hours depending on complexity. To use ASI’s translation service, please enter all menu items, prices, etc. in English and provide ASI with a “packdata” of the system. Also include a printed menu with BOTH English and Chinese descriptions of the items. If this is not available, then you can print out the menu from RM BackOffice and hand write the Chinese descriptions beside each item. Make sure the Chinese descriptions are clearly legible, as it will increase the time (and fee) for completing the translation if items are not legible.
Because of the sheer number of Chinese characters, it is impossible to guarantee that every character is available both in the Asian Suite software and in the printer. However, a large majority of characters (99% or more) are available. For those that are not available, alternate characters can be substituted. If you use ASI’s translation service, ASI will test each character to make sure it is supported by the printer.
The SP2000 printer made by Star Micronics is capable of printing the most common Chinese characters using the Big 5 character set. This is an economical dot matrix printer with 2 color capability and is available with an optional paper cutter. There may be an availability issue with the SP2000. Resellers have reported that the SP2000 has been replaced by the SP500. Though ASI has not tested this printer in-house, field tests indicate that the printer is compatible with RM and the Big 5 character set; however it requires different utilities to upload the Big 5 character set. The utilities to flash this printer can be downloaded from:
http://www.actionsystems.com/downloads/sp500.zip
The printer codes for the SP2000 are the same as the Star SP300/312, and DP8340 with the exception of the expanded print codes. The normal code is 14 for expanded ON and 20 for expanded OFF. For printing Chinese, the expanded ON print code should be changed to:
27 120 0 14
The Expanded OFF code should be changed to:
27 120 1 20
Notes:
27 120 0 turns on double height Chinese
27 120 1 turns off double height Chinese
When shipped from the factory, the printer is NOT configured for Chinese characters. In order to prepare the printer for Chinese printing, you must do two things. First upload the Chinese character set into the printer’s flash ROM, and then set the Memory Switch to enable Chinese printing. Both procedures are described below and only need to be done once. The information is stored in non-volatile memory so the printer will retain the Chinese characters even if powered off. In order to perform these procedures, you will need several utilities which can be downloaded from the following URL:http://www.actionsystems.com/downloads/sp2000.zip
Execute the Memset.exe utility (this DOS utility was written by Star Micronics and can be downloaded from Patches and utilities)
You can configure Restaurant Manager with label printers in the prep areas that print each item on separate on sticky labels which can be adhered to pizza boxes, or to sandwich packaging. Labels can be printed on either an 80 column tractor feed printer, or a 40 column printer. In either case, you will need special paper with pre-gummed, peel off labels.
When configured for label printing Restaurant Manager will print a header label and one item per label. For example, if an order has 3 items, Restaurant Manager will print 4 labels - a header label and one label for each item. Each label can include customer information if desired (i.e., name, address, phone #, etc.).
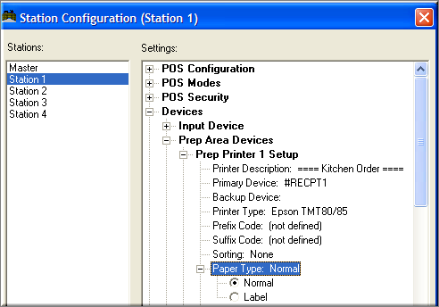
To configure a remote printer for labels instead of the normal kitchen format, go to the Station Configuration Setup Form and search for “Paper Type” and select the “Label” configuration. In the screen shot below Prep Printer 1 is configured to print each item on a separate label.
You can format each label using the Label Format Setup Form:
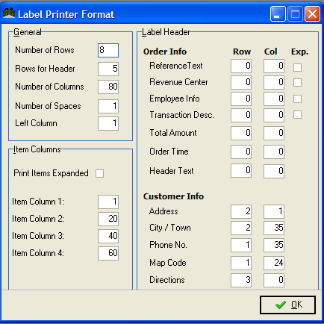
These parameters determine the size of each label and the position of the text within each label. Restaurant Manager defines locations in terms of rows and columns. The text may bleed into (or completely obscure) another piece of text if you use the same row and column locations for different information. The parameters in the dialog are divided into distinct groups. Below is a description of what and how these parameters are used.
The various fields in this section allow you to determine where on the label header the specified information will print. Remember the total number of rows allowed in the header is defined in the Label Format section described above.
The Crystal Mind had developed an interface for label printing. Click here to download:
Note: This programmed is not support by ASI.
The General Message Area or GMA is a new feature that would allow your Restaurant Manager system to display anything on the right hand side of the screen and it will persist to all POS modes, order entry, settlement and pizza screens.
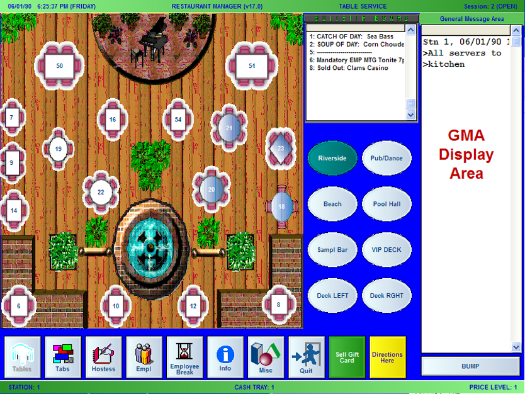
This area is composed of a text display area and a “BUMP” button. Bumping is a term used to delete or “kick-out” the top message of the display. As designed, this works in first-in, first-out (FIFO) scheme, that is, the first message(s) displayed will be the first to be “bumped”.
Self-sent messages by send or text will be displayed immediately while the messages that are sent from other stations or applications are scanned and displayed every ten (10) seconds.
The settings for GMA can be found under the General Message Area under POS Configurations.
Setting the value of this parameter to 0 disables it. Anything above it but not more than fifty percent (50%) will be considered the POS screen area percentage it will occupy. This value is set to default at 0, while the recommended screen value when enabled is 20%. You may have to try different values for the screen resolution so that the station does not occupy too much of the screen space.
When this option is unchecked, whenever a new message is displayed, the GMA automatically bumps the old messages. This setting is also termed as “Single (Message) Mode”.
For safety purposes, this option is checked as default. However, if and when the user finds confirming deletions to be too much work, un-checking this option suppresses this confirmation dialog.
Activating the General Message Area to display the sent item is just like setting up a prep printer. And since it can be send-activated, it also means that all the sorting options of send and other properties are applicable.
In the RM BackOffice, go to Setup >Station Configuration >Devices >Prep. Printers, select the prep printer that would be assigned for the General Message Area. Once selected, change the following options (see screen below):
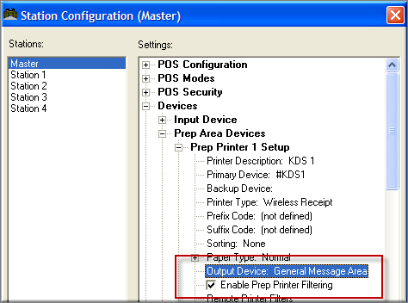
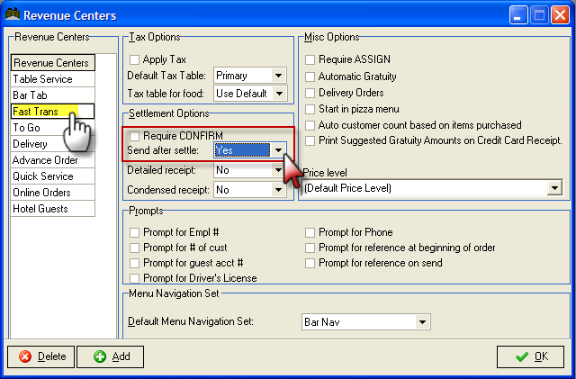
If you wish to send remote printer output to the GMA on “Fast” transactions, you must configure the “Fast” revenue center to send items after settlement. Follow these steps (see screen below):
Open the RM BackOffice
By activating the General Message Area, you have also activated the “texting” or “short message sending (SMS)” feature of RMPOS. This feature, being POS time enabled, scans for new messages sent to a station every five (5) seconds.
Messages could be sent from any station to one or all stations while the messages that could be received could come from any station.
Though new messages are being scanned every five (5) seconds, there may be a need to perform a quick message scan. By clicking/touching anywhere on the General Message Area, an immediate quick message scan is being made.
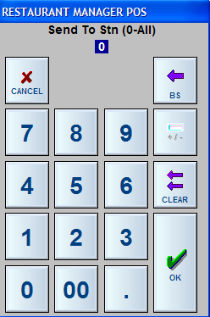
Sending text messages is very simple to any or all stations. Just double-click (or double touch) anywhere on the General Message area and the POS keyboard appears (see screen below). Compose your message and then click/touch “Ok”, specify the station number where the message is to be sent to by clicking/touching the POS numeric keypad, click/touch “Ok” to send the message.
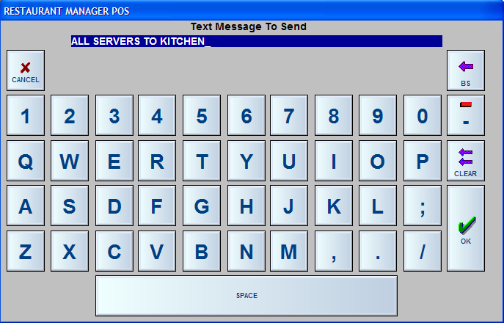
To broadcast a message to all stations, just send to station 0 (see screen below) and the message will be sent to all the stations including the station where the message originated.
You can configure your system to use a standard touch screen as a prep area display by selecting the “RM Display” option on the Prep Area Devices section of the Station
This configuration adds two [Seat] buttons to the Order Entry Screen just above the Order Detail Area:
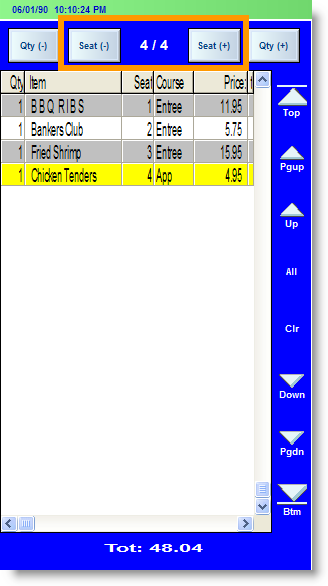
The gray area in between the [SEAT] buttons shows the active seat number. In the screen shot above the next item added to the order will be assigned to Seat #4, which is one of a total of four seats available at the table.
To advance from one seat number to the next you simply touch the [Seat +] button. When using Advanced Seat Management you must enable the Enter Numeric Customer Count setting on the Station Configuration Setup Form. It is recommended that you configure the Order Detail area with a column that shows the seat number of each item. It is also recommended that you configure the prep area output to include seat numbers.
NOTE: If you activate this feature, you must also activate the Prompt for Cust Count.
When Advanced Seat Management is enabled, the maximum allowable number of seats varies depending on the POS module. For Tables mode, the maximum allowable seat number is the larger of the customer count and the table capacity. For example, if there are 2 customers at a table with capacity 4, then the seat number is allowed to range from 1 to 4. If there are 6 customers at the same table, then the seat number may go from 1 through 6.
In Tabs mode, valid seat numbers range from 1 to the customer count; if the customer count is 1, then 1 is the only valid seat #.
For Deliveries mode if the customer count is 1 you may choose any seat from 1 to 99. If the customer count is greater than 1, valid seat numbers range from 1 to the customer count. For example, if the customer count is 4, then you are allowed to choose seat numbers 1,2,3,4.
Seat numbers do not apply on fast transactions. As an alternative to Advanced Seat Management you can configure your system to Prompt for Seat # on the Fly.
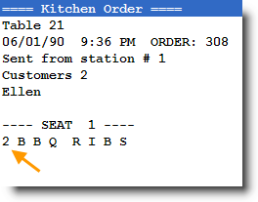
Table Service operations often send seat numbers to prep areas so runners know which customer ordered which menu items. Delivery and Quickservice operations sometimes use seat numbers so they can sub-total checks by seat number for large groups where customers wish to pay separately.
Restaurant Manager allows for three methods to place seat numbers on the prep area ticket.

All three methods can be configured differently on separate prep printers. In the RM BackOffice, go to Setup > Station Configuration to configure these settings. Select a station form the Station List and then go to Devices > Prep Area Devices and select the Prep Printer you want to effect the changes.
From the POS Module you can manually assign each item on an order to a specific seat at the table. You may also configure your system to prompt for a seat number on just food or beverage items or on every item. Or you may choose to enable the Advanced Seat Management feature (below).
As an alternative to Advanced Seat Management you can configure your system to “Prompt for Seat # on the Fly”. Check this box to configure Restaurant Manager to prompt for the seat number after each item. When this option is enabled, the POS program will ask you to choose a seat number for each item ordered depending which configuration method is used. It does this by displaying a list of seats, and requiring you to select a seat for each item. The list of seats is limited to the customer count on the check. So if there are three customers, Restaurant Manager will display 3 seats to choose from. If the customer count is 1, then the seat selections are not displayed and the seat number is automatically set to 1. If the customer count exceeds 99, RM will display 99 seats to choose from.
Restaurant Manager users can configure Seat Prompting for varying purposes. Where seat prompting can expedite splitting checks, its main purpose is for establishments that incorporate table runners. RMPOS can handle seat prompting using one of three methods.
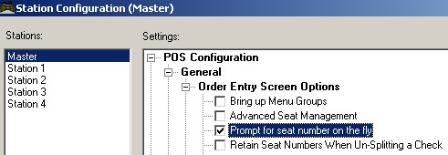
The first option utilizes a system wide function found in the station configuration. This option will have seat prompting on all menu items. To enable this option, go into Set UP, Station Configuration in the BACKOFFICE. Under POS Configuration > General> Order Entry Screen Options, check the option for [Prompt for seat number on the fly].
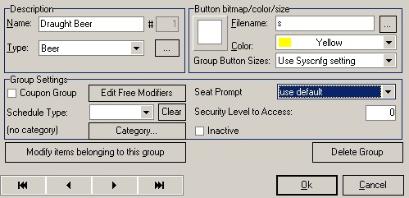
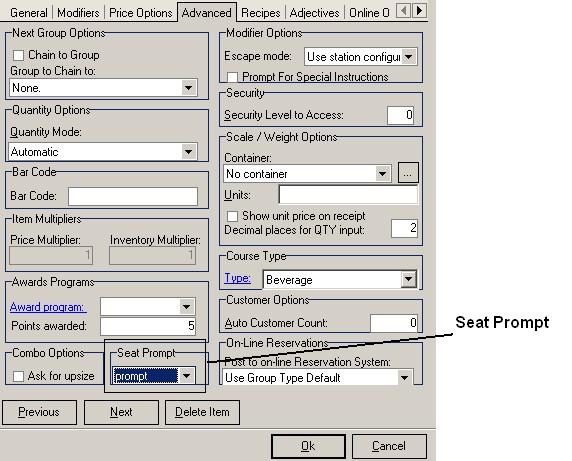
The Menu Group Option will call for seat prompting on the group level. All items within a group will call for the seat prompt at the POS when enabling this function. This function proves most valuable in a scenario where you want food items prompted for seat assignment but not beverage items. Enter the [Menu Set-Up] to enable this function. Go to the [Seat Prompt] option in [Group Set-Up]and select the prompt option using the drop down menu:
Prompting for seats can be micro-managed at the item level. Enabled items within a group will call for the seat prompt at the POS when enabling this function. In [Menu Set-Up], select the menu item and go to the [Advanced Tab]. Go to the [Seat Prompt] Option at the bottom left corner of the [Advanced Tab]. Choose the prompt option using the drop down menu:
Restaurant Manger posses to functions allowing the user to select a future time to have the order send to the prep printer automatically. The Delay Send feature, used primarily with the Delivery/Quick Service Module allows the end user to enter in a pre-determined time up to twenty three hours in advance. The Timed Send function is used principally by full service environments because the time allotments are typically programmed in minute increments.
Both functions place responsibility on the order taker to calculate the time difference between when the order should be sent and when it needs to be ready. In other words, the order taker should have a working knowledge of make times. If this is not possible, you may want to consider using Ready Time.
Delayed send is an option that allows the user to specify a future time within the same day to send an order to a prep printer. Delayed Send is typically used in conjunction with the Delivery Module. Restaurant Manager requires the running of Delay Send Manager (DSEND.EXE) on the computer where the print spooler controlling the remote printer is located. You will want to program this executable in RMStart if you opt to use Delay Send.
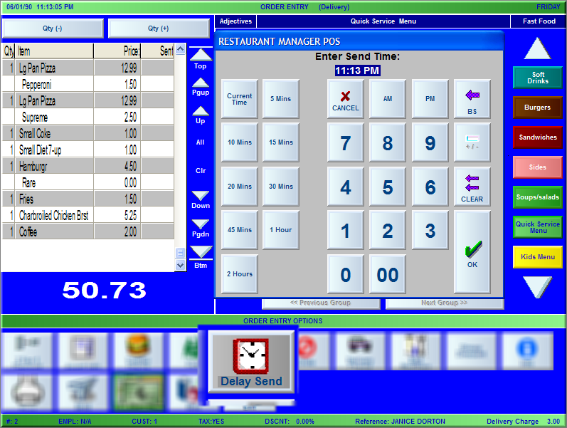
The Delay Send is a very intuitive process at the POS. Once an order has been completed and displayed on the Order Detail area, find and select the Delay Send function button. This button should be moved to the order entry screen, if not already, using the POS Function Button Layout Form. Pressing the Delay Send button will trigger a keypad prompt. It is this prompt that you can enter in the future time. The time entered in the display will always default to the current time. There are two methods to enter a time:
The pre-configured will add the time stated on the button to the current time. So, if the current time in 2:30pm and we know the make time of the order is 30 minutes, we will use the [30 min] if the customer will pick up the order at 3:30pm. The numeric keypad is used to enter absolute times not pre-configured (i.e. 3 hours).
The Time Send function of Restaurant Manager allows the order taker, typically in full service restaurants, to choose a pre-programmed time to automatically send an order. The Timed Send prompt is commonly programmed in increments of 5 minutes. If you are running Timed Send you will also need to run POSLINK (EXE) on the computer that runs the print spooler.
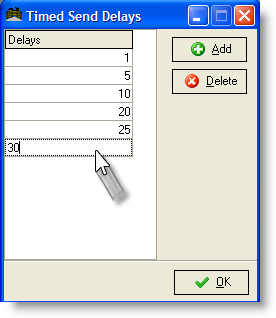
You can customize the send time in RM BackOffice by going to Setup > Prep Printing > Time Send Delay. The Timed Send Delay form has 6 time block programmed by default. You can change the pre-set times by clicking on the cell and type in your new time. You can add more time by clicking on the [Add] button. A new cell will be added at the bottom of the “Delays” list where you can enter the new time.
If used frequently, the Timed Send function should be placed on the bottom of the Order Entry screen using the POS Function Button Layout Form. To use the Timed Send function, items should be ordered as normal:
You will notice the time you just entered next to the items in the Detailed Order View Area. Items not marked with send times will be sent immediately upon pressing send or exiting (send on exit) the check if configured to do so. You can run multiple times within the order by repeating the process.
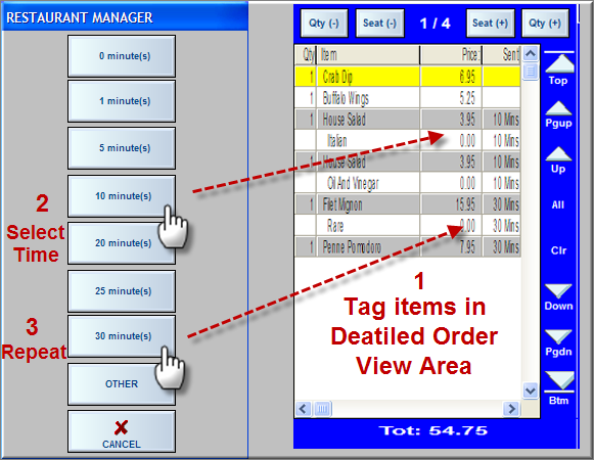
In the example above, we have three course- appetizers which we want to send right away (not timed sent), salads which we will send in 10 minutes, and entrees to which we will send in 30 minutes.
Notice there are two time presets that do not appear in the Timed Send Delay form. One of the buttons, [Other], triggers a prompt where you can manually enter in a time that does not appear on the presets.

The second button not appearing on the Timed Send Delay form but on the POS time preset prompt is [0 Minutes]. This function button allows the user to re-enter the order, use this button to set the time to zero, and send the items immediately. You may wish to do this if customers eat faster than anticipated or express the need to pace the courses faster. Keep in mind that you can also re-enter the Timed Send function and choose another time at any time up to the send time.
Once a time has been entered that the POS it will begin the time count down immediately after exiting the order. This function cannot be used for items already sent and will have no effect on these items.
You may configure your system to audit communication between service staff and kitchen and bar staff. For instance, any time an item is deleted from a check after being sent to the kitchen you can send the deletions to the original prep printer. You can also program an alert by e-mail to your cell or computer letting you know when a deletion has occurred. You can also use the same function with the Write Handheld unit.