(continued from Guest Checks Sales Receipts)
You may configure your system to display various buttons at the base of the key POS Screens that comprise your POS system:
The Order Entry Screen and the
The number of buttons that fit at the base of these screens is defined by settings on the Change Number Rows/ Columns button found in the POS Functions Layout form. The types of buttons that may be displayed on these screens include:
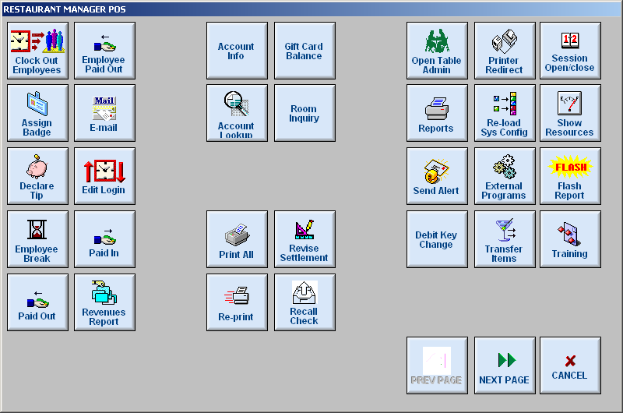
POS Function Buttons -Each operation that can be executed by your Restaurant Manager POS System is controlled by a “POS Function Button”. For instance, when you re-print a check, you touch a [RE-PRINT] button or when you apply a discount to a check you touch a [DISCOUNT] button, etc. Key POS Function Buttons are displayed at the base of each POS Screen. Other POS Function Buttons appear on a secondary or “Miscellaneous” screen.
MISC Button- The [MISC] button is always displayed at the base of all POS Screens. It provides access to a secondary screen of Function Buttons.
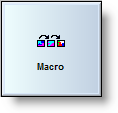
Macro Buttons- Macro Buttons execute a user-defined series of operational steps. To make your system as efficient as possible, it is highly recommended that you define Macro Buttons for any commonly executed operation that involves multiple steps.
Enhanced Passwords Control Buttons- In systems configured with Enhanced Password Control, two additional buttons are displayed at the base of the Status Screens. These “Begin” and “End” buttons switch the POS Status Screens between “Active” and “Inactive” modes.
Module Buttons- In systems configured with more than one POS module, you may switch between modules by touching the Module Buttons at the base of each Status Screen.
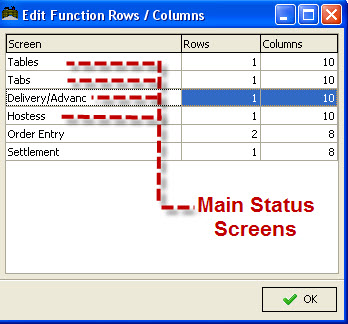
Button space is measured in “function button columns” and “function button rows”. For instance, if a screen is configured to fit 8 columns and 2 rows, a total of 16 buttons will fit on the base of the screen.
Use the Change Number of Rows/Columns button on the POS Function Buttons Layout Setup form to define the “function button” settings for each type of POS Screen:
Then, for each screen type, define the number of buttons that should appear at the base of the screen at each station on the Station List based upon POS Mode:
When configuring button space, you should not only allow space for the POS Function buttons controlled by the POS Function Button Layout Form. You should also allow space for other types of buttons, as well.
If you make an error in configuring the button area and don’t allow enough space for all the buttons that you wish to display on the base of each POS Screen, you will need to add more space so that all POS Functions and Macros are always available.
Function buttons enable the user to perform certain operations that will affect the total due on the guest check, employee timekeeping operations, banking procedures, etc. Restaurant Manager allows the end user to place function buttons where they make the most sense for the end user. Customization in placement of function button make the order streamlines the order process while making it more intuitive for the end user at the POS. For example, Restaurant Manager provides the user with three (3) pages of MISC screens that can be set-up or -out the way that is most useful and meaningful to the user. As with the function rows, related buttons may be grouped and spacers may also be included. See sample screen shot below,
Below are links to available functions based on different screens:
There are different POS Function Buttons associated with each of the key POS screens that comprise your Restaurant Manager POS System:
You may configure Function Buttons so that a password prompt appears each time the button is touched. You may change the color or bitmaps on the buttons. You may also remove certain Function Buttons or move them to a secondary or third screen under the “Miscellaneous Button Screen” so they do not clutter the main POS Screens.
In the default configuration of Restaurant Manager, all POS Function buttons are colored gray, a majority are displayed on the Miscellaneous Button Screen, and only a few are configured with password protection.
After defining how much screen space you wish to dedicate for the “Button Area” on each POS Screen, use the POS Function Button Layout Form to configure the POS Function buttons.
Laying out the buttons is very easy with the use of the POS Function Buttons Layout form in the RM BackOffice. To open this dialog, click Setup >Screen Layouts >POS Function Button Layout, after doing so, you should see something similar to below.
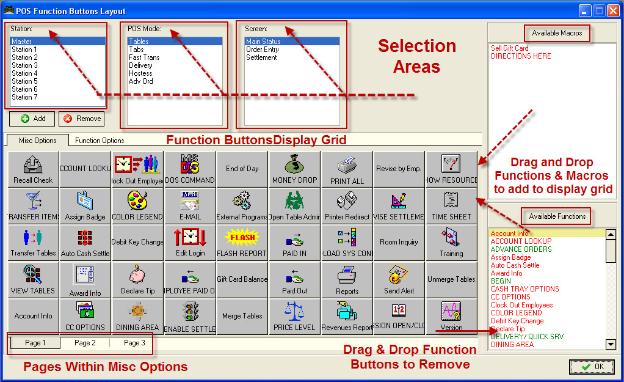
The form is divided into six sections. Located on the top, is the Station, POS Mode and Screen selection area. These selection areas allow you to select the specific screen that you would be laying out. To the upper right there is a section for Macros. This section holds all available macros associated with a POS screen that has been created at the stations. Below, you have another section for Available Functions that come pre-programmed with Restaurant Manager. The Function Button Display Grid appears prominently in the middle of the screen. The Function Options tabs will display all the function buttons/macros on the status screen and the MISC Options tab will display function buttons within the Misc screen within each POS type screen (order entry, settlement, etc)
You can tailor the button layout of any screen of any station to make use of the buttons that the specific station is going to use.Note the following:
If you wish to use a single button layout at all POS Stations, you need not access this section at all. A default “Master” station will be permanently highlighted on the Station List and you will start the configuration process with the POS Screens field below.
If, on the other hand, you wish to display different function buttons at different POS Stations, you must add the number of each station needing an alternative configuration to the Station List.
Laying out an additional station can be achieved by clicking on the [Add] button in the [Station] section. Any station that does not have its specific layout settings will follow the settings of the [Master]. To remove a station specific layout, click on the station in the list and click the [Remove] button. Note that the [Master] cannot be removed and/or deleted.
Use the settings in this section to indicate whether the Function Button highlighted on the Available Functions list should be enabled within a particular POS Module.
There are three types of POS Screens for which you may configure a Function Button Layout: Status Screens, Order Entry Screens and Settlement Screens.
Use the POS Screen drop down list to select the type of screen for which you wish to create a button layout. The type of screen you select determines which functions appear on the Available Functions list at the center of this form.
NOTE:If there are multiple stations on theStation List you must highlight the station you wish to configure BEFORE you select the type of screen you wish to work with.
On the right, is the list of ‘Available Macros’ and ‘Available Functions’’ and this shows you what may be used when designing the screen for the currently selected POS Mode/Screen.
The macros and functions are color coded whether they are already used in the layout or not, thus, making it easier to see which macros or functions that may be important for the restaurant’s operation but still needs to be laid out.
This area displays the function buttons that will be displayed at the POS station.
On the lower left, is the layout area grid for the “Miscue Options” and “Function Options” and is displayed as a layout grid where you can drag and drop functions or macros into it.
The “Miscue Options” screen has the “Page 1”, “Page 2” and “Page 3” tabs on the bottom that allows you to select the specific “Miscue” page to design. This area provides a 5 x 9 grid.
Below the “Function Options “screen on the other hand, is a clickable button, [Change Number of Rows/ Columns], allowing you to set the number of rows and columns for the function row of each specific screen. This also defines the grid size.
Setting up the buttons in both the “MISC Options” and “Function Options” grid is plainly a drag-and-drop operation.
To layout, you need to:
More things you can do with the drag-and-drop operation:
To set the button properties, right-click on any button in the layout grid and a dialog prompt will appear allowing you to change the button properties. The dialog is context sensitive, that is, if the button is a function, the macro options will be disabled and vice-versa.

The following is a description of the Button Property fields:
IMPORTANT: Note that the button properties settings you chose will apply station-wide. Thus, if you let an option appear multiple times in the function rows or “MISC” screen (or both), changing one changes for all.
The upgrade process attempts to layout all the buttons and macros similar to the way they were drawn before. In the most likely case, you may not notice a difference. However, there are a few:
If the Enhanced Password Control is enabled for the station, the function and macro buttons that need to be drawn in the function rows are not displayed at all.

Generally, macros do not need to be reprogrammed except when one of the buttons that it is expecting to click is no longer available (i.e. “More” as mentioned above). However, right after upgrade, these buttons should be available.
Below are the key differences between version 18 and the previous versions concerning button layouts:
The [MISC] button is always displayed at the base of all POS Screens. It is there to provide access to a secondary screen of Function Buttons. Less frequently used Function Buttons are usually displayed on this Miscellaneous Button Screen while commonly used buttons are displayed at the base of each POS Screen. The [MISC] button cannot be disabled and its placement is not configurable.
The first screen shot on the next page shows the Delivery Status Screen with key Function Buttons displayed across the base of the screen. In addition to the POS Function Buttons, themselves, you can see the special [MISC] button near the end of the second row of buttons. When you touch this [MISC] button, the Miscellaneous Button Screen appears, as shown in the second screen shot.
Delivery Status Screen Misc Button

Delivery Main Status Misc Screen

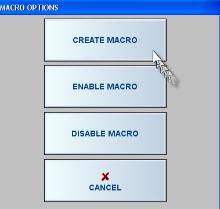
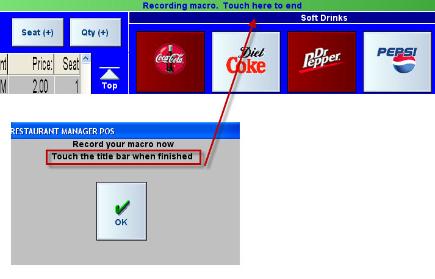
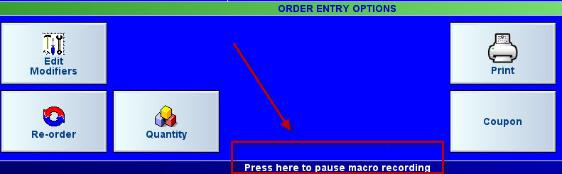
Macro Buttons are user defined buttons that allow you to execute multiple operational steps at the touch of a single button. Macro Buttons are defined from specific POS Screens at specific POS Stations. There is no programming involved. You simply activate the [CREATE MACRO] function at the appropriate POS Screen and then manually execute each of the operations you wish to include in the macro. Then, when you touch the when you touch the flashing title bar at the top of the screen (or “end” on prompts), the system will automatically add a Macro Button to the base of the POS Screen where you started the recording.
Macro Buttons may be added to the base of any type of POS Screen but they are particularly recommended for use on the Settlement Screen. Macro Buttons are always displayed (in left to right order) in the first open space after the POS Functions Buttons when created. You can move the macro using the POS Function Button Layout form.
Once you have created a Macro Button at one POS Station you need not manually enable the Macro at all the other POS Stations on your network. Instead you may use the POS Function Buttons Layout Form in the BackOffice Module to copy the Macro Button to other stations on your network.
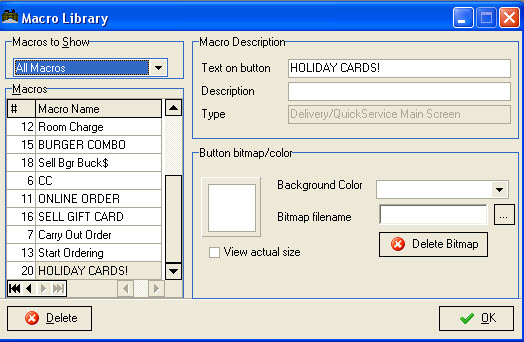
After you have added a Macro Button to a particular POS Screen, you may “disable” the Macro Button from the POS but you may not delete it. To actually delete a Macro Button, you must use the Macro Library Form. This same form can also used to further configure Macro Buttons with bitmaps, new colors, etc.
If you do plan to create Macro Buttons, be sure to configure space for them along with the standard POS Function Buttons when configuring the size of the Button Area at the base of each POS Screen.
To add a Macro Button to any POS screen:

Once a Macro Button has been created at a POS Station or copied to that station on the Station Macro Form, you may temporarily remove the Macro Button from the Button Area at the base of the POS Screen and then add it back again using the Enable/Disable Function: This can be done one of two ways:
You can remove or add a current macro function from the POS using the Drag and Drop function within the POS Function Buttons Layout form in RM BackOffice.
To permanently delete a Macro Button you must access the Station Macros form and enter the Macro Library form.
![]()
Within the Macro Library Setup form you can choose the desired heading from the Macros list and hit the [Delete] button below.
Restaurant Manager maintains some backward capabilities from previous versions The Macro Setup form is such a feature. Where most macro functions is now handled in the POS Function Buttons Layout form, we will cover the capabilities of the two setup forms, Station Macros and Macro Library, found within the Macros sub heading in the Setup drop down menu in RM BackOffice.
The Station setup form is where the user can add stations and assign available macros on stations based on POS screens. The user can also arrange macros alphabetically or freely assign the order of macros. However, it is recommended that you use the POS Function Buttons Layout. The Macro Setup form is broken down into the sections:
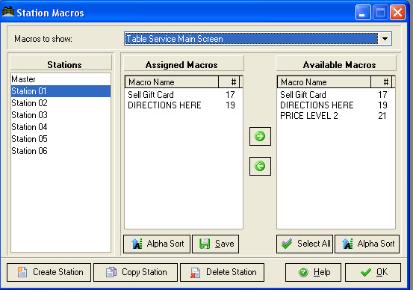
The Macro Library form exists to delete, rename, change color, and to add bitmaps to exiting macros. Most of these functions can be achieved using the POS Function Buttons Layout with the exception of deleting a macro.
The form is broken into 3 sections;
If your system includes more than one POS Module you may switch between modules by touching the Module Buttons at the base of each Status Screen. For example; if your system includes both the Table Service and Tabs modules, there will be a [Tabs] button at the base of the Table Service status screen a [Tables] button at the base of the Tabs Status Screen. Touching a Module Button switches the Status Screen on the POS to the module shown on the Module Button.
The partial screen shot below shows the base of the Tabs Status Screen in a system that includes both the Tabs and Table Service modules. To switch to the Table Service Status Screen, you would simply touch the button labeled [Tables]:

Although Module Buttons appear alongside POS Function Buttons at the base of each Status Screen, Module Buttons are not configured on the POS Function Button Setup Form. Module buttons are enabled or disabled on the Station Configuration Setup Form in the section that lists various settings for configuring that module
The partial screen shot below shows the base of the Table Service Status Screen in a system where all available Module Buttons have been enabled. Except for the [MISC] button all the buttons in the screen shot below are Module Buttons that must be enabled from the Station Configuration Setup Form:

You can use the [Search Settings] button at the base of the Station Configuration Setup Form to locate the settings that enable and disable Module Buttons for the following modules: Table Service, Tabs, Delivery, Fast, Hostess and Advanced Orders. If you disable a Module Button at any station, you will not be able to access that Module at that station.
NOTE: If your system is configured with more than one POS Module, you must also use the default opening screen setting to indicate which module should be the default module at each POS Workstation.