(continued from Status Screens)
Restaurants where servers wait on customers at tables should use the Table Service Module. The Table Service Module is distinguished by:
Table Service Status Screen
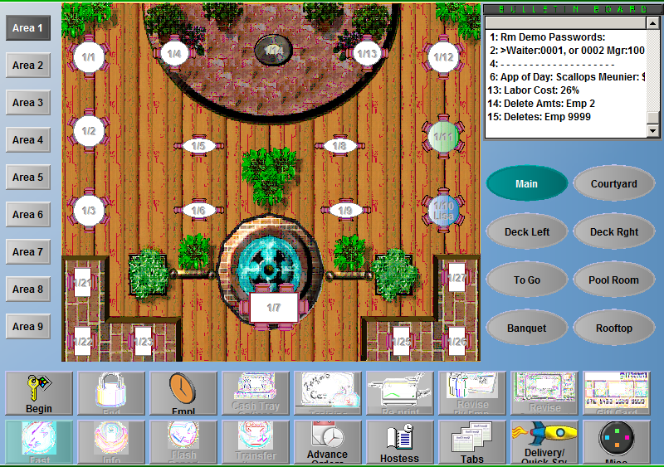
In addition to common features that appear on all POS Status Screens, the Table Service Status Screen includes the following elements:
Table Buttons
Each table button is interactive. To open an order you simply touch a table button.
Table buttons should be configured to reflect the actual layout of the restaurant floor using the Table Layout Form.
The color of an individual table button changes depending on the “status” of the table so that a quick glance at the Table Status screens gives an overall picture of what’s going on in the restaurant. The Color Legend function buttons displays the color codes used to indicate the status of each table.
By default each table button displays a table number. However you may configure the system to use a different system of Table IDs such as:
Table Buttons may also be configured to display alerts that notify you when a certain number of minutes have passed the order at the table meet either of the following conditions:
Table buttons will also display the name of frequent diners or other special customers are seated at the table.
You may configure different POS Stations to display different Table Layouts.
Table Group Buttons
You may use the Table Group Buttons to the right of the Table Area to change the table layout displayed on the Status Screen. In the screen shot above the green [Riverside] button indicates that the Riverside Table Group is the active Table Group. To view the Pub/Dance layout you would simply touch the [Pub/Dance] Table Group button.
Dining Areas
If your system is configured with Dining Area Buttons you may touch these buttons to switch to a different Dining Area.
This section details the RM BackOffice settings that are usually activated in systems configured for Table Service. Much of the Table Service configuration is defined on the Station Configuration Form under the POS Modes heading.
A number of settings on the Station Configuration Form control the layout of the Table Service Status Screen as well as other Table Service operations. Many of the settings are listed under the POS Modes heading.

Highlight the Master Configuration (or an alternative station) on the Stations List: and then use the [Search Settings] button to locate and enable the Table Service settings below:
When you disable this button you will not be able to access the Table Service Module from the station highlighted on the Stations List of the Station Configuration Setup Form.
NOTE: If your system does not include the Table Service Module this setting will be grayed out on the Station Configuration Setup Form and you will not be able to enable a Table Service Module Button at any of the stations on your system.
NOTE: Instead of setting the default Revenue Center by station you may also choose to link each table on the Table Layout Form to a default Revenue Center.
2/23 – denotes dining area 2, table 23
1/12:4 – denotes dining area 1, table 12, seat 4
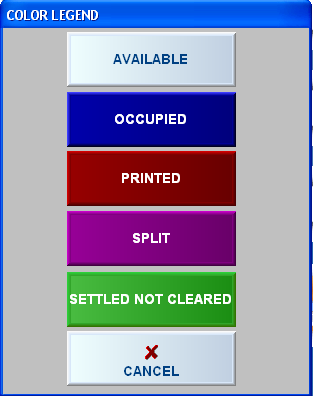
Click on the parameters under this option, a window will pop up for you to choose a color from. See screen shot below:
Available- Choose the button color for tables that are available (i.e., ready to be seated).
Occupied- Choose the button color for tables that are occupied.
Printed- Defines the button color for tables that are printed.
Split- Defines the button color for split checks.
Settled but not cleared- Defines the button color for tables that are settled, but not cleared. Note requires setting the option “Require table clear”.
For efficient settlement of multiple credit cards, you should enable the “Immediate Submit/Print” option under Miscellaneous->Interfaces in Station Configurations if using dial-up. If using internet processing you might disable this function and use “exit order after auth and complete pre-auth”.
Important Note: Credit Card Pre-Authorization is supported with Mercury (MPS) only. Attempting to do Credit Cards pre-auths with PC Charge or Datatran may result in undesirable results. Credit card pre-authorization provides the ability to capture and authorize a credit card at the beginning of a sale.
After swiping a credit card and entering the amount, Restaurant Manager will automatically submit it for processing. Enabling the “Stay in Settlement screen on split checks is enabled” the system will prompt for seat #. You may then enter another credit card and continue this process until you have entered all credit cards for all seats. Then exit the order to allow the credit card process (CCPrint.exe) to print the CC slips automatically as they are authorized. After taking the slips to the client and getting the tip adjustments, you can enter each tip and finalize the credit cards one after the other while remaining in the settlement screen.
The following settings are found under the Security tree branch In the Station Configuration. The settings listed below control who has access to tables and when.
If you wish to prevent servers from accessing each other’s tables, set this option to a security level that is HIGHER than the server security level, but lower than or equal to the manager security level. This will allow managers to access all tables; servers can only access their own.
This option does not put any restrictions on accessing tables that are available. For example, let’s say employee 2 is assigned to a table. As long as that table is open and occupied, then employee 2 is the only server that is allowed access to the table. Once the table is settled, then it becomes available and any employee is allowed access to it.
Note: this option takes precedence over the option "Share tables between peers." For example, if waiters are security level 3, and this option is set to security level 5, then waiters are NOT permitted to access each other’s tables, even if "Share tables between peers" is enabled.
Avoid using a large time-out value if you want to prevent employees from ringing orders on a different employee's sign-in. For example, one employee could sign in, enter his or her order and walk away from the POS terminal. If another employee uses the terminal before the time-out occurs, then it is possible that transactions are tallied to the wrong person. To ensure this does not happen, you might want to consider using the “Immediate time-out after 1 transaction”.
However, you may want to extend the time out period at a busy bar where only one person has access. Extending the password time out period will prevent the employee from having to enter their password every time they place an order. It is suggested that you train the employee to “End” button if leaving the POS station for a prolonged amount of time.
The Table Service Module is configured with nine independent Dining Areas each of which may display up to 400 tables in up to eight Table Groups. In most systems, however, Dining Area 1 is set as the default Dining Area and none of the other Dining Areas are used for processing orders.
Of course, if there are more than 400 tables in your restaurant you must use more than one Dining Area. Hotels or other operations with multiple kitchens must also use different Dining Areas for sending output to different prep areas.
If you do define separate Dining Areas, it is highly recommended that you put at least one POS station in each separate Dining Area. It is also recommended that you configure your system to include the Dining Area in the number displayed on each Table Button.
No matter which Dining Area is displayed by default on the Table Module Status Screen you may always change Dining Areas by using the [Dining Area] Function Button. Alternatively you may configure the Table Service Status Screen to display buttons for moving from one Dining Area to another as shown in the screen shot below.
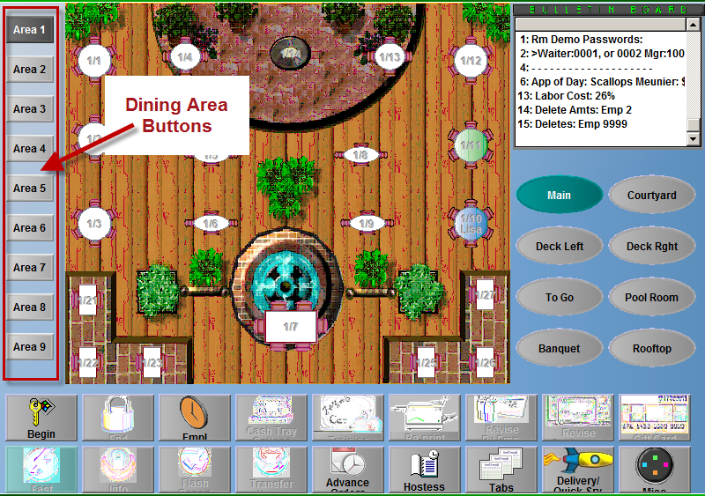
When changing between dining areas, Restaurant Manager remembers the active “Table Group” for each dining area and automatically selects it.
If you make extensive use of multiple dining areas, you can include the dining area along with the table description. To enable this option, check the following option (Show Dining Area in table description). To expedite the ordering process and to insure accuracy, you may want to enable “Prompt for table # when changing dining area in the station configuration.
There is a Bulletin Board on the Main Status Screen in the Table Service POS Module where you can display up to 14 lines containing text at a time. This feature is convenient for listing Daily Specials, posting menu items that are sold out, etc.
When an item is sold out (i.e., In Stock quantity reaches 0), a message is automatically posted to the bulletin board. If the In Stock quantity is replenished either from the back office, or from POS, the “Sold Out” message is automatically removed from the bulletin board.
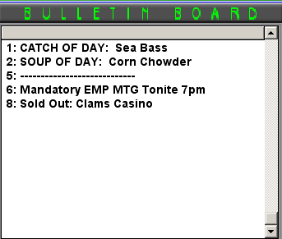
To post a message to the Bulletin Board:
Restaurant Manager lets you add as many Bulletin Board messages as you wish. The messages are displayed in descending order from the most recent to the last. You can scroll down to retrieve more messages if you go past 14 lines.
Restaurant Manager’s Table Layout feature allows you create an accurate layout of your restaurant floor. This speeds up order entry by allowing servers to simply touch the table they are serving instead of typing in a table number.
When designing table layouts you may use either standard table buttons or graphical image sets.
If you have more than 400 tables in your establishment or if you wish to track sales made in different areas of the restaurant, you can create up to 9 independent Dining Areas of up to 400 tables each.
The Table Layout Setup Form consists of five main areas.
Setup > Screen Layouts > Table Layout
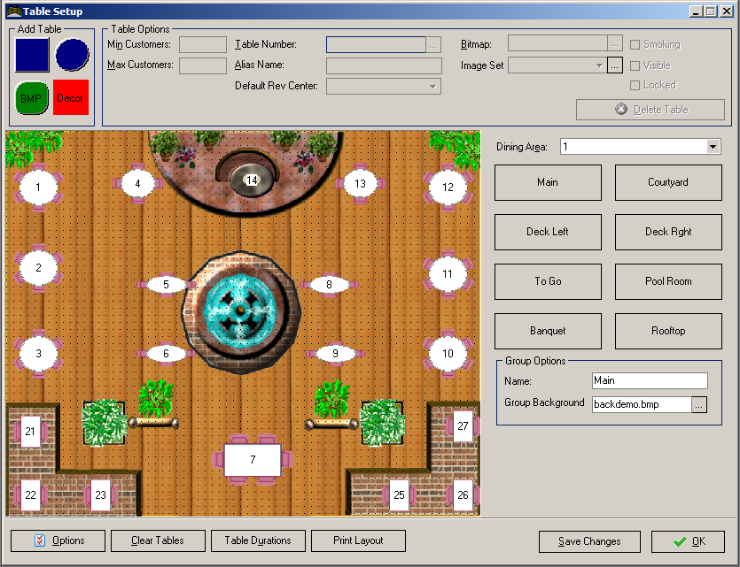
When using this setup form to create the table layout of your restaurant you must decide how many tables you wish to display on a single screen. On the far right, the Dining Area combo box is used to select the dining area you wish to work with. The Table Group buttons immediately underneath the Dining Area combo box are used to select the Table Group within the dining area you wish to work with.
You may use the Add Tables Templates described below to design a replica of your restaurant floor in the Floor Plan Area of the Table Layout Screen.
To add tables to the table layout simply left click on one of the templates in this section and hold down the left mouse button while dragging the template to the point in the Table Layout Area where you wish to display a table. Click on a square or circular table and drag and drop on to the Layout area. The next available table number will be automatically assigned and presented on the screen for editing. Once the table number is confirmed, the table is added to the design area. It is suggested that you click on the dining area table groups button (e.g. Riverside). This will re-align tables as you go.
The Add Table Templates are displayed in the upper left hand corner of the Table Layout Setup Form. There are two types of templates you may use to build the table layout screens:
Standard Button Templates- The blue square and circle shapes represent standard table templates. You may use the ‘Bitmap” field described below to superimpose a bitmap on the tables you create using the standard templates
Graphical Button Templates- The green “bitmap” template and the red “décor” template allow you to design a floor plan with more attractive graphical elements. If you use the graphical templates you must also define Image Sets.
The system assumes that the more customers there are at the table the more time they are likely to spend at the table. You can create a total estimated wait time AND an estimated time once the check has been printed.
There are certain functions that can be found only in the Table Service Module. The following sections on Merging/Unmerging tables and requiring Table Clearing may provide some useful insight on how to best utilize these features.
On occasion, you may need to combine several tables together to accommodate a large party. For example, a party of 10 might require bringing 3 tables together to form a single larger table. Though Restaurant Manager does not allow rearranging the table layout from the POS terminal, it does allow merging the tables together so that all but one of them are accessible, thereby preventing other servers from opening them accidentally.
When merging tables, one table must be chosen as the “base” table which will be the main table for processing the order (i.e., ringing items, printing the check, settlement, etc). The other tables not designated as the “base” are disabled and will not be accessible for the duration of the order.
To merge one or more tables together, choose the “Merge Tables” option located under the MISC options on the main tables screen. Restaurant Manager will ask you to specify the number of tables to be merged together.
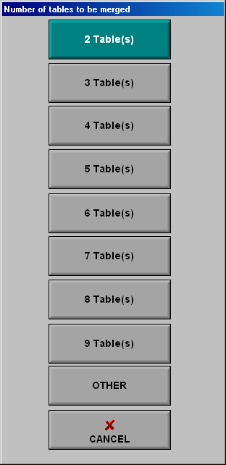
You can choose any number from 2 through 9, or if you want to merge more than 9 tables, choose “Other.” Restaurant Manager will display a numeric keypad allowing you to enter any number from 2 through 9999
After specifying the number of tables to merge, Restaurant Manager will wait for you to touch the tables to be included in the merge. So if you are merging 4 tables, you must touch 4 tables to complete the merge. The very first table you touch automatically becomes the ‘base’ table.
When choosing the tables for the merge, they appear depressed to give a visual cue of the tables that have been tagged. If you accidentally touch an incorrect table, touch it again to un-tag it. Once you tag the number of tables specified at the beginning of the merge operation, the system will complete the merge operation.
You can cancel the merge operation at any time either by touching the base table again, or by touching the status bar.
Once the merge operation is completed, the table numbers will change to indicate they have been merged. For example, if you merge tables 55, 56, and 57 together, designating table 55 as the ‘base’ table, the following chart shows the new table numbers that will be displayed on the buttons:
|
Table |
New Table Designator |
|
55 |
55>55 |
|
56 |
56>55 |
|
57 |
57>55 |
“55>55” indicates that table 55 is the ‘base’ table of a merge. “56>55” indicates that table 56 has been merged with table 55 as the base.
There are two methods of unmerging tables. To unmerge tables manually, choose “Unmerge Tables” from the MISC options of the main tables screen. Then simply touch the ‘base’ table to unmerge the set.
The second method of unmerging tables is after settlement. There is a setting in back office station configuration that affects the behavior of the system after a merged table is settled. The option is “Unmerge when settling merged tables.” It can be set to one of three choices: Yes, No, or Optional. It controls whether merged tables are automatically unmerged when they are settled. The system will give you the option of unmerging tables after settlement if set to “Optional.”
By default, when a table is settled, it immediately becomes available for seating a new party. Some restaurants prefer to leave the table in an “unavailable” status until a bus person has cleared the table and explicitly indicated that the table is ready for seating. In this mode, the table will change to a different color after it is settled, and the table only becomes available if it is pressed again to clear it. Options for setting up this mode of operation are located under Station Configurations:
To enable the table clear mode of operation, check the box labeled “Require Table Clear”.
You can define the table color in the “Settled, but not cleared” option under Table Status Button Colors under Table Service POS Options
Restaurant Manager uses color coding on order and table buttons to show the status of each pending order. Touch the [COLOR LEGEND] button on the POS Status Screen to display the meaning of each color code.
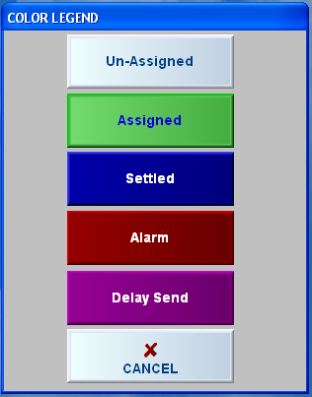
Depending on the POS Module in use, one of the legends below will be displayed:
|
Table Service Color Legend |
Delivery Service Color Legend |
|
|
|
The colors used to denote a given status can be changed on the Station Configuration Form. Use the [Search Settings] button at the base of the Station Configuration Form to locate the “Color” settings and select alternative colors.
You can configure your system to display a red Alert Icon on tables that require special attention. Instructions on configuring alerts can be found under the topic Table Alerts. Alerts are triggered as follows when an expected event does not occur within a specified period of time:
In addition to enabling key settings in the Table Service section of the Station Configuration Form, the settings below are often enabled in systems configured for use in table service restaurants:
|
Menu Setup Form |
Screen Layout |
|
Coursing |
Image Sets |
|
Next Group |
Table Layout |
|
Recipes |
|
|
|
|
|
POS Function Buttons |
Revenue Centers |
|
|
Price Levels |
|
Send to Tabs |
Tax Table for Food (Smart Tax) |
If the restaurant operates a bar, the Tabs Module should be included in the system configuration. Even if the restaurant doesn’t have a bar, the Tabs Module allows restaurants to use the “Send to Tabs” feature to “turn” the table and seat new customers before the original check from that table is settled.
You may also move orders between the Table Service and Tabs modules using the following POS Buttons:
Fine dining establishments often using the Coursing feature to sort the output sent to prep area devices.
Family/ Casual style restaurants using cashier banking may want to enable bar codes on checks and enable the option “direct to settlement screen”. You may also want to dedicate a table group to take outs and link table to a revenue center dedicated to delivery.