(continued from Restaurant Point of Sale and Management System)
All system setup and configuration is done via Restaurant Manager’s BackOffice Module on screens referred to as "Setup Forms". Many of these setup forms are already configured with default settings and there is no need to access them unless you wish to change the default settings controlled on that form.
The section on Quick Start-up Tips identifies the key Setup Forms that must be accessed to meet minimal configuration requirements. For more detailed information on the configuration options best suited to a particular type of business and the Setup Forms that control these options.
Before configuring the Restaurant Manager™ software for a particular user, resellers should use the System Setup Questionnaire to profile the specific operational needs of that user. This questionnaire can be downloaded from the “Reseller” section of the ASI website: www.rmpos.com.
You should always access Restaurant Manager (RM) BackOffice Module from the computer that serves as your Manager Workstation. Once your system is fully configured and operational, you will also use RM BackOffice Module to execute Management Functions and to print Reports.
The first time you enter the Restaurant BackOffice Module you will be prompted for a password. If installing a live system you will receive a prompt for to enter a four digit password and a separate alphanumeric administrator password. In a demo system you will receive a prompt to enter a security access code. More information on changing Master Passwords and Administrator Passwords can be found under the section Passwords.
To open RM BackOffice Module:
The first time you access the Restaurant BackOffice module you will receive the following prompt:
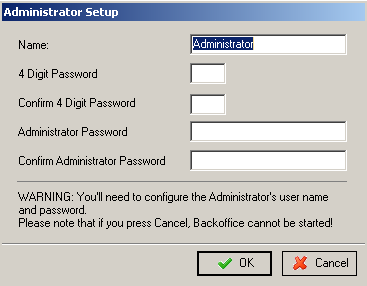
After initial installation of Restaurant Manager, start RM BackOffice, you will be immediately prompted to create the first administrator account. You will have to enter a four digit password, confirm the password by entering it a second time and enter an administrator password and then confirmation of the admin password. The first administrator password should be an alpha numeric password that should be no less than 7 characters. Additionally, a combination of upper and lower case letter, numbers, and symbols (e.g. characters above numbers on keyboard) is highly recommended when entering an administrator password. This is referred to as a “strong” password. Strong passwords provide the best security. It is important that you write this information down. Without this password you will not have access to certain functions. More detailed information can be found under the topic: Passwords
Continuing on, you will also be prompted for the master password. By default, the master password is set to four zeros (0000). Again you will be prompted for another password. At this point you can enter the four digit password you just setup. The initial set-up process will automatically setup and the first administrator as employee #1 with a level 9 security allowing access to all PCI-sensitive settings in the system. It is from this user you can continue configuring the credit card settings and creating additional admin passwords for store personnel. In addition, changes can be made to the initial administer or deleted completely.
In normal operations you will get the following password prompt after the application is launched:
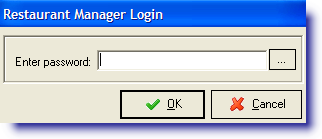
At this prompt users should type in their individual Employee Password. In new systems, however, before Employee Passwords have been assigned, you may type in a default master password of four zeros: [0000]. The default master password should be changed immediately. Instructions can be found under: Passwords
In demo installation you may get the following prompt before the Restaurant Manager Login prompt:
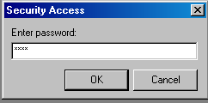
When you receive this prompt you can enter 4 zeros [0000].
NOTE: If this default password does not work, your system has already been configured with a customized master password that is unique to your business and you must contact your service provider for assistance.
The type of password used to access RM BackOffice Module is always displayed above the [Start] button at the base of the screen. The partial screen shot below is an example of what you would see at the lower left of the screen if someone used the master password to access a system licensed to a restaurant called Chat & Chew:

You must complete the basic configuration tasks detailed below to get your system up and running.
The system will not operate until you access the Employees Setup Form and define at least one employee.
Every user license issued by ASI must be signed before "going live" or used to ring up any sales. The end user is responsible for signing and dating the agreement and it is the reseller's responsibility to make sure the user accepts the terms of the End-User License Agreement (EULA) before the software is used to ring up any sales.
The user will be prompted to sign the agreement under the following conditions:
The EULA may be viewed at anytime within the RM BackOffice Module by clicking on "Help" on the toolbar and selecting the "Show License Agreement" option on the drop down menu.
There a few procedures that you should be familiar with if you wish to use the BackOffice Module as efficiently as possible.
Some setup forms allow sorting, like the Menu Setup Form. To sort items listed of forms, press either the [Sort by Item Num] or [Sort by Name] buttons on the lower left side of the setup form.
Some setup forms don’t have “sort buttons”. To toggle between the alpha and numeric ordering, simply click on the heading by which you wish to sort the list and that list will be sorted in the ascending order.
When lists are very long, Restaurant manager organizes them into “trees” that can be expanded or collapsed to show all the items on the list or to show only the major headings on the list. Collapsing and expanding the tree allows for easier navigation of long lists.
Trees display [+] or [-] signs to collapse and expand lists. The [+] sign beside an item (or heading) on a list indicates there are additional hidden items below that item or heading. When you click on the [+] sign these hidden items will be displayed and the [+] sign will change to a [-] sign. Clicking on the [-] sign then collapses that list so the items are hidden again. The following forms use tree navigation:
The Store Information Setup Form records the name, address and phone number of the business to which the Restaurant Manager POS System is licensed. The form has three tabs containing settings affecting system configuration described in the following sections. Contained within each tab are two buttons:
Note: exiting the form using the exit button ( ) on the top of the form will discard data entered. It is important to use the [Save Settings] button if you wish to retain information.
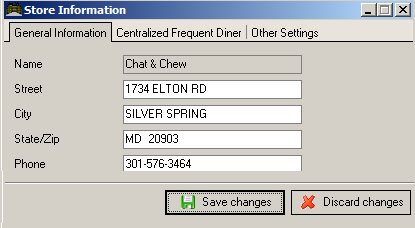
The business whose name appears in the Name field is the business licensed to operate the POS Software installed on the system hardware. The licensee is hard-coded into the system. In other words, you cannot change the business name that appears in the Name field. The hard-coded business name is also displayed at the base of the BackOffice Module screen. If you wish to re-license your system to another business, contact the ASI reseller who installed your POS System.
The other fields in the General Information box are used to record the Street, City, State/Zip and Phone number of the licensee. The information in these fields are used for guest check store keywords. To print any of this General Information on the header of sales receipts and guest checks, see the chapter on Guest Checks and Sales Receipts.
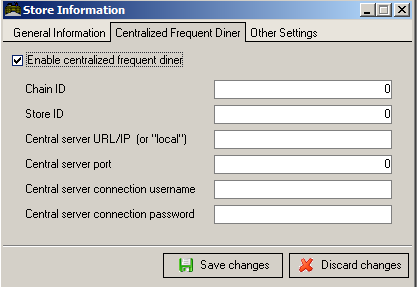
ASI offers an add-on module for a centralized frequent diner award program. All field setting parameters are assigned by ASI. Each restaurant in the chain will have an unique Chain ID. In addition, each store within the chain will have an unique Store ID assigned. Entering the information on the seven fields under this tab is one step in the process of setting up a centralized frequent diner program. Please consult the section on Customer Management and the centralized Frequent Diner Installation Guide for additional setup information.
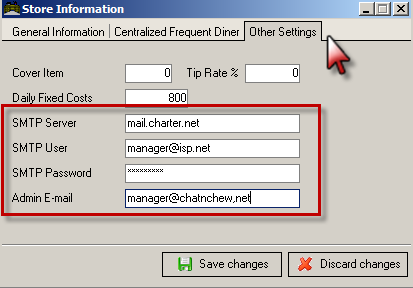
The seven fields under the Other Settings Tab control how your system operates:
- SMTP Server - enter in the outgoing mail server information given by the e-mail provider(smtp.domain.com). Example: smtp.gmail.com
- SMTP User- the information entered here will be the user name. This may be as simple as the name of the person or could be the name of the e-mail account itself.
- SMTP Password- the information entered here is the same password you use to access the account.
- Admin E-Mail- the information entered here will appear as sender information to the recipient. The data in this field has nothing to do with the SMTP accounts. Rather, this is the e-mail account the recipient will respond to. The admin e-mail account should reflect the person who maintains the information.
Please visit the section on Configuring Restaurant Email Account for additional information.
The Station Configuration Form allows you to customize the operation of each POS Workstation in your system. Settings in the different sections of the Station Configuration form allow you to customize order entry, settlement and other operations that are common to all POS modes and modules. They are categorized under the following sub-headings which are covered in more detail in different sections of this manual: You may access this form from the Setup Drop Down menu:
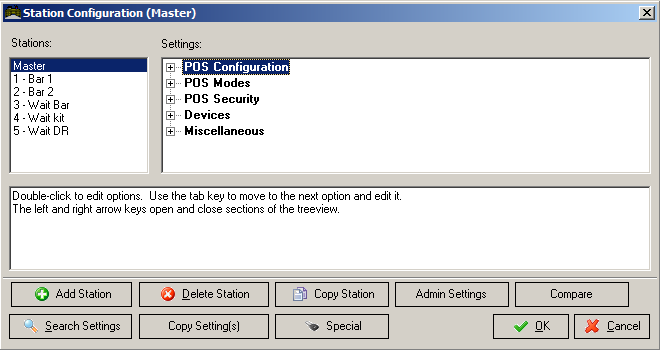
The Station Configuration Setup Form is divided into two key sections:
The Setting Definition Area just below these lists provides a brief description of any setting highlighted on the Settings List.
The Stations List on the left side of the Station Configuration form is used to identify the configurations that may be applied to different stations on your network. The Station List is always headed by a “Master” configuration that cannot be deleted. The Master configuration is applied to all POS Workstations NOT otherwise listed on the Station List.
To customize the Master configuration and POS stations, highlight the station to be affected on the Station List and then activate the settings on the Settings List that create the system configuration best suited to your business. (For tips on configuration settings typically used in different types of businesses see the chapter on Status Screens.)
Sometimes it is easier to relate to station names rather than station numbers when doing station configuration or customer support. Example: a POS station with the name "Bar Station" is easier to identify compared to Station 1.The names of stations on the Station List may be customized using the Station Name Setup Form found in the RM BackOffice module under the Setup menu > General.
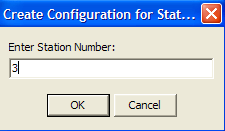
There are buttons at the base of the Station Configuration form that allow you to add or delete numbered stations from the Station List. (See the section on POS Workstations for more information on station numbers.) Use the [Add Station] button to call up the following prompt and add a station to the Station List:
The [Add Station] function copies the settings of the Master Configuration. So, before adding new stations to the Station List be sure that the Master Configuration settings are configured to meet your operational requirements.
If you copy the Master Configuration before making these adjustments you must use the [Copy Settings] button below to make the same adjustments to the configuration of each additional station you’ve defined.
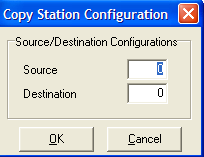
The [Copy Station] button allows you to add a new station configuration that is not based on the settings of the Master Configuration but, rather, on the settings defined for a particular station on the network. When you click on the [Copy Station] button the following prompt appears allowing you to define the number of the Source station to be copied and the number of the destination station that is being added:
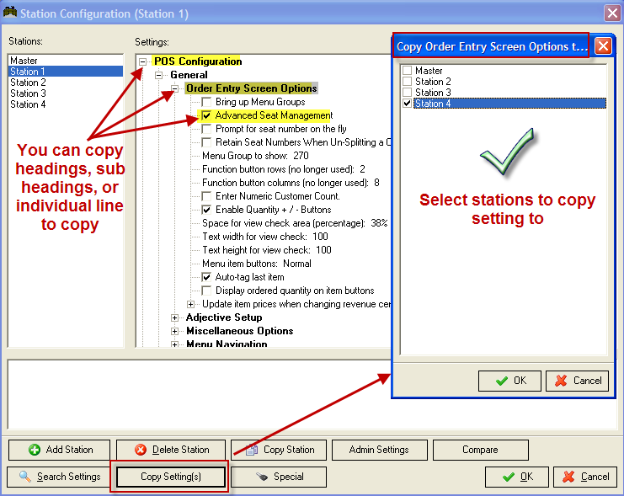
The [Copy Settings] button allows you to copy some but not all of the settings of one station configuration to another station. Before using the [Copy Settings] button, you must first highlight the station you wish to copy on the Station List and then, on the Settings List, highlight a single setting or a heading that controls multiple settings. In the screen shot below all the POS Security settings from the highlighted “Station 1” will be copied to the Station 7 configuration:
The Settings List on the Station Configuration Setup Form shows all the configuration options that can be enabled or disabled at any given POS Workstation. When you enable a particular setting on the Settings List it is applied only to the station highlighted on the Stations List.
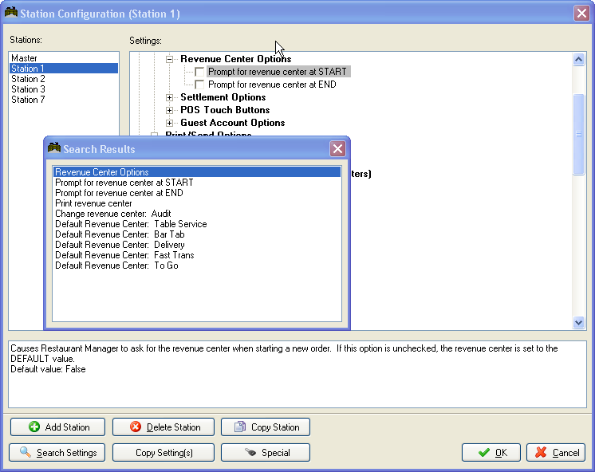
The quickest way to find a particular setting on the Settings List is to use the [Search Settings] button at the base of the Station Configuration Setup Form.
This [Search Settings] button calls up a prompt for Search Terms -- a word or phrase related to the setting you wish to find. The screen shot below shows the results of searching on the phrase “Revenue Center”. Note, too, that a description of the “Prompt for Revenue Center at START” setting appears in the Setting Definition Area.
Many of the settings on the Station Configuration Form work in conjunction with settings on other BackOffice Setup Forms. For instance the “Enable Navigation Buttons” setting display Navigation Buttons defined on the Menu Navigation Setup Form.
This button is not functional in standard Restaurant Manager POS Systems. To make the button functional you must contact your reseller for a Special Password which will then allow you access to special configuration defaults