(continued from Function Buttons Macros)
Restaurant Manager’s powerful security settings allow all POS and BackOffice operations to be password protected. Users who wish to execute protected operations must identify themselves with a password, an ID card or a fingerprint. The system uses this input to verify the user is authorized to execute the protected operation and then tracks details of the operation for security audits and other reports.
All users authorized to operate the POS System must be defined on the Employee Setup Form. At a minimum they must be assigned an Employee Password and an associated Security Level. Some users may also be defined as Administrators by assigning them an Administrator Password.
Most of the password prompts in Restaurant Manager are fully configurable. They can be enabled or disabled at the discretion of the business owner because their purpose is to protect the owner from fraud or errors perpetrated by restaurant staff. Each configurable password prompt requires the input of an Employee Password that has a security level equal to or higher than the security level assigned to the operation, itself.
A few password prompts are hard coded into the system and cannot be disabled. These prompts not only protect the business owner but also to protect restaurant customers from credit card fraud by controlling access to their credit card data. Hard coded password prompts are an important component in configuring a POS System to be PCI Compliant. Hard coded password prompts do not recognize Employee Passwords. Instead, they require the input of a separate Administrator Password.
As detailed in the section on Configuring a New System, when the BackOffice Module is opened for the first time, a special prompt facilitates the definition of new Employee and Administrator Passwords. This first set of passwords is usually reserved for use by the authorized service provider. The Master Password and the Daily Password are additional security features usually reserved for use by technicians authorized to service the system.
The overall security configuration of any given Restaurant Manager POS system is determined by:
Restaurant Manager uses Security Levels to categorize employees and the types of POS Operations they’re authorized to execute. Security Levels range from zero (0) to nine (9) where nine offers the highest possible level of security and zero means no security is required at all.
Most POS Operations can be protected with a configurable password prompt recognizing all Employee Passwords with a Security Level equal to or greater than the Security Level of the operation, itself. For example, if a [Discount] is assigned a Security Level of 5, a password prompt will appear every time a user tries to apply the discount. The prompt will recognize the Employee Password of any employee assigned a Security Level of 5 or greater. The discount will abort, however, if employees enter a password with a Security Level of 4 or lower.
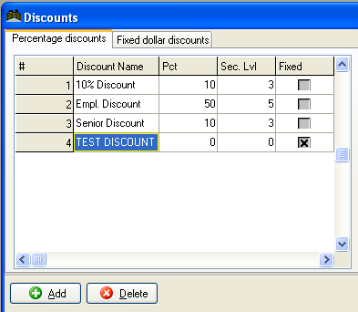
The sample screen shot below shows the different Security Levels associated with a variety of discounts. Notice that the TEST DISCOUNT is assigned a Security Level of zero [0] which means the password prompt is disabled and will not appear when a user applies this discount to a check.
The Discounts Setup Form is only one of a variety of Setup Forms where configurable password prompts maybe enabled.
A few POS operations related to credit card processing are protected with a password prompt that is hard coded into the software. Using Security Levels in conjunction with hard coded password prompts is covered in the section on Defining Administrators.
Security Levels may also be used to protect various BackOffice Functions.
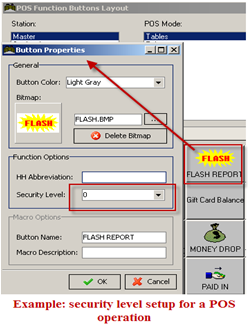
To protect a POS operation with a configurable password prompt, simply type a number between one (1) and nine (9) in the <Security Level> field on the Setup Form that controls that operation. For instance, the screen shot below shows the Security Level field that links a password prompt to issuing a Flash Report:
Most POS Operations are assigned a Security Level on the Function Button Setup Form. However, fields for defining a Security Level also appear on the Setup Forms below:
To disable a password prompt on any of the POS operations on the Setup Forms above, simply reset the Security Level to zero (0).
There are a few POS Operations that are protected with a hard coded password prompt that requires the input of an Administrator Password. In other words, the password prompt protecting the functions below is not configurable:Retrieve Credit Card Info
See the section on Back Office Security for details on protecting BackOffice Functions.
Restaurant Manager security features rely on four different types of passwords:
The Master Password provides access to any POS Operation or BackOffice Function that has been protected with a Security Level greater than zero [0].
It may also be used to Login to the BackOffice Module. However, the Master Password is not recognized at hard coded password prompts that require input of an Administrator Password.
Because the Master Password is not linked to an individual employee, it should never be used as a Manager Password by restaurant staff. Use of the Master Password should be reserved for the technicians who service the POS System. Otherwise the Audit Reports intended to show the employee responsible for a particular operation are rendered meaningless.
The Master Password is permanently assigned a Security Level of 9, is defined on the Security Settings Form, and may only be reset by Administrators with a Security Level of 9.
In newly installed systems the default Master Password may be required to access the BackOffice Module.
In new systems the default Master Password is set to four zeros. In other words, when you access the BackOffice Module immediately after installation, you must type <0000> when the Restaurant Manager Login prompt appears. If this default password does not work, it means the Master Password has already been reset to a password that is unique to your business and you must contact your service provider for assistance.
There is no default Administrator Password that is common to all POS Systems. However, during the initial configuration of a POS system most service providers create an Administrator record in the Employee database that is reserved for use by their own technicians. The passwords associated with this employee record often serve as default passwords for service technicians. If the Administrator Password associated with this record expires it may be reset using a Daily Password.
The only users authorized to change the Master Password are Administrators with a Security Level of 9. To reset the Master Password Administrators must follow the steps below to access the Security Settings Form:
Employee Passwords consist of a four digit code that is associated with a Security Level. Every employee authorized to operate the POS System may be assigned a unique four digit code and an associated Security Level. Both are defined on the Employee Setup Form.The Employee Password, itself, is defined in the “Password” field and must consist of four digits unless the system is configured with Fingerprint Readers in which case a fingerprint may serve as the password.
Two fields on the Employee Setup Form control the Security Level associated with a particular Employee: <Clocked in Level> and Clocked out Level>. Care must be used to ensure the <Clocked in> Security Level is equal to or greater than the Security Level of all POS operations the employee is authorized to execute. While any number from zero (0) to nine (9) may be used to define the <Clocked in Level>, it is usually set to <Use Job Class> as in the screen shot below.
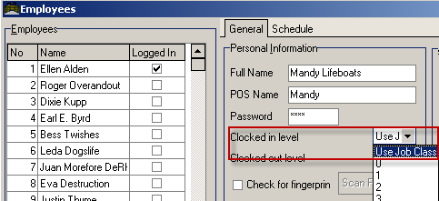
Linking Security Level to Job Class ensures that changing the Security Levels of certain password prompts does not also require adjusting the security level of every individual employee. For employees who work multiple jobs, the “Use Job Class” option also allows assigning different Security Levels depending on the work they’re doing.
The way Job Class Security Levels are organized, depends on the size and nature of any given business. But the chart below shows how Security Levels might be defined in a sample Table Service Restaurant. (Note that Security Level 9 is reserved for service providers):
|
Security Level |
Job Class |
Function Example |
|
0-1 |
Line employees, bus boys
|
Log In/Out, Print Time Slip |
|
1-2 |
Basic Server Functions |
Starting Order, Print Guest Check |
|
3-4 |
Bartender/Cashier Functions |
Fast Transactions, Open Cash Drawers |
|
4-5 |
Shift Leader/ Assistant Manager Functions |
Deleting Item From Check |
|
6-7 |
Manager Functions |
Voiding a check, Adding Menu Items, Reporting Functions |
|
7 |
General Manager functions |
Adding Employees |
|
8 |
Owners/ General Managers |
Managing Security Levels |
|
9 |
Service Providers ONLY |
Configuration Settings |
If the [EMPL Login] button is password protected, the <Clocked out Level> of all employees must be equal to or greater than the Security Level assigned to this operation. If the EMPL button is not password protected the <Clocked out Level> may remain at (0) although, in some businesses Manager Passwords are assigned high <Clocked out> Security Levels.
As Employees gain seniority and are trusted to execute more secure operations, there is no need to give them a new Employee Password. Instead you may simply change their <Clocked in> Security Level or Job Classification.
The only employees who may change their own Security Level are those who have a Security Level of 9 and who have been defined as Administrators. Employees are, however, able to change the Security Level and Password of Employees with a Security Level lower than their own – unless access to the Employee Setup Form, itself, is protected on the BackOffice Security Form.
Employee Passwords may be input at configurable password prompts but are never recognized at hard coded password prompts. The Master Password is recognized at any password prompt that accepts Employee Passwords.
Use of Employee Passwords is most efficient when you also implement Enhanced Password Control. Configuring a POS System with Magnetic Stripe Readers or Fingerprint Readers makes password input easier.
Restaurant Manager does not allow duplicate Employee Passwords.
A "Manager Password” is simply an Employee Password assigned to staff who fill managerial positions. Of course, a manager should always have a higher <Clocked in> Security Level than non-managerial staff. And, if the Manager is a salaried Employee, it may be helpful to define a high <Clocked out Level>, too. This allows Managers to enter their password and authorize protected operations with their own unique password whether or not they’ve taken the time to clock in.
It is recommended that managers NEVER use the Master Password to approve POS Operations.
Managers who are authorized to access sensitive data related to credit card processing must also be defined as Administrators with a separate Administrator Password that is distinct from their Manager Password.
On the Station Configuration Setup Form, there are settings that allow you to configure your system to accept password input in one of three ways:
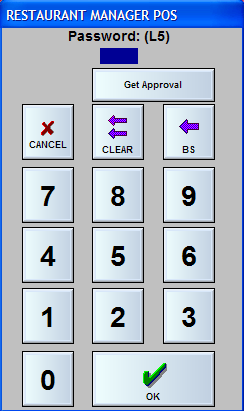
In the default configuration of Restaurant Manager, all password prompts appear above a touch screen keypad that employees use to type in their four digit password. This method of inputting passwords is not secure as dishonest people may have an opportunity to observe the number an employee types when this prompt appears:
If the [Use Employee Badges] setting is enabled the number buttons on the touch screen keypad are blanked out and the password must be input using Employee ID Cards and a Magnetic Stripe Reader.
If your Restaurant Manager system is configured with a Magnetic Stripe Reader, you may choose to enable the [Use Employee Badges] setting on the Station Configuration Form and distribute Employee ID Cards to your staff. (These cards may be purchased in lots of 100 from the ASI reseller that installed your system.)
Employee ID cards are pre-coded with a unique Employee Password. Whenever a password prompt appears, an employee simply swipes the ID card through the reader. When Enhanced Password Control is implemented Restaurant Manager will require all employees to swipe their ID card every time they enter an order.
To link a particular ID card to a particular employee:
Write the employee's name on the card OR start a list showing the employee's name and the number that appears on the front of the ID card that you assign to him.
Enhanced Password Control is a security feature that should be enabled at all POS Workstations used by more than one employee. This security feature requires servers & other employees to identify themselves every time they start a new order or add to an existing order. Systems configured with Enhanced Password Control typically use MSR or Fingerprint Readers to input passwords.
When Enhanced Password Control is enabled the system works more efficiently because password prompts are suppressed unless the user attempts an operation that has a Security Level higher than their own. Enhanced Password Control is enabled on the Station Configuration Form which means it is possible to enable it at some stations and not at others.
To activate Enhanced Password Control you must use the [Search Settings] button on the Station Configuration Form to locate and enable this setting:
You must also define a Security Level greater than zero for opening and editing existing orders in all of the POS Modules you use. See the section on POS Security for more information or use the [Search Settings] button on the Station Configuration Form to locate the settings below and assign each a Security Level greater than zero:
A default setting in Enhanced Password Control prevents servers from accessing orders opened by other employees at the same security level. To disable this default configuration you must use the [Search Settings] button on the Station Configuration Form to locate and enable this setting:Share tables among peers
When Enhanced Password Control is activated, the POS Status Screens have both and active and an inactive state which are controlled by two new buttons that appear at the base of the POS Status Screens: [BEGIN] and [END]. You must use the Function Layout Form add these button to the bottom of the Status Screen.
When the Status Screen is in an “Inactive” state Employees can clock in and out, but are not allowed to open orders or execute other POS operations until they identify themselves by inputting their password. The screen shot below shows the Table Service Status Screen in the “Inactive” state with most buttons grayed out:
Once a server has identified himself, the standard Status Screen Function Buttons appear, the [BEGIN] button is grayed out, and the [END] button is enabled. In other words, the screen is in an “Active” state and servers may open new orders or execute other POS operations.
When the server has completed the necessary POS operations he may touch the [END] button to put the Status Screen back in an Inactive state. Alternatively, you may configure your system to automatically revert to an “Inactive” state after a single POS operation has been executed. Or you may define a time-out period after which the Status Screen will automatically revert to an “Inactive” state. Use the [Search Settings] button on the Station Configuration Form to locate the settings below which control how the Status Screen reverts to an “Inactive” state:
You can set different Password Time outs at different POS Stations. This can be useful, for instance, at a bar station where only one bartender will be entering orders. When there is no need to revert to Idle Mode and re-enter the same password to begin each new order, simply define a time out period of “999” minutes.
Avoid using a large time-out value if you want to prevent employees from ringing orders on a different employee's sign-in. For example, one employee could sign in, enter his or her order and walk away from the POS terminal. If another employee uses the terminal before the time-out occurs, then it is possible that transactions are tallied to the wrong person. To ensure this does not happen, you might want to consider using the option below.
Some systems configured with Enhanced Password Control may also be configured with Auto Clerk Interrupt
Restaurants that wish to operate their business in a manner consistent with the Data Security Standards (DSS) promulgated by the Payment Card Industry (PCI) are required to implement a variety of measures to protect the credit card data provided by restaurant customers.
Restaurant Manager has been certified vas a PCI Compliant POS application because:
- Station Configuration Settings that control credit card processing
- The Security Configuration Form
- The option to ADD an Employee on the Employee Setup Form
- The Employee Admin Information Form
- The BackOffice Security Form
- The Revise Settlement function
Configuring software to meet industry standards, however, does not guarantee PCI Compliance. Other equally important measures that restaurants must implement involve hardware configuration, the facility in which the main server is housed, and day-to-day business procedures. Readers can learn more about PCI Compliance in the document: RM Reseller PCI Guidance.
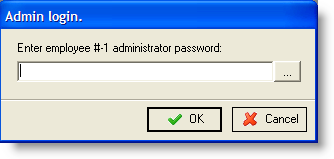
Administrators are employees who may access any area of the software related to credit card processing because they have been assigned a unique Administrator Password and given a Security Level equal to or greater than the minimum level defined on the Security Settings Form.
You must access the Employee Setup Form to define a new Administrator. If the Administrator Password expires, the employee’s status as an Administrator is automatically revoked.
The Administrator is a concept that was introduced into Restaurant Manager in order to meet the requirements of PCI Compliance. However, definition of an administrator is a key step in the initial configuration of every new Restaurant Manager system – regardless of whether or not the system will be configured to be fully PCI Compliant.
Before an employee may be setup as an Administrator you must first add them to the employee database. A new Administrator may only be setup by users who are, themselves, currently defined as Administrators.
Follow the steps below to define an existing employee as an Administrator….or to reset the password of an existing Administrator:
The following password prompt appears whenever a user attempts an operation that affects the storage or processing of sensitive credit card data:
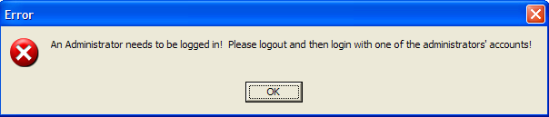
The prompt is hard coded into the Restaurant Manager software and requires input of a special Administrator Password that has a Security Level equal to or greater than the threshold defined on the Security Settings Form.
Hard coded password prompts do not recognize Employee Passwords and cannot be disabled by assigning them a Security Level of zero [0]. In fact, hard coded password prompts do not even appear unless the system detects that the user operating the software is defined as an Administrator. Users not defined as Administrators, view the following Error Message:
Only one POS operation is protected with a hard coded password prompt. The many BackOffice functions protected with a hard coded prompt are detailed in the section on PCI Compliance.
Administrator Passwords are recognized at the hard coded Password Prompts that protect credit card information.
The characters that comprise a specific Administrator Password are defined on the Employee Admin Password Information Form. In systems configured to be PCI Compliant Administrator Passwords must be “strong” passwords and they must be set to expire every 90 days.
Employees who use Administrator Passwords must be assigned a <Clocked in> Security Level equal to or greater than the threshold set on the Security Settings form.
Administrator Passwords are independent of Employee Passwords and are not recognized at the configurable password prompts that accept Employee Passwords.
See the section on Defining a new Administrator for instructions on assigning an Administrator Password to a specific employee.
The popup screen below appears when you select the option to [Reset Password] on the Employee Admin Password Form. It not only prompts you to enter a “strong” password it also rates the strength of the password:
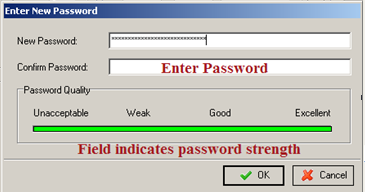
A “strong” password is an industry term used to denote that the password is complex enough to reduce the chances of it being guessed using brute force methods. The rules for strong passwords are:
The last 2 are not required, but add additional password security, and make an admin password quality “excellent”. When setting up administrator passwords keep in mind that the POS onboard screen keyboard only has the following symbols:
Various functions at the POS (e.g. credit card number retrieval) require an administrative password. The onboard screen keyboard limitations should be a consideration when creating an admin password.
The Employee Admin Password Form is used to define a unique Administrator Password for a specific employee. It may be accessed by clicking on the button of the same name on the Employee Setup Form – after the employee name has been highlighted on the Employee List.
The form is protected with an Admin Password prompt. The user operating the software must input their own Administrator Password at the prompt, NOT the password they wish to define.
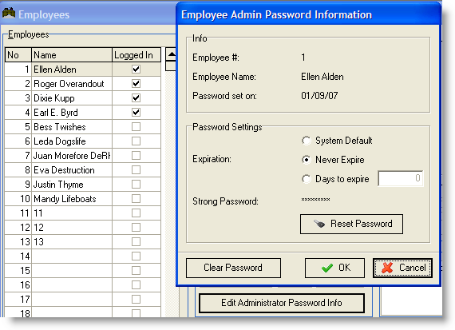
The Employee Admin Password Form is comprised of three key areas:
By default Administrator Passwords are configured to expire every 90 days because password expiration is required in all systems configured to be PCI Compliant but the default expiration setting can be disabled on the Security Settings Form.
Administrator Passwords that require an expiration period different than the default be given a unique configuration on the Employee Admin Password form.
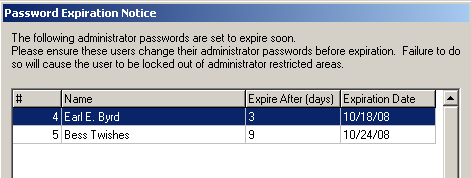
As expiration dates approach users who login to the BackOffice Module will be greeted by a reminder like this:
Once an Administrator Password expires it is no longer recognized at any Administrator Password Prompts and the employee to whom the password was assigned is no longer defined as an Administrator.
To reset an Administrator Password before it expires, follow the steps detailed in the section on Defining a new Administrator.
If admin passwords are forgotten or left to expire, they will need to be reset. Resetting a password is achievable through the following means:

After retrieving the Daily Pass code:
The Security Settings Form systems is particularly important in configuring a POS System to be PCI Compliant and, for this reason, the form is protected with a hard coded Administrator Password prompt. This form is accessed in the RM BackOffice Module by going to Setup > BackOffice > Security Tab
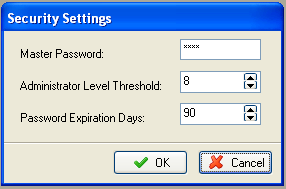
The Security Settings Form includes the following fields:
Daily Passwords can be used to reset Administrator Passwords that have expired. Daily Passwords are issued by ASI to authorized Restaurant Manager service providers. ASI cannot provide Daily Passwords directly to licensed users.
To reset Administrator Passwords when they have all expired, use the Daily Password to login to the BackOffice Module and then proceed with the procedures to define a new Administrator.