(continued from Configuring a New System)
New orders are opened and pending orders are tracked at a glance from the POS Status Screens. You can also open and close sales sessions, log employees on and off, change cash trays and execute other non-sale transactions from the Status Screens. There is a different POS Status Screen for each POS Mode, except the Fast Transaction (or “Quick Service”) Mode which has no Status Screen but, rather, is operated directly from the Order Entry Screen.
At the base of each of the main POS screens is a button labeled [MISC] that gives access to a Miscellaneous Functions Screen displaying secondary function buttons and associated screens. The function buttons on these various Miscellaneous Functions screens vary slightly in each POS Mode as described on the pages indicated below:
When the RMPOS software boots onto the POS station, a POS Status Screen will appear on the station monitor, except at those stations. You can configure your system to default to different POS Status Screens at different POS stations. If you have activated Enhanced Password Control the POS Status Screen will begin in idle mode. You can initiate active mode by entering a password using either the card swipe, finger print, or hit Begin and entering a password manually. have both an Idle Mode. If you have not activated Enhanced Password Control, the Status Screens always appears in Active Mode as shown in the sample Status Screen below:
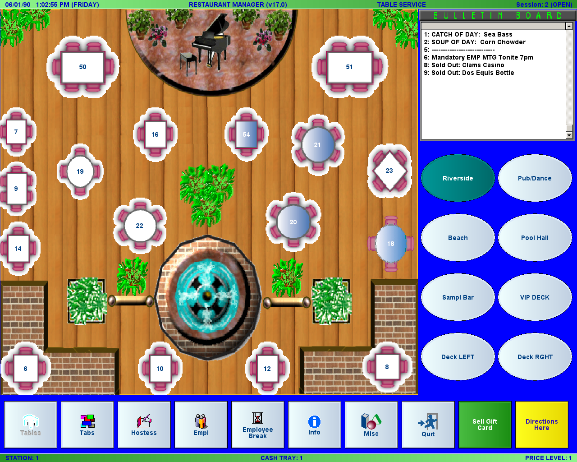
Tables Main Status Screen
The sample above is the Table Service Status Screen. . The features common to all the Status Screens are described below, including how the various function buttons work. The Table buttons and Table Group buttons on the Table Service Status Screen are described in the section Function Buttons & Macros. The Bar Tabs Status Screen appears in the section covering Bar Tabs. And the Delivery Status Screen appears on in the section Delivery / Quickservice
The green bar at the top of the Status Screen displays the active POS Mode as well as the current date and time. To switch to another POS Mode, press the appropriate button at the base of the screen. If RMTime is running on the rmserver, the POS station will synchronize its time with that of the rmserver.

The green bar at the base of the Status Screen displays the following information:

The station number in the lower left hand corner identifies that station you are working at. The station number is permanently assigned when the system is first configured using RMStart.
The Cash Tray number in the center identifies the number of the cash tray attached to a particular POS station. If your system is configured for Cashier Banking, if you do not initialize a tray, you will be prompted to do so when trying to settle the first order of the session. To change cash trays or view information on the active cash tray, press the [MISC] button and select the [Cash Tray Options] function button .If your system is configured with Server Banking the system displays “will always default to the local station number.
The number (or name) at the lower right identifies which of up to 14 different price levels is currently in usePrice levels are created when you define multiple prices for each item on the menu. If you have scheduled automatic price level changes, this display will change accordingly. You can also temporarily change price levels from this Status Screen as described in the section Price Level Changes.
All Status Screens have a number of common function buttons that appear across the base of the screen, as listed below.
NOTE: If a button labeled [BEGIN] appears at the base of the Status Screen, the screen is in Idle Mode and configured with Enhanced Password Control. The buttons below appear only when a password is entered to put the screen in Active Mode.
If you press the [MISC] button at the base of any POS Status Screen, a selection of secondary function buttons appears.
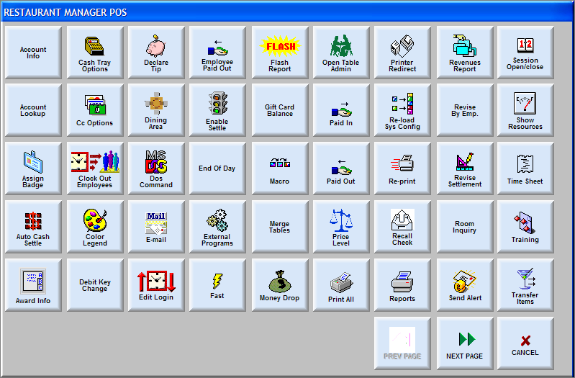
The sample screen above is the Miscellaneous Functions screen that appears behind the Table Service Status Screen. When you are in Delivery Mode or Bar Tabs Mode some additional buttons appear on the Miscellaneous Functions screen. The listing below includes a description of these additional buttons:
Account Info- Press the button to look up a Guest Account balance.
Account Look-up – Press this button to look-up Guest Account Number for a particular client as described in the section Accounts- POS Operations.
Assign Badge – Press this button if you want to assign a badge to an employee. When you do, Restaurant Manager will ask you to choose an employee. Then it will ask you to swipe the badge. If the password encoded on the badge does not conflict with another employee, it will assign that password to the chosen employee. You can repeat this process to assign multiple badges at once; press [Cancel] when finished.
Auto Cash Settle – Press this button when you are in Delivery Mode or Table Mode to settle to “CASH” all open orders assigned to a particular employees.
Award Info- Use this function button to find status for a customer award balance. This function requires the Frequent Diner optional module.
Button Info – Press this button when you are in Delivery Mode to select the type of information you would like to see displayed on the order buttons that appear on the Delivery Status Screen.
Cash Tray Options – Press this button to initialize a new cash tray, close out a cash tray, or open the cash drawer. You can also view information on the various cash trays initialized during the current sales session.
CC Options – Press this button to re-print the receipt for a credit card transaction before the settlement has been finalized. You can also use this button to disable/enable the Credit Card Authorization interface. If you are having communication problems, you may wish to temporarily disable this interface. You can only enable the authorization interface if it has already been configured as part of your system. This is cover in greater detail in the section Credit Card Management at POS.
Clock Out Options- Use this button to clock out several employees at the same time. You can clock them out for the current time, start time, or manually enter a time. Color Legend- Use as a quick reminder of the different colors used on tables and the status the color is associated with.
Debit Key Change- Used in conjunction with Canadian Debit processing.
Declare Tip - To modify declared tips, choose MISC from the main POS screen, then “Declare Tips.” Restaurant Manager will ask you to choose an employee if Enhanced Password in not enabled If enabled the information will only show for the employee who swiped into the system. It will then display their logins for the current pay period. If you are not using pay periods, it will display the logins for the past 2 days. Touch the login of interest and enter a new tip declaration amount. You can also adjust tips received and paid to other if enabled for a Job Class.
Dining Area -- Press this button when you are in Table Service Mode to change the table buttons display from one Dining Area to another.
DOS Command – Press this button to type a DOS command or Windows executable that Restaurant Manager will execute at the active DOS prompt.
E-mail -- Press this button to retrieve e-mail messages for a particular employee.
Edit Login- Use this function to adjust an employee’s time.
Employee Paid Out- Use this function button when assigning a specific cash amount to an employee. The amount transferred will appear as a negative on a cash tray report and will be reflected in the Cash Due on a server revenue report. This function is usually used when the “house” provides money for a starting bank when using cashier banking.
Enable Settle – Press this button to enable or disable the settlement function at a particular POS Station. When settlement is disabled, the [SETTLE] button is grayed out and you cannot access the Settlement Screen from that particular POS station.
End Of Day- Initiate the OED sequence by pressing this button. This function can be configured to not only close a session but have prompts for logging out employees, cash trays, and settling credit batches. More on this topic can be found under the section End of Day (EOD).
External Programs- use this button to access programs outside in POS module. See the topic External Programs Setup Form for more information.
Flash Report – Press this button to issue a summary report of all sales activity during the current Sales Session.
Full Reports- pressing this button allows user to gain access to a touch friendly version of the RM Report Module.
Gift Card Balance- Use this button to view on-line gift card balances.
Macro -- Press this button to create a new “Fast Button” Macro that will appear at the base of the active POS Status Screen. You can also use the [MACRO] button to enable or disable a previously defined macro button.
Merge Tables- Use this function button to temporally merge two or more tables.
Money Drop – Press this button to record a payment into the cash drawer by a delivery driver or by a waiter (when your system is set up for server banking).
Open Table Admin- press this button to access the Open Table Interface (optional module)
Paid In/Paid Out – Press these buttons to open the cash drawer and make a note about any non-sale transaction where money is deposited into or removed from the cash drawer.
Price Level – Press this button the change the prices that are charged for the various items on your menu from one price level to another.
Print All – Press this button when you are in Table Service Mode or Delivery Mode to print a check for all outstanding orders assigned to a particular employee.
Printer Redirect – Press this button to redirect a prep printer. When you press the button, the list of prep printers will appear. Select the prep printer you wish to redirect followed by the prep printer you wish to redirect to.
Quit- Use this function button to exit POS program and return to Windows screen.
Re-load Sys Config -- Press this button after making adjustments to the system configuration from the RM BackOffice Module to ensure that the changes are applied to all subsequent transactions.
Re-Print – Press this button to reprint a check from a POS station after it’s been settled. A selection list is displayed on screen. Use the scroll buttons to highlight the desired order and press the “print” button to re-print the check. This option uses the existing “reprint” security level.
Recall Check- use this button to re-open a settled order. Checks recalled are placed in the Main Tab Status. More on this procedure can be found under the topic Recalling a Settled Check
Reports- pressing this button triggers a screen with a list of seven reports covering labor, table management, and sales.
Revenue Reports- pressing this button trigger a filter screen where you can search for a particular employee’s sales report for a specific shift past or present.
Revise by Emp. - Pressing this button will have Restaurant Manager ask you to choose an employee if Enhanced Password is not enabled. If enabled, the information will only show for the employee who swiped into the system. It will then display a list of closed checks for the specific employee. You may select a check to revise the settle. The closed checks listed can be configured to show certain transaction types.
Revise Settlement – Press this button to change the payment type recorded on a particular settlement or to change the tip amount. After revising settlement, RM will print a receipt showing the original settlement information (before revising settlement) and the new settlement information (after revising).
Room Inquiry- Use this button if your system is configured the Micros Compatible PMS to check the validity of a room.
Send Alert- use this button if your system is configured the WO handheld unit to summon a manager.
Session Open/Close -- Press this button to open a new Sales Session or to close the active Sales Session
Show Resources – Press this button when you are trouble shooting a particular POS Station to view the available System Resources, GDI resources, User Resources and Free Memory at that station.
Tabs Displayed – Press the button when you are in Bar Tabs Mode to filter the pending order buttons that appear on the Bar Tabs Status Screen .
Tab Order- Use this function button to arrange tabs displayed alphabetically or by tab number.
Time Sheet – Press this button to print a time slip for an individual employee.
Training Mode - Press this button to enable the Training Mode. While in training mode regular orders cannot be process. In addition, orders will not be sent or cash drawers will not open. Press this button again when in training mode to return to “Live Mode”.
Transfer Items – Press this button when you are in Table Service Mode to transfer an order from one table to another. You can also transfer a bar tab to a table but you must initiate the transfer from the Order Entry Screen, not from a Status Screen.
Transfer Tabs – Press this button when you are in Bar Tabs Mode to transfer one employee’s open orders to another employee.
Transfer Tables – Press this button when you are in Table Service Mode to transfer all the tables from one waiter to another.
Unmerge Tables- Pressing this button reverses the affect of merging tables.
Version- Pressing this button affects a screen listing current executables files.
View Employees – Press this button to see a listing of all active employees on your payroll that highlights all those currently logged on to the system.
View Button Log- This button will trigger a log screen that tracks all button pushes. The log can be filtered by session, station, employee, order, etc. using the navigation button on the right.
View Checks- pressing this button will bring about a filter screen where you may use filters to view a specific order on screen. You can view checks from both past and current screens.
View EOD Log- Use function button to review EOD (function) logs for current month.
View Tables -- Press this button when you are in Table Service Mode to see a listing of all open tables in the restaurant, the waiter serving the table and the customer name (if the order is linked to the frequent diner database).
To set the default POS Module at a particular POS Workstation:
[Note: This list of modules includes the three basic POS Modules: Table Service, Tabs and Delivery /Quickservice; as well as two Add-on Modules: Reservations and Advance Orders.]