(continued from Hostess Module)
Bars or nightclubs that allow customers to open tabs should use the Tabs Module. The Tabs Module is distinguished by:
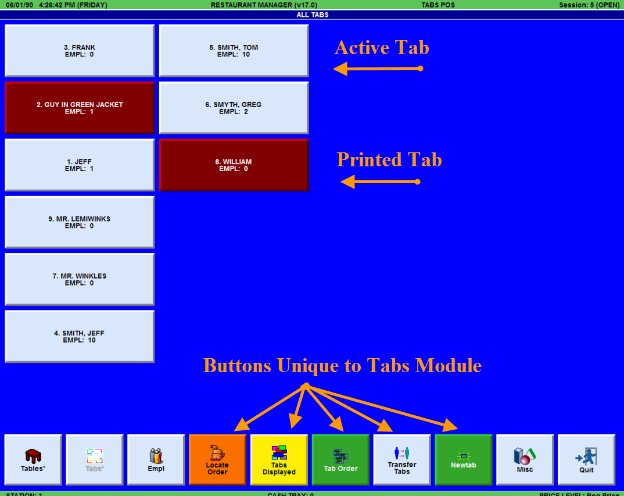
In the Tabs Module, pending or “open” orders are displayed on the Tabs Status Screen which includes many common features that appear on all POS Status Screens:
Order Button Area
The body of the Tabs Status Screen is used to display buttons for each of the “open” or pending orders that has been processed in the Tabs Module. New orders (and order buttons) are created each time you start a new order.
Restaurant Manager uses color coding to display the current status of any pending tab order. The status options include:
Open an Order- Every time you use the [NEW TAB] button or the [CC TAB] button to start a new order, the system creates an order button that is displayed in the Order Button Area of the Tabs Status Screen. Gray is the default color for open order buttons.
Printed- The order button displayed on the Tabs Status Screen changes color every time you use the [PRINT] function button on the Order Entry Screen to print a check summarizing a particular order, Red is the default color for printed orders.
Tab Orders are processed and tracked according to Order Number. However, the buttons on the Status Screen Order Button Display may be configured to sort orders by:
The Tabs Module can be configured to start new orders in multiple ways. If Enhanced Password Control is enabled the first step is always to swipe an Employee ID card or use a fingerprint reader. The next step depends on whether your system has been configured to start new orders with:
You can configure your system to open a new tab with the swipe of a credit card. The the recording of credit card information is designed to prevent walkouts and charges in excess of what the customer can afford. Order buttons automatically display the customer name which is read right off the card. There are two methods to record a credit card information: pre-authorization and non-authorization. The latter method simply records the name, credit card number, and expiration date: it does not verify if funds are available in the card holder's account or check if the card is stolen. The benefit to this method is the cardholder will not have funds"on hold" until the CC merchant clears the transaction. Pre-authorization is excellent for to validate if the card is stolen or if there are available funds in the card holder's account. Restaurant manager allows you to pre-authorize a card for any amount during the initial purchase period and allows for re-authorization when the customer is nearing the initial authorized amount. You must use Mercury Payment Systems for credit card pre-authorization.
Pre-authorized credit card tabs can be initiated using one of the following methods dependant which POS mode you are using:
To configure your system to start a credit card tab transaction:
Clerk Interrupt is a feature in the Tabs Module that should be enabled when multiple bartenders (or servers) are sharing a POS station and need to rapidly switch between various open tabs. Clerk Interrupt allows each user to suspend the order of a fellow bartender to recall their own open order. As soon as the user inputs their password -- usually by swiping a badge -- the system recalls their last pending order to the Order Entry Screen. If the user has no open orders, the Tabs Status Screen appears, ready to process a new order.
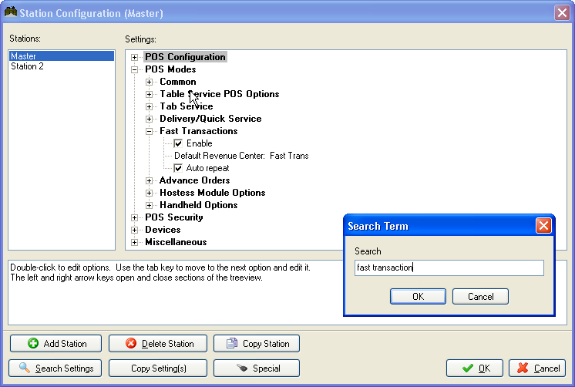
To enable Clerk Interrupt, use the [Search Settings] button at the base of the Station Configuration Screen to locate and enable the following configuration settings:
When Clerk Interrupt is enabled, it is recommended that the Default Tab Filter be set to “Single Employee” to ensure that each user sees only their pending tabs on the Tabs Status Screen.
When Clerk Interrupt is enabled and the security default is configured for immediate time-out after 1 transaction, a special Function Button must be enabled to allow users to work on multiple orders at once. The [Exit No Time Out] Function Button may be added to the base of the Order Entry Screen and used to exit one order and access another one without inputting an Employee Password.
The following settings are used to control the behavior and access of the Tabs Module.
The following settings are found under the Tabs Mode branch In the Station Configuration. The settings listed below control screen and function button behavior.
When you disable this button you will not be able to access the Tabs Module from the station highlighted on the Station List of the Station Configuration Setup Form.
All Tabs- Selecting this enables viewing tabs for all stations and all employees at once.
Single Employee- As the name implies, selecting this option displays only the bar tabs for a single employee. This is usually the best choice when using server banking (i.e., each server carries his/her own bank). If "Enhanced Password Control" is ENABLED, then Restaurant Manager will display bar tabs for the employee who activated the POS terminal (i.e., pressed the "BEGIN" key and entered his/her password). If "Enhanced Password Control" is DISABLED, then the employee number must be entered when selecting the "Tabs to Display" option from "MISC" on the bar tabs screen (POS).
Single Station- If this option is selected, Restaurant Manager only displays the bar tabs that were created at that station. This option is usually best in a cashier banking environment (i.e., 1 or more bartenders working a single cash drawer).
The following settings are found under the Security tree branch In the Station Configuration. The settings listed below control who has access to tabs and when.
Avoid using a large time-out value if you want to prevent employees from ringing orders on a different employee's sign-in. For example, one employee could sign in, enter his or her order and walk away from the POS terminal. If another employee uses the terminal before the time-out occurs, then it is possible that transactions are tallied to the wrong person. To ensure this does not happen, you might want to consider using the “Immediate time-out after 1 transaction”.
However, you may want to extend the time out period at a busy bar where only one person has access. Extending the password time out period will prevent the employee from having to enter their password every time they place an order. It is suggested that you train the employee to “End” button if leaving the POS station for a prolonged amount of time.
This section details the BackOffice settings that are usually activated in systems configured for bars and nightclubs.
|
Menu |
POS Function Buttons |
Station Configuration |
Revenue Centers |
|
Price Schedules |
|
CC Tab |
Prompt for reference at beginning of order |
|
Modifiers disabled at Bar |
Revise by Employee |
Revise by Employee |
Tax table for food (Smart Tax) |
|
Price Multipliers on Drink Modifiers |
Tabs Displayed |
Tabs Displayed (Employee) |
POS Modes |
| CC Pre-Auth |
Cash |
Use Employee Name |
Smart Tax |
|
Settlement & Tips |
Recipe Lookup |
|
|
|
|
Re-Order |
|
|
Night Clubs and bars usually are configured to do Cashier Banking at the Bar stations while waiters and waitresses do Server Banking.
In some nightclubs and bars, drink orders are settled as soon as they are rung up. In this case, there is no need to use the Status Screen to track pending orders and it is recommended that you enable “Fast Transactions”. To enable Fast Transactions:
After enabling Fast Transaction, the Fast function button can be added to any of the Module Main Status screens using the POS Function Buttons Layout.
The following settings should be used when using fast transactions:
When you disable this button you will not be able to access the Order Entry Screen for processing a Fast Transaction from the station highlighted on the Station List of the Station Configuration Setup Form.
NOTE: In the Delivery/Quickservice Module there is a setting labeled “Automatically Begin New Order” that you may wish to activate in place of the Fast Transaction option.
This section details the BackOffice settings that are usually activated in systems configured with Fast Transaction.
|
POS Function Buttons |
Settlement & Tips |
Station Configuration |
|
Fast |
Auto Credit Card Detection |
POS Modes |
|
Send to Tabs |
Cash |
CC Tab |
|
CC Tab |
|
Reprint Current Station Only |
|
Cash |
|
Auto Repeat |
|
Recipe Lookup |
Revenue Centers |
Change price level on fly |
|
Reprint (Check) |
Vat Tax |
|
|
Send to Tabs |
Smart Tax |
|
|
CC Tab |
|
|
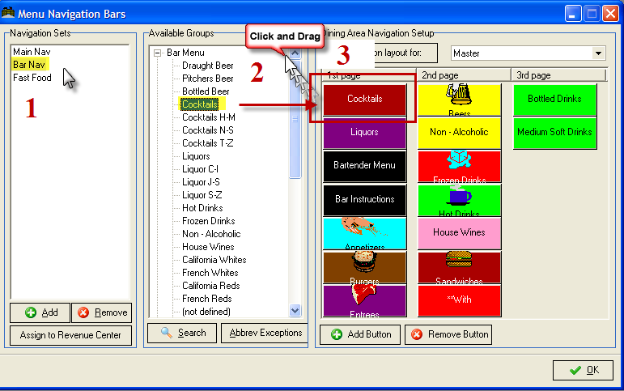
The sample screen shot below shows a Cocktail Menu that is configured with both Half Height Buttons and Navigation buttons.
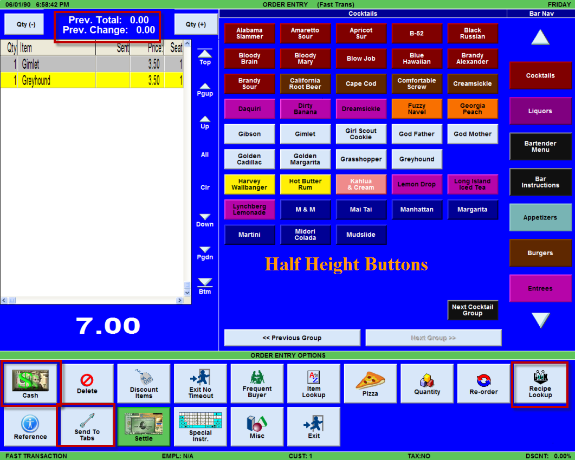
Although there are four groups of cocktails on the menu, the Nav Bar displays only one “Cocktails” group button, the first of four consecutive cocktail groups defined on the Menu Setup Form.
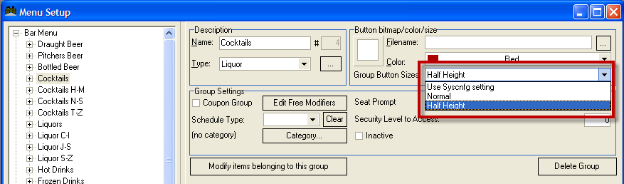
Half Height Button mode ensures that the first and second groups of cocktails always appear together whenever you touch [Cocktails Button] on the Nav Bar. To display up to 120 Cocktails on two screens connected via Navigation Buttons you must create at least four consecutive Menu Groups like those on the sample Menu Tree below. Each of the consecutive cocktail groups should be configured so that the [Group Button Size] is set to Half Height:
The Half Height configuration ensures that every time the first cocktail group is displayed on the Menu Area of the Order Entry Screen, items from the next consecutive group will also appear on the same screen. This link shows a sample screen shot where two cocktail groups are displayed in the Menu Area of the Click here The second and the fourth consecutive cocktail groups should be configured with Navigation buttons for moving back and forth between.
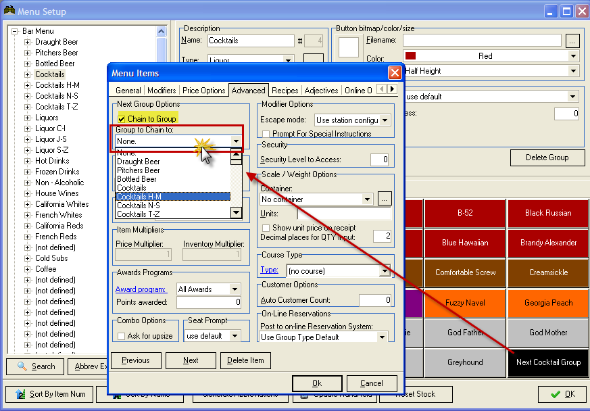
Follow these instructions to set up four consecutive menu groups that translate into two pages at the POS. First, go the Menu Setup in the RM BackOffice (using demo menu).
Half Height Setup
Next Group Button
Back to First Page
Add Group to Navigation Bar
In the RM BackOffice: go to Setup > Menu > Menu Navigation.
Large Total Displays
In a bar environment where managers might wish to easily spot check bartenders and other staff are ringing up the correct amounts, you may configure the system so that:
