Businesses that offer delivery service as well as businesses that offer Quickservice or counter service should use the Delivery / Quickservice Module. This module is distinguished by:
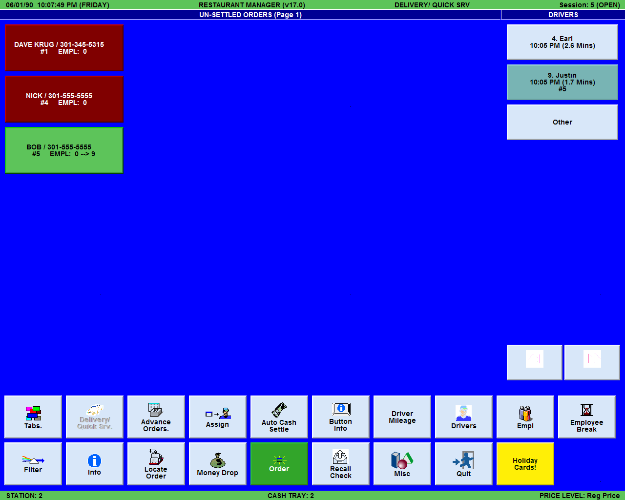
The Delivery screen is divided into two main parts. Orders are displayed on the left and drivers are displayed on the right.
By default, the system will allocate the majority of the screen for displaying orders and a relatively smaller portion for displaying drivers; however, these portions can be changed along with the number of buttons in each section. The following parameters located in RM BackOffice > Setup > Station Configuration can be used to customize the main Delivery screen to suit your needs.
Sample Macros
In Delivery operations it is common to create macros attached to the [Filter] and [Button Info] function buttons. You can configure macros to change the information displayed on the main status screen at a simple touch of a button. You default screen may show addresses but with a touch of a button you can change the information displayed to “elapsed time” and back again. You can also create a macro to display “All Orders” if the default screen shows “Un-settled orders”.
When using Cashier Banking, it is recommended that you create a macro button for initializing cash trays. This cash tray macro would automatically execute all the steps involved in initializing a cash tray with pauses at appropriate moments for entering an employee name and the cash tray number, etc. You may also initiate cash tray without linking to employees if you use one drawer throughout the day.
Who should use?
Businesses delivering food to customers should use the Delivery Module. The Delivery Module is distinguished by:
The delivery module has several functions unique to its operation. If you reimburse drivers for mileage, you will want to enable prompt to record mileage and set up monetary rates to calculate the re-imbursements. Information listed on the buttons can be changed on the fly using the [Filter] and [Button Info] function buttons. Delivery and phone-in orders can be expedited using Caller ID and the “Last Order Recall “functions.
The following sections outline key features that should be enabled for the Delivery Module. You will also want to read the sections with Customer Managementt for additional instructions for controlling customer database prompts such as phone numbers, street addresses, etc. You will also want to visit the chapter on Gratuities & Service Charges if you planning on implementing delivery charges.
In addition to enabling the “Prompt for Phone’ option in the Revenue Center setup form, you will want to enable the following:
When you disable this button you will not be able to access the Delivery/Quickservice Module from the station highlighted on the Station List of the Station Configuration Setup Form.
NOTE: If your system does not include the Delivery/Quickservice Module this setting will be grayed out on the Station Configuration Setup Form and you will not be able to enable a Delivery / Quickservice Module Button at any of the stations on your system.
NOTE: This setting is overridden by another setting on the Station Configuration Setup Form that configures a station to prompt for a Revenue Center at the start or end of an order.
Note: even when this option is enabled, delivery orders can be re-assigned to a different employee (i.e., the driver) using the [ASSIGN] function in POS.
Note: the dispatcher can always override the system by assigning an order to a different driver; however, this option merely puts the higher priority drivers near the top of the list.
If your drivers typically take more than 1 delivery order at a time, and then you should enable this option, but if they frequently just take one order at a time, then you should disable this option.
This option does not prohibit you from entering the same number more than once, it only displays warning box for your information.
Driver designation is done through the Job Classification Setup form in the RM Back Office. You can set up a job class specifically for a driver or you can use another jobclass (i.e. server). All you have to do is enable the option for Driver.

Anyone with a Driver designation will appear in the driver column.
Guest Check Printers
Busy delivery operations often use a special POS Printer in the kitchen for printing delivery guest checks. This allows kitchen workers to easily affix the guest check to the delivery package. Guest checks and sales receipts from Carry Out orders, etc are printed on the main Receipt/Check Printer at the POS Workstation where the customer’s order was entered.
To configure a special Delivery POS Printer you must activate the “Delivery Order” setting on the Revenue Center Setup Form and then configure a Delivery Printer on the Station Configuration Setup Form.
Prep Printers
Prep printers are assigned for pizza within the Pizza matrix Setup Form (if you are using the Pizza Matrix for pizzas):
You may also want to consider using Label Printers. Restaurant Manager is capable of sending items to multiple printers. You can send menu items to easier to read standard prep area printers, print easy to read guest check for the drivers, and print a label to affix to each delivery item to insure delivery accuracy.
This feature allows you to print a detailed Revenue Report for reconciling with each delivery driver when he ends his shift. You may configure your system to print this report only at one POS station (where the drivers clock out) and not at another (where the bus boys clock out)
It is also typical that some features be disabled in the Delivery Module, especially the following:
If this feature is turned on, pizza toppings and other menu item modifiers are listed separately from the pizzas and menu items themselves.
Because delivery orders are ultimately assigned to an employee (a driver) other than the one that took the phone order, Enhanced Password Control is not particularly useful at POS Stations where orders are being entered. You may wish to activate this feature at POS stations where orders are settled.
This feature causes extra touch buttons to appear on the Order Entry Screen that cannot be used in the Delivery Module.
In busy bars and quick service establishments orders are often settled as soon as they are rung up. There is no need to use the Status Screen to track pending orders. So it is recommended that you configure your system to stay on the Order Entry Screen rather than reverting to the status screen each time an order is settled.
Use the Station List on the Station Configuration Form to highlight the Master Configuration (or other station) where you wish to configure the Order Entry Screen as the default display. Then use the [Search Settings] button to locate and activate the following setting: Automatically Begin New Order
This Delivery / Quickservice setting are similar to the Auto-Repeat setting in the Table Service and Tabs Modules. The screen will revert to the phone number prompt if you have “Prompt for phone number “enabled in the revenue center,
You may also configure your system to automatically transfer orders from the Advance Orders Module to either the Delivery or Tabs modules.
Ready Time is a POS function of Restaurant Manager that allows users to input a pre-determined time for when the customer would like to receive the order. The “Ready Time” is static and will print on the prep area printer. This function is not to be confused with Advanced Ordering, Delayed Send, or Timed Send functions. However, it may be used in conjunction some of these functions if wished. Additional setup is required to add the command line for Time send in the Printer Template Editor. To expedite the ordering process, users may want to move the Time Send function button to the order entry screen via the POS Function Button Layout form.
Most systems are configured to automatically print the send time. Typically, orders will be made upon receipt of the order. To place the “Ready Time” on the prep ticket, you must use the [Ready Time] function button, by default, found in the MISC functions of the Order Entry screen. The following is a screen shot representation of the “Ready Time” entry screen.
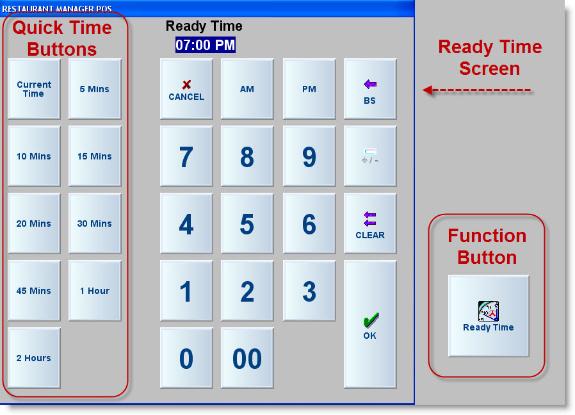
By default, the current time will always be displayed in the time display field when the “Ready Time” screen first appears. Use the keypad to manually enter the desired time you want the order to be ready. You can distinguish time of day by using the AM or PM buttons and use the BS (backspace) or CLEAR buttons to correct mistakes. You can also use the quick time buttons on the left side of the “Ready Time” screen to enter a time. The time listed on the buttons will add to the current time. For example, if the current time of the POS is 11:25 AM and you press the [20 Mins] button, the ready time displayed will be 11:45 AM. Press the [OK] button once you have entered the ready time. It is recommended that you use the “Ready Time” function after all menu items have been ordered. Note: you will still have to send the order to kitchen manually or by one of the automated send functions.
Note: The Ready Time will only print if different from the order time
This section details the BackOffice settings that are usually activated in systems configured for Delivery.
|
General |
Menu |
POS Function Buttons |
Station Configuration |
|
Phone Prefixes |
Pizza |
Info |
POS Modes |
|
Caller ID |
Adjectives |
Filter |
Print Check on assign |
|
Last Order Recall |
Combos |
Button Info |
Prioritize Drivers |
|
Map Interface |
Auto Customer Count |
Locate Order |
Alarm Condition |
|
|
|
|
|
|
Settlement & Tips |
Prep Printing |
Revenue Centers |
|
|
Group Discounts |
Timed Send Delays |
Require Assign |
|
|
Coupons |
Label Printer |
Delivery Orders |
|
|
|
Ready Time |
Start in Pizza Menu |
|
|
|
|
Prompt for Phone |
|
|
|
|
|
|
Caller ID, an optional interface, is a useful tool used to expedite the order taking process. In addition, Caller ID insures accuracy of telephone numbers be taken reducing errors and costly mistakes. More on configuring Caller ID setup can be found under the topic: Caller.
The Restaurant Manager Map Interface uses Microsoft Mappoint. This interface is ideal for establishments with delivery. The map interface can help route orders and cut drive time down thus reducing costs while improving delivery times. More on the map interface can be found in the topic: Map Interface.
The Delivery/Quickservice Module is recommended for Quickservice and counter service operations. When configuring your software to work in these environments it is usually appropriate to include the following in your system configuration:
This section details the BackOffice settings that are usually activated in systems configured for Delivery.
|
General |
Menu |
POS Function Buttons |
Prep Printing |
|
Customer Pole Display |
Custom Groups |
Coupons |
Timed Send Delays |
|
Coin Dispenser |
Adjectives |
Cash |
Ready Time |
|
KDS |
Combos |
Refund |
Auto send on Exit |
|
Frequent Diner |
|
Reprint |
|
|
|
|
|
|
|
Revenue Centers |
Settlement & Tips |
Station Configuration |
|
|
Prompt for Reference |
Group Discounts |
POS Modes |
|
|
Quick Service |
Coupons |
Default Revenue Center |
|
|
|
Award Program |
|
|
Enable this option if you want repeated fast transactions. After settling a fast transaction, Restaurant Manager will automatically begin another one. This option is useful in quick service / counter service operations.
