(continued from Labor Management)
Your Restaurant Manager POS System allows you to track the number of customers that frequent your business each day. You may gather this information by:
Tracking customer counts will allow you to better manage your labor. Example- you can use the Sales by Hour or Sales by Revenue Center reports to determine busy periods and adjust labor scheduling to match. You can also use one of the Comparison reports to determine trends or to view employee sales averages per customer.
Through one of the many Restaurant Manager programs you can also add value to your system by tracking individual customer information. If you have purchased the Frequent Diner/Awards program, you can incent customers to visit your restaurant in slow periods. This not only increases sales during slow periods but will help reduce employee turnover by putting more money in their pockets. Delivery establishments will want the customer database program to retain customer information when taking phone in orders. In both programs, by tracking customer information, you can use the customer database to do marketing via mailing labels.
Restaurant Manager may be configured to track customer counts in a variety of ways. You may configure the system to prompt for the customer count each time and order is opened. This setting is typically enabled in tabled Service environments. Alternatively you may configure the system to generate automatic customer counts based on the number of entrees on the order. This setting is typically enables in Quickservice environments.
Enabling a prompt for customer counts is one of many settings that must be configured as a two step process involving both the Revenue Center Setup Form and the Station Configuration Form. This gives you the flexibility to enable the prompt only for certain types of orders or only at certain POS Stations.
To enable a customer count prompt:
Once this option is configured, Restaurant Manager will automatically scan through the check after finalizing a transaction and set the customer count based on the items purchased.
If your system is configured with a Customer Database, you may link orders opened in any POS Module to any customer in your database.
Information displayed on order buttons on the Delivery Status Screen may include either the customer name or address.
When using the Delivery Module, you will usually index each customer record to a phone number and then configure your system to prompt for this phone number each time a new order is opened. In systems configured with Caller ID, the number of the incoming phone call is used to automatically link the order to a record in the customer database. If your system is not configured with Caller ID, employees taking incoming calls must type in the customer’s phone number.
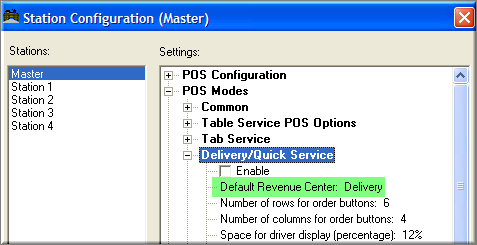
To configure your system to prompt automatically for customer info, you must first define the Revenue Center you will use to process these orders and then define this as the default Revenue Center at each station where the orders should be linked automatically to customer info:
NOTE: You may configure other POS modules to prompt for customer info every time an order is opened. But in this case, you would not use the “Delivery” Revenue Center described below.
It is possible to configure your system to prompt for customer information every time you open a new order in the Tabs or Table Service Modules. But the default configuration of these two modules is set so that linking an order to a customer is done manually on an occasional basis from the POS Order Entry Screen.
If you link an order to a specific name in the customer database, this name will always be displayed on the appropriate table button on the Table Service Status Screen. You may also display the customer name on order buttons on the Delivery Service Status Screen. In the Delivery Module you may configure certain stations to display either the customer name or address on the order button. If the default configuration is not set to display customer information on the order button, you may manually change the information displayed on the order buttons from the Status Screen in the Delivery Module.
Names from the customer database are never displayed on order buttons in the Tabs Module. However, there are two other ways to display customer information on a button on the Tabs Status Screen. You may type the customer name into the reference field and display this field on Tab Order buttons. Or, if you have enabled the credit card tab feature, you may read the customer name off the credit card when you swipe the card to open a new order.
Restaurant Manager provides a great deal of flexibility in the format for saving and recalling customers. By default, the system is configured to identify each customer with his or her unique phone number. However, in some environments, customers may be reluctant to volunteer their phone information, in which case, saving and recalling customers by “name only” may be a good alternative.
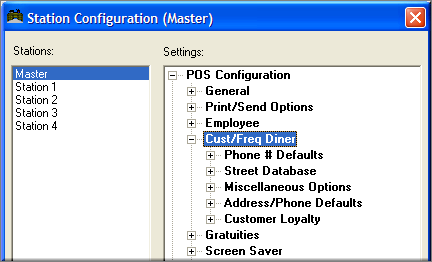
To store customers by name, you must set several options in Setup->Station Configuration. Under the “Phone # Defaults” section, set the following options.
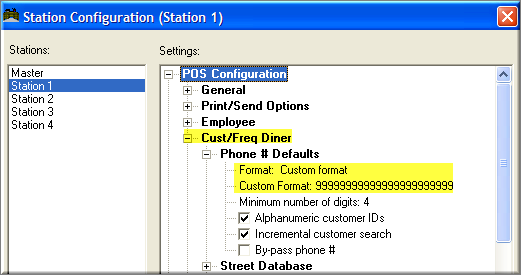
With the above options set, you are ready to save and recall customers by name rather than phone number. Note: entering phone numbers as Customer IDs can still be done in this setup. Meaning, a Customer ID can either be a name or a number. However, it is suggested that you decide which one do you like and stick with it.
Also, first, you must decide on a convention for entering customer names. For example, do you want to enter first name followed by last name, or last name <comma> first name? In either case, you should choose one convention and stick with it because all customers must have a unique identifier and once a customer has been entered into the database, their identifier cannot be changed.
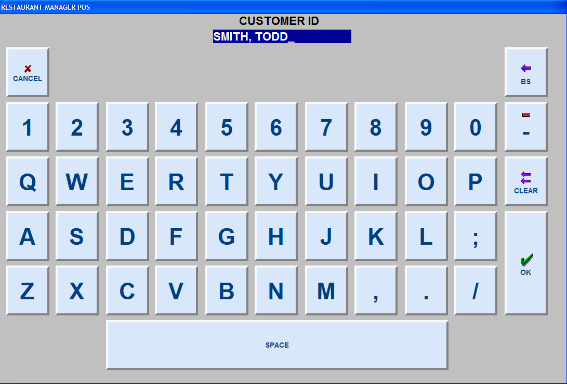
When you choose the “Frequent Buyer” option under MISC in Order Entry of the Point of Sale module, the following incremental search window is displayed.
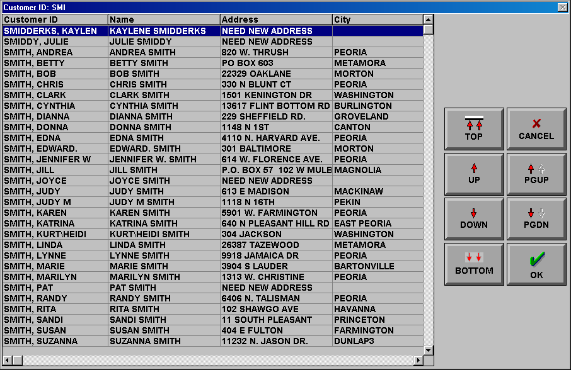
At the very top of the window (in the blue header), the incremental search text is displayed. In order to perform an incremental search, you must have a regular PC keyboard. As you type in alphanumeric characters, your search string is displayed at the top of the window and the highlight bar automatically advances to the first customer that matches your search string exactly. If you attempt to enter a string for which there is no match, the incremental search window will not accept your entry.
You may use the <Backspace> button to correct typing (or spelling) errors. You may also scroll up and down using either the on-screen touch buttons, or the <Up>, <Dn>, <PgUp>, <PgDn> buttons on the keyboard. Once the correct entry has been found, press <Enter> on your keyboard, or the “OK” button on-screen to select that customer. The Point of Sale program will then display full information for the selected customer, allowing you to enter their full name, address, and additional information.
Because each customer must be uniquely identified, you may find it necessary to enter additional information for certain customers. Notice in the sample screen shot above, there is a “Judy Smith” and a “Judy M Smith.”
If you wish to create a new customer, press the “Cancel” button and you will be prompted to enter a new customer ID.
After entering the Customer ID, the Point of Sale program will walk you through the remaining process of entering the customer information. Depending on whether the street database is enabled, it may display a selection window showing a choice of known streets in your area, or it may take you directly to a blank customer data form as shown below:
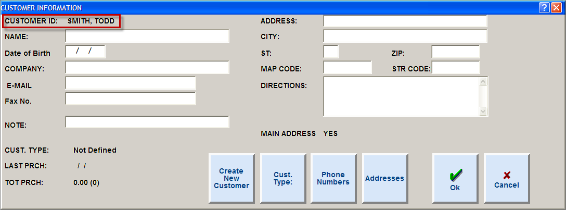
When creating a new customer, it is important to check that the “Last Prch:” field is empty. If not, then you have inadvertently selected an existing customer. In that case, you should press the “Cancel” button and enter a different customer ID.
All basic Restaurant Manager POS systems include a basic customer database that can be accessed from both the Delivery and Table Service POS Modules. The database stores each customer’s name, address and telephone number and tallies purchases made and dollars spent. You can use the basic database to record sales to frequent diners. If your system is configured with an expanded database (optional module) you can also use it to assign delivery orders to quadrants on a map of your service area, to generate customer mailings and to issue reports, etc.
Whether you use the basic or expanded version, the records in the Customer Database are indexed on a number that can be formatted like a phone number or a like Social Security Number. To access a customer record from any POS Module, enter the customer’s phone number (or SSN). If your system is configured with magnetic stripe readers at the POS Stations, you may also use magnetic stripe cards to read in a customer’s number.
From the POS Modules, you can only access the customer database in order to link a specific order to a customer record. You cannot issue reports or mailing labels from the POS Modules.
If your system is configured with the expanded version of the Customer Database, you can also access the Customer Database from the RM BackOffice Module. Here you can add new information to a record (like a birth date), process mailings to your repeat customers, issue customer reports, edit purchase totals that may be incorrect, etc. You can also create a Street Database. The Street Database further automates the way you enter delivery data from the POS Module. Essentially it links a particular street name with a Map Code, a street code and driving directions. This allows you to assign delivery orders to drivers in a geographically rational way and provides drivers with directions on how to reach each destination.
To setup a basic Customer Database for tracking frequent diner purchase profiles you must access the Customer and Frequent Diner Setup Form This form dictates how information is entered into the Customer Database from the POS Module. To further facilitate data entry from the POS Module, you can also pre-define commonly used phone pre-fixes in the Phone Prefix Setup Form. If you are using the Delivery Module your system configuration must also include the creation of a Street Database.
For information on issuing mailing labels or customer reports see the section: Creating Mailing Labels & Lists
The following fields on the Cust/Freq Diner Station Configurations settings control how data is entered into the Customer Database from the POS Modules:
If this option is enabled, the POS program will display a street locator window, which shows all the streets in your local area. The street locator window allows incremental searches to make locating a street very fast and efficient.
Customer type can be used to classify your customers (e.g., boy scouts, senior citizens, cigar club, etc.). You can define award programs that only apply to certain customer types.
As discussed above, customer records in the Customer Database are indexed by number. This number can be formatted like a telephone number or like a Social Security Number. If you select the telephone number format, you can also pre-define common area code(s) and prefixes. Using these pre-defined prefixes from the POS Modules ensures quicker, more accurate data entry when typing phone numbers.
Use the Phone Prefixes Setup Form to create a POS pop-up window of the most common area codes and 3 digit phone prefixes in your area.
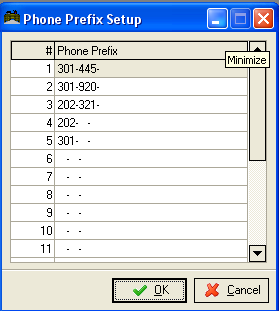
The fields in the Phone Prefixes Setup Form are organized under the following columns headings:
To link an order to a record in the customer database, you must type the customer’s telephone number in the Telephone Entry Pop-up Screen. Press the [LOOKUP] button under the Telephone Entry Pop-up to enter the phone number using the pre-defined phone prefixes.
NOTE: For more information on accessing the Telephone Entry Popup from the Delivery Module see the section on Delivery / Quickservice. For more information on accessing it from the Table Service Module see the section on Frequent Diner.
If your system is configured with the Customer Database Interface, you can access the Customer Database from the RM BackOffice Module. RM BackOffice access allows you to create a “Customer Database”. The database allows you to track customer’s birthdays and other information for generating mailings and reports.
If you are only using the Customer Database to track frequent diner purchases from the Table Service Module, you are not required to have this interface.
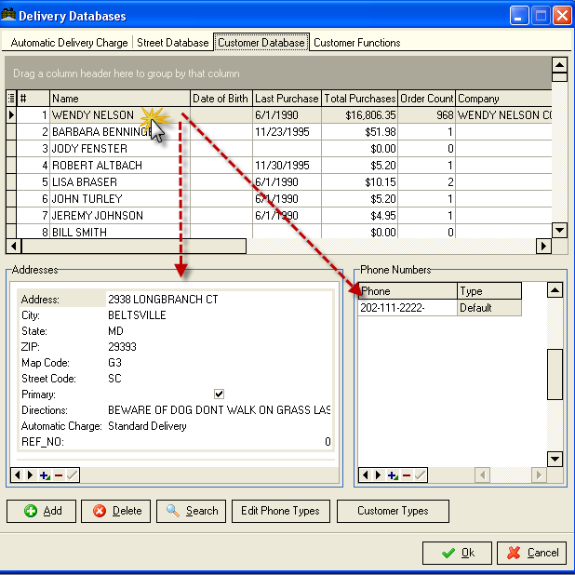
The image shown above shows the three major parts of the form which are the customer list (top), customer addresses (bottom-left), and the customer phone numbers (bottom-right).
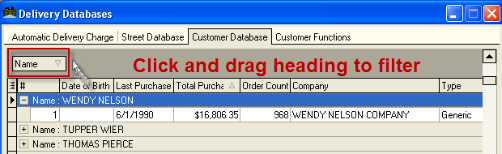
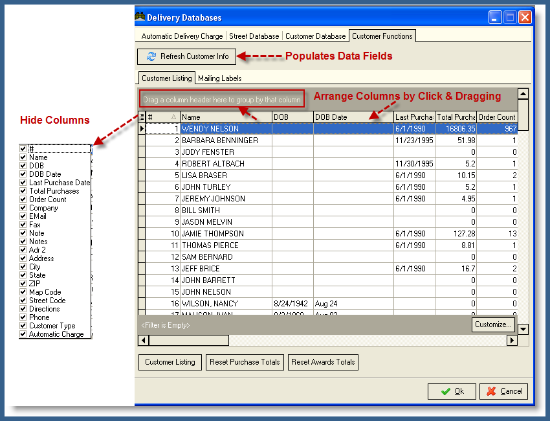
You can filter the columns in the customer list by clicking on the header and selecting one of the filters in the drop-down. In addition, by dragging any of the columns to the drag area, you can perform a more advanced filtering to better able to manage the customer database. You can arrange the column headers by click and dragging into position. You may also limit whatcolumns are displayed by clicking on the column heading with icon on the far upper left corner cell of the customer information display grid.  Clicking on this field heading will produce a drop down menu with a list of all the column headings. Remove the check mark corresponding to the column you do not want displayed.
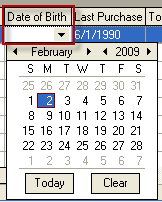
You can further manipulate columns by clicking on the heading and sort information alphabetically, by date, or numerically.
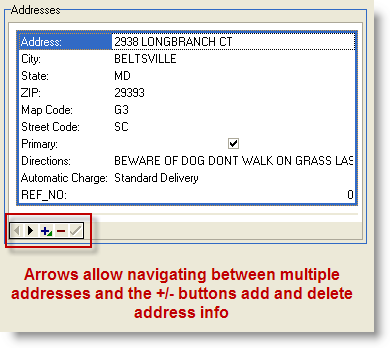
The information displayed in these fields corresponds to the name selected on the customer list. You can add or delete for a customer by using the [+/-] buttons at the bottom of the “Address Field”. The [left/right] buttons at the bottom of the field allows you to scroll between multiple (alternative) addresses if used.
However, if you are using the Customer Database to track both delivery orders AND frequent diner purchases you should use this field to enter a special code that distinguishes frequent diner customers from delivery customers. For example, you could enter "000" in the "Street Code" field when you create new frequent diner records. You can then use the Street Code field to filter reports and bulk mailings.
The information displayed in these fields corresponds to the name selected on the customer list. You can add or delete for a phone number by using the [+/-] buttons at the bottom of the “Phone Numbers”. The [left/right] buttons at the bottom of the field allows you to scroll between multiple (alternative) phone numbers if used.
This form is used to set up the information to be displayed for “Mailing Labels” and “Customer Listing” reports. You can use either of these functions to actively promote your business and identify your customers spending habits.
You can arrange the column headers by click and dragging into position. In addition, by dragging any of the columns to the drag area, you can perform a more advanced filtering to better able to manage the customer database. You may also limit what columns are displayed by clicking on the column heading with icon on the far upper left corner cell of the customer information display grid.
Clicking on this field heading will produce a drop down menu with a list of all the column headings. Remove the check mark corresponding to the column you do not want displayed. You can further manipulate columns by clicking on the heading and sort information alphabetically, by date, or numerically.
Once you have the information arranged, click on the [Customer listing] button to bring up the “Print Preview screen”. You use any of the setting to refine your viewing choices and print from this screen.
Add-Ons > Customer Street Databases > Customer Functions tab
Customize- Restaurant Manager allows you to do further filtering information displayed. For example: let’s say we wanted to limit the list to people with the name “Smith”. To do this we would click on the [Customize] button and then:
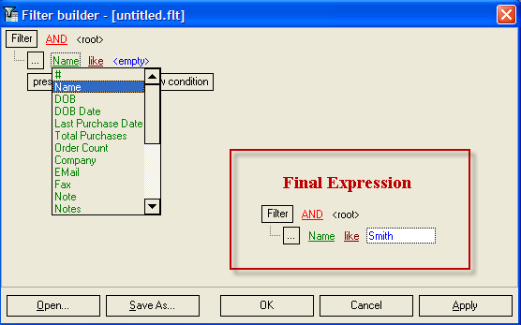
The "like" comparator should also work with the others as well (not just name). For example, for Phone, if we have the filter "Phone like 111", it should show the following:
- 111-222-3333
- 222-111-3333
- 222-333-3111
- 311-122-2333
Or, if we have "City like VER", it should show SILVER SPRING and VERNON HEIGHTS.
To assist delivery drivers in finding addresses and to make POS data entry as simple as possible, Restaurant Manager includes a database to record all the streets in your service area. The Street Database is only useful if you first purchase a large map of your service area and enter all street names AND MAP CODES in your service area into the Street Database BEFORE processing any delivery orders. If the ‘Automatic Street look up” option is enabled in Station Configuration, pre-defined street names pop-up in alphabetical order in the POS Module so staff can quickly select the appropriate street name for error proof data entry. Most importantly, when you add a street from the database to the customer record, the associated Map Code, Street Code and driving directions are automatically added to the record, too.
NOTE: You must have a keyboard attached to each POS workstation where you will be accessing the Street Database. The Street Database automates data entry in the POS Module only.
Add-Ons > Customer Street Database > Street Database tab
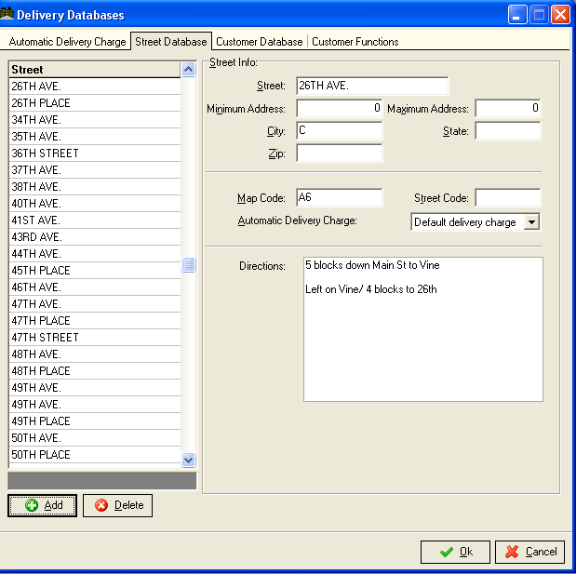
This screen is organized as follows:
The “Automatic Delivery Charge” setup form is found in the RM BackOffice > Add-Ons >Customer Street Database > Automatic Delivery Charge tab. The “Automatic Delivery Charge” setup form has three column headings: #, Description, and Amount. Delivery charges are assigned a number when created. The “Description” column lists the name of current delivery charges. Your system comes with two default delivery charges: Standard Delivery and Special Delivery. The amount column lists the dollar amount associated with the delivery charge. In the illustration below we find #1 Standard Delivery is set for 3 dollars.
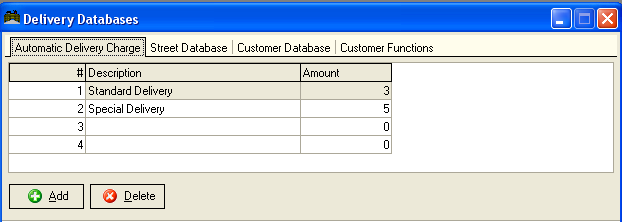
You can add or delete delivery charges by using the [Add] and [Delete] buttons on the bottom of the form. You can change both the description of the delivery charge and amount charged by clicking on the cell and type in the changes.
More on Delivery Charges can be found in the topic- Delivery Charges
Customer information is essential for operations that utilize Delivery, Phone-in orders, or the Frequent Diner program. It is essential for most operations to create and edit customer information at the POS. In response, Restaurant Manager comes with an enhanced customer management functionality that allows the user to be able to any of the following:
Phone numbers are the most typical method of linking a customer to the database. However, alternative methods of input can be configured if needed. Regardless of input method, you will always access or create customer information at the POS using a phone or number customer ID prompt. Accessing customer information differs and is dependent upon which module you are in at the time:
Using any of these methods will lead you to the phone prompt.
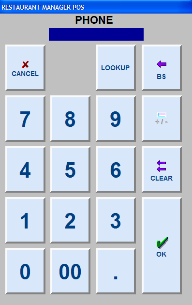
The phone number will be recorded and is linked to the customer. From the below Customer Information Screen, you can create a new customer.
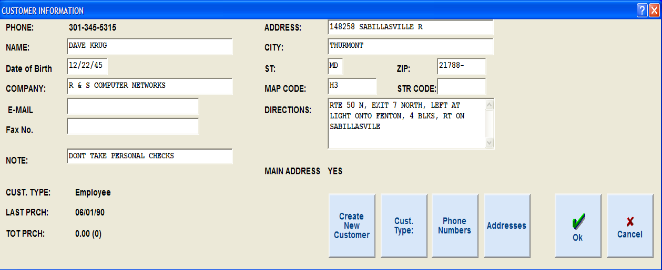
You can enter the information essential for delivery operation in the designated fields including the following:
|
Name |
City |
Map Code |
|
Address |
Zip |
Directions |
Other Information not essential for delivery but considered important for marketing can be entered in the following fields:
|
Birth Date |
Fax Number |
|
|
Cust Type |
Restaurant Manager can store multiple addresses per customer – for example, a work and home address. Or if a customer wants his food delivered somewhere other than the usual place, you can use the alternate address capability of Restaurant Manager.
By default Restaurant Manager uses the main (or primary) address. To switch to the alternate address, press the “Address” button at the bottom of the customer edit form.
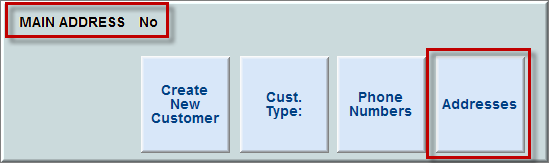
Restaurant Manager displays the text “No” next to the Main Address field if an alternative address is used. From this point forward, the alternate address will be printed on the guest check and remote printers (if so configured), and will be used for the mapping interface if enabled. Press the “Address” button again and choose among the addresses listed to change.
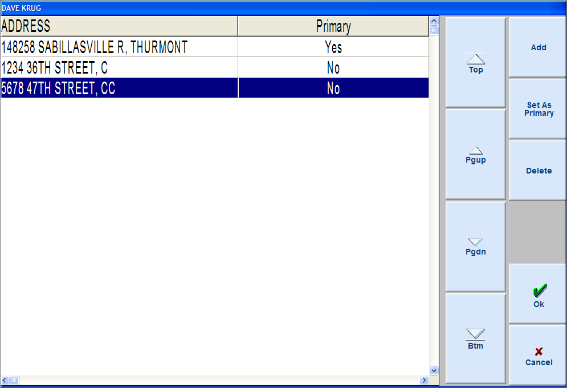
Use the [Add] button if you are entering an alternate address for the first time, all fields will be blank to start off with. If the street database is active, then you will be given the opportunity enter a street number and then a prompt to choose a street from a selection window and any available information regarding that street (i.e., city, state, directions, etc) will be filled in automatically. After you enter alternate address information, it will be available for future use.
The address fields, map code, street code, and directions for the alternate address can be different from the main address; however, the customer name, company and “Note” fields are shared by both the primary and alternate address (i.e., if you change it in the primary address, it will also change in the alternate address and vice versa).
You can also change a customer’s “primary” address by selecting an address and pressing [Set as Primary]. You can also delete an address from the POS by selecting an address under the [Address] function and pressing [Delete].
Navigation buttons are provided to move around the list should there be a long list of phone numbers for the customer. The action these buttons do are as follows:
Top – displays the top most page of the list
PgUp – displays the previous page of the list
PgDn – displays the next page of the list
Btm – displays the bottom page of the list
You can sort the listed addresses in the by clicking on the header of the list. Clicking a different header the first time sorts the list by that header in ascending order. Doing so again on the same header sorts the list the descending order.
Note: If you use the customer database for mailings, make sure to use the alternate address when a customer wants his order delivered elsewhere. That will preserve the primary address for future marketing purposes.
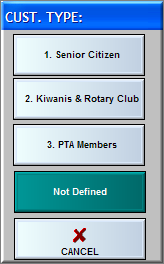
If you have implementing an Frequent Diner Program , you can select a customer type for a new customer or change a change a customer type for an existing customer using the [Cust Type] button on the Customer Information screen. Press the button will bring about a prompt of customer types that are defined in the Frequent Diner setup forms in RM BackOffice. Choosing the [Not Defined] option will automatically enroll them in all available award programs.
Cust Type Prompt
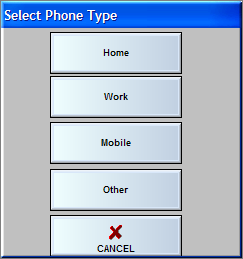
Another useful to tool is the ability not only to be able to change the customer phone number without losing sales but also to be able to assign multiple phone numbers for a certain customer.
A customer ordering from home, office or even from the park using his cellular phone may opt to use a different phone number (for contact purposes) for the order but would want to have the sales attributed to him for the various award programs the restaurant may have.
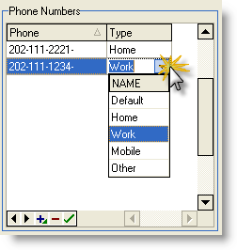
When clicking on the [Phone Numbers] button, the Customer Phone Number Management screen will show (see below).
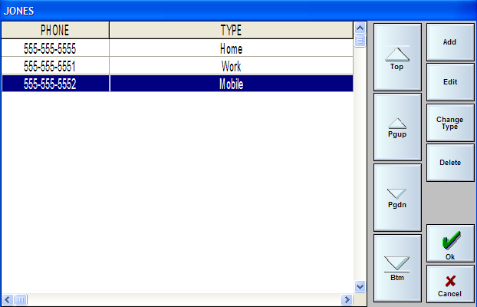
The Customer Phone Management screen lists the entire phone numbers created for the specific customer.
To select/highlight a phone listed, just click on the item. Selection of a phone does not make it the active phone for the check yet until you click the “Ok” button. The “Cancel” button exits from this form without selecting another phone as the active phone.
The rightmost pane/column of buttons is the action buttons and when clicked, usually performs the action on the currently selected/highlighted phone on the list. The buttons are:
If however, it needs deleting, the workaround is to create a new phone number, select it by clicking [Ok], go back to the Phone Management screen, select the phone and click delete. Note that when the last phone on the list is deleted, the phone prior to that will be selected.
[Ok]– This button confirms the selection of a phone number and will assign the highlighted phone as the number to use for the check.
Cancel – this cancels the assignment of a new customer phone number to the check and keeps the previous one. Added, edited or deleted phone number still takes effect.
Note: Any action done, i.e. adding, editing number, changing phone type, or deleting a phone are saved even if the [Cancel] button is clicked.
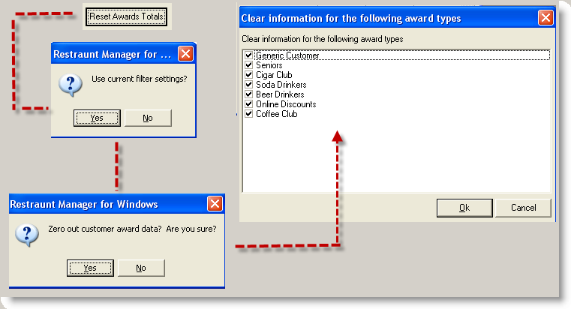
To remove customers from the database, use the RM BackOffice option under the Add-Ons->Customer Street Databases setup forms.
Navigation buttons are provided to move around the list should there be a long list of phone numbers for the customer. The action these buttons do are as follows:
Top – displays the top most page of the list
PgUp – displays the previous page of the list
PgDn – displays the next page of the list
Btm – displays the bottom page of the list
You can sort the listed phone in the by clicking on the header of the list. Clicking a different header the first time sorts the list by that header in ascending order. Doing so again on the same header sorts the list the descending order.
Restaurant Manager will allow a separate database for different people who share the same phone or customer ID number. This is useful for offices, businesses, or roommates. This is also helpful in the same scenarios when offering a frequent diner program. A pop-up dialog (see below) will be displayed listing all the customers that may have the same phone number.
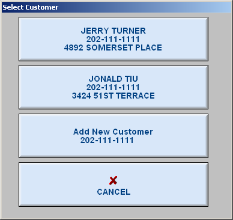
Choose a name from the list to continue with the order. Clicking on the “Cancel” button would cancel the selection of the customer to the check.
Note, if only one customer is found with the same customer number, the customer will automatically be selected.
As with previous versions, to remove customer assignment to a check, you simple need to click the buttons [Misc] > [Freq. Buyer] or [Cust] and on the number prompt, click on [Clear] followed by the [Ok] button.
Age verification is a useful feature for restaurants that serve alcoholic beverages. Because most states have a minimum drinking age, the restaurant owner carries the responsibility of verifying the age of their drinking customers. The age verification feature in RM not only verifies that customers are above the legal drinking limit, it can also store the information encoded on their drivers’ license for future verification that the customer was in fact “carded.”
Note: Age verification is an optional module of Restaurant Manager. If you wish to implement age verification, make sure you have purchased the Age Verification module.
The age verification feature makes use of magnetic stripe information encoded on the back of driver's licenses. Both track 1 and track 2 are used. Restaurant Manager uses this information to determine if the customer is above the minimum drinking age. Though the magnetic stripe has become a federally mandated standard in the United States, some states have not yet adopted it, therefore the age verification feature is only useful in those states have adopted this standard.
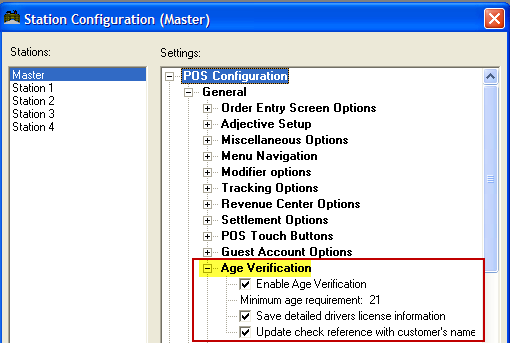
To use the Age verification feature of RM, there are several options located in RM BackOffice > Setup > Station Configuration which must be set.
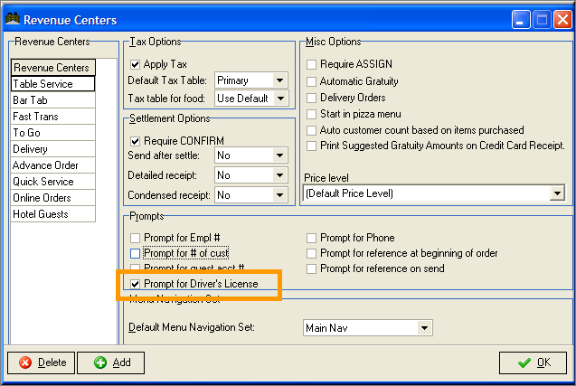
You can also configure Restaurant Manager to prompt for the driver’s license at the beginning of an order. This is configurable by revenue center. To enable the prompt, go to RM BackOffice >Setup >Settlement and Tips > Revenue Centers, and enable the option to “Prompt for Driver’s License.”
If this option is checked, Restaurant Manager will display a message to swipe a driver’s license when starting a new order.
Note: age verification provides feedback to the operator only. It does not prevent the ordering of alcoholic beverages regardless of the customer’s age
To use Age Verification, simply swipe a driver’s license at any time while in the order entry screen. RM will read the customer’s date of birth from the driver’s license and determine whether they meet the minimum drinking age. A message is displayed accordingly.
Here is a sample driver’s license swipe for informational purposes.
%MSJACKSON^SMITH$JOHN$B^222 CHESTNUT PLACE$^?;63602522221090=090819690601=?
The swipe consists of the State and city, followed by the name and address of the driver. The date of birth is the last 8 digits. In the above sample, it is 1969, June 1st (0601).