(continued from Real Time Monitoring)
This section contains information on how to operate your systems on a day to day basis. The following sections describe the screens you will use along with the ringing of sales in each module. You will also learn about advanced functions such as transferring menu items and checks, deleting items, performing discounts, and various banking procedures. Towards the end of this section you will discover the different methods you may wish to implement to open and close a sales session.
No matter which POS mode(s) you are using, you must go through the following cycle to process sales. A “Sales Session” is a defined period of time during which your business is open and operating. In most establishments, the sales session is opened each day when the business opens and closed when the business closes at night. However, if you shut down your business periodically during the day (for instance, between lunch and dinner) then you may wish to open one sales session for lunch and another one for dinner. Alternatively, if your business is open 24 hours a day then your sales session is defined when the session is closed and when it is opened (e.g. 3:00 am to 3:01 am).From the RM BackOffice Module, you can issue many reports on the transactions conducted during specific sales sessions. Some of these reports allow you to further break a Sales Session down into Meal Periods
You will want to open a session prior to ringing the first sale of the day. For reporting purposes, it typically best to open the session the same calendar day.
If your system is configured with Cashier Banking, you will want to initialize a cash tray at the beginning of each shift within a session. You will be prompted to initialize the Cash Tray(s) prior to ringing the first order of a shift if you fail to initialize a cash tray.
NOTE: Because a single sales session may include many cashier shifts, you can close cash trays and open new ones as many times as you wish during a single sales session.
Employee clock-in is the one POS operation that may be executed regardless of whether Employees must clock-in at a POS Status Screen before they can process orders. To ensure accurate timekeeping, employees can log on and off at any time (regardless of whether or not a Sales Session has been opened.) If you have created Employee Work Schedules, however, a manager’s password is required when an employee attempts to log on (or off) when his or her name is not on the schedule.
If your system is configured with Enhanced Password Control, employees must swipe an Employee ID card to log onto the system
Each sales transaction follows a cycle of its own:
NOTE: When you are working in Delivery Mode, some of the steps in the sales cycle may occur in a different order. And the cycle will also include the all important ASSIGN feature which allows you to assign one of more orders to a driver for home delivery. When you are working in Quick Service Mode you will usually use only the ADD and the SETTLE functions.
Employees can log off the system at any time. You can configure your system to print time slips and revenue reports, etc. whenever an employee logs off the system .If your system is configured with Server Banking you MUST print a revenue report when wait staff or delivery drivers log off.
Before you can close a Sales Session, all employees must log off the system and all Cash Trays must be closed. If your system is configured to track Bank Deposit amounts, the system prompts for these amounts before the session is closed. If your system is configured with on-line credit card authorization or inventory control (described in a separate manual) a batch operation may also be processed automatically as the session is closed.
You cannot begin recording sales transactions until you have opened a Sales Session and logged on at least one employee, two procedures that can be easily executed from any POS Status Screen. The basic steps involved in recording a sales transaction are detailed in the next few sections.
To access the Order Entry Screen you must “open” an order from a POS Status Screen, a simple process but one that is slightly different in each POS mode. The [TABLES], [TABS] and [DELIVERY] buttons at the base of each Status Screen allow you to move quickly between them.
NOTE:If you have enabled Enhanced Password Control, you must press the [BEGIN] button at the base of the Status Screen or swipe your ID card BEFORE you can open an order.
Table Service Mode- To open an order from the Table Service Status Screen, touch the appropriate table button. Restaurant Manager will prompt for the employee number and the number of customers sitting at the table and then display the Order Entry Screen.
Bar Tabs Mode- To open an order from the Bar Tabs Status Screen, simply touch the [NEWTAB] button. Restaurant Manager will prompt you to type in text that identifies the order and then display the Order Entry Screen. If you wish to simply number the orders in sequence, you can hit [ESC] instead of typing in a reference.
Delivery Mode- To open an order from the Delivery Service Status Screen, touch the [ORDER] button and follow the prompts onscreen to identify the customer placing the order. If you are processing a carry out or pick-up order rather than a delivery order, want to enable “prompt for revenue center” on before accessing the order entry screen.
Quick Service Mode- To operate in Quick Service Mode touch the [FAST] button at the base of any POS Status Screens. Begin the order simply by touching the appropriate menu item touch buttons, followed by the [CASH] or [SETTLE] buttons.
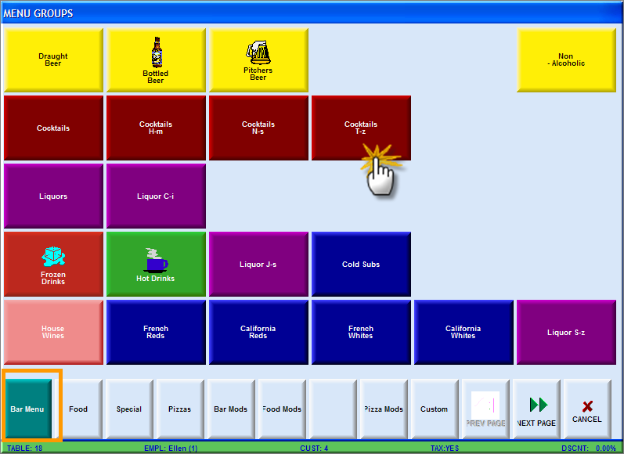
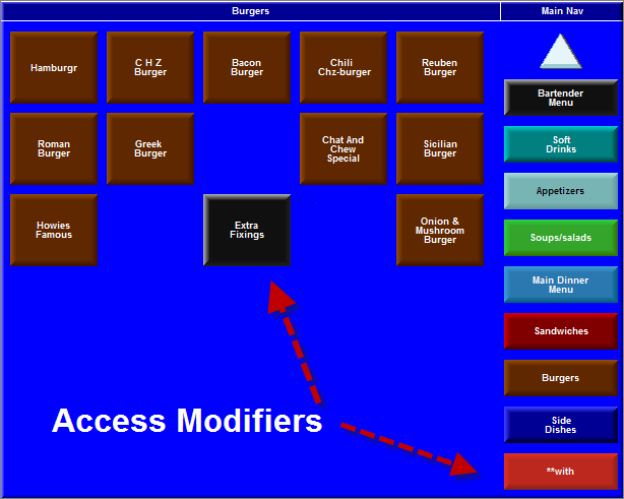
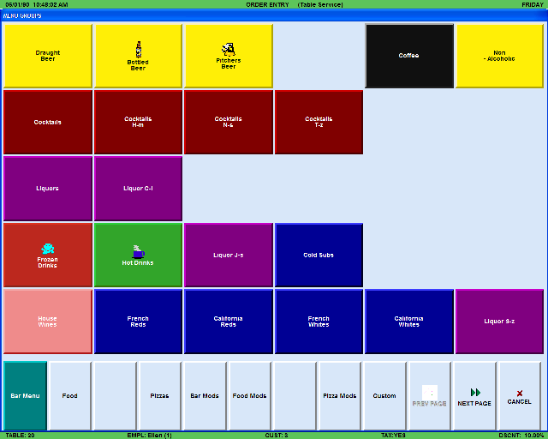
Item Buttons are organized into groups for display in the Menu Area of the Order Entry Screen. To change the Menu Item Buttons displayed in the Menu Area of the Order Entry Screen, you must locate and touch the appropriate Group Button. This process of locating and touching Group Buttons is called “Menu Navigation”. Depending on how your system has been configured, you may use one or more of the following tools to navigate your menu:
When you open an order, the Order Entry Screen appears. You must use this screen to move among groups of menu item touch buttons and record the customer’s order by touching the appropriate items.
NOTE: Your system should already be configured with many Fast Button macros that help you easily locate the appropriate menu item touch buttons. Because the Fast Button macros are unique to your system, the instructions below present only standard procedures.
The default display will on the Order Entry Screen can show either the menu item touch buttons from a particular Menu Group or it will show the Menu Groups screen (below). (See the section on Default Display for instructions on defining the default display.)
If menu item touch buttons appear onscreen, touch any that might be included in your customer’s order. Then press the [Groups] button at the base of the Order Entry Screen to call up Menu Groups Screen:
The menu groups from the active menu are displayed on the main body of this screen. The button corresponding to the active menu is highlighted at the base of the screen.
Touch the group button that includes the next set of menu items you wish to display on the Order Entry Screen. As soon as you touch a menu group button, Restaurant Manager returns to the Order Entry Screen and displays the items in the selected group:

Again, to add an item to the order, simply touch the appropriate button. The item, price and a default quantity of “1” are displayed in the Order Detail Area on the left of the screen.
There are many times when you need to send extra information about a menu item to the food preparation areas. “Medium Rare” or “House Dressing” are examples of modifiers used in almost any restaurant. Side dishes like a “House Salad” that accompany an item at no extra charge are also modifiers. As are special requests like “No Onions” or “Extra Salt”
When you define a menu item in the RM BackOffice Module you can link it to a “Forced Modifier Pop-up Screen”. This means that each time you order this menu item from the POS Module you will be prompted automatically to select appropriate modifiers or side dishes.
Forced Modifier Pop-up Screens are especially useful for different kinds of salad dressings, or the bread choices on a sandwich, etc. Other modifiers, however, like “No Onions” are not appropriate on Forced Modifier Pop-up Screens and should only be linked to menu items on an “as needed” basis.
The sample screen below shows a Forced Modifier Pop-up Screen that appears every time a hamburger is ordered. Simply touch the appropriate button to modify the menu item. You can link up to five Forced Modifier Pop-up Screens to any one menu item.
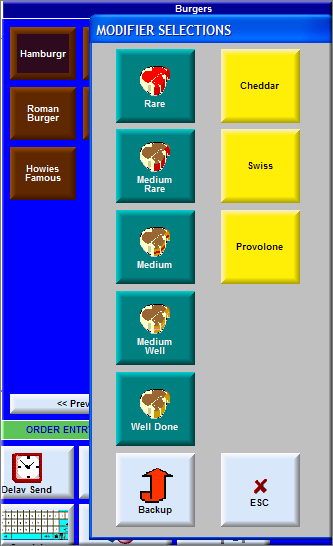
NOTE: When you select an item from a Modifier Menu, it is automatically linked to the last menu item selected. RESTAURANT MANAGER will not allow you to select an item from the Modifier Menus if all the standard menu items on the order have already been "SENT" to the food preparation areas.
You may also create a navigation button on the menu group that will lead to modifiers or place modifier groups on the Menu Navigation bar. Examples of these two buttons are listed below:
Use the Edit Modifier button to edit or add modifiers and special instructions of any rung menu item but not sent. You must first select one or more unsent menu items on the Order Display Area before pressing the Edit Modifier button. . Pressing the [Edit Modifiers] button will produce the Modifiers Edit screen which displays all menu items and modifiers rung (but not sent) .
There are a number of ways to change modifiers during order entry. If an item has several pop-up modifiers, and you make an incorrect selection before the final modifier, RM displays a backup button to allow you to back up and change your selection. Once the final modifier has been selected however, you can either delete the item and start over, or select “Edit Modifiers.” For simple items, it may be faster to delete the item and start over, but for more complex items with several modifiers, it may be faster to “Edit Modifiers.”
If you wish to send a message to the kitchen that goes beyond any of the pre-defined modifiers, you can create a special note using the [Spec Instr.] button typically found at the base of the order entry screen. You may also add special instruction within the Edit Modifiers user interface.
By default, Restaurant Manager assumes that the desired quantity is 1. If you want to order 2 or more of a given item, you must specify the quantity BEFORE you order the item. Press [MISC] from the Order Entry screen, and select the "QUANTITY" option. Restaurant Manager displays several quantity selections. Simply press the appropriate quantity button.
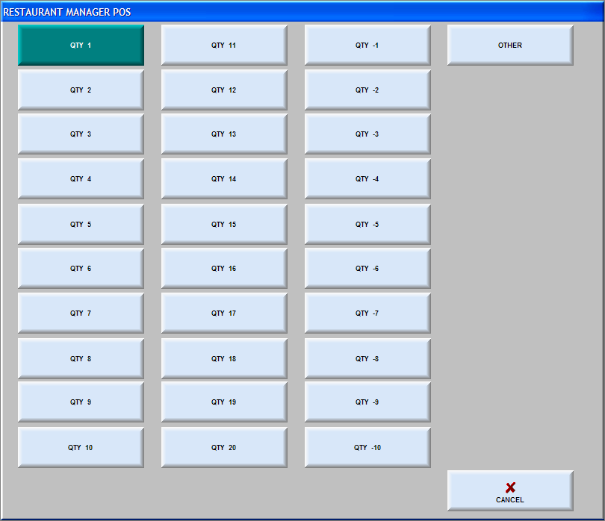
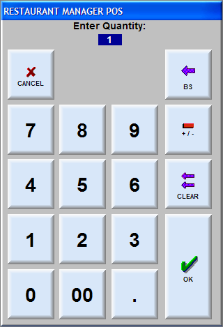
To change the quantity to 21 or more, press the [Other] button. A numeric keypad is displayed on screen allowing you to enter a quantity up to 99. You can also create a Fast Button Macro to the [Other] Button so only the keypad shows.
The quantity selection only affects the very next item ordered. After an item is selected and the quantity is applied, the quantity automatically reverts back to 1 for the following item.
Another method to increase menu item quantities is to enable and use the Qty +/- above the Order Detail Area. Once an item has been placed on the Order Detail Area, you can tag (highlight) the item and press the qty +/- buttons. The buttons will only increment quantities by one. You can enable “auto-tag last item” in Station Configuration to expedite the process.
To delete one or more items from the order on screen, tag (highlight) the items you wish to delete and then press the [DELETE] button at the base of the Order Entry Screen.
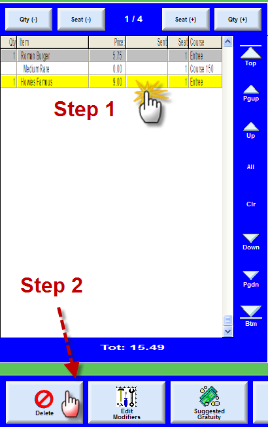
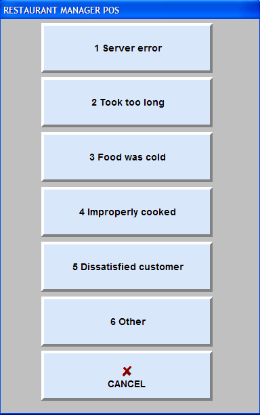
If the item has already been sent to the prep area printers or if the check has already been printed, Restaurant Manager will request the manager password before deleting the item and allow you to tag the deletion with a pre-defined deletion code.
When you have selected all the menu items requested by the customer, check to make sure everything is correct, and press the [SEND] button to send the order to printers to the preparations areas. The item will be sent to print at the printers indicated on the Menu Items Setup Form. If your system is configured to send items automatically as you exit the order you need not press the [SEND] button.
If you have already sent part of an order to the food preparation areas, Restaurant Manager will not re-send that part of the order unless you have activated “Re-send items” features.
The “Sent” column in the Order Detail Area indicates which items have already been sent to printers in the preparations areas.
If you wish to send different courses to the kitchen at different times, see the instructions in the section Automated Time Sending.
To add more items to an existing order, touch the table or order button on the POS Status Screen and the order is displayed on screen again. You may add additional items as necessary. When finished, press the [SEND] button to send the new items to the preparation printers. Adding restrictions on who can add items to existing orders is a highly configurable option in Restaurant Manager. More on this topic can be found under the section:Accessing Open Orders Security Level Restrictions
If the customer is re-ordering certain items, be sure to use the [RE-ORDER] button. Press this button to re-order any of the items that appear in the Order Detail Area of the screen. Select items from the Order detail area prior to pressing this button.
There are two function buttons on the Order Entry Screen that may be used to delete items from an order:

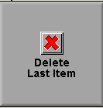
From the Order Entry Screen you may delete items from an order either before and after the items have been sent to the prep area devices. By default your system only tracks and reports items deletions made after the order is sent to the kitchen. If you wish to configure your system to track items that are deleted before they are sent to the prep area devices you must use the [Search Settings] button on the Station Configuration Form to enable the setting the “Track Item Deletions” option
When you Item Deletions appear on the Deletions Report which details the employee number, order number, etc of each deleted items.
Restaurant Manager POS allows you to selectively apply a discount to one or more items on an order. On Restaurant Manager, you are not allowed to discount items that are not enabled for the discount. For example, if you define a beverage discount that applies to beverages only, then you are not allowed to apply the discount to non-beverage items.
To perform item discounts, just tag item(s) from the Order Detail Area, press the [Item Discount] and then select the discount option you want.
There are a number of order entry options that affect prices. They are:
The first three options apply to 1 or more tagged items. If you hit:
Note that Discount Check and Discount Items only apply to items that are flagged as “discountable” in the menu setup whereas Price Adjust and 2 for 1 Discount ignore the “discountable” flag in menu setup; i.e., even if an item is flagged as ‘non-discountable’ you can still perform an item discount on it.
Price changes can affect the automatic gratuity. Price adjustments, 2 for 1 discounts and item discounts always affect the gratuity calculation. The amount used in the calculation is always the amount “after” the price change. Check discounts however, may or may not affect the automatic gratuity amount, depending on a setting in system configuration (Setup->Stations->POS Config-> Auto Gratuity-> Basic Gratuity Options->”Compute Gratuity Using”). This setting determines whether to compute the gratuity based on the discounted amount, or the un-discounted amount.
To track discounted items, check “Enable Audit Trail” under SetUp >Station Configuration >POS Config >Audit Trails.
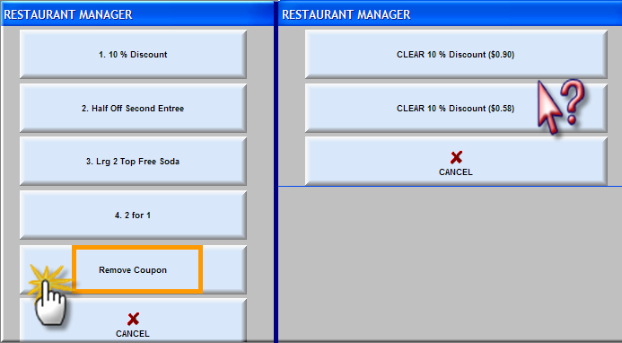
Coupons is another method you can incorporate to discount a check. Most coupons will have parameters set up so that all you will need to do is press the [Coupon] button. You will need to select a coupon form a list if more than one coupon has been programmed. The coupon itself will seek out the parameters and apply the coupon to the appropriate items.
Some coupons may require certain items to be tagged. If you fail to tag the items in the Order detail Area, you will receive a prompt telling you to do so.
If allowed you can apply more than one coupon to an order. You will have to press the [Coupon] button as many times for the number of coupons you wish to apply.
You will need to use the [Coupon] button to remove coupons. Pressing the button will bring forward the Coupon List. Select the [Remove Coupon] option. You may have to select the appropriate coupon if more than one coupon has been applied.
To split an item from the view check area on the Order Entry screen, tag the items you wish to split. Find and select the [Split Item] function button. You will then be prompted for the “Split Quantity”: Entering 2, will split the item(s) into halves, enter 3 to split it into thirds, and so on.
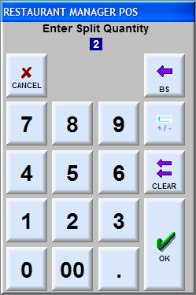
The split item(s) will be broken up according to the Split Quantity selected, and appear on the order entry screen with the corresponding fractional quantity.
From the view check area on the Order Entry screen, tag the items you want to un-split. Note that you only have to tag one of the fractional quantities. Find and select [Un-split Items] function button. Note that you can only un-split items that have previously been split.
You can limit the access to Split Item by setting the security level required to Split and/or Un-Split items in the POS Function Button Layout form.
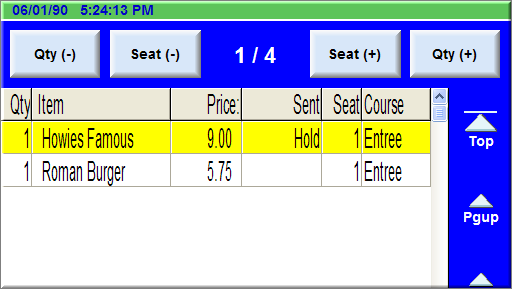
To hold item(s), simply tag menu items on the Order Detail Area. Find and select [Item Hold: On] function button. Held items are clearly shown in the view check area, see below:
To Un-Hold Items- From the view check area, tag item(s) on “Hold” then select the [Item Hold: Off] function button.
Securing the Hold Feature- You can limit the access to the hold feature by setting the appropriate security level on the POS Function Button Layout form.
To print a check, simply touch the appropriate table or order button on the POS Status Screen to call up the Order Entry Screen. Then press the [PRINT] button at the base of screen. You can print a check as many times as you wish. When you print a check, the order is automatically assigned a sequential Check Number. The Check Number is independent of the Order Number.
You can customize the information that appears on a check and the way the check is printed from the BackOffice Module. You can also configure your system to print a sales receipt automatically when the order is settled.
Most of the functions described in this section are executed from the Miscellaneous Functions Screens which can be accessed by pressing the [MISC] at the base of the Status Screens and the Order Entry Screen.
You can add a text reference to any open orders. This reference will print on the guest check and, on the Bar Tabs Status Screen; it appears on the order buttons. You can view the reference on table orders from the Table View Screen.

You can configure your system to automatically prompt for a reference whenever you open an order.
NOTE: If you link an order to a record in the Frequent Diner/Customer database, this information can also serve as a customer reference.
To tag an order with a reference:
From the BackOffice Module you can configure the Order Entry Screen at each POS station so that it defaults to a particular group of menu item buttons.
The customer count is displayed in the status bar at the base of the Order Entry screen. The customer count can be changed by pressing [MISC] followed by [CUSTOMER COUNT]. In the Bar Tabs and Delivery Mode, the customer count defaults to “1” and you only need change the customer count if you wish to print a sub-total for each customer on the check or use the Partial Settle function.
Restaurant Manager automatically assigns a revenue center when a new order is opened based on the POS Status Screen from which the order was opened. These default revenue centers are set from the POS Modes Setup Form in Station Configuration. The Revenue Center to which an order is assigned can affect the way Restaurant Manager processes the order.
You can change the Revenue Center for the active order on the Order Entry Screen by pressing the [MISC] button followed by [REVENUE CENTER]. Restaurant Manager will prompt you to select from a list of all the Revenue Centers you have defined.
In some cases, you may want to specify the revenue center each time you open an order. You can configure your system to prompt for the revenue center at the beginning and/or end of each transaction. You may also control revenue centers displayed when prompted.
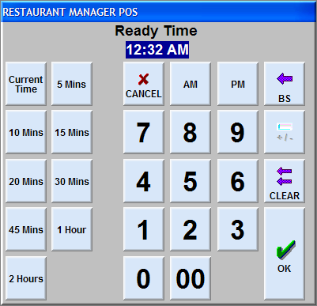
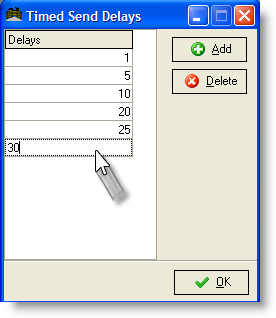
The Time Send function of Restaurant Manager allows the order taker, typically in full service restaurants, to choose a pre-programmed time to automatically send an order. The Timed Send prompt is commonly programmed in increments of 5 minutes.
You can customize the send time in RM BackOffice by going to Setup > Prep Printing > Time Send Delay. The Timed Send Delay form has 6 time block programmed by default. You can change the pre-set times by clicking on the cell and type in your new time. You can add more time by clicking on the [Add] button. A new cell will be added at the bottom of the “Delays” list where you can enter the new time.
If used frequently, the Timed Send function should be placed on the bottom of the Order Entry screen using the POS Function Button Layout Form. To use the Timed Send function, items should be ordered as normal:
You will notice the time you just entered next to the items in the Detailed Order View Area. Items not marked with send times will be sent immediately upon pressing send or exiting (send on exit) the check if configured to do so. You can run multiple times within the order by repeating the process.
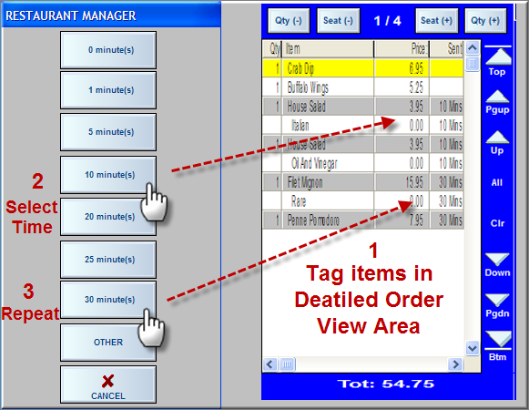
In the example above, we have three course- appetizers which we want to send right away (not timed sent), salads which we will send in 10 minutes, and entrees to which we will send in 30 minutes.
Notice there are two time presets that do not appear in the Timed Send Delay form. One of the buttons, [Other], triggers a prompt where you can manually enter in a time that does not appear on the presets.

The second button not appearing on the Timed Send Delay form but on the POS time preset prompt is [0 Minutes]. This function button allows the user to re-enter the order, use this button to set the time to zero, and send the items immediately. You may wish to do this if customers eat faster than anticipated or express the need to pace the courses faster. Keep in mind that you can also re-enter the Timed Send function and choose another time at any time up to the send time.
Once a time has been entered that the POS it will begin the time count down immediately after exiting the order. This function cannot be used for items already sent and will have no effect on these items.
Most special instructions like “NO ONIONS” or “DRESSING ON THE SIDE” can be pre-defined as modifiers on the Menu Setup Form. You can then add these modifiers to an order just the way you add a menu item.
When a customer makes a special request that is not included on the existing modifier menus, you can type special instructions that get linked to a particular menu item as follows:
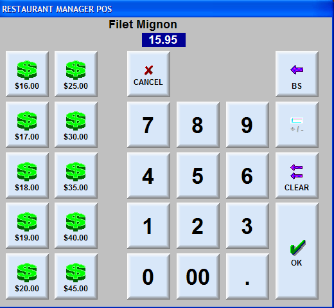
From time to time it may be necessary to change the price of one or more items rather than apply a fixed discount to the entire check.
Type the new price into the keypad pop-up and press [OK]. You can also adjust modifier prices. The monetary amount in the keypad will always start with the main menu item. You will have to press the [OK] button repeatedly until you reach the modifiers you want changes. Repeat these steps for each price you wish to adjust.
The active price level can be shifted momentarily from the Order Entry Screen. The shifted price level is applied only to a single item and all its modifiers. This feature can be useful for promotional pricing. For example: if you have a happy hour based on price level and you just missed the cut off time. A momentary price level shift can be used to achieve the correct pricing on the menu items.
To shift the price level, press [MISC] from the Order Entry screen, then select [PRICE LEVEL SHIFT]. Restaurant Manager will ask for the price level to use. Enter a number from 1 to 14 (price level may be identify by name), or press [Cancel] to stop the operation. After entering the price level, Restaurant Manager displays a blinking message at the bottom of the screen indicating the new price level in effect. The price level is automatically returned to the default on the following item.
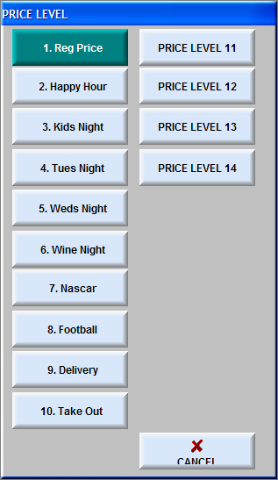
Unless you have configured your system with automatic price level shifts you can shift between price levels from the Status Screen. When you change price levels from the Status Screen, the new price level stays in effect until you change it again.
To use an alternative price level, press the [MISC] button at the base of the POS Status Screen, then select [CHANGE PRICE LEVEL]. Restaurant Manager will request a password, and then ask for a new price level to use. You may enter any number from 1 to 14 (price level may be identify by name).
If your system is configured to change price levels based upon automatic time schedules, Restaurant Manager will override any attempt to manually change the price level. For additional information see the section on Price Levels.
Restaurant Manager automatically assigns every transaction to a Revenue Center. The Revenue Center controls how the transaction is taxed and how it is categorized on sales reports. You can change the Revenue Center assigned to a given transaction by touching the Revenue Center function button ON THE ORDER ENTRY SCREEN and selecting the appropriate Revenue Center.
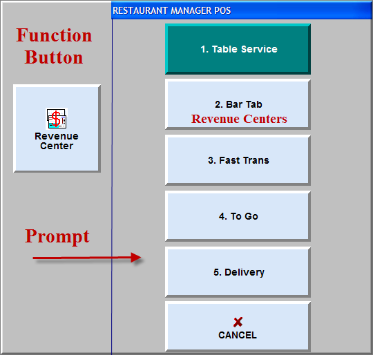
The [Revenue Center] Function Button is accessible from the POS Order Entry Screen but the exact location of the button is determined by configuration settings on the POS Function Buttons Layout Form.
All the items on a particular order are shown on the Order Entry Screen. If the order includes more items than can be displayed on a single screen, you can use the scroll buttons to the right of the Order Detail Area to move through the entire order.
The total price of the order appears just under the Order Detail Area (Running Total). This total includes all applicable taxes, discounts and gratuities. If you wish to view these amounts broken out alongside the pre-tax sub-total:
NOTE: The same information accessible by pressing the [VIEW] button is also displayed on the Settlement Screen.
From the Order Entry Screen you can view any of the recipes you may have defined from the BackOffice Module. The sample data that comes with a new system includes a complete bar menu with recipes for all the cocktails on this menu. If you’ve copied this sample data into your system you can view the recipes for any of these cocktails from the Order Entry Screen:
To view a recipe for a menu item:
You may also use the [Search] button located at the bottom of the Recipe Lookup screen and type in a few letters within the name of the menu item. A list of names with the letters in the drink will appear where you can make your selection. In the example below, we have typed in the letters “HO” for Hot Brandy.
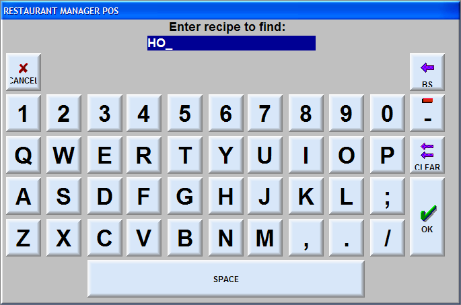
The search result below shows all the drinks programmed with the letters “HO” in the words:
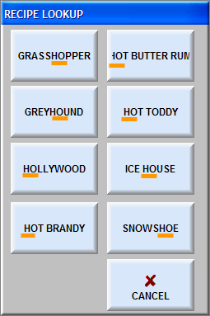
NOTE: If you have not created a recipe for the selected item, a message appears saying "Recipe Not Found".
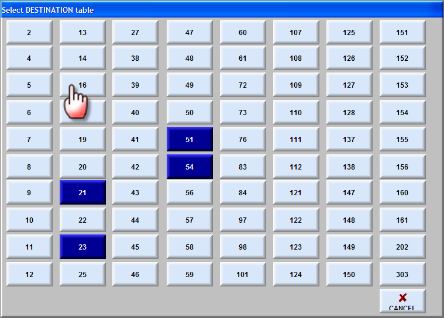
Restaurant Manager allows you to transfer an order from one employee to another. It also allows you to transfer menu items from a tab to a table or from one table to another table, as described below.
When the transfer is complete the table that originally held the order will be closed.
Restaurant Manager allows from the transferring of all or selected items from table to table or tab to tab. This is an order specific operation that is preformed within the order. You must first open the order the do the following:
If you select a table this is not active (gray) you will receive a prompt asking for an employee number for who will assume the table. If configures, you will also get a password prompt.
If all items on the order are being transferred and when the transfer is complete the table or tab that originally held the order will be closed.
You can transfer all item on a fast transaction to a tab. This is particularly useful for nightclubs and bars using fast transaction as the primary order entry screen. You can start all orders in fast transaction, take the order, and the send it to a tab or cc tab as needed. The following is the procedure to send items to a tab:
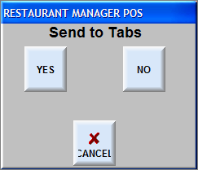
The fast transaction will disappear and the new tab will have been created. If you are doing this from the Table Status screen you will have to move to the Tab Status screen to access the tab.
This function can also be used from the Order Entry screen [MISC] functions for table turns. Some establishments will close out all tables at the end of a shift. This creates the need to clear out an active order when a table turn occurs. You can use this function to move the table to a tab that can be accessed later.
There may be a need to transfer a table or tab to another employee. This commonly happens at a shift change or when an employee who started an order is too busy to continue with servicing the customer associated with the order. Regardless of the need, Restaurant Manager caters to these needs with the following functions:
Transfer Tables- transfers all tables from one employee to another
Transfer Tabs- transfers all tabs form one employee to another
Employee Transfer- transfers single order from one employee to another
Depending how your system is configured, a password prompt may be triggered during some of these steps.
This function is achieved by using the [Transfer Tables] function button typically located under [MISC] function of the Table Main Status screen:
All tables and sales belonging to those orders will now be assumed by to employee whom the tables were transferred to.
This function is achieved by using the [Transfer Tabs] function button typically located under [MISC] function of the Table Main Status screen:
The transfer employee to employee of a single order is used when a new employee will be picking up an existing table. The [Employee Transfer] function is used for this operation. This button is typically found under the MISC screen under the in the Order Entry screen of an active order:
Sales belonging to the order will now be assumed by to employee whom the orders were transferred to.
You may touch the [Groups] Function button to select any group on your entire menu and display the items that comprise that group on the Menu Area of the Order Entry Screen.
The Groups Function Button is accessible from the POS Order Entry Screen but the exact location of the button is determined by configuration settings on the POS Function Buttons Layout Form.
The Groups Button calls up a screen like the sample screen shot below which reflects the Pages and Menu Groups of the entire Restaurant Manager Menu:
The first four buttons across the base of the screen shot above represent the four menu pages set aside for Menu Items. The next four buttons are pages of Modifier Items and the last button at the base of the screen links to a page of Custom Group Buttons.
In our sample screen shot, the “Food Moods” button is blue because it is the active page in this screen shot. The Modifier Groups that comprise the active page are displayed on the body of the screen. One of the Menu Page buttons in the sample screen shot is blank because only three Menu Pages have been defined in the sample data.
To change the Item Buttons displayed in the Menu Area of the Order Entry Form:
You may configure the way Group Buttons are laid out on the POS Groups Screen using the functions described in the section on Button Layout. You may also temporarily disable certain Group Buttons so they are not visible on this screen but are still part of the menu.
You may configure your system so that the Menu Groups Screen is the Default Display that appears every time you access the Order Entry Screen.
If you wish to dispense with Menu Navigation, you may use the Item Lookup Function Button to locate any item on the menu and display the associated Menu Button on the Order Entry Screen. If you then touch this button the item will be added to the Order Detail Area as part of the active order.
The Item Look-up Function Button is accessible from the POS Order Entry Screen but the exact location of the button is determined by configuration settings on the POS Function Buttons Layout Form.
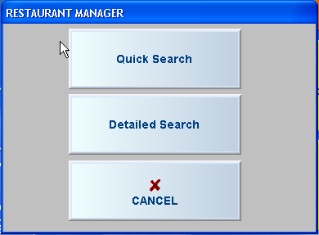
There are two modes for searching the menu to locate an item. The [Quick Search] Mode looks for an item name that begins with certain letters (or numbers). The [Detailed Search] Mode looks for an item name that contains certain letters in any portion of the name.
To lookup and item and add it to an order:

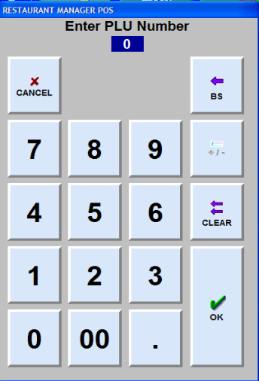
Every Menu Item and Modifier Item on the menu has an associated PLU Number that is detailed on the Item Setup Form. You may use this number to add an item to the active order using the PLU Order Function Button.
The PLU Order Function Button is accessible from the POS Order Entry Screen but the exact location of the button is determined by configuration settings on the POS Function Buttons Layout Form.
To add an item to an order using the PLU Number:

Every time you access the Order Entry Screen you’re building an “Active Order” by adding Menu Items to the Order Detail Area of the screen. Adding an item to the active order usually requires nothing more than touching one of the Menu Item buttons displayed on the Menu Area of the Order Entry Screen. But you may also search for and add items using the Item Lookup function or the PLU Order function.
Touch the [Edit Menu Item] Function Button to change the name, price or button color of any Menu Item (or Modifier Item) in the standard Menu Group currently displayed on the Menu Area of the Order Entry Screen but the exact location of the button is determined by configuration settings on the POS Function Buttons Layout Form:
The [Edit Menu Item] Function Button will not work when Custom Groups are displayed on the Menu Area of the Order Entry Screen. If the Item Buttons in the Menu Area comprise a Custom Group, you must use the [Groups] Function Button to locate and display the standard Menu Group that contains the item you wish to edit.
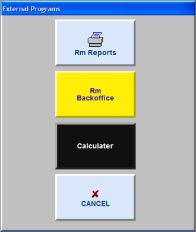
For security purposes, users cannot use standard Windows procedures to open third party software while Restaurant Manager POS Modules are running on a POS Station. Instead, the External Programs Setup Form can be used to identify external applications pre-approved for use at POS Stations.
Calculators, calendars, and the BackOffice Module are examples of applications that are frequently configured to run as External Programs at POS Stations. At POS Stations without a keyboard, it may be necessary to use a touch screen keyboard utility to operate some External Programs.
Any of the programs specified on the External Programs Setup Form may be launched from a POS Station simply by touching the External Programs Function Button found on any POS Status Screen:

Touching External Programs button calls up a list of available programs like the one in this sample screen shot:
If password protection was enabled on any of these applications the user will be prompted to enter an Employee Password before the program will launch.
Use this Setup Form to specify the External Programs approved for launch from a POS Workstation.

External Programs supports tag expansions. Tag expansions are essentially keywords for RM External Programs to pass the certain information to the external program. Example: for the tag, <Account Number> if “External Programs” is accessed on the order entry/settlement screens, it is expanded to the currently set account number. However, if accessed on the main POS screen or if no account number is set-up, then it is replaced with a null string
The following are the current tag lines available to use:
<Account number>
<Receipt printer>
<Employee>
<Order number>
<Station number>
Note the use of angle brackets to indicate keywords.
To open the BackOffice Module at a POS Station while a POS Module is open and operating: you will need to use External Program with the following command line:
c:\rmwin\rmwin.exe
In the above command line “C” equals the mapped drive leading to the server where rmwin folder resides. The last part of the command “rmwin.exe” is the executable to launch the RM BackOffice Module.
The Point of Sale program provides a gateway for accessing DOS commands and other DOS programs. Press [MISC] at the Status Screen and select the [DOS COMMAND] option. Restaurant Manager will display a touch screen keypad ask you to type a command. You may enter any valid DOS command or Windows executable. For example, you could enter the command to execute your word processor, or a spreadsheet or accounting program.
NOTE: Depending on the DOS command executed, you may be required to have a keyboard connected to the POS station. Without a keyboard, you could lose control of the station and have to re-boot the computer to bring it back on-line.
Restaurant Manager has the ability to log all the button presses for each POS station. This feature can be useful for auditing purposes and is an excellent to track employee mistakes, intentional or not. To enable button logging, you must set the station configuration option “Number of Days to store button presses (0 to disable).” This option defines the number of days that the system will retain button log information. You should set it to a value that will suffice for your auditing needs. To disable the button log, set the value to 0. Restaurant Manager will automatically delete “old” button press information each time a new session is opened.
Note- this feature may result in a slight speed degradation of the POS stations, therefore, if using slow machines and it speed is an issue, you may want to disable this option for improved performance.
To view the button log, choose MISC->View Button Log from the main POS screen. The following window is displayed.
The window is divided into three areas described below:
The browse area headings contain specific information listed below:
- Date- Shows the date the ticket was opened
- Time- Logs the time when the button was pressed
- The ‘Prompt’ column shows the message that was displayed on screen when the button was pressed
- The button column list the button pressed at the POS
- Order#- List the order number of the check opened. If a button is pressed at the main POS screen (not within an order), the Trans # will be 0.
- Employee Number- Lists the employee number who pressed the button.
- Station- This column will display the POS station number where the button was pressed.
- The ‘POS Mode’ column identifies the type of transaction and corresponds to the “Chk Type” filter (1=tables, 2=tabs, 3=fast, 4=delivery, 5=hostess, 6=advance orders).
- “Area” column corresponds to the dining area (applies to tables only).
- The “Trans. #” corresponds to the table # for table transactions, tab number on tabs, and delivery # for deliveries. If a button is pressed at the main POS screen (not within an order), the Trans # will be 0.
Technical note: Button press information is stored in files named BTN<nnnnn>.DBF, where <nnnnn> corresponds to the session number. For example, button press information for session 53 is stored in BTN00053.DBF
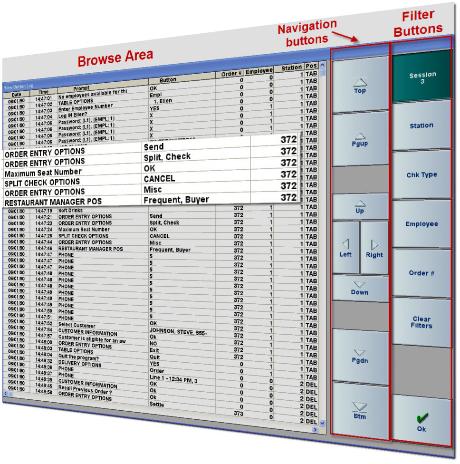
The View Checks feature provides a quick and easy way to locate any order in the system, whether open or settled. You can also view the items on the order and recall the check if desired. If searching for a specific order, several filtering options allow narrowing down the search so you can quickly locate the order of interest. This feature works across ALL POS modes including tables, tabs, delivery orders, and fast transactions.
To use this option, locate and press the [MISC] button on the Main POS screen, then choose “View Checks.” The following window is displayed.
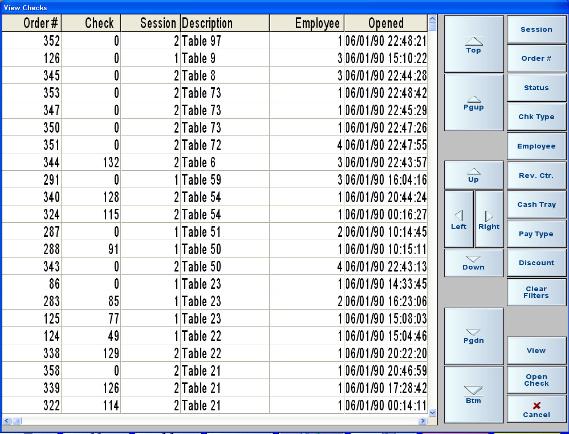
You may also change the information in the columns if desired. By default, the list is sorted in chronological order, but may be sorted on any column by clicking the column header (e.g. pressing “Order” heading will sort information by order number). Click once to sort in ascending order, and click again to sort in descending order. To revert back to chronological order, press “Clear filters.” You can also click and drag on column heading to move to order of the columns to prominently display user relevant information.
This window displays all orders for the current session (both open and settled). Initially, the first order in the list is highlighted. Use the navigation buttons to move through the list. The [Left] and [Right] buttons allow scrolling the window left and right to display additional columns that are not visible in the initial view.
To move the highlight bar to a different order, press the navigation buttons (PgUp and PgDn), or touch the order of interest using the touch screen. To view the check details of the currently highlighted order, press the [View] button. This causes the [View Items] window to be displayed as follows:
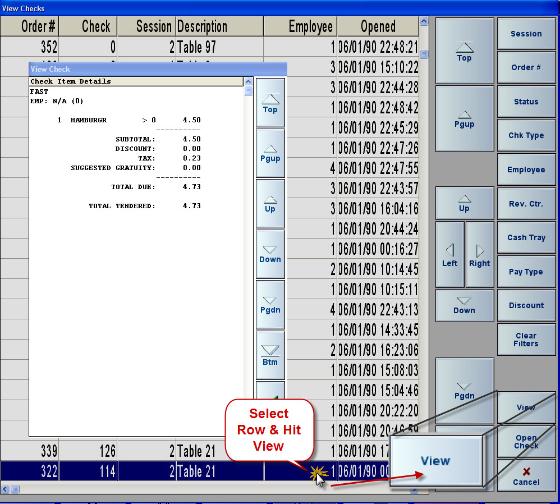
While the View Items window is displayed on screen, you can continue navigating through the order listing as described above. The information in the View Items window is updated automatically to reflect the items in the highlighted order. To remove the View Items window, press the “View” button again.
If you wish to access an order and display the Order Entry screen, press the [Order Entry] button. Note- you can only load up unsettled orders and the order must not be opened at another station.
If you are attempting to locate a specific order, the filter buttons along the right portion of the screen can be used to narrow down the search. For example, if you know the employee that processed the order, or the revenue center, or the method of payment that was used, one or more filters can be used to quickly locate the order of interest.
To activate a filter, simply touch the corresponding filter button. Each button is context sensitive so it will give different filtering options depending on the type of filter being selected. For example, pressing the “Employee” filter will display a list of employees, while pressing the “Rev. Ctr.” filter will display a list of revenue centers. To activate the filter, choose one of the filter selections. The following screen shows all orders that were processed by employee 1.
Note the “Employee” filter button is shown depressed, and the filter condition (employee #1) is displayed on the button. Multiple filters can be active simultaneously to further narrow down the list. When multiple filters are active, each active filter button appears depressed along with the filter condition. Only those orders that meet ALL filter conditions are displayed in the list.
Filters can be canceled individually, or all at once. To cancel an individual filter, press the corresponding filter button and choose “Cancel.” To cancel all filters at once, press the “Clear Filters” button.
To save key strokes and depending on how frequently your establishment use the "View Check" function, you may want to enable the "View Checks defaults filter to last session. When this option is enabled, it will automatically set the filter to the last session. This will improve performance of View Checks as it will limit the number of orders it initially displays. Users who uses the feature to display their last orders for the day/session will most benefit. Default value: False
A security level may be applied under the POS Function Button Layout form to restrict access to certain employees.
Most features and functions in the Restaurant Manager POS Module are common to the different POS Modes. These features and functions are described in the sections titled Basic POS Operations and Advanced POS Operations. This section only describes those features and functions that are unique to the Table Service Mode.
From the POS Modes Setup Form in Station Configuration, you can configure most operational defaults for the Table Service Mode. Other operational defaults, like prompting for the number of customers, must be configured from the Revenue Centers Setup Form.
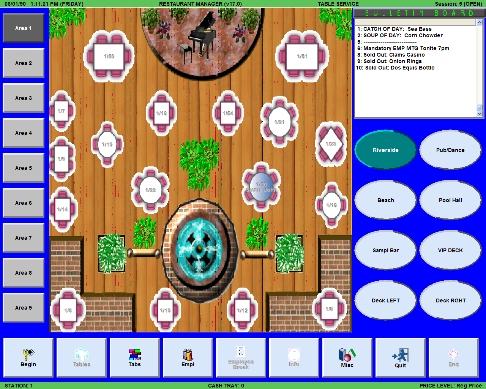
When you are in Table Service Mode, you open new orders and track pending orders from the Table Service Status Screen:
If you have activated Enhanced Password Control, the Table Service Status Screen has both an Idle Mode and an Active Mode. If you have activated Enhanced Password Control, the screen always appears in Inactive Mode as in the sample screen above
Features that appear only on the Table Service Status Screen include:
NOTE:You can customize the way table buttons are displayed on the Table Service Status Screen from theTable Layout Setup Form. You can change the colors that show the status of each table from the Table Status Button Color option in Station Configuration.
By default a number appears on each table button. From the BackOffice Module you can create a custom ID for each table of up to 6 alpha-numeric characters.
Table Groups- You can group the tables in your restaurant into different sections or “Groups”. Each Group can contain up to 40 table buttons. The 8 buttons under the Table Groups bar at the right of the screen allow you to switch the table display between these different sections of your restaurant.
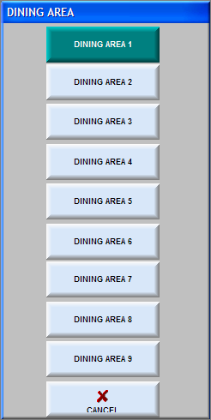
Dining Area Status Bar- The tables and table sections on screen all belong to a single Dining Area. The active Dining Area is indicated in the bar above the Table Display where, in the sample above, it says “Tables in Dining Area 1”. As described in the section Dining Areas, you can define up to 9 Dining Areas of 320 tables each. And you can configure each POS station to default to a different Dining Area.
To display the tables and Table Groups from an alternate Dining Area, press the [MISC] button and select the [Dining Area] option (as described below).
Bulletin Board- At the upper right hand side of the Table Service Status Screen is a box that displays messages for all employees. Messages posted here must be entered in the BackOffice Module.
NOTE: E-mail does not appear on the Bulletin Board. Employees can retrieve E-mail by pressing the [MISC] button followed by the [E-mail] button.
All other features of this Status Screen are common to all the POS Status Screens as described in the section Table Service.
At any given moment the Table Status Screen displays up to 40 individual tables. You can change the tables displayed on screen by selecting another table group or another dining area.
The active dining area is displayed on the Table Service Status Screen. Touch buttons for the eight different table groups will be displayed regardless of the active table group you are in. To change table groups simply touch one of these buttons.

To change the active dining area:
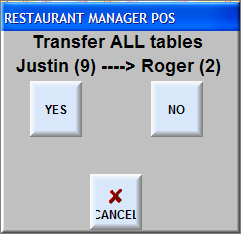
You can transfer all table orders opened by one waiter to any other waiter logged onto the system. Press the [MISC] button at the base of the POS Status Screen, and then select [TRANSFER TABLES]. Restaurant Manager will prompt you to enter the number of the employee giving up their tables followed by the number of the employee accepting the tables:
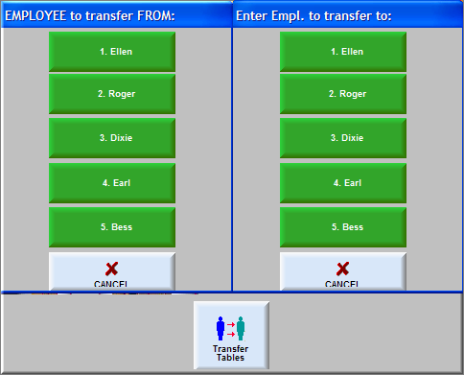
Depending on the way system security has been configured, you may also be prompted for a password. When prompted for a password you must enter the password of the employee giving up his tables OR any password with a security level higher than this employee.
To view a listing of all the open tables in all the Dining Areas of your restaurant, press the [MISC] button at the base of the Table Service Status Screen:
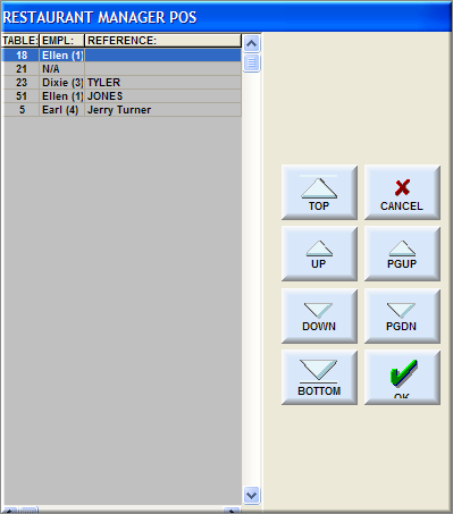
This screen shows each open table in the active dining area, the waiter serving the table and whether or not the order has been tagged with a reference or linked to a record in the Frequent Diner/Customer database. This screen provides a convenient way to see all open tables on a single screen.
In the sample screen above you will notice that 5, 23, and 52 have been tagged with a reference.
You can use the scroll bar or the buttons at the right of the screen to navigate the list.
The Table Service Mode includes a Seat Assignment Feature to assist your wait staff in serving each individual customer at the table. This feature can also be used to help you prepare split checks.
If you wish to use seat numbers on most orders, you should enable the "Advanced Seat Management" feature in the BackOffice Module. If you wish to use the Seat Assignment Feature on an occasional basis, you need not enable this feature. Instead you can simply press the [MISC] button at the base of the Order Entry Screen and select the [REASSIGN SEATS] option for those orders where you wish to assign seats.
When the Advanced Seat Management feature is enabled two seat buttons appear just above the Order Detail Area of the Order Entry Screen:
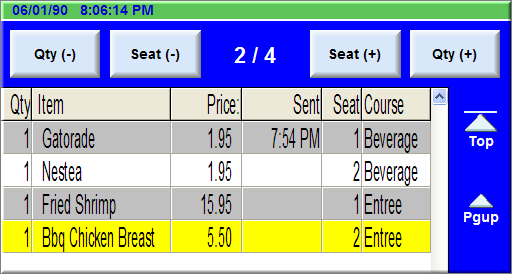
The seat buttons are used to advance the active seat number up and down. The active seat number and the total number of seats are displayed between these two buttons. You can change the total number of seats by changing the customer count.
Press the [-] button to decrease the active seat number and press [+] to increase the active seat number. You must set the seat number BEFORE ordering the items you wish to link to that seat. The seat number is shown beside each item in the Order Detail Area.
You can also have your system prompt for seat number on the fly. You system can be configured to prompt for all menu items, prompt for items in a menu group, or you can micro manage by assigning the prompt at the menu item level.

The legacy method to reassign seat numbers has been to use the [Reassign Seats] function button within the Order Entry screen as described above. A new method introduced in version 18 is to use the [Reassign Seats] button within the Split Check screen.
To change an incorrect seat assignment prior to splitting a check press the [MISC] button at the base of the Order Entry screen followed by the [REASSIGN SEATS] button to call up the Seat Assignment/Split Check screen:
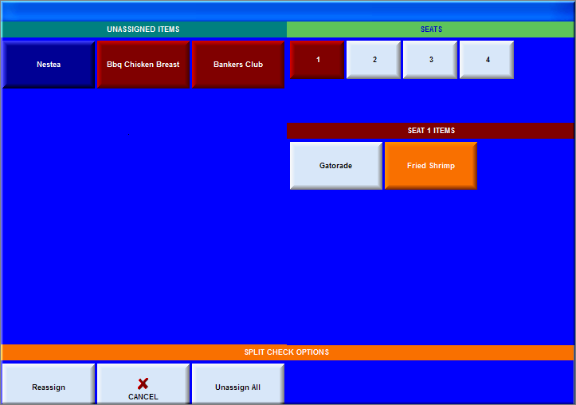
The screen is divided into three main areas which are labeled with bars.
In the sample screen above, the seat [1] button under the “Seats” bar is red; indicating that seat one is the active seat. The two items currently assigned to seat 1 appear under the “Seat One Items” bar. Another three items have been moved from Seat 1 to the area the “Unassigned Items” bar at left.
To change the seat assignment:
As mentioned above, you can also use the Re-assign Seat feature to create initial seat assignments. In this case all the items on the order appear under the “Unassigned Items” bar when you first access this screen.
To create an initial seat assignment using the Reassign Seats screen:
Within the Split Check User Interface, touch an item/items belonging to one seat and move it to another seat. Once the items have been assigned to the correct seats , tap the [Reassign Seats] button on the Split Check screen. You will be re-directed to the Order Entry screen after selecting the [Reassign Seats] button. You can verify changes on the Order detail section of the order Entry screen. Note: pressing the Reassign Seats button will not split the check.
See the chapter on Guest checks and Sales Receipts for instructions on splitting a single order into multiple checks.
To un-split a check from the Order Entry Screen, press the [MISC] button followed by the [UN-SPLIT] check button. See the chapter on Guest checks and Sales Receipts for instructions on splitting a single order into multiple checks.
You can back into spilt check and re-assign seats or un-split a check. The easiest method is described below:

NOTE: Any discounts, gratuities and taxes applied to the first check are applied to the re-constituted check.
If you wish to merge two or more split checks but DO NOT wish to re-constitute the entire order on one check, you may combine checks for settlement on the Settlement Screen as described below.
If an order has been split into two or more checks, Restaurant Manager allows you to combine some or all of those checks for settlement purposes. For example, if a check is split into 4 seats, and the person on seat 1 decides to pay for seat 2, those seats can be combined at the settlement screen.
To combine two checks from the Settlement Screen:
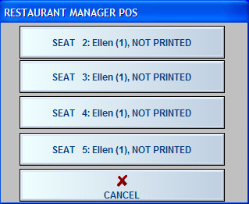
Press the Seat button of the check you wish to combine with the check already displayed on the settlement screen.
If you wish to combine a third check for payment, repeat steps 4 and 5, and then proceed with settlement as described in the section Settling Sales.
Most features and functions in the Restaurant Manager POS Module are common to the different POS Modes. These features and functions are described in the sections titled Basic POS Operations and Advanced POS Operations. This section only describes those features and functions that are unique to the Bar Tabs Mode.
When you are in Bar Tabs Mode you can open and track pending orders without assigning them to a particular table. Rather, you can number orders on a first in/first out basis, type in a reference text, or swipe accredit card to identify each order. The Bar Tabs Status Screen is use in Bars, Nightclubs and Pool Halls where a reference other than a check or table number is required. It is also appropriate for Drive-Thru operations where checks are processed on a "first-in/first-out" basis.
From the POS Modes Setup Form you can configure most operational defaults for the Bar Tabs Mode. Other operational defaults, like prompting for the reference text displayed on the order button, must be configured from the Revenue Centers Setup Form.
Orders created as tabs can later be transferred to a table.
When you are in Bar Tabs Mode, you open new orders and track pending orders from the Bar Tabs Status Screen:
To access the Bar Tabs Status Screen, from one of the other status screens, press the [TABS] button at the base of the active POS Status Screen.
If you have activated Enhanced Password Control, the Bar Tabs Status Screen has both an Idle Mode and an Active Mode. If you have not activated Enhanced Password Control, the screen always appears in Active Mode as in the sample screen above.
Features that appear ONLY on the Bar Tabs Status Screen include:
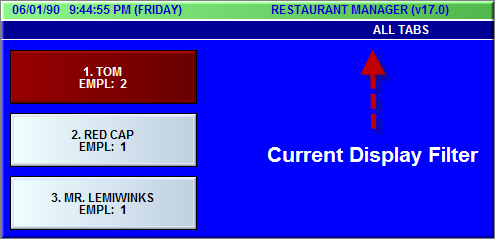
The body of the Bar Tabs Status Screen displays buttons corresponding to each pending order. When there are no open orders the body of the screen is blank. The tabs screen can be thought of as a queue, where tabs are maintained in chronological sequence. The first (or oldest) tab is displayed in the upper left corner of the screen and newer tabs are displayed beneath it. When a tab is settled, it is cleared from the Bar Tabs Status Screen and all tabs after it are advanced forward in the queue to fill the void. If you have created more orders than can fit on a single screen [NEXT PAGE] and [PREV PAGE] buttons will appear that allow you to view multiple screens.
To access any open orders, simply press the appropriate order button. You may access an open order as many times as you wish.
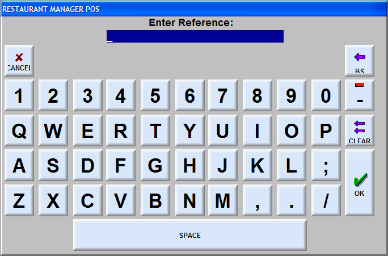
Each order button on the Bar Tabs Status Screen is automatically numbered in sequence when the order is opened. This number is always displayed on the order button. You may also add a label or reference text that will appear on the order button (as on the sample screen above.) The reference is simply a note that can be used to identify the order such as the customer's name, their location in the restaurant, the color of their shirt, or any descriptive text that can differentiate this tab from all others.
You are not required to label an order with a reference. And in establishments that process orders on a first in/first out basis there is no need to use references. However if you do wish to use the reference feature on a regular basis you can configure your system to automatically prompt for a reference text each time you open a new order. If you do not activate this automatic prompt you can still manually add a reference to the touch button using the [Reference] function button typically found in the [MISC} function of the Order Entry Screen.
When an order is first opened the order button is gray. When the check has been printed, the button turns red.
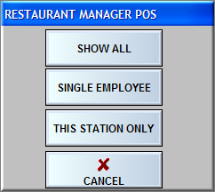
The order touch buttons that appear on the body of the Bar Tabs Status Screen can be filtered at each POS Station on criteria like “single employee” or “this POS Station Only”. You can set a default filter for each station from the BackOffice. You can also change the filter temporarily by pressing the [MISC] button at the base of the Bar Tabs Status Screen and selecting the [Tabs Displayed] function button.
The active filter is displayed in the gray bar just above the order buttons. (In the sample screen below, the filter is set to “All Tabs”)
The following function buttons appear ONLY on the Bar Tabs Status Screen:
NEW TAB – Touch this button at the base of the Bar Tabs Status Screen to open a new order.
TABS DISPLAYED – Use this button to select the filter you wish to apply to the order buttons displayed at the active POS Station. This button is typically found on the Miscellaneous Functions Screen of the order Entry Screen.
TRANSFER TABS – Use this button to transfer all tabs from you employee to another. This button is typically found on the Miscellaneous Functions Screen of the order Entry Screen.
NOTE: See the section Secondary Function Buttons on the POS Status Screens for a description of all other buttons that appears on the Bar Tabs Status Screen and the Miscellaneous Functions screen.
To open a new order from the Bar Tabs Status Screen, press the [NEWTAB] button at the base of screen. You may be prompted to enter an employee ID number. And a touch screen keypad will usually appear prompting you to type in a reference text of up to 25 characters:
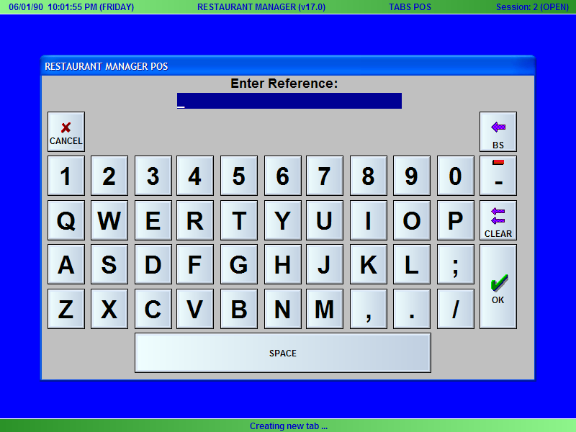
The reference text you type will appear on the order button on the Bar Tabs Status Screen along with a tab number that is assigned automatically and in sequence. The order number is assigned whether or not you enter a reference text. If you prefer not to type in a reference text, simply press the [CANCEL] button to exit the touch screen keypad and proceed directly to the Bar Tabs Order Entry Screen where you should process the customer order as described in the section on Basic POS Operations.
You will only be prompted for a reference when you first open an order by pressing the [NEW TAB] button. To access an order that is already opened you should press the order button itself which will bring you directly back to the Order Entry Screen.
This option can be used when multiple bartenders (or servers) are sharing a POS station and require the ability to rapidly switch between employees by swiping a badge. Note: this option applies to the TABS mode only (not delivery or tables POS). In order to use this feature, you must enable the following two options in RM BackOffice >Setup- Station Configuration:
After swiping in (or pressing the [Begin] button and entering a valid password), the system will automatically load up the last open tab for the employee who swiped in. If there are no open tabs, then a new one will be created. With this option, it is also permissible to swipe a badge from the order entry screen. The system will automatically suspend the current transaction and load up the last tab for the employee who swiped in.
If you have enabled the option "Immediate time-out after 1 trans" located in Station Configuration, special consideration must be given in order to create multiple tabs for a single employee. When exiting the order entry screen, rather than press the [Exit] button which will cause the system to immediately timeout, you must choose the option [EXIT NO TIMEOUT] function located under the [MISC] options. This will cause the system to exit the order entry screen, but keep the current employee signed in, allowing them to create a new tab or choose any of the existing ones.
It may be helpful (and reduce clutter) if the "Default tab filter" in Station Configuration is set to "Single Employee." This causes the employee who is signed in to see only their own tabs, and not the tabs of other employees.
You can filter the pending orders displayed on the Bar Tabs Status Screen at a given POS station. The filter options include:
The default filter for each POS station can be configured on the POS Modes Setup Form in Station Configuration. However, you can also change the filter for each POS Station from the POS Module.
To change the tab buttons displayed on the Bar Tabs Status Screen at an individual POS Station:
NOTE: If you select [SINGLE EMPLOYEE] you will also be prompted to enter the Employee ID number. This filter option works best in systems configured with Enhanced Password Control. When Enhanced Password Control is activated, the system knows the employee number (based on the password) and can automatically display the tabs opened by each employee and automatically assign the employee number when creating a new tab.
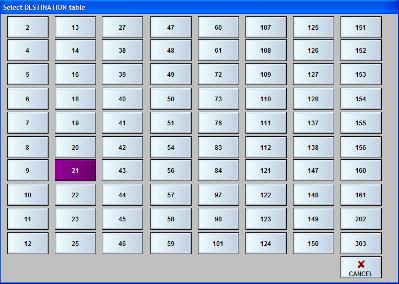
In a bar/restaurant operation, it is common for customers to have a few drinks at the bar while waiting for a table. When the table becomes available, items on the bar tab can be transferred to the table. To transfer a tab to a table:
If you select an unopened table to receive the tab, Restaurant Manager will prompt you for the number /name of the employee who will be serving the table. Depending on the security configuration of your system, you may also be prompted for the employee’s password.
If you transfer the tabs to a table that is already open the items from the tab will automatically be added to the table order.
Restaurant Manager provides the option of transferring tabs from one employee to another. There are two ways of making the transfer. One method transfers a single tab, whereas the other method transfers all tabs.
NOTE: If you have set a security level greater than zero for "Transfer checks/bar tab to another employee” Restaurant Manager will prompt for a password before transferring the tabs. You must enter the password of the employee receiving the tabs OR any other password of a security level equal to that of this employee.
The Delivery POS Module is essential for managing and tracking orders that are called in for delivery or pick-up. When processing call-in orders, the system gives you access to a complete customer database (indexed by phone number) that allows you to track name, address, driving directions, map quadrant, previous order detail and total purchase information.
The body of the Delivery Service Status Screen displays buttons corresponding to each pending order. When there are no open orders the body of the screen is blank.
The orders on the Delivery Status Screen are maintained in chronological sequence. The first (or oldest) order is displayed in the upper left corner of the screen and newer orders are displayed beneath it. If you have opened more orders than can fit on a single screen [NEXT PAGE] and [PREV PAGE] buttons will appear that allow you to view multiple screens.
All delivery orders are linked to a record in the customer database. Various fields from the customer database can be included on each delivery order button, including the customer name, address and delivery map code. Non-delivery orders need not be linked to a record in the customer database. However you can still label non-delivery orders with a reference just like on the Bar Tabs Status Screen.
All order buttons on the Delivery Status Screen are automatically numbered in sequence when the order is opened, regardless of whether the order is a delivery order or a non-delivery order. This order number and the number of the employee handling the order are always displayed on the delivery order buttons.
The order buttons on the status screen change color as their status changes. From the Delivery Status Screen you can view a color legend detailing which color indicates which condition. From the Station Configuration you can customize the colors used to show each of the status codes listed below:
If you have activated Enhanced Password Control, the Delivery POS Status Screen has both an Idle Mode and an Active Mode. If you have not activated Enhanced Password Control, the Delivery Status Screen always appears in Active Mode. To access any open orders, simply press the appropriate order button. You may access an open order as many times as you wish.
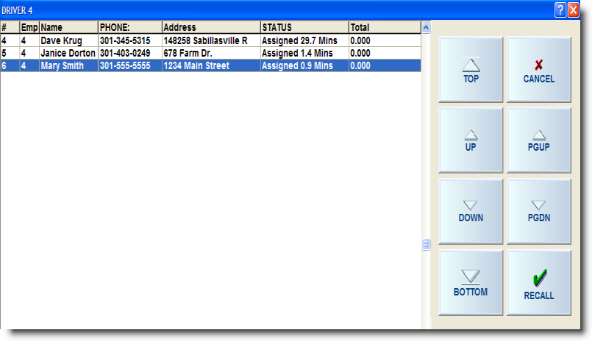
The Delivery screen is divided into two main parts. Orders are displayed on the left and drivers are displayed on the right
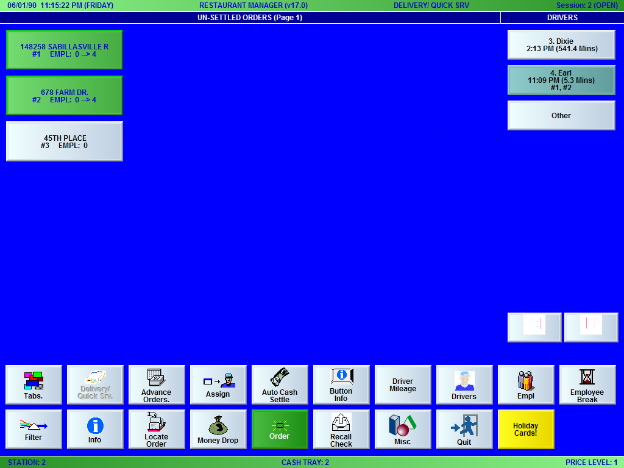
By default, the system will allocate the majority of the screen for displaying orders and a relatively smaller portion for displaying drivers; however, these portions can be changed along with the number of buttons in each section. The following parameters located in RM BackOffice >Setup >Station Configuration > POS Modes > Delivery/ Quick Service can be used to customize the main Delivery screen to suit your needs.
The following function buttons appear ONLY on the Delivery Service Status Screen:
NOTE: See the section onSecondary Function Buttons on the POS Status Screens.For a description of all other buttons that appears on the Bar Tabs Status Screen and the Miscellaneous Functions screen.
You can configure your system from the BackOffice Module to display a variety of different information on the order touch buttons that appear on the Delivery Status Screen. These POS Station defaults can be changed from the POS Station, itself:
You can apply a variety of filters to the display of pending orders on the Delivery Status Screen. From the BackOffice Module you configure your system with different default filters at different POS Stations. You can also temporarily change the filter from the POS Module by touching the [FILTER] button at the base of the Delivery Status Screen.
Select the filtering option that best suits your needs.
The Delivery module provides a utility for quickly locating a past order. To locate an order, press the “MISC” button from the main Delivery screen and select the option “Locate Order.” You will be given a choice of locating the order by Name or by Phone number.
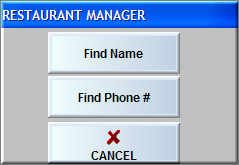
When locating an order by name, you can enter either the first name or last name or any portion of the name. For example, if searching for an order placed by “John Smith”, any of the following search strings will suffice:
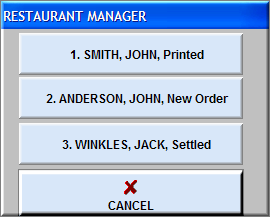
A search on the full name “John Smith” will bring up the exact order of interest; whereas, a search on “John” will find all other orders placed by people named John. The search is NOT case sensitive – that is, it does not matter if you enter the search string in upper or lower characters. Restaurant Manager will display a list of orders (both settled and un-settled) that match your search string.
If you see the desired order, simply press it to recall it. When doing a search based on Phone #, the process is very similar, but you must enter the entire phone number in order to perform the search.
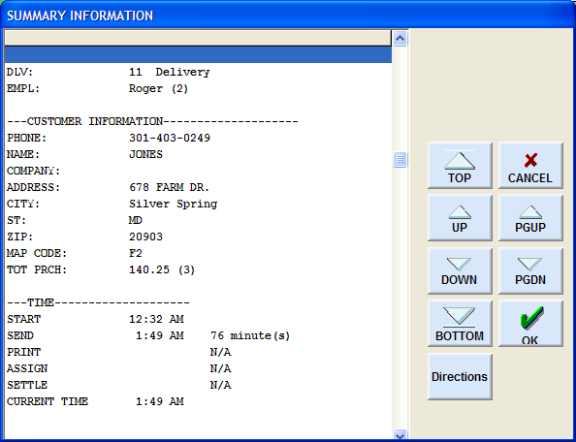
Press this button to get a quick snapshot of the status of an order. Additional information outside of what is displayed on an order button is the start time, send time, and other relevant times pertinent to the order cycle. Use this button when a customer calls inquiring about the status of an order. To use this function you must first press the [Info] button and the order of interest.
Customer information is essential for operations that utilize Delivery, Phone-in orders, or Take Out orders. It is essential for most operations to create and edit customer information at the POS. Encourage your staff to read the name, address and driving directions back to the caller to confirm that the information is correct. Remember that driving directions from the Street Database are automatically added to each customer record on a particular street. But you may need to add to these directions or change them to reflect, for instance, the best way to get to an address on a one-way street, etc.
The topic on Customer Management provides detail information regarding the relevance of customer information, what can be achieved with the information and the association it has with other programs
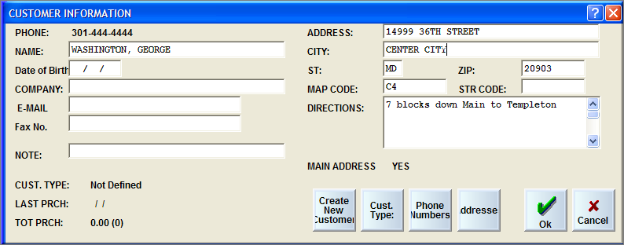
You can enter the information essential for delivery operation in the designated fields including the following:
Other Information not essential for delivery but considered important for marketing can be entered in the following fields:
- Birth Date
- Fax Number
- Cust
Restaurant Manager can store multiple addresses per customer – for example, a work and home address. Or if a customer wants his food delivered somewhere other than the usual place, you can use the alternate address capability of Restaurant Manager.
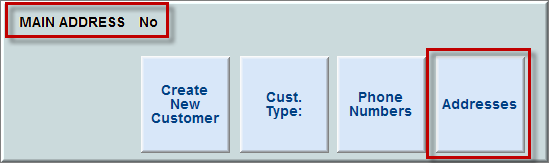
By default Restaurant Manager uses the main (or primary) address. To switch to the alternate address, press the “Address” button at the bottom of the customer edit form.
Restaurant Manager displays the text “No” next to the Main Address field if an alternative address is used. From this point forward, the alternate address will be printed on the guest check and remote printers (if so configured), and will be used for the mapping interface if enabled. Press the “Address” button again and choose among the addresses listed to change.
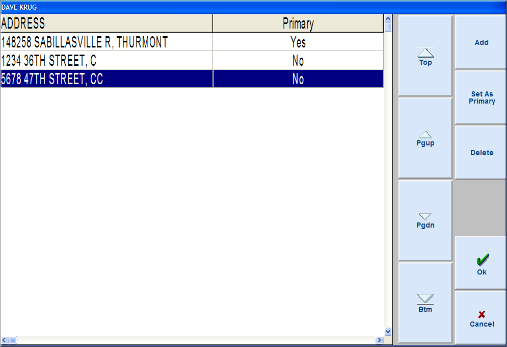
Use the [Add] button if you are entering an alternate address for the first time, all fields will be blank to start off with. If the street database is active, then you will be given the opportunity enter a street number and then a prompt to choose a street from a selection window and any available information regarding that street (i.e., city, state, directions, etc) will be filled in automatically. After you enter alternate address information, it will be available for future use.
The address fields, map code, street code, and directions for the alternate address can be different from the main address; however, the customer name, company and “Note” fields are shared by both the primary and alternate address (i.e., if you change it in the primary address, it will also change in the alternate address and vice versa).
You can also change a customer’s “primary” address by selecting an address and pressing [Set as Primary]. You can also delete an address from the POS by selecting an address under the [Address] function button; choose the address, and pressing [Delete].
Navigation buttons are provided to move around the list should there be a long list of phone numbers for the customer. The action these buttons do are as follows:
Top – displays the top most page of the list
PgUp – displays the previous page of the list
PgDn – displays the next page of the list
Btm – displays the bottom page of the list
You can sort the listed addresses in the by clicking on the header of the list. Clicking a different header the first time sorts the list by that header in ascending order. Doing so again on the same header sorts the list the descending order.
Note: If you use the customer database for mailings, make sure to use the alternate address when a customer wants his order delivered elsewhere. That will preserve the primary address for future marketing purposes.
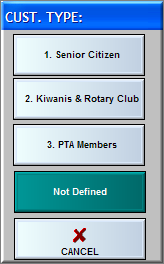
If you have implementing an Frequent Diner Program , you can select a customer type for a new customer or change a change a customer type for an existing customer using the [Cust Type] button on the Customer Information screen. Press the button will bring about a prompt of customer types that are defined in the Frequent Diner setup forms in RM BackOffice. Choosing the [Not Defined] option will automatically enroll them in all available award programs.
Cust Type Prompt
Another useful to tool is the ability not only to be able to change the customer phone number without losing sales but also to be able to assign multiple phone numbers for a certain customer.
A customer ordering from home, office or even from the park using his cellular phone may opt to use a different phone number (for contact purposes) for the order but would want to have the sales attributed to him for the various award programs the restaurant may have.
When clicking on the [Phone Numbers] button, the Customer Phone Number Management screen will show (see below).
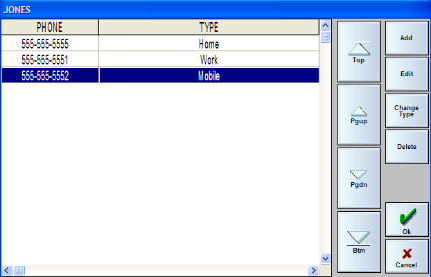
The Customer Phone Management screen lists the entire phone numbers created for the specific customer.
To select/highlight a phone listed, just click on the item. Selection of a phone does not make it the active phone for the check yet until you click the “Ok” button. The “Cancel” button exits from this form without selecting another phone as the active phone.
The rightmost pane/column of buttons is the action buttons and when clicked, usually performs the action on the currently selected/highlighted phone on the list. The buttons are:
[Add] – allows the adding of another phone number for the customer. First, it would prompt for the phone number then the phone type. If the [Cancel] button for both prompts is not used, the new phone information will add to the last of the list.
[Edit]– allows the user to change the phone number of the currently selected item on the list. Note that, if the active phone currently displayed in the Customer Edit Screen is edited, the new number will be reflected too.
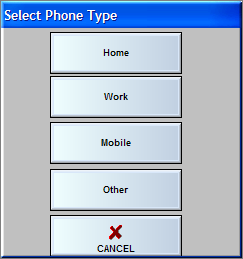
Change Type] - allows the user to change the phone type. These phone types are defined in the RM BackOffice but by default, should be “Home”, “Work”, “Mobile”, “Other”. See image below.
[Delete] – allows the user to delete an unneeded phone number listed under the customer. The current active phone used in the Customer Editing screen cannot be deleted.
If however, it needs deleting, the workaround is to create a new phone number, select it by clicking [Ok], go back to the Phone Management screen, select the phone and click delete. Note that when the last phone on the list is deleted, the phone prior to that will be selected.
[Ok]– This button confirms the selection of a phone number and will assign the highlighted phone as the number to use for the check.
Cancel – this cancels the assignment of a new customer phone number to the check and keeps the previous one. Added, edited or deleted phone number still takes effect.
Note: Any action done, i.e. adding, editing number, changing phone type, or deleting a phone are saved even if the [Cancel] button is clicked.
To remove customers from the database, use the RM BackOffice option under the Add-Ons->Customer Street Databases setup forms.
Navigation buttons are provided to move around the list should there be a long list of phone numbers for the customer. The action these buttons do are as follows:
Top – displays the top most page of the list
PgUp – displays the previous page of the list
PgDn – displays the next page of the list
Btm – displays the bottom page of the list
You can sort the listed phone in the by clicking on the header of the list. Clicking a different header the first time sorts the list by that header in ascending order. Doing so again on the same header sorts the list the descending order.
Restaurant Manager will allow a separate database for different people who share the same phone or customer ID number. This is useful for offices, businesses, or roommates. This is also helpful in the same scenarios when offering a frequent diner program. A pop-up dialog (see below) will be displayed listing all the customers that may have the same phone number.
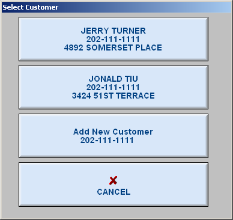
Choose a name from the list to continue with the order. Clicking on the “Cancel” button would cancel the selection of the customer to the check.
Note, if only one customer is found with the same customer number, the customer will automatically be selected.
Use the [Order] function button to start a new order. The next prompt may vary depending how your system is configured. Telephone numbers are the most common way of linking a customer with an order. Alternative methods of linking customers with orders are discussed in the topic Linking Orders to Customers. The remainder of this section will be written with the assumption that telephone numbers will be used by your establishments. If your system is configured with Caller ID the next screen will look like this:
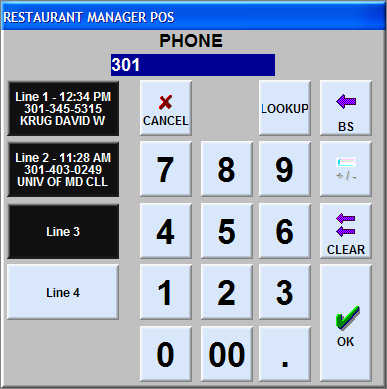
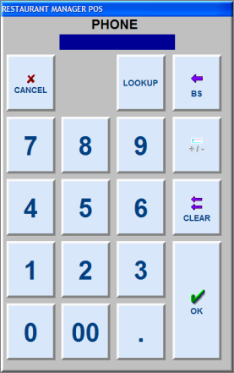
If your system is not configured for Caller ID but is configured with a phone prompt (recommended) you screen will look like this:
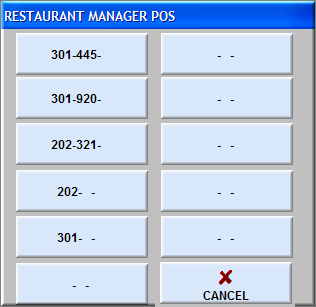
If you are using the above prompt, you can configure your system with a default area code so the employee only has to enter in seven digits. You can also configure your system to have a list of preset number including area code accessed using the [LOOKUP] button on the phone prompt:
When you use the Telephone Entry prompt to enter a number that is not already in the database, Restaurant manager prompts you to create a new record by typing in the customer name and street number. It is suggested that you enter the name last name, first in the “Name” field. Enter the address/street number in the Street Field (i.e. 14999). Do not enter in the street name or number (i.e. 69th Street).
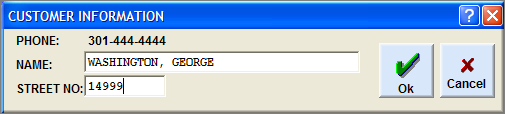
If you are not using the street database, you will want to disable this prompt.
After you type in the street number, Restaurant Manager calls up the Street Database to automatically add the street name, Map Code, Street Code and basic driving directions to the customer record.
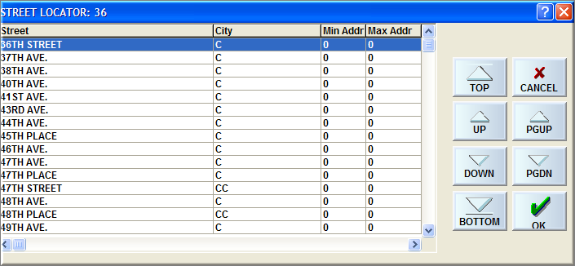
Type the first few letters of the street name to locate the correct street name on the list or use the cursor keys on the keyboard to move through the alphabetical street listing and press [OK].
If you are not using the street database, you will want to disable this prompt.
NOTE: If the customer’s street does not appear in the street database, you must press the [Cancel] key to exit the street database and manually enter the street name into the address field on the customer record.
On return visits, this customer information screen will be filled in automatically. For new customers, the Customer Information Screen will pick up the data from the previous prompts. In our example below, the driving directions, map code, and zip code were taken from the street database. The blank data fields (i.e. Company, e-mail, etc.) can be filled in manually.
The Customer Information screen will be the default if you configure your system without the Street Locator and Street Database prompts. The system will still pick up the phone number. However, you will have to put the address and remaining information manually.
Whenever possible you should open all non-delivery orders from the Delivery Status Screen at a POS Station that has been configured with a default revenue center in which both the “Require ASSIGN” and “Prompt for Phone Number” features have been disabled and the “Prompt for Reference” feature has been activated.
You can further customize the way your system processes non-delivery orders based on the type of non-delivery order it is. For instance, with carry out orders that are phoned in, you may wish to enter the order, send it to the kitchen and save the information for settlement when the customer arrives. While for counter service or eat-in orders you may wish to enter the order, send it to the kitchen, and settle the order immediately, whether or not it has actually been served to the customer.
At dedicated non-delivery POS Stations the process for opening an eat-in or carry out order is as follows:
If you open an eat-in or carry out order from a POS Station that is configured to handle delivery orders by telephone, you must:
NOTE: Some end-users who do not have a POS Station that can be dedicated to non-delivery orders configure the system to prompt for the Revenue Center at the start of each order).
If your system is configured to allow delayed send, you can enter an order in the system and delay the SEND feature for a specified time during the current Sales Session. This ensures that the kitchen staff will be reminded to prepare the order at the appropriate time. Simply follow the instructions for opening a standard delivery order and, when the entire customer order appears on the Order Entry Screen.
NOTE: To calculate the correct send time, take the requested delivery time and SUBTRACT the average time it takes to prepare and deliver and order.
Some establishments may not want the staff to time orders for various reasons. Restaurant Manager provides an alternative method to communicate future order (same day) to the prep area. You can use the [Ready Time] function to put a “ready time” on the prep ticket. The Order will still have to be sent manually to the prep area. To place a “ready time on a prep ticket:
The Ready Time keyword will have to be configured to print on the prep area printer using the Printer Templates Editor
Last Order Recall allows the user to recall an order from a previous date to expedite the ordering process. Viewable past orders may be set to a minimum of one to all past orders. By default viewable orders are set to ten orders
Last Order Recall is designed to be used for delivery, takeouts, and similar types of orders. The feature is most efficient when “Automatic Last Order Recall” is enabled in the Station configuration and works in conjunction with “Prompt for Phone” which must be enabled within the “Revenue Centers” setup form.
For our example we will open a delivery order that has been configured to prompt for a telephone number. You will need to go through the phone prompt, and the “Customer Information “screen to access the “Recall Previous Order” screen.
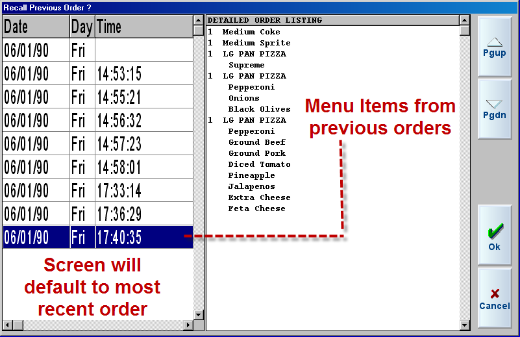
By default, the most recent past order will be highlighted and ready for the user to select. Clicking on the [OK] button on the right side of the recall screen will recall the order. Hitting [Cancel] will bypass the last order recall process.
Information viewed in the list display column on the left side of the recall screen can be sorted by date, time, and day by using the appropriate named column headers. Once pressed, the information listed will sort in ascending order based on the column selected. If pressed again, the sorting order will be reversed. Next time the recall screen is accessed, the information displayed will default back to the original configuration.
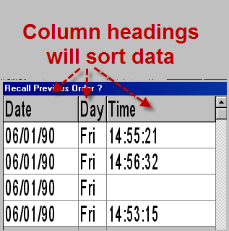
Menu items listed under the “Displayed Order Listing” display area can be navigated using the “PgUp” and PgDn” buttons. This is to be used if a previous order contains a particularly long order (27 items-both menu items and modifiers) and cannot be displayed in its entirety on one screen.
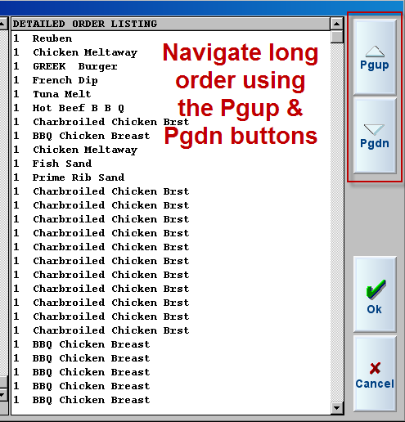
The Recall Order function can be accessed again if a wrong previous order was selected. The user will use the [Customer] function button in the Order Entry screen. You will have to go through the phone number prompt and customer information screen again to access the Recall Order screen. Once you have selected the correct order, press [OK] to continue the process. You will receive another prompt inquiring if you want to overwrite the current items. Press [YES] to continue with the ordering process. Unwanted menu items may be deleted once the check display area has been populated with the correct information.
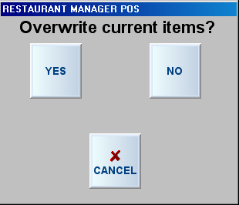
“Automatic last order recall” must be enabled in the Station Configuration in RM BackOffice for the Recall Order screen to be displayed at the POS station. Use the [Search Settings] function button within the Station Configuration screen to find the setting. You can also change the default settings for the number of previous orders to be displayed on the “Recall Previous Order” screen” at the POS. The default value is set to 10 orders. Using the Maximum last orders to show” setting to change the number of orders you wished displayed. If you want all orders to be available, set the value to “0”.
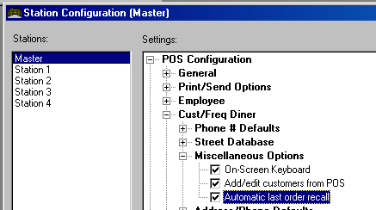
Orders processed in the Delivery Module is linked to the customer database by the telephone number. But you are not required to link all orders to the customer database. If an open order is linked to a record in the Customer Database it is considered a delivery order and can be assigned to a delivery driver. If an open order is not linked to a record in the customer database, it is considered a non-delivery order and does not appear on the default Assignment Screen for assignment to a delivery driver.
You can give a name or reference to non-delivery orders. But as soon as you type in a phone number, the order is processed as a delivery order. You can edit any open order to change its status from delivery to non-delivery or vice versa. To change a delivery order to a non-delivery order:
Restaurant Manager allows you to switch the customer record to which a delivery order is linked:
If this new number is already in the database, the customer record will be displayed so that you can accept or edit this information and link it to the order. If the number is not in the database, create a new customer.
When you open a delivery order, the system uses the fields from the customer record to automatically create a reference that appears on the Delivery Status Screen. That reference could be the customer’s name or address, etc. You can use the [Button Info] feature to determine which information identifies an order.
You can also create references for non-delivery orders. To tag a non-delivery order with a reference:
….OR…
As with previous versions, to remove customer assignment to a check, you simple need to click the buttons [Cust] and on the number prompt, click on [Clear] followed by the [Ok] button.
Other Considerations
To assign orders to drivers, press the [Assign] button at the bottom of the Delivery Status screen. Depending on the security setting, the system may require a password to access this function. While in “Assign” mode, the screen looks essentially the same, except the status bar flashes the word “ASSIGN” and there are fewer function options at the bottom of the screen.
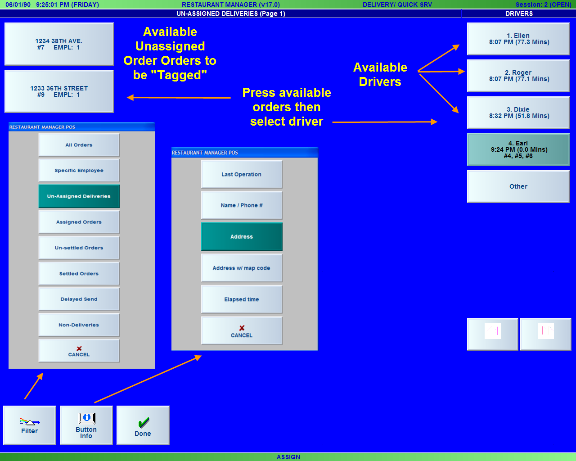
You must select the orders to be assigned. This is done by “tagging” or touching order on the left side of the Assign screen. Tagged orders appear “depressed” when selected and change a different color. Orders can be un-tagged by pressing the button again. Once the desired orders are tagged, they can be assigned to a driver by simply touching the button with the drivers name on the right side of the screen.
You may assign multiple orders at a time or just one. Start the procedure by hitting the [Assign] Button at the base of the Delivery Status screen. You will notice the absence of the function buttons and the status bar at the bottom of the screen will be flashing. Select the un-assigned order on the left side of the screen then select the driver to assign the orders to. The assigned order will leave the screen. Hit the [Done] button when you are finished. Hitting the done button will return the screen to its normal default state.
If no orders are tagged, then touching a driver button displays driver options as described in the section Driver Management.
You will also notice the two filter button on this screen: Filter and Button Info.
Filter - Touch this button to filter the orders that appear on screen at the active POS Station. The filter can help you locate a particular order when there are many open orders pending.
Button Info - Press this button at the base of the Delivery POS Status screen followed by this button to change the information displayed on the order buttons. On delivery orders this information is taken from the associated record in the customer database and includes name, address, delivery map code, etc. On non-delivery orders, you can display only the reference text and the elapsed time.
It should be noted the term "Assign" is used to describe two different functions in the Delivery Module:
Even though an employee is assigned to an order (#1), it does not mean that the order has been assigned to a driver. Depending on your configuration or the status of the order button, an employee number will show on the button. If trying to settle an order without an order being assigned to a driver, you will receive a warning that the order has not been assigned.
Several configuration parameters located in RM BackOffice >Setup >Station Configuration will affect the behavior of the assignment operation. They are described below.
You may configuration your system to prompt for confirmation for each order:
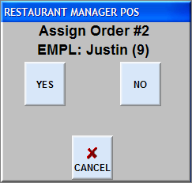
As a security function you may also configure your system to print the guest check on assign.
If you mistakenly assign an order to a driver, or if you assign an order to the wrong driver, you have two options.
It is highly recommended that this function be password protected
Anyone with a Driver designation will appear in the driver column The following sections describe the process the driver will have to go through on a typical shift.
The driver buttons are color coded to indicate driver status --gray indicates availability to take orders, and cyan indicates that a driver is out on a run. Each driver button also shows a time and duration. Depending on the driver status (i.e. gray or cyan button), the time refers to when the driver became available, or when the driver was assigned an order.
For example, a gray button with 10:06 AM (15.9 minutes) indicates that at 10:06 AM the driver became available to take deliveries and has been waiting for 15.9 minutes for an order. On a cyan button, the same text would mean that the driver was assigned an order at that time.
Cyan buttons (drivers that are out on a run); also show the order numbers that are assigned to the driver.

Press this button to authorize an employee as a driver when the employee is NOT currently logged onto the system as a driver. When you press the [OTHER] button you will be prompted to enter the ID number of the employee you wish to designate as a driver.
The Delivery module provides the ability to prioritize your drivers so orders are assigned to each driver in turn. To enable driver prioritization, you must check the option “Prioritize Drivers” located in RM BackOffice >Setup >Station Configuration > POS Modes > Delivery/ Quick Service.
When this option is checked, drivers are displayed in chronological order so drivers that clock in first are at the top. When a driver is assigned an order, he is moved to the bottom and changed to a different color. Upon returning from a delivery, the driver must select the “Driver Return” option, which places him back in line to take another order. If “Prioritize Drivers” is not enabled, then drivers are displayed in numerical order based on their employee number.
Drivers become not available (cyan) whenever an order is assigned to them. Drivers become available (gray) after each of the following operations:
In each case, the driver’s time stamp is updated and their place in the queue is adjusted to be in chronological sequence
When a driver button is pressed, the following options are displayed.
View – Press this button to view a list of all current orders assigned to the driver. You can get a quick glimpse of the order number, customer info, and the status of when the order was assigned. The assigned time is dynamic in the sense that the time measured is from the current time to the time an order was assigned.
You can use the navigation buttons on the right side of the screen to move up and down the list. This functionality will allow you to [Recall] an order from this screen. If needed, you can password protect the “Recall’ function.
To avoid carrying excessive amounts of cash, delivery drivers may wish to make periodic money drops. All money drops appear on the Employee Revenue Reports that can be issued when an employee logs out or using the [Revenue Report] function button located in [MISC] functions.
On Restaurant Manager, money drops are treated like Paid Ins and are shown on the cash tray report. Since money drops affect the cash tray report, a cash tray must be initialized in order to perform this option. To record a money drop from the Delivery Status Screen:
Once you complete the process above you will receive a confirmation prompt and then a receipt will print out you can have the employee sign.
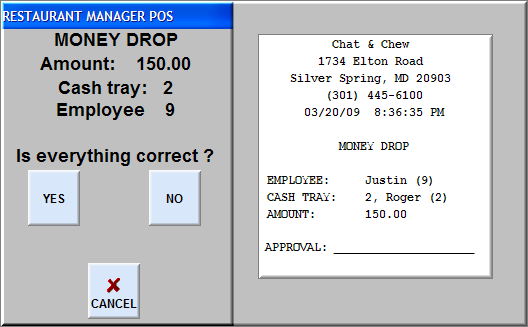
All delivery orders can be settled individually by calling the order up on screen and pressing the [SETTLE] button at the base of the Order Entry Screen. In fact, Restaurant Manager requires you to individually settle all delivery orders that are settled with a non-cash payment.
However, all orders that have been paid in cash can be settled automatically in a batch. You must NEVER execute a batch cash settlement if ANY of the outstanding checks assigned to a particular driver were not paid in full in cash by the customer.
In other words, before executing an automatic cash settlement you must:
NOTE: If you accept credit card payments you may wish to take the credit card number over the phone in order to authorize the payment and issue a credit card receipt that the customer can sign. You should not settle the check until the driver returns with the signed receipt and a tip has been added. However, you can adjust tips by employee after finalizing using Revise by Employee..
To execute an Automatic Cash Settlement on all outstanding checks assigned to a particular driver (or other employee):
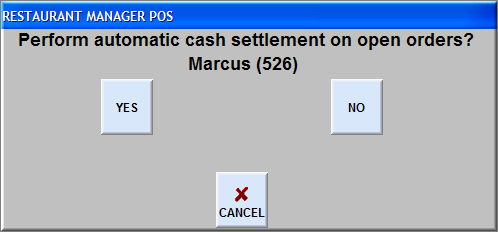
A receipt will then print out:
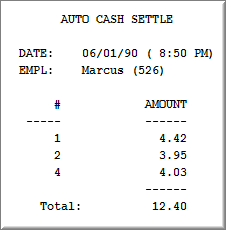
Restaurant Manager allows for multiple ways to print checks and formats. Below is a list of considerations:
- Select the [PRINT ALL] option. This option is usually found under the [MISC] function on the main Status screen of the Delivery Module.
- Select/enter the employee number whose orders you wish to print.
- Answer [Yes] in the confirmation prompt
Fast Transactions Mode is appropriate for quick service establishments, bars, nightclubs, or other restaurants that do some counter service. To operate in Fast Transaction mode, press the [FAST] button at the base of any POS Status Screen. Pressing this [FAST] button allows you to access the Order Entry Screen to record, send, and settle multiple orders without ever exiting the Order Entry Screen. The [CASH] settlement button at the base of the Order Entry Screen can also speed up cash settlements.
NOTE: You can also configure your system to process quick service orders from the Delivery Status Screen as described in the section Delivery Module.
The ASI’s Hostess Module provides the end-user the capability of managing guest reservations and waiting lists for walk-in customers. Configuration options are covered under the chapter POS Modules and Status Screens in the section titled Hostess Module.
The Reservation Screen can be accessed from any POS station using the Hostess function button. However, it is recommended using a dedicated station for the Hostess Module and the station is configured to default to the Hostess Module Main Screen at start up.
The Hostess Module Main Screen is divided into three main areas:
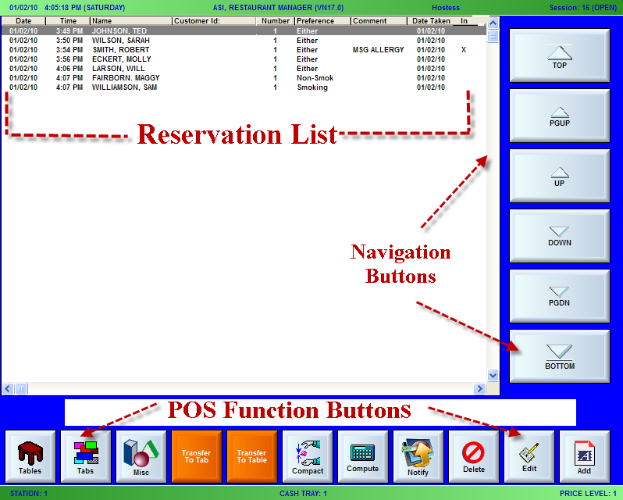
The Reservation List Area is broken down into nine columns. The data entered into the columns using the Add function button and can be changes using the Edit function button. The columns are broken down as follows:
When adding a new reservation, this date will be initialized into the current Rmserver date. When recording a waiting list for walk-in customer, both the date and time will be grayed out” and will not be editable. See next section.
The Hostess Module also accepts time in 24 hour format for hours beyond 12 but less than 24, that is, if “19:00” is placed, it will be recorded as “07:00 PM” irregardless of the “AM” or “PM” setting.
When adding a new reservation, the time will be initialized into the current server time. When recording a waiting list for walk-in customer, both the date and time will not be editable and will be adjusted as to the number of minutes as specified in the “time advantage” setting
Reservation List-Partial Screen Shot
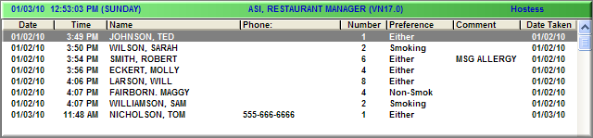
The Reservation Data Screen will appear when using the Add or Edit function buttons. However, you may receive a number of prompts before the Reservation Data Screen depending how your system is configured (described below). It is in the Reservation Data screen where most primary customer reservation data is entered. Most all of the data enter in this screen is then displayed on the Reservation List Area of the Hostess Module.
However, the field "Notify Via", does not appear on the Reservation List Area. This field is used to enter a telephone number to contact a customer to notify that a table is ready. This function is covered in greater detail later in this section. Setup of this function is performed in the RM BackOffice under Setup > General > PCall and is outlined in greater detail under the Section: POS Modules Status Screens- PCall Setup
There are three button options in the within the Reservation Data Screen:
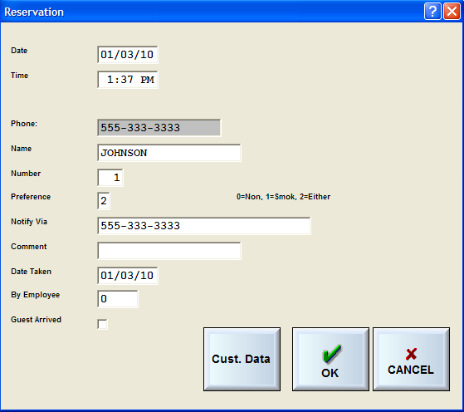
Three prompts may appear before the Reservation Data Screen depending how your system is configured
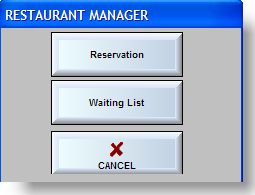
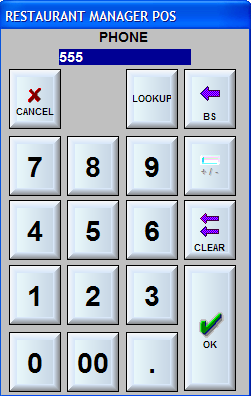
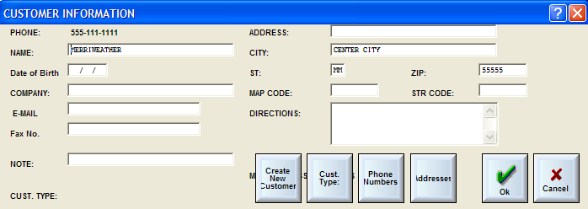
Note: You can also configure your system to prompt for customer type to use in conjunction with an Award program.
Use the following buttons to affect information displayed and interaction with

Add-Use this button to add an entry (i.e. Guest Arrived) to the reservation list. Pressing this button will affect the Reservation Data Screen to appear. You must first select the reservation to be edited on the Reservation List Area. You can select the reservation using the navigation buttons on the right side or by directly touching the reservation on the Reservation List Area. Once the reservation has been selected you can press the Add function button. Proceed with the entry of the reservation data as accurately as possible.
Edit- Use the Edit function button to edit or to add data to a reservation entry. You must first select the reservation to be edited on the Reservation List Area. You can select the reservation using the navigation buttons on the right side or by directly touching the reservation on the Reservation List Area. Once the reservation has been selected you can press the Edit function button. Select he “Cust. Data” button on the Reservation Data Screen to change the customer ID or phone number.
Delete- Use this function button to delete a record for cases where a wrong entry was entered, the reservation was canceled or a customer walks-out. .You must first select the reservation to be deleted on the Reservation List Area. You can select the reservation using the navigation buttons on the right side or by directly touching the reservation on the Reservation List Area. Once the reservation has been selected you can press the Delete function button. After doing so, the reservation entry is deleted from the list.
Search - Use the Search function button as an alternative to locate a reservation if there is a full list with an extreme amount of entries. Using the Search function will prove less time-consuming compared to use the navigation buttons to sort through the list. The search function will differ depending on how your stem is configured:

Use Phone Based search- If the “Use Phone Based Search” option is enabled in the BackOffice, the Customer Look-Up Screen will be displayed and the host will be prompted to enter the phone number to search for. This is one of the fastest ways of searching for an entry and is therefore highly recommended.
When the “Search” button is selected, the host/employee will be prompted for the telephone number to search, if none is entered, the alpha numeric keyword will be displayed and the host will be prompted to enter the text to search for. Note, that, if “Use Phone Based Search” is not enabled, the phone number prompt will be bypassed.
If a phone number is entered, it will search and will match the first digits of all the entries in the list. Thus, when the numbers “555” are entered, all phone numbers starting with the numbers will be searched through. To get the best hit, get as much digits as possible. After entering the phone number/Cust ID, you will receive a series of Reservation Data screens containing customer data. The system will perform an incremental search for all entries that matched the search criteria. You can sequence through the data screens by hitting "No" in the Reservation Data screen until you find the desired reservation where you can press "Yes" to confirm. Touching “Cancel” aborts the search
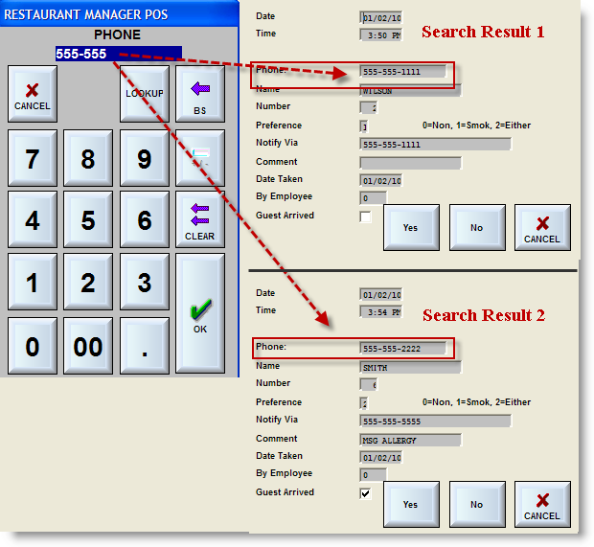
Once the reservation has been selected it will appear at the top of the Reservation List Area where you can perform further operations (i.e. Edit)
Text Based Search (Use Phone Based Search option disabled)-If searching for a text , the text that will be entered will be searched through the whole list of entries for all occurrences of the text in the name field of the list. Thus, if “WI” is entered, names like “Wilson”, “Williamson” and “Will” will all be returned. To get the best hit, enter as much characters in the prompt as possible. After entering the text, you will receive a series of Reservation Data screens containing customer data.The system will perform an incremental search for all entries that matched the search criteria. You can sequence through the data screens by hitting "No" in the Reservation Data screen until you find the desired reservation where you can press "Yes" to confirm. Touching “Cancel” aborts the search
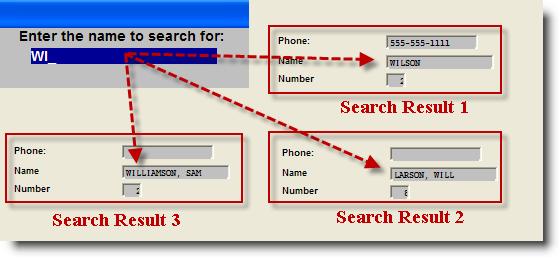
Once the reservation has been selected it will appear at the top of the Reservation List Area where you can perform further operations (i.e. Edit).
Notify-Use the Notify Function button when the customer is ready to be notified. First you must, select the customer name for the customer display list. When pressing the [Notify] function button after the customer has been selected, the call process will begin and you will receive an onscreen window confirming the process. The number called will be the phone number entered in the "Notify Via" field of the Reservation Data screen. The Notify function can also be found in the Compute screen. The Notify function is an extra feature available on a subscription basis. You will need to setup an account with ASI before using this option.
Compute- The “Compute” function matches the entries of the reservation list against the available tables on the floor and based on the smoking preference, number of persons in the party and also displays when occupied tables are going to be available. The table durations, Min/Max Customer Counts, and smoking preference can be customized in the RM BackOffice Module under Setup->Screen Layouts>Table Layouts..
Clicking on the “Compute” button initiates the matching process and displays the Compute Result Screen.. Listed in the screen are the results of the compute process which consists of::
It also contains navigation buttons to move the highlighting bar to the top (TOP), bottom (BOTTOM), one page up (PGUP), one page down (PGDN), one line up (UP) and one line down (DOWN).
Additionally, to close the Compute Result Screen, touch the “CANCEL” button and the host/employee will be taken back to the Hostess Module main screen.
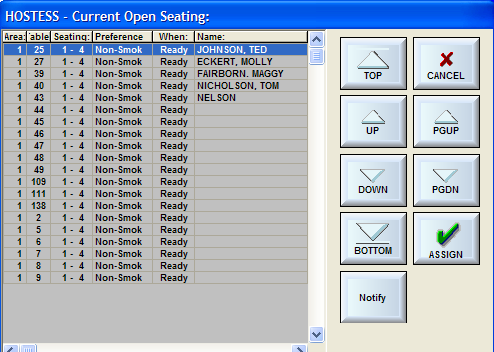
The “ASSIGN” button of the Compute Result Screen is used after selecting a reservation from the list is based on a table/guest match, then initiates the opening of the table process, sets the reference of the table to the guest name and deletes the reservation from list. At this point, the guest could then be guided to the table assigned and readied for them.
Since the Hostess Module can be associated with the customer database, assigning a table to the guest also provides access to such other features such as last order recall, customer loyalty, awards, etc. all to the convenience of the guest and a commendable and efficient service by the host, the waiter and the whole restaurant in general.
The "Notify" button performs the same task as the "Notify" function button. Pressing the Notify button after the customer has been selected from the list will initiate .the call notification process and affect an onscreen window confirming the process.
Transfer to Table- The Transfer to table is another method allowing the end user to assign a reservation to a table.Where the “Compute” feature may be the standard operation the host/employee will perform, there may be times that a more direct control of the table assignment is needed. Example: the system will not recognize when two tables are physical pushed together for a large table Rather, the system will only recognize the individual tables seating capacities. You will want to utilize the Transfer to Table function in this scenario

Pressing the “Transfer To Table” button moves the current reservation selection (highlighted) entry to a table. A table selection window will be opened for the host/employee to select and the processes of opening a table is initiated, including possibly, recalling of the last order if configured. When finished, the reservation record is automatically removed from the list.
Transfer to Tab-Selecting the “Transfer To Tab” button initiates the process of opening a tab and the removing the reservation entry from the Reservation List Area.
This is a powerful feature the host may employ to keep the customer waiting in the bar, have a few drinks until a table can be assigned or maybe, even while waiting for other people in the party. Thus, instead of being bored from waiting, he’ll be taking his time in the bar and have a good time. Another thing the host can do to make the guest satisfied.
Compact- As the Hostess Module operations are being processed from day to day, the reservation file that keeps record of all the reservation entries may have grown quite large that may result in possibly slowing down the operations.
Thus as maintenance, it would be best implement the “Compact” function on a monthly basis. If the host/employee/ manager feels that the Hostess Module has been handling quite a number of operations each day, he may opt to do this more often, maybe on a weekly basis.
The compacting operation would take only from a few seconds to not more than two (2) minutes.
To apply a global discount (all items) to a check:
If you select a discount that was defined with a fixed percentage the discount amount will be calculated automatically, if the discount you select was defined with a variable percentage, you will be prompted to enter the percent amount of the discount.
To apply an item discount to a check:
If you select a discount that was defined with a fixed percentage the discount amount will be calculated automatically, if the discount you select was defined with a variable percentage, you will be prompted to enter the percent amount of the discount.
NOTE: Individual menu items can be marked as 'Discountable' or 'Non-Discountable' When applying a discount, only 'Discountable' items are discounted.
Global Discounts can also be applied from the settlement screen.
A 2 for 1 discount provides the ability to offer 2 items for the price of 1. You can apply a 2 for 1 discount to any items that already appear on the Order Detail Area of the Order Entry Screen.
To apply a two for one discount to the active order:
The system will automatically zero out the price of the lower priced item and prompt you to confirm that you wish to zero out this price.
NOTE: If you wish to zero out the price on the more expensive item you must use the Price Adjust feature to set the price to zero .
Coupons is another method you can incorporate to discount a check or items on a check. Most coupons will have parameters set up so that all you will need to do is press the [Coupon] button. You will need to select a coupon form a list if more than one coupon has been programmed. The coupon itself will seek out the parameters and apply the coupon to the appropriate items.
Some coupons may require certain items to be tagged. If you fail to tag the items in the Order detail Area, you will receive a prompt telling you to do so.
If allowed you can apply more than one coupon to an order. You will have to press the [Coupon] button as many times for the number of coupons you wish to apply.
You can add a gratuity to an order from the Order Entry Screen or from the Settlement Screen. The gratuity can be automatic based triggered by customer count or check total or it can be entered manually. For automatic gratuities, refer to the section on Automatic Gratuities.
To activate a manual gratuity, or to override an automatic gratuity:
Since the customer may decide to tip more or less than the printed gratuity, the gratuity amount is not strictly enforced at the time of settlement. It is up to the cashier (or server) to enter the actual amount tendered. If automatic gratuities are implemented, the amount tendered will default to the check total plus the gratuity; however, it is possible to override the default amount and enter a larger or smaller value depending on the actual amount tendered. In addition, the term “suggested gratuity” is configurable and you may wish to change the term depending on your establishment’s policy.
The tax status of the active order is always displayed in the bar at the base of the Order Entry Screen. From any POS Station you can make the active order tax exempt. Simply press the [MISC] button at the base of the Order Entry Screen followed by the [TAXABLE] button. This button allows you to toggle back and forth from taxable to non-taxable status.
You can also configure your system so that any order linked to a particular Revenue Center will be tax exempt. You may also define specific menu items that are always tax exempt.
If your system is configured with a secondary tax table, you can apply the tax rates from the secondary tax table to the active order simply by pressing the [MISC] button at the base of the Order Entry Screen followed by the [TAX TABLE] button.
If your system is configured with the online credit card authorization interface, you must submit all credit card payments for authorization. If the “Immediate Submit and Print” feature is enabled you can continue with other transactions while the authorization is being processed.
When a customer presents a credit card:
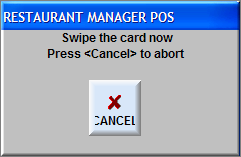
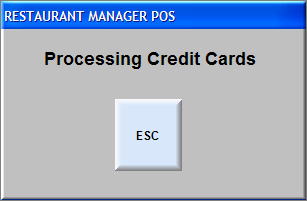
NOTE: If your system is configured to allow background processing, you may press the [ESC] button once the authorization has been submitted. This allows you to exit the settlement screen and continue with other transactions while the authorization is being processed. When you access the settlement screen again you will be given the option of printing a credit card receipt.
When the customer signs the credit card receipt and adds a tip, you can finalize the payment and tip amount:
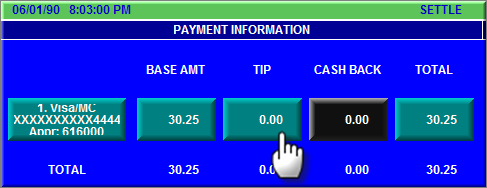
If you need to change either the tip amount or the base amount of an already approved or even settled credit card payment, simply enter the payment screen, select the payment you wish to modify and then touch the button with the amount you wish to change. However, this can only be done when the payment is not finalized yet.
Restaurant Manager will display a warning message prior to unsplit ing a check if there are credit cards on any of the seats. The user can choose to continue, or cancel the operation. This prevents accidental removal of pre-authorized credit cards during the un-split check operation.
Important Note: Credit Card Pre-Authorization is supported with Mercury (MPS) only. Attempting to do Credit Cards pre-auths with PC Charge or Datatran may result in undesirable results. Credit card pre-authorization provides the ability to capture and authorize a credit card at the beginning of a sale.
Open the check and go to the [Settlement} screen. Use the [Void] payment button. It is highly recommended that this payment method be password protected.
NOTE: If your system is configured with the Inventory Module, you should note that voiding a check DOES NOT decrement inventory. If you wish to decrement inventory but recognize that no payment has been made, you must settle the check as a Guest (or “house”) check.
There are two ways to issue refunds at the POS. One method is to use the [Refund] function button. The other method is to use negative quantities. Experiment with both methods to see which one works best for you.
To issue a refund you must first create a new order and then:
If you answer “Yes” then all items on the current order are marked for refund. When applying the refund, Restaurant Manager will change the quantity from positive to negative. For example, if you have Qty 2 Hamburgers, it will be changed to Qty -2 Hamburgers. The gross value of the refund (not including tax) is saved to the audit trail.
Alternatively, you can apply a refund to specific items on the check by tagging the items first, then choosing the “Refund” option. Only the tagged items are refunded.
To cancel a refund, you must tag the items in the view check area, and then choose the “Refund” option. The “Refund” option acts as a toggle, items that are not refunded are marked for refund, while items that are already refunded, have the refund canceled.
At the POS you can ring up items using a negative quantity, even if there aren’t any corresponding positive quantity items on the order. This is useful for generating credits against checks that have already been settled. For example, a customer might dispute a check claiming that he was charged for items he did not consume.
To ring up a negative quantity, select the Quantity button under Miscellaneous and chose one of the negative quantity buttons in the rightmost column. If you need a negative quantity greater than 10, use the [Other] button to pull up the numeric keypad.

You can limit the access to negative quantity items by setting the security level under Setup >Stations Station Configuration. Use the search function to locate “Negative Item Quantities”. The default security level on newly installed systems is 2.
If you wish to pick-up an entire order so that the customer is charged nothing but the system recognizes that the order was served:
Touch the appropriate table button or order reference on the POS Status Screen to call the order up on screen.
NOTE: If you prefer not to pick up the entire check but, rather, wish to pick up the cost of one or more menu items, simply set the prices of those items to zero .
If your system is configured with the Guest Accounts Module, you may post a transaction to a Guest Account for payment at a later date.
Record the customer order and print a guest check as you would for an order that is to be settled with any standard form of payment.
- Type in the first few letters of the customer’s last name to call up a list of customer’s whose names begin with those letters.
- Press the button corresponding to the customer whose account should be billed.
- Answer appropriately to any additional prompts for sending items, printing customer receipts, etc.
NOTE: You may wish to create a Fast Button Macro for posting transactions to a Guest Account .
Restaurant Manager has two methods of handling foreign currencies: basic and advanced. The basic method has been existent in Restaurant Manager prior to version 18. The basic method handles only two currencies: primary and secondary. The basic method primarily handles payments at the POS with little reporting tools. Version 18 introduced the advanced method of handling foreign currencies.
If your establishment takes more than one form of currency, and if you have defined those currencies on the Foreign Currency Setup Form, you can settle checks and make change in a secondary currency as follows:
NOTE: The secondary currency type is used during the settlement process only. All cash tray and sales reports are printed in primary currency units.
Guest check settlement performed using the exact same procedure as settling with a primary cash payment type. However, it is important to note that change given will always be displayed using the primary currency. Example, the base amount of the check is ten dollars and the customer pays the check using a Canadian $20 note. Using the exchange rate provided in the section above, the customer would receive $8.98 in US currency (primary).
See the section on Advanced Foreign Currency for setup information.
From the Settlement Screen you can record as many payments as you wish toward the settlement of the active order. Simply press the appropriate payment button and type in the amount of each payment. Restaurant Manager will assume the full amount of each payment goes toward the check, itself. However you can adjust the payment information to include a tip or cash back amount in each payment.
To record a partial payment on an order that includes a tip or cash back amount:
The "SETTLE" function can be enabled (or disabled) for each POS station. This is useful if you want to ensure that your employees only settle checks at designated stations. To enable (or disable) the settlement function, press [MISC] at the main POS screen. Select the [ENABLE SETTLE] option and follow the prompts on the screen. This feature requires the entry of a password.
The default settlement mode (whether enabled or disabled) can be changed in the Method of Payment form.
The following sections will guide you through the process of revising a check before and after settlement along with when it is best to use the Revise by employee function.
If you make a mistake while settling a check, you can make adjustments to the settlement from the Settlement Screen. For each payment you record, a row of buttons appears on the body of the settlement screen. You can adjust the amount displayed on any one of the payment buttons simply by touching the button.
To delete one or more payment types, select which payment you wish to delete and then press the [DELETE] button at the base of the Settlement Screen
While a POS Session is open, employees or managers may revise payment details associated with orders that have already been settled. The Revise Settlement Screen below can be protected with a password prompt and may be accessed by touching this Function Button located on the Status Screen of each of POS Module:
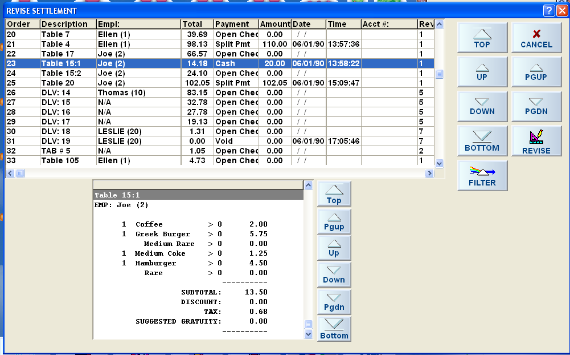
To correct transactions settled during the current session:
This option provides a means of revising settlement for all transactions for a specific employee. This can be used to efficiently enter tip adjustments at the end of a shift. To access this option, choose MISC from the main POS screen, then “Revise by Emp.”
The system will ask you to choose an employee for the operation. After selecting an employee, the system will display all the employee’s transactions for the current session. Note, if the employee has more than one clock in for the current session, transactions from both clock-ins are displayed.
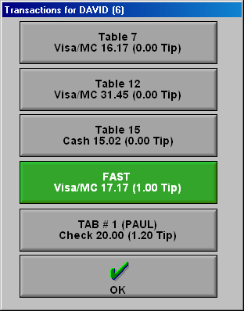
Each button contains information on a specific transaction. To revise a transaction, or enter a tip, simply touch the transaction of interest and the POS program will display the revise settlement window for that transaction. After you have completed the revise settlement process, the system will return to this window and the “revised” transaction is changed to green. This helps give a visual clue as to which transactions have been revised and which have not.
The Recall Check function requires the TAB Module when using in the Table Module. Recalled checks will not re-open the table were the order was originated. Rather, recalled check will be placed and named accordingly on the Tab screen This is to prevent from placing one order on top of another (example: table turnover). This function should be used to manipulate items on an order or to re-open if closed by mistake. In the latter scenario, you can transfer the tab to the old table if needed. You can recall a check by using the [Recall Check] button typically located within the MISC functions of the order entry screen.
The [Recall Check] button will affect a new screen where you can navigate the screen for the wanted order. On the right of the screen you can use the navigation buttons to move up and down the screen to find more recent orders. You can select and highlight order on the Order List Display section of the screen and view check area on the bottom of the screen. Once a check has been found you can recall the check using the [Recall Check] button located next to the navigation buttons.
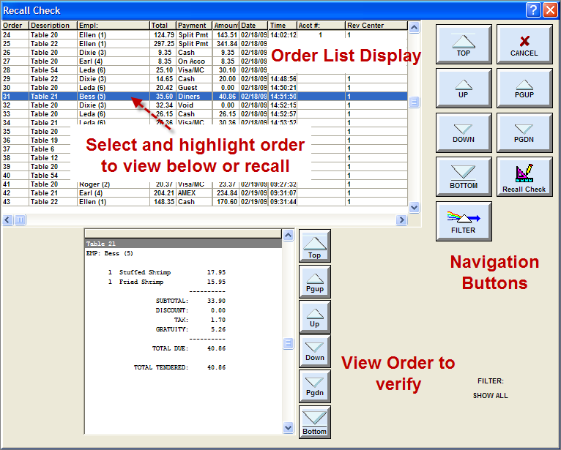
Once you select and recall the order a prompt will appear asking to confirm to process. Select [Yes] if you want to proceed.
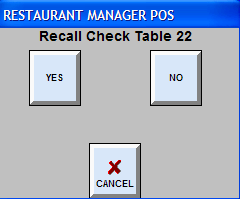
Another confirmation prompt will be triggered if you press [YES] to continue the process. This prompt is confirming that the system is removing the payment associated with the order from the system. The system does this to insure proper balancing procedures are in place. The system will always look for the drawer at the station you are recalling the check from. It is best to recall an order from a station that does not have a drawer attached unless the drawer belongs to the employee whom the drawer is assigned to.
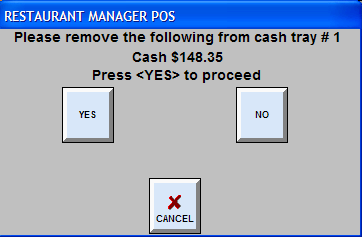
By answering [YES] to the prompt shown above will complete the process and send the order to the Tab screen.
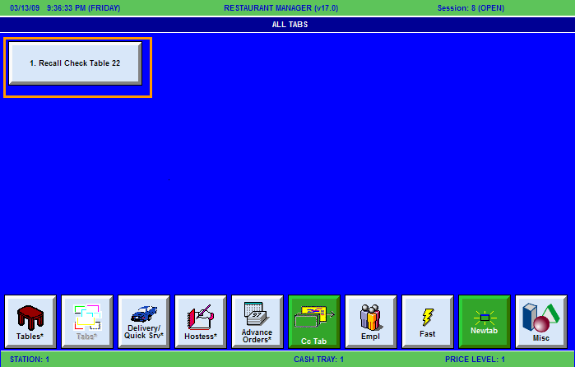
Notice on the above screen shot above the new tab button lists “Recall Check Table 22”. Tabs created from recalled checks will always list this information to make it easily discernable from other tabs. As stated above, you can transfer the tab to a table using the [Transfer to Table] function button found in the [MISC] functions of the Order Entry Screen.
Note: Recalling closed delivery orders do not require the Tabs Module. Closed order will be placed directly on the Delivery Main Status screen when being recalled. The same recall process applies to delivery order.
In a cashier banking environment, you can improve the speed and accuracy of recalling checks by using bar codes. Restaurant Manager can print a bar code at the bottom of each guest check and the cashier can recall the check by scanning the bar code.
When recalling a check using the bar code, the POS station must be on the main Tables, Tabs or Delivery screen. Attempting to recall a check from the Order Entry screen or settlement screen may yield unpredictable results. If using enhanced password control, the POS station must be in the “Active” mode (i.e., an employee must first sign into the system by swiping their card, or manually entering their password, or placing their finger on the fingerprint device).
When recalling a check using a bar code, Restaurant Manager will automatically switch to the correct POS mode. For example, if the POS is in Tabs mode, and the cashier recalls a Table, the POS will automatically switch to Tables mode and if necessary, change to the correct dining area.
To enable bar codes, set the option “Recall Check Using Bar Code” under RM BackOffice >Setup >Station Configuration. You must also set the “Begin Bar Code” and “End Bar Code” codes for the printer you are using. This is also done under Station Configuration Stations under the Printer Code menu tree. You will also have to configure the bar code to print on guest checks using the Configurable Guest Check Editor.
Certain operations such as transferring items, or un-splitting a check may cause the bar code recall feature to fail. For example, if you print the check for a table, then transfer the items to another table, the bar code on the printed check will fail to recall the original check. The one exception to this is the “Send to Tabs” feature. It is permissible to send a table transaction to tabs and the bar code recall will still work properly.
Technical Note: Restaurant Manager utilizes UPC-A bar coding conventions, which is the most common bar coding scheme used in retail environments. To print bar codes, your printer must support UPC-A bar codes. In addition, cashier stations must be equipped with scanners that support this standard. The Epson TMT85 and TMT88 printers both support UPC-A bar coding. The Metrologic model 9540 scanner also supports UPC-A.
Restaurant Manager provides an optional integrated frequent diner program. In addition to storing name, address and telephone number, Restaurant Manager can record birth date, number of purchases, last purchase date and the dollar value of all purchases. Frequent diner records can be created and linked to specific orders from any POS Station. These records can also be accessed from the RM BackOffice Module if your system is configured to allow such access for mailing purposes, etc.
You can configure your system with default telephone area codes, zip codes, etc. so that these defaults are automatically entered when you create a new record.
This same Customer Database is used with Street Databases in the Delivery Module to track Map Codes and driving directions for all delivery orders and so comprises part of the “Delivery Databases”.
To link an order to a record in the Customer Database:
In order to make a cash payout, the cash tray must be initialized at the station where the payout is taking place. Once the Cash Tray is initialized, press [MISC] on the main POS screen, and then select the [Paid Out] option. Restaurant Manager will display the payout categories.

Select the desired pay out category. Restaurant Manager will ask you to enter the amount of the pay out and an optional comment describing the nature of the pay out. You will get a confirmation prompt:
If you answer “Yes” you will get a paid out voucher you can place in the drawer. Payout's appear on the cash tray report and on the paid out report found in the RM Reports Module.
The steps for a Paid In is exactly the same as described above for a Pay Out
Flash reports provide an up-to-the-minute summary of activity for the current session. It can be printed from any POS station at any time and includes all transactions that have been finalized (i.e., settled) and lists the open orders sales separately for the current session. To print a flash report, press [MISC] from the main POS screen, then select [FLASH REPORT] from the selection window. The flash report is printed on the receipt printer or can be printed to the screen.
If you only sell specialty pizzas where the customer cannot choose the crust size or toppings, etc. that come with the pizza, you should simply define each specialty pizza as a standard menu item. If you sell pizzas where the customer can mix and match a variety of crust sizes and toppings, etc., then you must create a special pizza menu. When you create a special pizza menu, Restaurant Manager automatically generates a special Pizza Order Entry Screen that allows you to enter all the particulars of any pizza order from a single screen.
The Pizza Order Entry Screen can only be accessed from the main Order Entry Screen.
All pizza orders defined on the Pizza Order Entry Screen are displayed on the Order Entry Screen along with the drinks and other standard menu items the customer may order.
To access the Pizza Matrix Order Entry Screen:
NOTE: To expedite the ordering process you will want to move the [Pizza] button to the front screen using the POS Function Button Layout or configure your system to default to the Pizza menu.
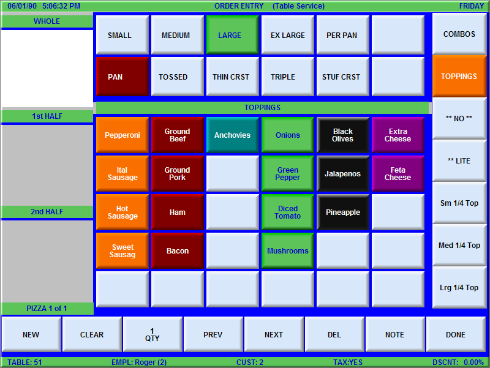
The Pizza Order Entry Screen is organized as follows:
As you add toppings to your pizza order they will appear in the highlighted section. Simply touch a topping (or combo) button at the center of the screen and the topping will appear in the highlighted section.
The 30 combo pizzas can be displayed on the touch buttons at the center of the Pizza Order Entry Screen by pressing the [COMBO] button in the upper right hand corner of the screen. To order a combo pizza, select the crust size and type and then simply touch the appropriate combo pizza button. The name of the combo pizza will appear in whichever of the “Whole” or “Half” sections are highlighted on the left of the screen and will be priced accordingly.
The following function buttons appear at the base of the Pizza Order Entry Screen:
- New – Touch this button to add a second or third pizza to the active customer order. If you wish to order a pizza for a new customer, you must touch the [DONE] button at the base of the Pizza Order Entry Screen and then exit to the Status Screen to open a new order.
- Clear – Touch this button if you wish to erase the toppings or specialty pizzas listed in one or all of the “Whole” and “Half” sections on the left of the screen.
- Qty – Touch this button if you wish to order more than one pizza with the same toppings. The quantity is displayed on the face of this touch button.
- Prev – Touch this button if you have added multiple pizzas to a single order and wish to view or change one of the pizzas entered already. (NOTE: The total number of pizzas in the order and the actual pizza displayed on screen are identified just under the section labeled “2nd HALF”.)
- Next -- Touch this button if you have used the [PREV] button to review the first pizzas added to the active order and now wish to return to the last pizza order you were working on.
- Note – Touch this button to type in a brief note that will be sent to the kitchen along with the pizza order.
- Del – Touch this button if you wish to delete the entire pizza defined on screen.
- Done – Touch this button when you have finished using the Pizza Order Entry Screen.
NOTE: The Pizza Order Entry Screen can only be accessed from the main Order Entry Screen. All the pizza orders processed from the Pizza Order Entry Screen appear on the Order Entry Screen when you exit the pizza screen.
Restaurant Manager allows price changes on pizzas, such as Price Adjustments, 2 for 1 discount, and line item discounts; however, after the price of a pizza is adjusted, the pizza can no longer be modified in any way. It can only be deleted. If you need to make a change after modifying the price of a pizza, you must delete the pizza and re-enter it.
If Pizza is your primary business, you can configure the system to bring up the Pizza Ordering screen each time you go into an order. Note that the Pizza screen is displayed on initial orders as well as recalled orders. This option is enabled by revenue center. To enable, in the RM BackOffice, go to Setup > Settlement and Tips >Revenue Centers and check the box “Start in pizza menu.”
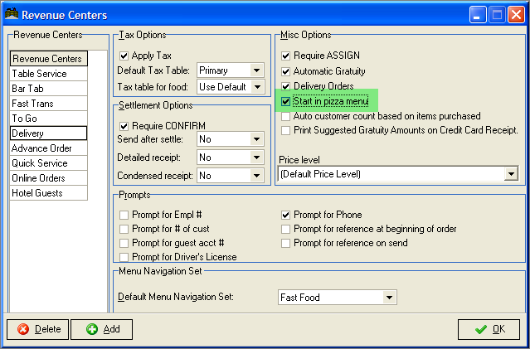
The Point of Sale process is organized into "sessions" which are numbered in sequence. When you first begin using Restaurant Manager, the session number is set to 1. This number is automatically incremented with each new session.At the beginning of each business day, you must "OPEN" a session, and at the end of the day. Before closing a session, the following criteria are required:
Restaurant your system may be configured to manual close a session, utilize the guided EOD process, or implement an automated process requiring limited user interaction. Restaurant Manager may require a password depending upon your system configuration.
The [SESSION OPEN/CLOSE] function is accessible both from the Windows BackOffice and the POS Status Screen. To perform Session Open/Close Operations in the BackOffice go to Activities > session > Session Open/Close. The same function can be performed at the POS by pressing the [MISC] button at the base of the Status Screen, then select the [SESSION OPEN/CLOSE] option and follow the instructions on the screen.
You may do so by selecting [SESSION OPEN/CLOSE] from the BackOffice program or close the POS module from any POS station as a described below:
To close the session from a POS Station, select [MISC] followed by [SESSION OPEN/CLOSE], and follow the instructions on the screen.
After entering the bank deposits, Restaurant Manager will proceed to close the session. Depending on the options installed in your system, Restaurant Manager may perform one or more of the following actions:
A blinking message is displayed as these actions occur.
Restaurant Manager can only open a Session only after the previous session has been closed. You can initiate the Open session process by pressing the Session Open/Close buttons either in the RM BackOffice Module or at the POS station.
The End of Day function is a step by step guide to insure a proper Session Close. Pressing this button in the [MISC] function of the Main POS Status screen will trigger successive prompts for the following:
The steps for the EOD process may vary depending how they were setup in the Station Configuration. This process can also be automated or run from the back office computer.
The only way to automatically Open or Close a Session is to use a third party scheduling software. Several excellent programs are available including Windows built in scheduler, Solways (Freeware), and Cobian Backup (also Freeware and highly recommended for backups AND automatic sessions.
Regardless of which scheduler you use, you must point to the location of the executable file that controls the Session Open procedure. This usually means typing the following path in the task pane:
C:\rmwin\Sessopen.exe
You must also enter a “NoAsk” parameter to suppress prompts associated with the Sessopen.exe. If these prompts are not suppressed the process will pause indefinitely waiting for user input. For most schedulers you may append the “NoAsk” parameter to the path as follows:
C:\rmwin\sessopen.exe noask
In scheduling applications like Solway, however, that include a separate parameter field, the NoAsk parameter must be entered separately in this parameter field.
The session status is displayed at the top of the main POS screen. It shows the session number and whether the session is open or closed. This information is shown in all POS modes (tables, tabs, delivery, hostess, and advanced orders).

When opening and closing sessions, the information displayed on screen is stored in a file called SESSOPEN.LOG. The status text for each open/close operation is appended to the file in plain text format. This information can be reviewed using a standard text editor.
Restaurant Manager can handle both cashier banking and server banking. Cashier banking requires that you have at least one cash drawer connected to your system (POS Station). The cashiers handle ALL settlements and are responsible for balancing their cash tray at the end of the shift.
Restaurant Manager has several ways to incorporate cashier banking. You can have the cashier initialize a cash tray and link it to an employee for tighter controls. Perhaps you establishment has more than one employee utilizing a single drawer. In this circumstance, you may choose to initiate a cash tray without linking it to an employee. In the most casual of environments, you may not even have to initiate a cash tray. If you are not sure, your Reseller can help you decide.
Restaurant Manager can manage up to 99 cash trays per session. When configured, cashiers are not allowed to clock out of the system until they "CLOSE" their cash tray and declare the final cash tray balance. The Cash Tray report, accessed from "Session Operations" provides figures for cash tray reconciliation.
NOTE: An important System Configuration parameter for cashier banking is "Require Cash Tray Init." This parameter should be set to "YES."
In a server banking system, cash trays are not required as waiters and waitresses carry their own banks. Servers enter their employee number (passwords) when opening tables. Restaurant Manager keeps a tally of sales for each employee. The "Revenues" reports print when an employee clocks out, showing their sales broken down by method of payment. The information on the revenues report provides reconciliation for servers.
NOTE: Cashier banking and server banking can be used simultaneously; however strict operational procedures must be established. When mixing cashier banking and server banking, servers MUST NOT settle their transactions at a cashier terminal.
Restaurant Manager assigns the server number when a table is opened and the cash tray number at the time of settlement. If a server opens a table and enters his/her employee number, then settles the check at a cashier terminal, the money for that check is added to both the cashier's tally and the server's tally. Either the cashier or the server will end up short depending on whether the money went into the tray, or into the server's bank. To avoid this situation, it is important for servers NOT to settle their checks at a cashier station.
Another way this may be handled is to enable “Dynamic Cash Trays” in Station Configuration and have the cashier initialize a cash tray. In this scenario, the cashiers ticket will close to the assigned cash tray and the servers will close to a dummy tray (0). This will ensure that server tallies are kept separate from cashier tallies.
Cash tray options provide facilities for cashiers to initialize and close out their cash trays and to declare their starting and ending cash tray balances. These options are typically required when using cashier banking and some sort of strict controls are wanted. To access Cash Tray Options, press [MISC] from the main Point of Sale screen, then select [Cash tray Options].
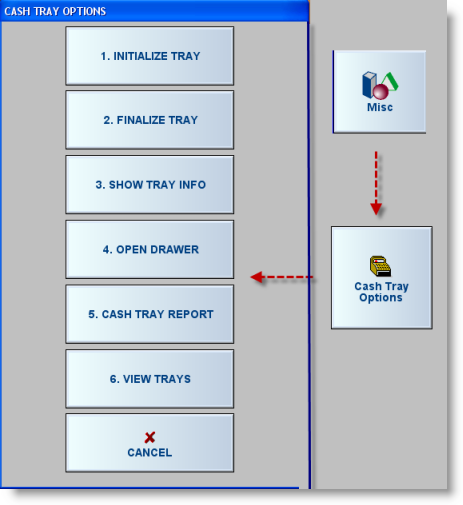
IMPORTANT: Do not confuse the term CASH TRAY with CASH DRAWER. A cash drawer refers to the physical hardware that contains the cash tray. The cash tray is assigned a number and is tied to the employee that initialized it. During the course of a session there can be several cash trays associated with one Cash Drawer, depending on the number of cashier shifts. See the Station Configuration section for more information on Cash Drawers and Cash Trays,
To initialize a cash tray, select the option [1. Initialize Tray]. Restaurant Manager will ask for a cash tray number and if configured, an employee number, and the starting amount in the tray. For the starting amount, enter the total amount in the tray including cash, checks, credit card vouchers, etc.This procedure only initializes the tray on the station where it is performed
If the station is shut down, or re-booted for any reason, the cash tray number is automatically restored when the station is brought back on line. Restaurant Manager will continue adding to the previous cash tray tally.
Cash trays must be closed at the end of a shift or day. To close out a tray, select option [2. Finalize tray] from the [Cash Tray Options] menu. Restaurant Manager will ask for the cash tray total. This prompt is for cash purposes only. Your system can be configured to declare a total amount or declare by denomination. You can also configure your system to prompt for NON-cash forms of payments. This is the total of all forms of non-cash payments check, credit cards, guest accounts, etc. This number is printed at the bottom of the Cash Tray Report. Discrepancies between the declared amount and the theoretical amount (based on sales) are shown as an "Over" or "Short" at the bottom of the cash tray report. You can also configure your system to display running over/short and cash total during the declaration process.
RESTAURANT MANAGER does not allow duplicate cash tray numbers in the same session. Therefore, once a tray is closed, the same tray number may not be used until the next session.
To see the cash tray activity for the current session, select [3. Show Tray Info] on the Cash Tray Info menu list. Restaurant Manager will display a window showing the tray numbers that have been used during the session and the employee (or cashier) assigned to each. To the right of the employee number, the tray status is shown as either "OPEN" or "CLOSED."
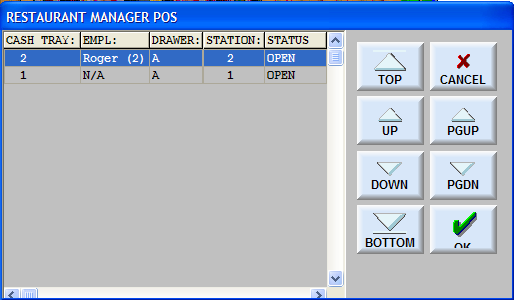
This terminology is not be confused with the drawer actually being open or closed. Instead, an "OPEN" tray is one that has been initialized, but not yet closed out.
Normally, Restaurant Manager automatically opens the cash drawer at the time of settlement; however, the drawer can be opened for other reasons. For example, to give change to a customer, or to change the till, etc.). From the [Cash Tray Options] screen, select option [4. Open Drawer]. This option may be password protected. Note: a cash drawer will not open for an employee that does not have a cash tray assigned when having “Require cash tray Init” enabled.
You may want to balance the cash tray at the end of the shift, session, or to conduct a spot check. You will want to use the “Cash Tray” report to balance. From the [Cash Tray] Options screen select option [5. CASH TRAY REPORT] You will receive a prompt asking for a cash tray number. Enter in the tray number and then select where you want the report to print: screen or printer. If printer is chosen, the report will print to the local POS station printer. If screen is chosen, you may still print the report by selecting the “print” option within the screen.
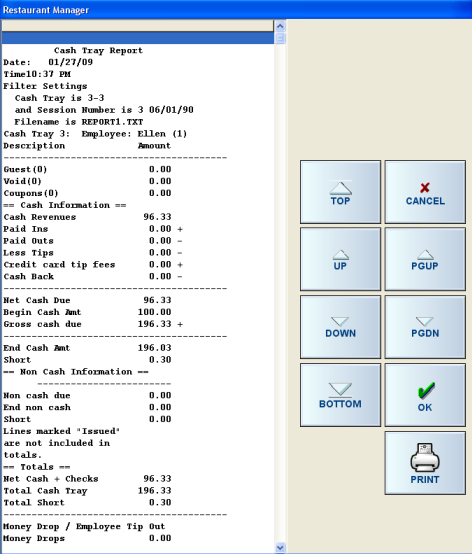
A cash tray report for any tray can be run as many times throughout a same session no matter if a tray is still open or has been closed. Cash tray totals are reset upon closing a session. Cash tray totals for previous session must be run through the RM Report module.
You may want to edit cash tray totals if mistakes were made during the declaration and/or initiation process. To initiate the process, from the [Cash Tray Options] list, select option [6. View Trays]. Pressing this button will bring about a screen that displays cash tray number, employees assigned to the drawer, station number where the drawer was assigned, the cash declared and the “Open/Closed” status. The display screen also shows the drawer letter assigned if multiple drawers are implemented (this will default to “A” if not implemented).
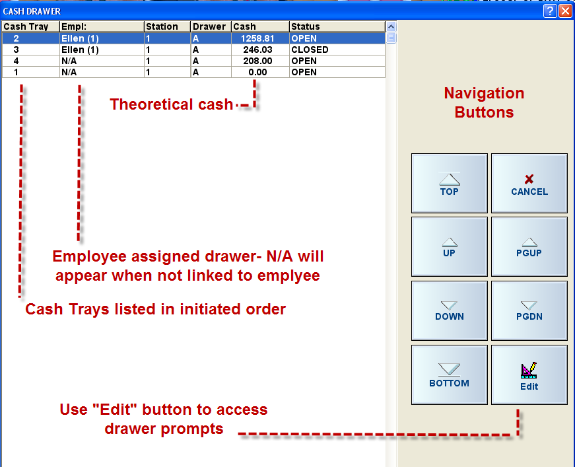
Use the navigation buttons on the right side of the screen to scroll up and down to select the cash tray to be edited. Press the [Edit] button once the selection is highlighted. Your first prompt will be for editing cash totals. Enter in the new amount using the declaration method configured. Hit the [OK] button once the dollar amount has been entered. Again, if configured, the next prompt will be for NON-cash totals. Follow the same step for entering dollar amount.
The “View Tray” function cannot be password protected. Only the Cash Tray function button can be password protected. It is recommended that “blind” be implemented for simple a theft prevention measure. To aid in the process the process of blind balancing you can suppress the editing of the cash tray totals creating a .txt file called " NOCTEDIT.TXT" and add it to the RMWIN directory. The content of the .txt file does not require content.
When multiple drawers are physically present at a POS station and has been configured so, this function allows the cashier to move their cash tray to another drawer if needed. This function appears on the [Cash Tray Options] menu only when “Multiple cash drawers per station” is enabled in Station Configuration. From the "Cash Tray Options" screen select option [7. CHANGE DRAWER]. Enter in the cash tray number in the prompt, press [Yes] in the conformation prompt, and then select the new drawer letter associated with the drawer you want to move the tray to.
During cash tray declaration, Restaurant Manager can optionally display the cash due amount. This amount takes into account the starting cash in the drawer, the cash sales, and paid-ins and paid outs. Enable the option "Show computed cash amount during declaration" located in RM BackOffice >Setup, Station Configuration>Devices > Cash Drawers > Cash Tray Declaration if you want this information to be displayed when finalizing cash trays. The cash tray declaration screen will appear as follows:
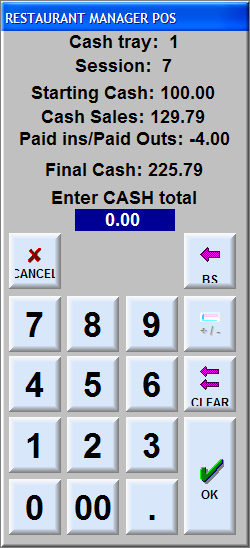
The “Paid Ins/Paid Outs” shows the total of all paid-ins and paid outs performed at that cash tray. If the paid-ins exceed the paid outs, then the number will be positive (e.g., it increases the cash amount that should be in the drawer). If paid outs are greater than paid-ins, then the number will be negative and decreases the cash amount.
If you prefer a blind declaration (e.g., the cashier does not know the amount that should be in the cash tray), then you should disable the option.
In a normal (non 24-hour) operation, Restaurant Manager requires all transactions to be settled, cash trays must be finalized and employees clocked out in order to close the session. In a 24-hour operation, this may not be feasible. To accommodate 24-hour operations, Restaurant Manager provides several configuration options under Setup->Station Configuration->Miscellaneous->Session.
When a 24 hour operation is enabled, Restaurant Manager will allow starting a new session at any time. If a session is already open, it is automatically closed, before opening the new one. In addition, all cash trays are automatically finalized with a declared amount of $0.00, any open tickets are transferred to the new session, and employees can be optionally left on the clock or clocked out and immediately clocked back in for the new session. The procedure for opening a new session is identical to non 24-hour mode and can be done from either a POS terminal, or from the BackOffice.
Although the session change can occur at any time, it is recommended that it be done at the same time each day and at the same time as a shift change. If you want your cashiers to declare their ending cash tray balance, then they should manually finalize their cash trays prior to starting a new session.
Because the 24-hour changeover requires modifying key data in Point of Sale, the POS stations are held in a locked state while the changeover occurs. As the session change is occurring, the POS stations will display the following message:
“Restarting RMPOS, please wait …”
Once the session change is complete, the POS stations will automatically shut down and restart themselves.
The only condition that will prevent opening a new session in 24-hour mode, are credit card transactions that are authorized, but not finalized. This is by design to ensure that the credit card batch stays in agreement with the Restaurant Manager session reports. If you are using on-line credit card authorization, you must finalize all credit cards before starting a new session.