(continued from Configuring Peripherals)
The settings described below appear on the Station Configuration Setup Form (Admin Settings) under the Interfaces heading using an Administrator Password and control interfaces to third party software applications. However, this section does not describe all the settings listed under the Interfaces heading. Settings that describe interfaces to hardware devices described above in the section on Configuring Peripherals:
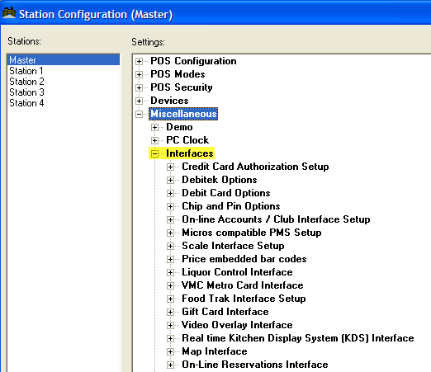
Use the settings on the Station Configuration Setup Form (Admin Settings) under the “Interfaces” heading to configure your Restaurant Manager POS System to work with third party software applications:
Station Configuration > Admin settings > Miscellaneous > Interfaces
You must complete a number of steps to configure your system for online credit card authorization:
In compliance with PCI guidelines, you must use the [Admin Settings] but at the bottom of the form and enter an Administrator Password to enable the Credit Card setup options. Using the [Search Settings] button, type “Credit Card Authorization Setup” and open up the menu by clicking on the (+) next to the heading. Access the Devices > POS Printers section of the Station Configuration Setup Form to define which printer should be used for credit card receipts and to verify the configuration of the Magnetic Strip Reader at the POS stations.
Access the Method of Payment Setup Form to define each type of credit card that will be processed online. You must be sure to click on the [CC Authorization] check box for each credit card you define.
Restaurant Manager allows many options and can be configured to match the needs for a variety of environments. Quickservice environments can utilize the “Threshold to print” option placing a dollar threshold to print a receipt thus saving paper and expediting the ordering process. Establishments using cashier banking can also expedite the customer check process by using barcodes to scan with. All establishments can benefit by using the “Auto assign base amount” option guaranteeing accuracy and efficiency in customer settlement.
If you will be using the Tabs Module to open credit card tabs with a simple swipe of the customer’s credit card, you want to define credit card types on the Auto Credit Card Detection Setup Form. And if you wish to implement automatic pre-authorizations as soon as the card is swiped you must read the entire section below on Credit Card Pre-Auths.
Important Note: Credit Card Pre-Authorization is supported with Mercury (MPS) only. Attempting to do Credit Cards pre-auths with PC Charge or Datatran may result in undesirable results. Credit card pre-authorization provides the ability to capture and authorize a credit card at the beginning of a sale.
Most of this Credit Card processing configuration can be done from the Credit Card Authorization Setup Form in RM BackOffice > Station Configuration under the "Interfaces" tab. Due to PCI compliance, this field setting is hidden and can only be accessed using the [Admin Setting] button and entering in an Administrator password. Additional setup will need to be done in the Restaurant Manager Card Interface Configuration Setup (RMCCWIN) form. Specific installation instructions vary depending on which third part interface you are using. Documentation regarding your specific interface can be found on the Tech Notes and Manuals page of the Dealer web site or click on one of the interfaces below:
Note: ASI now recommends PAYware PC over PCCHarge for credit card processing. In addition it is highly recommended you use the PAYware SIMM interface to streamline CC processing. Please visit the PAYware SIMM Interface Installation Guide for detailed installation instructions. Important: The PAYware SIMM Interface does not support third party gift cards when using PAYware PC and PAYware Connect.
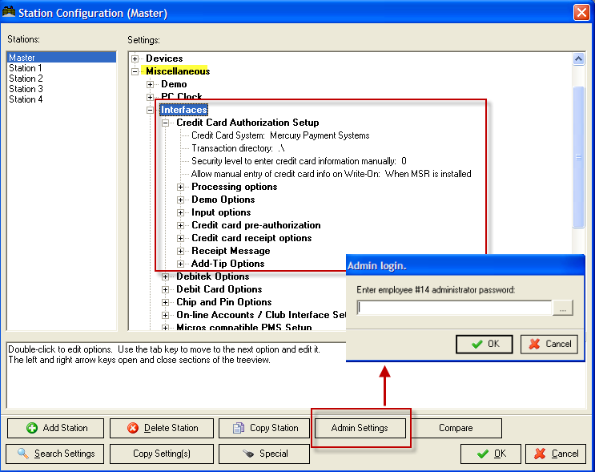
The following are the Station Configuration setting you will need to consider if you are processing credit cards. The Credit Card Authorization Form is accessed using the Admin Settings button on the bottom of the form. You will need an administrator password to access these settings.
Credit Card System-Choose the third party interface (Mercury, Datatran, or PC Charge)’
Transaction Directory- Restaurant Manager creates special transaction files. You must decide where on your hard drive you would like those transactions files to be created. Normally, you can leave this field blank (or use the default ".\", which causes Restaurant Manager to use the Restaurant Manager working directory. If you enter a different directory name, make sure to specify the drive letter and full path
Allow Manual entry of credit card info on Write On- Enable if you wish to manually process credit card number (i.e. MSR failure). Requires ASI's Write On module.
- Save CC in Payment File-Checking this option causes credit card information (card #, expiration, cardholder) to be saved in the payment history file (PMTmmyy .DBF). Note: this option should be used only if there is a business need. If there is no justifiable business need to store cardholder data, then this option should be disabled, otherwise, your restaurant may be deemed non-PCI compliant.
- Number of days to Store CC Info-Credit card information is confidential. If the information were to get into the wrong hands, it can mean big fines for the merchant as well as headaches for the card holders. Restaurant Manager provides the ability to store credit card information for the convenience of the merchant as well as the card holder. Having the credit card information on file can be useful for tracking down billing problems, issuing refunds, etc.; however, the credit card information should not be stored any longer than necessary. Enter the # of days that you wish to store credit card information. For PCI compliancy, you should enter the minimum value that satisfies your business needs. Restaurant Manager will automatically purge old credit card information when opening each new session.
IMPORTANT: Your system will not work properly if you leave the Time Out field at [0].
This feature is intended to provide a safe guard against credit cards being approved during pre-auth, but exceeding the credit limit after the tip is added. For example, if a credit card is initially authorized for $20.00, and a $12.00 tip is given, the amount charged to the card including tip is $32.00. The ratio of $32.00 to $20.00 is 1.6. The system will require the full $32 transaction to be authorized if the Maximum Tip Multiplier is set to 1.5 (as is recommended),
If using Datatran, to test proper operation, process a credit card normally, then add a tip and settle the transaction. Then use the "Revise Settlement" option to change the tip amount. After changing the tip amount, check your credit card batch to ensure that the transaction is not duplicated, and shows the correct tip amount DataTran. Datatran is an independent credit card authorization package that is sold by Datacap Corporation:
Additional Setup will have to be done in the RMCCWIN credit card interface module. Restaurant Manager currently interfaces into three separate third party credit card software/hardware platforms. Click on one of the hyperlinks below to get specific installation instructions:
This setup form works in tandem with the “Auto detect credit card type” setting on the Station Configuration Setup Form to identify the card type from the number of the card as it is swiped. Together they allow your system to automatically credit card types when a card is swiped. This can be beneficial in two different setup scenarios:
And when you select a credit card form of Payment on the Settlement Screen the data on this setup form will be compared to the number of the swiped card to ensure that the selected form of payment corresponds to the valid number ranges defined on the setup form.
When the selected form of payment does not match the defined range, the following error message is displayed you will get a message stating “invalid card type”.
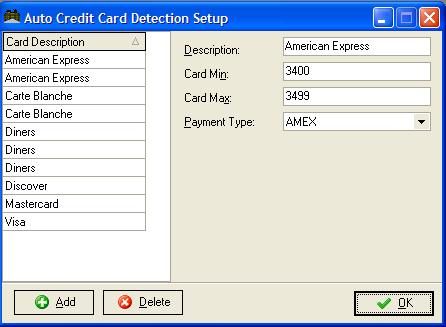
Use the settings on the Automatic Credit Card Detection form to define valid number ranges for the types of credit cards accepted in your establishment:
NOTE: If there is a range of numbers between the minimum and maximum that do not pertain to a particular type of credit card, simply select the card type on the Card description list and delete it.
Credit card pre-authorization provides the ability to capture and authorize a credit card at the beginning of a sale. This feature is available only in the Tabs module and is extremely useful in minimizing lost revenue due to customer walk-outs and invalid or overdrawn credit cards.
Important Note: Credit Card Pre-Authorization is supported with Mercury (MPS) only. Attempting to do Credit Cards pre-auths with PC Charge or Datatran may result in undesirable results. Credit card pre-authorization provides the ability to capture and authorize a credit card at the beginning of a sale.
There are essentially two ways of using credit card pre-authorization: Single and Multiple Authorization Mode. Both are described below along with their advantages and disadvantages.
In Restaurant Manager, credit card pre-authorization is a foreground process, which means that the POS terminal is tied up while authorization is in progress. For this reason, it is strongly recommended that credit card processing is done via the internet to achieve the fastest possible response time. Note: internet processing can yield approvals in 3-4 seconds as compared to 15 seconds or more using phone dial up.
This section contains information that applies to all credit card systems; however, it is mostly relevant to people using the Multiple-Auth approach. For Single-Auth mode, credit card downgrades are less of a problem.
Credit card processors generally charge a different rate for swiped credit cards versus hand keyed credit cards. Swiped transactions offer better rates (lower fees) than hand keyed transactions. The term used to describe the higher fees associated with hand keyed transactions is a “downgrade.”
Aside from hand keyed transactions, credit card downgrades can occur if the final authorization amount differs substantially from the initial pre-authorization amount. Generally, the credit card processor allows a margin of +/- 20%, but this varies from processor to processor. So for example, a credit card that is pre-authorized for $100 can be finalized for any amount between $80 and $120 without being downgraded. But if it is finalized for an amount outside that range, it will be downgraded and higher fees may apply.
Restaurant Manager avoids credit card downgrades when possible. In the finalization process, Restaurant Manager only adjusts authorization amounts within a user defined tolerance. See the option “Max allowable pre-auth adjustment” under the System Setup section below. If the adjustment is outside the allowable range, the pre-auth is discarded (or left intact) and a new authorization is issued. This is discussed in more detail in the section entitled “Complete Pre-auth.”
In some cases, credit card downgrades may be unavoidable -- particularly when making tip adjustments. Consider an example where the check total is $112 and it is split into three authorizations of: $50, $50, and $12. If the customer decides to leave a $20 tip, the tip adjustment if applied to any single authorization will cause it to be downgraded. In this example, one way of avoiding a downgrade is to split the tip among two or more authorizations. For example, putting a $10 tip on each of the $50 authorizations would keep avoid a downgrade situation. This tip splitting must be done by the operator and is NOT an automatic feature of Restaurant Manager.
When using the “Multiple Auth” approach, it is important NOT to authorize more than necessary; otherwise you increase the risk of maxing out the credit card. Here’s why: although a pre-authorization is not the same as an actual sale, it does impact the card holder’s “open to buy” limit. Typically, funds from a pre-authorization are held for 3 days before being deposited back to the card holder’s account.
Consider this example. A customer is $300 away from reaching their credit limit. If you do an initial pre-auth for $200, it will be approved. But if the check total comes out to $150, Restaurant Manager will discard the $200 pre-auth and attempt to authorize a sale for $150 (for an explanation, see the previous discussion on credit card downgrades). Since the pre-auth funds are held for 3 days, the final sale will be declined – $200 pre-auth plus $150 sale comes to a total of $350 which exceeds the customer’s credit limit.
In this example, if you authorize in $100 increments rather than $200, when it comes time to finalize the transaction, there will be two authorizations of $100 each. Restaurant Manager will discard the second $100 auth and attempt to authorize a sale for $50. In this case, the transaction will go through because the total amount authorized is $100 + $100 + $50 = $250 which is below the credit limit. The downside of smaller pre-auth increments is the additional credit card fees due to a higher transaction count. If you use the Multiple Auth approach, you should give careful consideration to this issue. You need to weigh the trade-off between minimizing credit card fees and reducing the risk of exceeding the credit limit.
In this mode, the customer’s credit card is authorized for a small amount (typically $1.00) at the very beginning of a transaction. If the authorization is approved, it indicates that the card is valid (i.e., not lost or stolen, and has not exceeded the credit limit).
Upon finalizing the sale, the initial pre-auth is discarded, and a new authorization is obtained for the final check amount. The main advantage of this approach is the credit card fees are minimal; however, there is no guarantee that because a card was approved for $1, it will be approved for the final check amount. In a bar environment where the check average is low (say $100 or less), credit cards are unlikely to be “maxed out” if they are first approved for $1. But if you run a high ticket establishment with check totals that regularly exceed $100, then you are at greater risk and may want to consider the “Multiple-Auth Mode” described next.
Important Note: Credit Card Pre-Authorization is supported with Mercury (MPS) only. Attempting to do Credit Cards pre-auths with PC Charge or Datatran may result in undesirable results. Credit card pre-authorization provides the ability to capture and authorize a credit card at the beginning of a sale.
In this mode, the customer’s credit card is authorized for a more substantial amount (typically $50.00 or more) at the beginning of a transaction. As items are added to the TAB and it nears or exceeds the initial pre-authorization amount, the credit card is re-authorized for an additional amount. This process continues with as many “Repeat Authorizations” as necessary until finalizing the sale. Both the initial authorization amount and the repeat authorization amounts can be preset to a fixed amount, or the system can prompt the operator. See below under “System Setup.”
The biggest advantage of this approach is it minimizes the likelihood of getting “stiffed” on a transaction due to a bad credit card, particularly in a high ticket environment. But the drawback is higher credit card fees due to multiple authorizations.
Before adopting this mode of operation, you should do a cost estimate by multiplying the expected number of transactions per day by the “per-transaction” fee assessed by your credit card processor. Depending on your sales volume and ‘per-transaction’ fee, the cost of this approach could be significant. If you think you lose more money in walk-outs and bad credit cards than the additional transaction fees, then the multiple-auth approach may be the way to go.
Another drawback of the multiple authorization approach is the customer will see multiple charges on their credit card statement. For example, a $258 transaction might appear as three transactions, $100, $100 and $58. This may result in phone calls from confused (and possibly irate) customers.
In both Single and Multiple Auth modes, the finalization process is identical. Because the check total will rarely (if ever) match the pre-authorized amount exactly, Restaurant Manager provides a “Complete Pre-Auth” option in the settlement window. This option adjusts the authorization amounts so the total amount authorized matches the check total. This option is described in more detail later.
Important Note: Credit Card Pre-Authorization is supported with Mercury (MPS) only. Attempting to do Credit Cards pre-auths with PC Charge or Datatran may result in undesirable results. Credit card pre-authorization provides the ability to capture and authorize a credit card at the beginning of a sale.
A credit card pre-auth is initiated by pressing the “CC Tab” button from the Tabs main screen. Restaurant Manager will prompt you to swipe a credit card, then automatically pre-authorize the card for a preset amount. Depending on the system configuration, Restaurant Manager may prompt the operator to enter the pre-auth amount.
Restaurant Manager will automatically authorize the card for the amount specified. If the card is approved, a receipt is printed and the Tab is initiated.
The running total displayed at the bottom left of the order entry screen shows the check total as well as the amount tendered. For example, if the check total is $14.50 and the pre-auth amount is $50, it will show “14.50 / 50.00.” Note: if the option “Large text for running total” is enabled, it does NOT show the pre-auth amount – only the check total.
Important Note: Credit Card Pre-Authorization is supported with Mercury (MPS) only. Attempting to do Credit Cards pre-auths with PC Charge or Datatran may result in undesirable results. Credit card pre-authorization provides the ability to capture and authorize a credit card at the beginning of a sale.
This is the final step in a credit card pre-auth transaction. Because the check total will rarely (if ever) match the pre-authorized amount, Restaurant Manager provides an efficient means of balancing the transaction (i.e., making the authorized amount equal the amount due). After the “Complete Pre-Auth” option is executed, it cannot be undone and the system will no longer recognize the transaction as a credit card pre-auth. Therefore, this step should only be done when the transaction is final and the customer is ready to settle up.
From the settlement screen, choose the option “Complete Pre-Auth.” On some systems, this option may be located under “MISC.” When the option is executed, Restaurant Manager will adjust the LAST payment so the total amount tendered exactly matches the total BASE amount. If there is an automatic gratuity, the gratuity amount is added to the last payment.
While adjusting the amount tendered, Restaurant Manager tries to avoid credit card downgrades by keeping the adjustment within the limits defined in RMWin->Setup->Stations (“Max allowable pre-auth adjustment”). Only when the adjustment amount is within the limits set by this parameter will Restaurant Manager keep the original authorization code and adjust the amount.
When the adjustment falls outside the allowable range, Restaurant Manager will take the following action:
When adjusting to an amount below the “Max allowable pre-auth adjustment,” Restaurant Manager will discard the approval code for the pre-auth and add a new payment for the desired amount.
When adjusting to an amount above the “Max allowable pre-auth adjustment,” Restaurant Manager will keep the approval code for the original pre-auth and add a new payment to make up the difference.
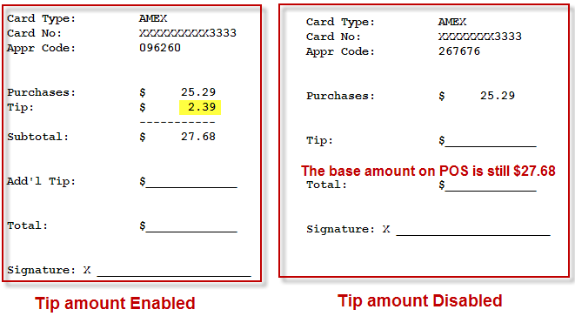
Once the adjustments are complete, Restaurant Manager will submit the credit card(s) for approval and if the transactions are approved, it will print a consolidated receipt showing the approval codes and the amount of each. The consolidated receipt provides a space for the customer to write in a tip amount. If using the Multiple-Auth approach, the tip can be applied to any one of the existing authorizations (or split between them). See previous discussion regarding credit card downgrades.
Important Note: Credit Card Pre-Authorization is supported with Mercury (MPS) only. Attempting to do Credit Cards pre-auths with PC Charge or Datatran may result in undesirable results. Credit card pre-authorization provides the ability to capture and authorize a credit card at the beginning of a sale.
A REPEAT authorization provides an efficient way of authorizing the same credit card for additional funds. Depending on your system setup, Restaurant Manager may display a warning when it is time to do a REPEAT authorization. The warning is by way of a flashing title bar.
To execute a REPEAT authorization, choose the option “Repeat CC Auth” from the order entry screen. Depending on how your system is configured, this option may be located under “MISC.” When doing a REPEAT auth, Restaurant Manager may prompt the operator to enter the REPEAT auth amount, or it may default to a fixed amount depending on the system configuration.
Once the amount is determined, Restaurant Manager will automatically add another payment on the settlement screen and copy all the credit card information from the initial pre-auth to the new payment. The new authorization is submitted for approval; however, Restaurant Manager does NOT print a receipt on REPEAT authorizations.
If a REPEAT auth fails, it is recommended that you finalize the transaction immediately by getting the balance in cash, or an alternative form of payment. If the customer wishes to continue running a tab, you can start a new CC Tab with a different credit card once the initial tab is settled out.
The setup parameters for credit card pre-authorization are located in the Credit Card Authorization section of RM BackOffice > Setup > Station Configuration > Admin settings > Miscellaneous > Interfaces. Each parameter is described below. As a first step, you need to decide whether you are going to use Single-Auth mode or Multiple Auth mode (see discussion in previous section).
Important Note: Credit Card Pre-Authorization is supported with Mercury (MPS) only. Attempting to do Credit Cards pre-auths with PC Charge or Datatran may result in undesirable results. Credit card pre-authorization provides the ability to capture and authorize a credit card at the beginning of a sale.
You should consult an attorney to ensure that the language is legally binding. The message may be helpful in the event of a walk-out where the customer has signed the initial pre-auth slip, but has NOT signed the final authorization.
As an alternative, you can use the Receipt Message area to print a blank line for recording additional information, such as driver’s license number, or other form of ID.
Warning message as it appears in the option description box for Enable credit card pre-auth (Mercury only):
Note: this option supported with Mercury (MPS) only. Attempting to enable this option with PC Charge or Datatran may result in undesirable results. Credit card pre-authorization provides the ability to capture and authorize a credit card at the beginning of a sale. This feature is available only in the Tabs module and is extremely useful in minimizing lost revenue due to customer walk-outs and invalid or overdrawn credit cards. There are essentially two ways of using credit card pre-authorization. Both are described below along with their advantages and disadvantages. (Single-Auth Mode) In this mode, the customer's credit card is authorized for a small amount (typically $1.00) at the very beginning of a transaction. If the authorization is approved, it indicates that the card is valid (i.e., not lost or stolen, and has not exceeded the credit limit). Upon finalizing the sale, the initial pre-auth is discarded, and a new authorization is obtained for the final check amount. The main advantage of this approach is the credit card fees are minimal; however, there is no guarantee that because a card was approved for $1, it will be approved for the final check amount. In a bar environment where the check average is low (say $100 or less), credit cards are unlikely to be "maxed out" if they are first approved for $1. But if you run a high ticket establishment with check totals that regularly exceed $100, then you are at greater risk and may want to consider the "Multiple-Auth Mode" described next. (Multiple-Auth Mode) In this mode, the customer's credit card is authorized for a more substantial amount (typically $50.00 or more) at the beginning of a transaction. As items are added to the TAB and it nears or exceeds the initial pre-authorization amount, the credit card is re-authorized for an additional amount. This process continues with as many "Repeat Authorizations" as necessary until finalizing the sale. Both the initial authorization amount and the repeat authorization amounts can be preset to a fixed amount, or the system can prompt the operator. See below under "System Setup." The biggest advantage of this approach is it minimizes the likelihood of getting "stiffed" on a transaction due to a bad credit card, particularly in a high ticket environment. But the drawback is higher credit card fees due to multiple authorizations. Before adopting this mode of operation, you should do a cost estimate by multiplying the expected number of transactions per day by the "per-transaction" fee assessed by your credit card processor. Depending on your sales volume and 'per-transaction' fee, the cost of this approach could be significant. If you think you lose more money in walk-outs and bad credit cards than the additional transaction fees, then the multiple-auth approach may be the way to go. Another drawback of the multiple authorization approach is the customer will see multiple charges on their credit card statement. For example, a $258 transaction might appear as three transactions, $100, $100 and $58. This may result in phone calls from confused (and possibly irate) customers. In both Single and Multiple Auth modes, the finalization process is identical. Because the check total will rarely (if ever) match the pre-authorized amount exactly, Restaurant Manager provides a "Complete Pre-Auth" option in the settlement window. This option adjusts the authorization amounts so the total amount authorized matches the check total. This option is described in more detail later. Default Value: False
The amount is expressed as a percentage of the pre-auth amount. For example, if the pre-auth amount is $100 and you set this option to 20%, then Restaurant Manager will adjust the authorization amount between $80 and $120 to make the amount tendered equal the check total. If the required adjustment is more than 20%, Restaurant Manager will either discard the pre-auth or issue a new one to balance the transaction.
If set improperly, this option could result in credit card downgrades. Most credit card processors allow the final sale amount to vary by +/- 20% of the pre-auth amount in order to qualify for the best possible discount rate, but you should check with your credit card processor to make certain.
If the operator does a REPEAT auth for another $100, it will disarm the warning momentarily, but if the check total reaches $160 (80% of $200), the title bar will start flashing again.
Note: it is permissible to set this value to an amount greater than 100%. For example, if the value is set to 120%, then the warning is triggered when the check total exceeds the pre-auth amount by 20%. So if the pre-auth amount is $100, then the warning is activated when the check total reaches $120.
The Debitek system an optional interface and is similar to Restaurant Manager’s gift cards; however, the card balance is stored on the card itself, rather than the host computer system. The Debitek device connects to a serial port on the POS terminal. You must have one Debitek device at each POS terminal in order to process Debitek cards.
The Debitek system is most widely used in corporate cafeterias or hospitals where employees are the predominant customers. Each employee purchases a Debitek card, and uses it to pay for their meals. The Debitek system can significantly improve turnover speed at the POS station by eliminating the need for the cashier to handle cash and make change.
There are two types of Debitek devices: the Enhanced DCT (EDCT) and the Secure Debit Device (SDD). RESTAURANT MANAGER only supports the SDD Debitek device. Though both types have the same basic capabilities of reading a card, debiting a card and displaying a card’s balance, there are a few key differences which are summarized below:
Both the EDCT and the SDD support a 4 character site code which is encoded on each smart card. This site code prevents card holders from one location, to going to another location and using their card. RESTAURANT MANAGER does NOT support the use of the site code (i.e., it does provide any site code restrictions).
To configure RESTAURANT MANAGER with the Debitek interface, you must purchase the Debitek Interface Option. If not purchased initially with the system, contact ASI to purchase a feature upgrade.
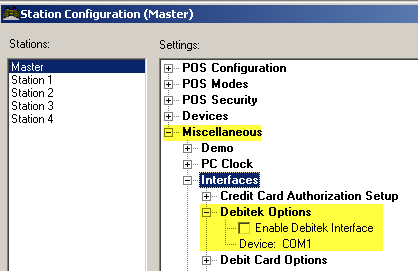
Go to Setup > Station Configuration > Miscellaneous-> Interfaces to enable the Debitek interface. Check the box to enable the Debitek interface, and enter the name of the COM port (e.g., COM1 or COM2).
It is not necessary to define the COM parameters. RESTAURANT MANAGER will automatically configure the COM port with the default Debitek settings, which are 9600 baud, 8 data bits, no parity, and 1 stop bit.
Next, you must define a form of payment under Setup >Settlement and Tips > Method of Payments. Enter a new payment called Debitek and check the box “Debitek Payment.”
The POS program will automatically initialize the Debitek device when booting up. It will initialize the Debitek as follows:
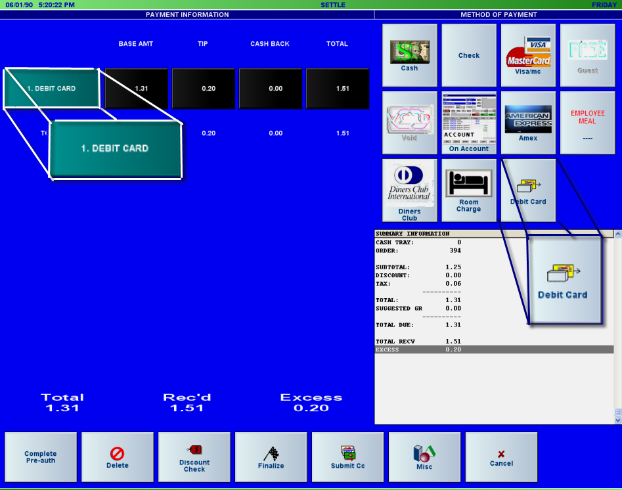
At the POS, ring up an order as usual. From the settlement screen, select Debitek as the form of payment. Before entering the amount, make sure the customer inserts his card into the Debitek device. Otherwise, you will get an error. After entering the amount tendered, Restaurant Manager will verify that the card has sufficient balance to complete the transaction. If not, it will display an error. It does not actually debit the card at this time; it only checks the card balance.
Restaurant Manager actually debits the card when the transaction is finalized. As a safety check, Restaurant Manager will first read the card balance, then debit the card, and read the balance again. Only if the final balance is consistent, does the transaction become final. If the consistency check fails, Restaurant Manager will display a message showing the initial balance, the debit amount and the new balance. If the consistency check passes, Restaurant Manager will finalize the transaction and eject the card.
Restaurant Manager allows split payments involving Debitek and other forms of payment such as Cash or Credit Card, but you cannot use more than one Debitek card on a single transaction. For example, if the check total is $10.00, you can tender $5.00 on a Debitek card and $5.00 to cash or Visa, but you can NOT tender $5.00 on one Debitek card and another $5.00 on a different card.
Restaurant Manager also places restrictions on revising settlements involving Debitek. Revise settlement is allowed, but you may not change the Debitek payment. This is because the SDD Debitek device does not allow adding value to (i.e., crediting) a Debitek card. So split payments involving Debitek and other forms of payment can be revised, but you can only change the other forms of payment (NOT the Debitek).
At this time, Restaurant Manager only supports Canadian Debit cards. This is an optional feature of Restaurant Manager and is available only when purchased with the Debit feature. The account site will need a broadband internet connection for Debit Cards to work.
Below are the areas this topic will cover to setup Debits cards:
Note: The DBTAUDIT.TXT found in the rmwin directory contains log files for troubleshooting debit card issues
Follow the instructions below to setup:
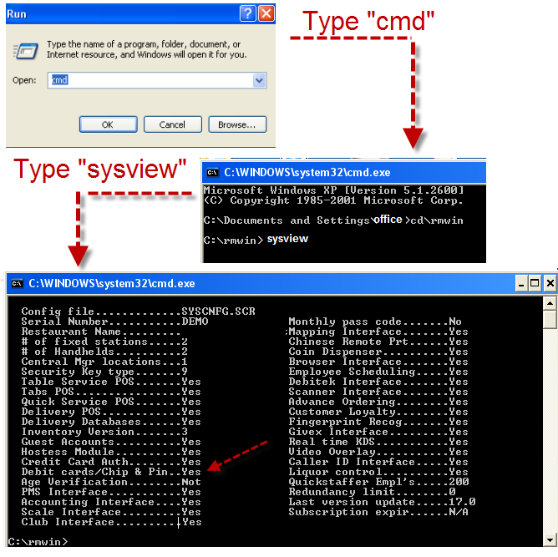
At a dos prompt (start> run >cmd) change the directory to rmwin. Type in “sysview” at the C:\rmwin> prompt and hit enter. Verify “Debit Cards\Chip & Pin” is enabled (Yes).
Install “DSI client “at the pos station with pin pads as well on the server. The DSI Client is an active x control that allows communication between the pin pad and the POS. You can download the DSI Client from Datacap: http://www.datacapepay.com/software/dsiclient/ . Additional installation instructions can be downloaded from this website.
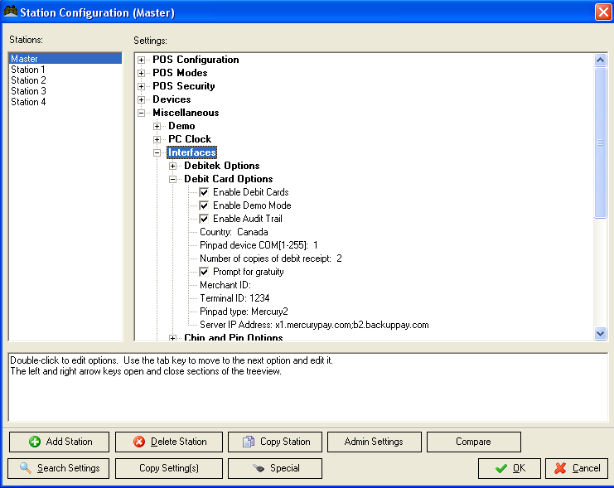
In the Restaurant Manager BackOffice go to Setup > Station Configuration, and use the [SEARCH] function at the bottom of the screen to find “”Debit Card” options. The Station Configuration setting must be filled in on every station with a Pin Pad device connected. The following fields must be filled in:
- Ingenico & Datacap: 8 digits total consisting of “91” plus last six digits of Pin Pad serial number
- Verifone5000: 8 digits total consisting of "70" plus last six digits of Pin Pad serial number
- When using Ingenico or Dial Bridge enter: Mercury2
- When using Verifone 5000 enter : Mercury1
You must setup a form of payment for a Debit Card. In The RM BackOffice go to Setup > Settlement and Tips > Method of Payment and click on the [Add] button in the setup form. Fill in the following fields:
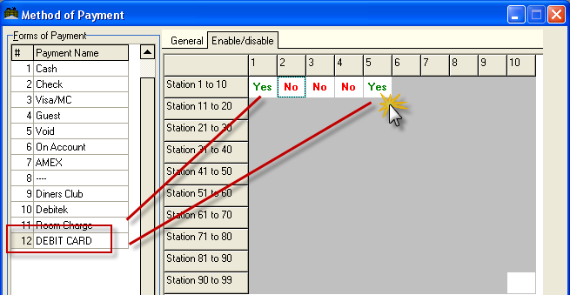
You will need to enable debit card form of payment on each station the Pin pad is attached to. Within the Method of Payment form, click on the “Enable/disable” tab. Make sure the form of payment (Debit Card) is highlighted on the “Payment List” Move the cursor to the grid on the right side of the form and click on the yes/no cell on the station number to enable/disable the method of payment.
In the illustration below, the “Debit Card” method of payment is enabled on stations 1 and 5, disabled on station 2, 3, and 4.
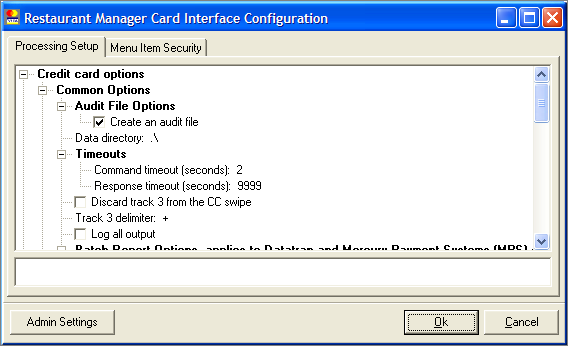
Enter into the RMCCWIN interface using the RMCCWIN executable:

Hit the [Stop] button in the lower right hand corner of the RM Card Interface program and click on File in the upper left hand corner. Go to “General Setup” , click on [Admin Settings] button, enter the administrator password, and scroll down to Credit Card Interface type. Select the Mercury Payment Systems option.
Next, go down to Mercury Payment Systems Options and fill in the Merchant ID field. If you are using an IP Dial Bridge, change the “Server list “field to the IP of the machine with the Dial Bridge (127.0.0.1).
Exit from the RM Credit Card Interface by clicking on the [ok] button > [Start] > and then minimize the screen. Closing the program will cause Credit and Debit card transaction not to process.
When first connected, the pin pad screen will display the unit’s serial number. You must perform a “debit key change” to synchronize the pin pad with the Mercury Debit server. At the POS, enter the [MISC] functions on the Main Status screen and select the [Debit key Change] function button.
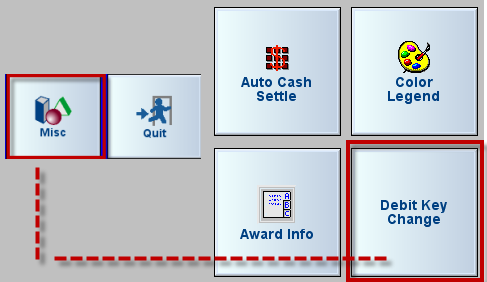
This process must return the message “Debit key has been changed”. This may have to be done before the desired message appears. You will notice that the display on the pin pad has changed to “Welcome/Bonjour”.
The “Debit key change” process must be preformed every time the pin pad is restarted for any reason (e.g. power failure)
If 90 seconds has elapsed and a debit transaction is canceled on the POS station, you should ensure that the transaction is ALSO canceled on the Pin pad; otherwise, it will cause the RM reports to be out of balance with the debit system.
To perform a debit refund, a card must be swiped and PIN entered. There is no option for a manual entry option for a credit.
You will have to make changes to the setup if you are using the MPS Dial Bridge for backup.
The Chip and Pin is an optional interface available in the United Kingdom (UK). The Chip and Pin uses the Thyron MTP500 series of card readers. The Chip and Pin option requires set-up in three places: Station Configuration, Method of Payments, and RMCCWIN.
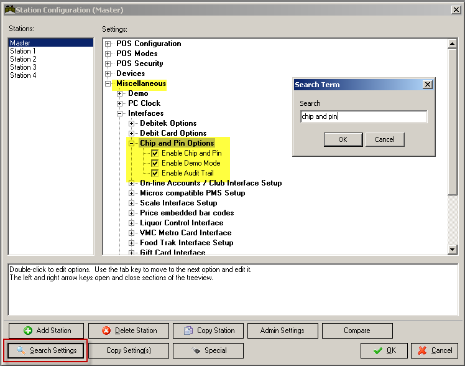
Use the [Search Settings] button on the Station Configuration, type in “Chip and Pin” and select the “Enable Chip and Pin” option.
Enable Chip and Pin- Check this option to enable chip and pin processing.
Enable Demo Mode- Enable this option to process chip and pin transactions in demo mode. Note: if demo mode is enabled, a chip and pin device is not needed. You will be prompted to enter the base amount and tip amount from the POS station. To test declined transactions, create a file called DECLINE.TXT in the RM working directory.
Enable Audit Trail- Check this option to enable the audit trail for chip and pin transactions. Information is stored in CPAUDIT.TXT
Setup> Station Configuration> Miscellaneous> Interfaces > Chip and Pin Options
The use of Chip and Pin will require setting up new form of payments. When the new form of payment has been set up you will need to enable the Chip and Pin Field setting. You will need to enter in the IP and Port Address in the field settings accessed using the ellipsis […] button.
Setup> Settlement and Tips > Method of Payment
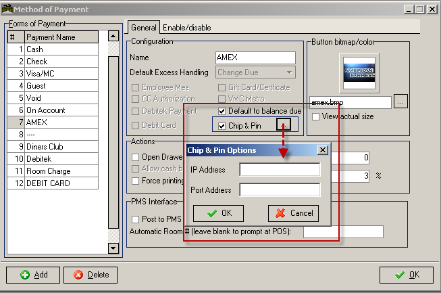
This operation must be repeated for any payment type using chip and pin.
The Thyron Card Reader must be enabled in the Restaurant Manager Card Interface Configuration (RMCCWIN) setup form. Start by enter the RMCCWIN interface and select [Stop] at the bottom of the screen. Go to “File” at the top of the screen and select “General Settings”. Select the [Admin Settings] at the bottom of the “Processing Setup” screen and enter your Administrator Password. Enable the “Thyron Card Reader” option under the “Credit card interface type” menu heading.
At the bottom of the “Credit Card options” menu there is an option to enable the “Thyron card Reader Options”. This field setting must be enabled.
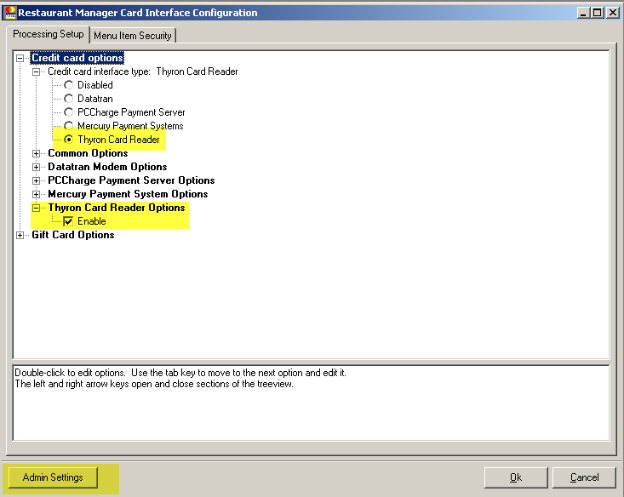
Make sure you make sure you hit the [Start] button when finished. Cards will not be processed if you do not. Also, when you are finished, do not close the RMCCWIN program. Again, cards will not be processed if this program is not running. You should minimize the screen when finished.
It is suggested that you download and install the MSXML 4.0 Service Pack 2 if you encounter any “Class not registered, ClassID” errors
Restaurant Manager interfaces into TAI Club Management Systems while older versions could interface into Club Data. The Club Interface is ideal for country clubs, golf clubs, sport clubs, or other environments where “members” are allow to charge and use a separate accounting package to bill members (TAI). The Club Interface is an optional package and requires the Guest Account package as well.
When processing guest payments at the POS, the interface is configurable to verify the guest account by accessing the third party customer database to insure accuracy and prompt if correct. You can also configure your system to charge members on the fly or have the POS system gather the information and send a data batch at the end of a session.
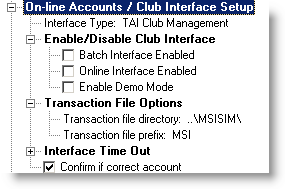
In the RM BackOffice go to Setup > Station Configuration and use the [Search Settings] function at the bottom of the form. Type in “Club Interface” and select the “Online Accounts/ Club Interface setup” option. Configure the following settings:
Interface Type-This option is used for processing on-line guest accounts. Select the appropriate club package interface (i.e. TAI Club Management).
Enable/Disable Club Interface
- Batch Interface Enabled-This option is used only with TAI club interface. Batch interface is not supported with ASI On-Line Accounts module. With the batch interface, sales information is transferred to the club system when closing the session. This option is used to enable or disable the batch interface. Note: RESTAURANT MANAGER provides a separate program called MSIBATCH.exe which provides a similar function. The MSIBATCH.exe Generates an ASCII file when closing the session.
- Online Interface Enabled- The on-line interface provides a real time link between Point of Sale and the club system. Member's are queried and charged on the fly
- Enable Demo Mode- Enable this option to generate automatic responses for demo purposes. An "Approved" response is automatically generated roughly 4 seconds after a transaction is submitted. Make sure this option is DISABLED in live installations.
Transaction File Options
- Transaction file directory- This is the directory for writing transaction files (applies to both batch and on-line interfaces). Restaurant Manager will not allow a directory name that does not exist. To write the transactions in the RMWIN working directory leave this field blank.
- Transaction file prefix-Enter a 3 letter prefix for the transaction files. This prefix can be used to uniquely identify different locations.
Interface Time Out- when enabled, a prompt will appear after entering an account number at the POS asking to verify account.
If the “Online Interface” option is not enabled, you will need to synchronize or maintain the customer’s databases between Restaurant Manager and the third party system .If you choose to send a batch at the end of the session you must schedule the MSIBATCH executable. Careful consideration must be made to the Menu setup (especially group types) in addition to Revenue Centers and Gratuities. It is highly suggested that you work closely with the third party’s consultant from the beginning.
Detailed instructions for PMS installation can be found in the Restaurant Manager PMS Interface Guide found at the ASI website. Additional configuration instructions can be found within the manual under topics related to Station Configuration and Form of Payment
Food Trak is a third party F & B management system and the interface is an optional module. If enabled sales information is written to an ASCII text file at the end of each session. The text file can be imported directly into FoodTrak. The file has the name FTmmddyy.TXT, where mmddyy is the month, day, year that the session was opened. For example if the session began on 03/15/96, the file name would be FT031596.TXT. Each line of the file contains the following information:
All fields are right justified blank filled.
In the RM BackOffice go to Setup > Station Configuration and use the [Search Settings] function at the bottom of the form. Type in “Food Trak” and select the “Food Trak Interface Enabled option. Enable the option by placing a check mark in the option. This must be enabled on each station.
The Gift Card Interface is an optional module. Currently, Restaurant manager interfaces into:
Each Gift Card program requires different setup procedures. You can visit the Tech Notes and Manuals page at the ASI website to download specific instructions.See the Appendix 3 for a list of which credit card or internet platforms support specific gift card processing.
The Restaurant Manager Map Interface uses Microsoft Mappoint. This interface is ideal for establishment with delivery.
Software
Overview
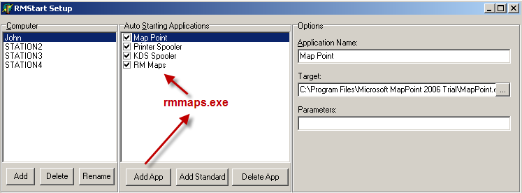
Map Point- Follow the manufactures instructions to install Mappoint and Media Player 11. After installing Map Point, copy and paste the executable in either RM Start or in Windows Start Up
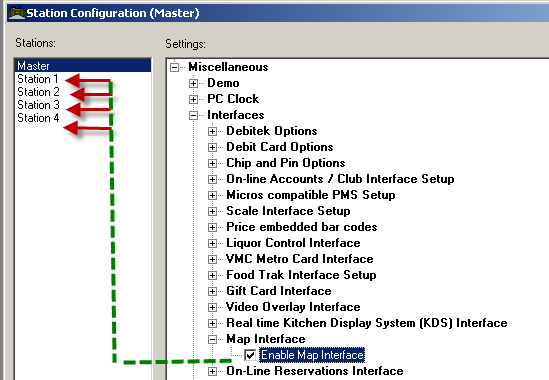
In the RM BackOffice > Station Configuration > Interfaces > Map Interface> enable the “Map Interface” option
Place the RMMaps.exe in the RM Start on the same station Map Point is installed. RM Maps is not found under “Standard Apps” in RM Start Setup. You will need to choose the “Add App” button, name the application and place the command RMMAPS.exe in the “Target” field.
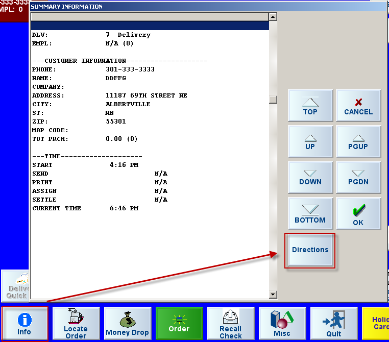
RM Maps can be found utilized in two different areas in RMPOS. The first method is to use the [Info] button on the “Main Status” screen at the POS. This method will bring a display screen that will allow the user to get directions. This method will allow directions to only one location at a time. This method is best used at establishments that do not utilize directions on a frequent basis, e.g. every driver trip.
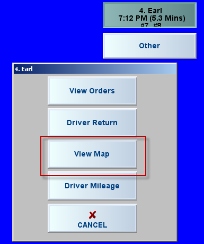
The second method is incorporated at the point when drivers are assigning orders and can be used to get point to point directions for several locations. In the “Main Status” screen, after orders have been assigned to a driver, touch the Drivers name under the “Drivers” column. A display screen will appear offering four choices. Choose the [View Map] option.
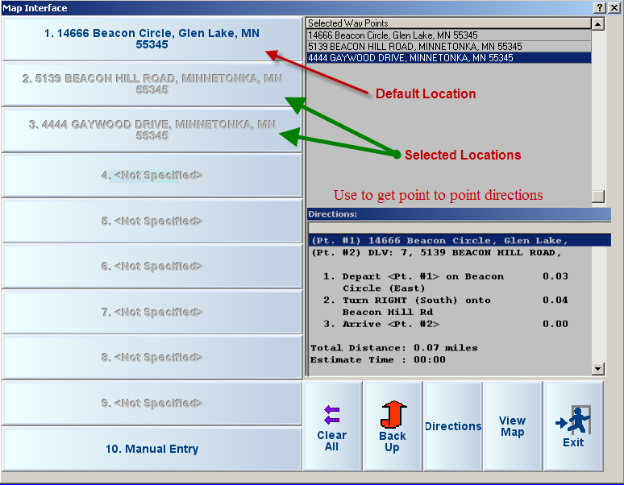
In the “Map Interface”, the store location will appear at the top of the lists. The store location is programmed in RM BackOffice under Setup > General > Store Info. Choose your addresses but touching the corresponding addresses, and press the “Directions” button. You will then have the option to view on screen or sent to printer. A map can be viewed by selecting map but it will not print.
When executing the RM Map Server, the following command line parameters may be used as it seems fit, but is not recommended on normal operations:
/LOG - to show the “Request” and “Turn by Turn Directions” tabs. This is helpful to see the map/directions requests as well as the server responses. The maximum numbers of lines for the request and directions log are 100 and 500, respectively.
/MAP – to show the “Map” tab. This tab shows the map result of the last successful map request.
/MANUAL – to show the “Manual Entry” tab. This is useful for diagnostics and testing the interaction of the map server as well as the mapping system (i.e. MS MapPoint 2006).
The map interface is accessible in RM on the following places:
<< Show image of full-map interface >>
Note: If you have set the printer output to screen, you will not be able to see the “Print” button when the turn by turn directions are displayed on the POS.
See section on Open Table Interface
Important: This interface is no longer supported. The instructions below are for legacy users only.
The online and program reservation system known as “Open Table” is a third party means of tracking reservations and current table status for a restaurant. Restaurant Manager’s Open Table interface is a communication process between the two programs that allows sharing of a given amount of information concerning the status of a table.
The communication flow of information is unidirectional only. Simply stated, the table data information (status of order) flows only to the “Open Table” program, the “Open Table” program does not send any data to Restaurant Manager.
The following list is the status changes that Restaurant Manager will send a status change indicator to the “Open Table” interface.
Prior to any attempt to view this new data exchange with the “Open Table” program, the user must be assured that, the following RM BackOffice station configuration parameters for the following data options have been set correctly.
First find the section titled "ON-LINE RESERVATIONS INTERFACE" using the [Search] button on the bottom of the station configuration form.
Once the user is there, the following sub-menu required options are displayed for possible changing and / or editing of the defaulted settings.
When the system (standard Master and Station configuration rules apply) configuration has been completed and set to the restaurants’ operating parameters, the RESTAURANT MANAGER interface for “Open Table” will begin processing data immediately for the various status changes listed on the previous page.
If the configuration parameters are not properly set for usage by either program, RESTAURANT MANAGER halts operation and displays the message below.
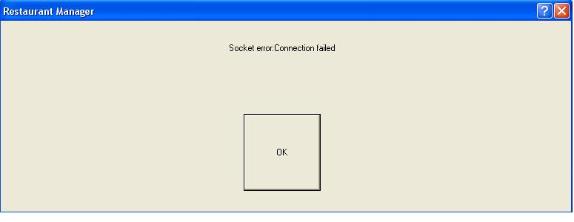
The message will remain on screen until the parameters are set correctly or completely turned off from usage.
Authorized Restaurant Manager resellers may load a third party application, Crystal Report Writer version 8 onto networks running Restaurant Manager™ to provide users with special report templates not included in the basic Report Module. Once a reseller has followed the procedures below to create a custom report format, the report may be added to the "Report List" of the Reports Module.
Warning: Only users familiar with Crystal Reports should attempt to create their own reports. Please note that ASI does not provide any technical support for any reports you create. Please note due to Crystal Reports no longer supporting the crpe32.dll for a report engine, RMReports only works with Crystal Reports versions prior and equal 8.
The Restaurant Manager™ setup installs all the files required to launch the crystal reports created by ASI. However, you will need
ODBC drivers and File DSNs-If you plan to use the Restaurant Manager™ Crystal reports dictionaries you must first associate the Restaurant Manager™ working directory with a File DSN using an ODBC driver as described below.
Before running either existing or newly created crystal reports you must consolidate the “raw” Restaurant Manager™ data by use of the RMDBCONS.exe utility. This utility should be run on a regular basis so that it can append newly generated transaction information.
WARNING: The Crystal Reports will not work if the consolidated files are not created.
Make sure the session is closed.
Set the start date to use in generating the consolidated files by going to File->Setup and entering the desired date (This need only be done the first time the consolidator is run.)
Click on the Update All button to start the consolidation process. This process can take a long time to complete, depending on the consolidation start date and the amount of transactional data present, so be patient!
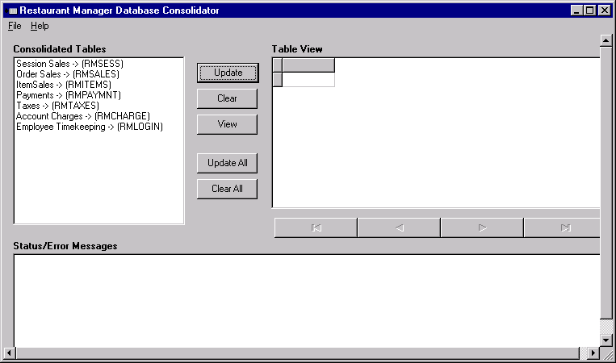
Select the consolidated file you wish to inspect, and click on the view button. A list of the records will appear in the window on the left.
Following is a list of the transaction files that are consolidated alongside the name of the consolidated file (mm = month, yy= year).
|
Source Transaction Filename |
Consolidated Filename |
Description |
|
REPyy |
RMSESS |
Session Data |
|
SLSmmyy |
RMSALES |
Order/Check Summary Data |
|
PMTmmyy |
RMPAYMNT |
Payment Data |
|
SDETmmyy |
RMITEMS |
Items Detail Data |
|
LOGINyy |
RMLOGIN |
Timekeeping Data |
|
TAXmmyy |
RMTAXES |
Taxes Data |
|
CHRGmmyy |
RMCHARGE |
Account Data |
The following Crystal dictionaries are provided with Restaurant Manager:
Both these dictionaries require you to setup a file DSN to point to the RM Working directory as described above.
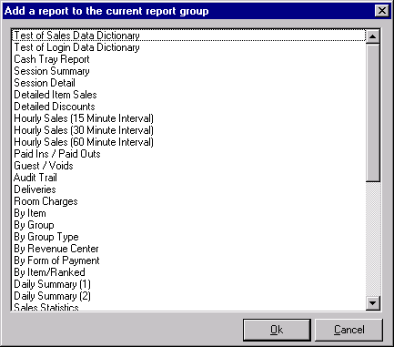
Restaurant Manager ships with the following reports using the Crystal Data Dictionaries:
Before attempting to create your own reports using the RM Crystal Data Dictionaries, make sure these reports run correctly with your consolidated data. Note that if you have not consolidated your data, these reports will fail.
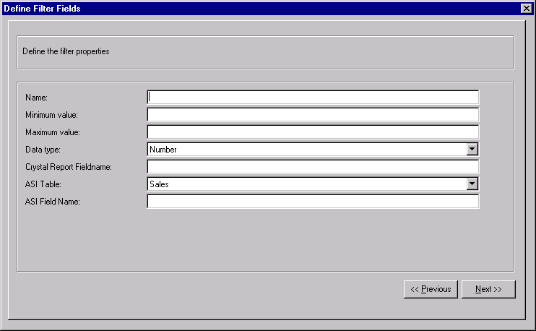
To Create a Crystal Report to use with the Reports Interface
Decide which filter fields will be visible to the user. If necessary, add filter fields to master field list by use of the Define Filter Fields Wizard (Setup->Add/Modify available filter fields) IMPORTANT: You must type in the crystal reports field name exactly as it reads in the data dictionary respecting case.
Redundancy provides insurance against catastrophic failure by automatically writing all data not only to the file server but also to a second computer that has been designated as a backup server. Although total failure of the hard-drive is not a common occurrence, it is a very costly problem when it occurs. Implementing system redundancy is highly recommended for all networked systems.
One way to implement redundancy is to define one of the POS Workstations as the backup server. ASI uses a 3rd party product called Mirror Folder, which implements server data redundancy at the file system driver level. Mirror Folder supports Windows 98 or later.
Restaurant Manager utilizes a program call RMNetmon in conjunction with Mirror Folder to offer an industry leading redundancy package. RMNetmon (Restaurant Manager Network Monitor) is a background program that constantly monitors the network for the presence of the rmserver If configured, in the event of network failure, RMNetmon will ask if you want to implement the backup server.
Full instruction on the installation can be found with the document: Restaurant Manager Failsafe Guide
By default, Restaurant Manager uses a native database driver to access all the fixed and transactional data in the system. But power problems and other networking issues can sometimes corrupt data when it is communicated across network. To eliminate problems with data corruption, local and remote database servers can be installed on the system. For best performance and data stability, the use of an Advantage Remote Database Server is recommended.
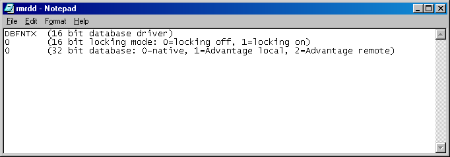
The Advantage Database Server must first be installed and configured on the rmserver. An interface to the Advantage Database Server can then be setup using the following Restaurant Manager™ file: < RMRDD.INI >.
To configure a Restaurant Manager system with the Advantage Database Server you must modify the RMRDD.INI file using the Windows Notepad application:
- ACE32.DLL
- ADSLOC32.DLL
- AXCWS32.DLL