(continued from Gratuities Service Charges)
This chapter uses the following terms to explain the configuration of printed invoices that are presented to customers:
Guest Check – A guest check is a detailed summary of all the menu items ordered by the customer. Guest Checks are always printed prior to settlement and are usually generated by pressing the [PRINT] button on the Order Entry Screen. In systems configured for delivery, guest checks may also be printed automatically when an order is assigned to a driver. Because guest checks are always printed prior to settlement they never include information on payment tendered but they always details all the menu items ordered by the customer.
Sales Receipt – A sales receipt is printed after payment has been tendered. A sales receipt always details the payment (or payments) made by the customer. Restaurant Manager provides a number of configuration settings that control the printing of sales receipts. You may choose to print “detailed” sales receipts that list each menu item on the order just like the guest check. Alternatively you may choose to print “condensed” receipts that simply sub-total the prices of all the items on the order. You may configure the system to print both of these receipt types automatically every time a transaction is settled. Or you may also configure the system to ask if you wish to print a receipt on each transaction. From the POS Modules you may also
Order Number -- Every time an order is opened, Restaurant Manager automatically assigns a number to the order in sequence. Even if the order is voided the order number remains linked to the voided transaction. Guest Checks and Sales Receipts may both be configured to show an Order Number.
Check Number -- If you use the Restaurant Manager assigns a unique order number for each and every transaction. The order number starts from 1 and advances indefinitely. As time goes on, the order number could become very large, perhaps 6 or 7 digits. In many operations, this is not an issue; however, if you use the order number for calling out orders to customers, or for matching kitchen chits to printed guest checks, you may want to restrict the order number to 2 or 3 digits. The system will still track the full order number internally, but when printing to the kitchen, or on the guest check, the order number only shows the last 2 or 3 digits as specified by this setting. Example, if the order number is 1234567 and this parameter is set to 3, and then the system will print order number 567 on the kitchen and on the guest check function in the POS Module(s) to print an order on a guest check, the system assigns a “check number” to the order that is independent of the order number. Orders that are not printed prior to settlement are not assigned check numbers. The default configuration includes a standard format for guest checks and sales receipts that works well in many restaurants. However, Restaurant Manager allows you to edit this standard format and even create multiple formats that can be linked to different Revenue Centers. You can also configure a template to print different information depending on which POS Module was used to open the check.
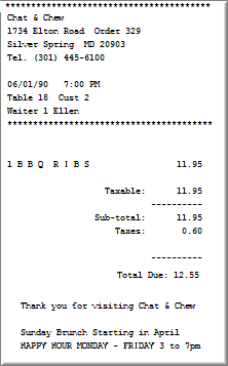
The guest check includes a header with information on your business and, on the body of the check, details on the items ordered, the sub-total, the sales tax and the amount due.
The format of the guest check can be modified from the Configurable Guest Check Editor. Unless you wish to alter the default format of the guest check, however, you need only access the Standard Guest Check Editor to add a customized message to the bottom of the guest check.
The following setup forms also affect the guest check:
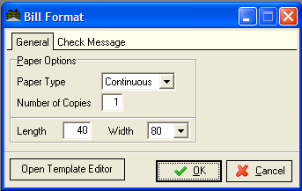
The Standard Guest Check Editor handles the basics in the bill format. You can copies printed and paper type. This form also allows the user an easy message to add to message to the guest check.
The fields in the Bill Format Setup Form are organized under two tabs:
Bill Format, General Tab fields
The General Tab is divided into three sections. The following fields under the "General" tab affect the format of the guest check:
You can add a customized message to the base of each guest check and change the message as often as you wish. Whenever you change the message, the changes are applied instantly at all POS stations throughout the system.
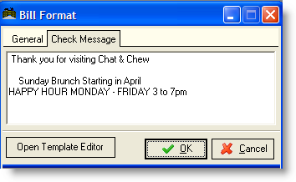
To add a message click on the "Message" tab and type in your check message formatted just as you wish them to appear on the check. (In other words, if you wish the message to be centered on the check, you must center each line on screen by using the space bar.)
The options print Send Options section of station configuration control various prep area and print functions. You can enable prompts that require confirmation to print a check or a warning a check has not been printed when going into settlement. You can also configure items that will print on the guest check (modifiers) or to a prep printer (ingredients). In addition, you can automate printing functions for both guest check and remote printers for both security and ease of use. Use the [Search Setting] button at the bottom of the form to find settings when configuring station Print/Send options,
NOTE: Activating this option does not affect how Menu Items are displayed on the Order Entry screen. Here items always appear in the order in which they were entered.
Gin & Tonic 3.50
- Rocks
0.50
- Price Roll-Up- When Price Roll-Up is enabled, the price of the modifier is rolled-up to the item, but the modifier is still printed on the guest check.
Gin & Tonic 4.00
- Rocks
- Modifier Roll-Up- When Modifier Roll-Up is enabled; the entire modifier including the price is rolled-up to the item (the modifier is NOT printed on the guest check).
Gin & Tonic 4.00
Consolidate tax description- Type the name or term you wish to denote the consolidated taxes in this field setting
Allow printing w/ unsent items- Enable this option to allow printing guest checks when there are held items or delayed send items. Do not enable this option if you want tighter security and reduce the potential for theft.
Print Value added taxes- Enabling this function will print VAT taxes on the guest check. Additional setup will be needed in the Guest Check Configuration Editor.
Old Settings- The following are old settings (prior to ver 16) now configured in the Guest Check Configuration Editor.
The configurable Guest Check Editor is where you can make extensive changes to the guest check. You can add lines for revenue centers, signatures, gratuities. In additional you can arrange where text appears on a guest check and add a logo.
Restaurant Manager allows you to create multiple templates based on revenue centers for formatting guest checks and sales receipts. The default configuration includes a standard template that creates checks and detailed receipts that look like this:
There is no need to edit the standard template unless you wish to modify this format. Some common reasons for modifying the standard template include:
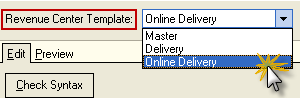
Restaurant Manager allows you to create a different template for each Revenue Center defined on the Revenue Center Setup Form. Once you create a customized template for a given Revenue Center, checks for all transactions linked to that Revenue Center will be printed in this format.
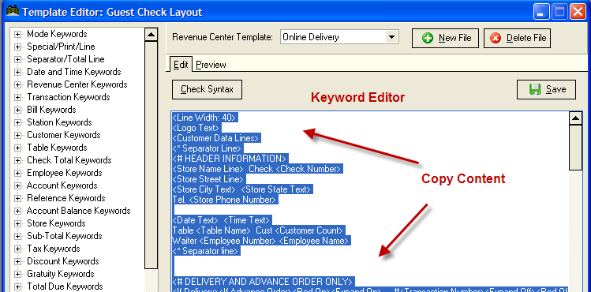
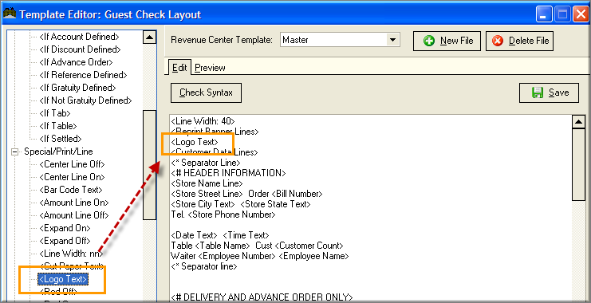
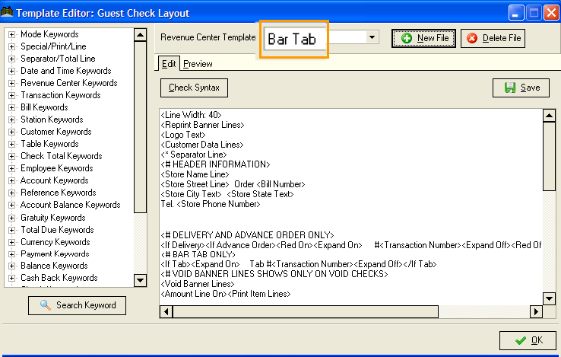
Guest check templates are built with “keywords” that translate data from the various Restaurant Manager databases into printed output. The templates are built on the on the Guest Check / Receipt Format Setup Form below.
The Guest Check / Receipt Format Setup Form is comprised of four main areas:
There are thirty two different categories of keywords. Each named category contains a list of keywords relevant to the function it performs on the guest check (i.e. the discount category contains discount keywords). Keywords appear in the folder cased in <brackets>. It is these keywords, including brackets, which you will transfer to the Template Editor. The following is a list of the different Keyword Types”
Standard keywords appear in the template in <brackets>. The brackets contain an expression that will be replaced with actual data when the check is printed. For instance the standard keyword <Check Number> is always replaced with a specific check number when the check is printed.
Some standard keywords represent a specific piece of data from the Restaurant Manager database. Other standard keywords insert multiple bits of information into the template, usually a label and some data. Keywords that include the following terms will add multiple bits of information to the template: “Info”, “Line”, and “Lines”. For instance, when you add the <Payment Lines> keyword to the template the printed check will display the form of payment plus the amount tendered. And if multiple payments were made on the check <Payment Lines> might look like this:
Keywords that include the following terms add only one piece of data to the template: Amount, Count, Number, Name, and Text.
Any character, space or number typed into the template and not enclosed in <brackets> is a literal keyword. Literal keywords are printed on checks and receipts exactly as they appear in the template. In the screen shot above “Check #” is a literal keyword.
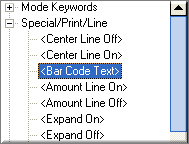
Special keywords control the way printing is formatted and other options such as converting the check number to a bar code, or directing the printer to cut the paper, etc. Many special keywords must be used in pairs. For instance, to print an employee name in red you would use the pair of special keywords below:
<Red On> <Employee Name> <Red Off>
The [Check Syntax] button on the setup form is especially useful for identifying places where you might have added the <Red On> keyword to a template but neglected to also add the <Red Off> keyword. There are also some special “Separator Lines Keywords” that allow you to add lines to the template.
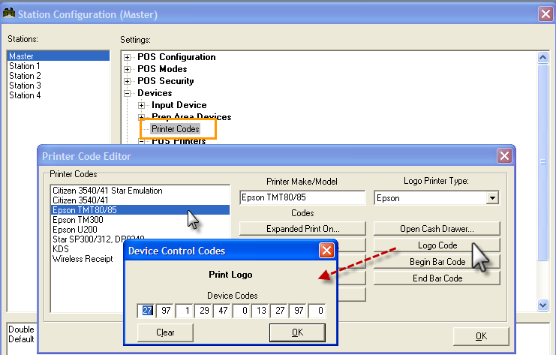
The specific numeric printer codes that control the model of check printer installed on your system may be inserted directly into the check template. These printer codes must always be typed in <brackets>and can be useful in sending printer command codes as defined in the printer manual. Device Control keywords do not appear on the Keyword List. You must research them in the printer manual and type them directly into the template.
Mode keywords are used to specify when space on a check should be used to print certain information and when the space should NOT be used to print information. All mode keywords work in pairs. The first keyword in the pair always begins with <If …> and the ending keyword always reads “end if” : </If….> some mode keywords allow you to print certain information only when operating a particular POS module. Mode keywords like <If Table> or <If Tab> specify that the literal or standard keywords between the mode keywords will only print if the indicated module is in use when the check is printed.
Other mode keywords are dependent on data in the transaction, itself. For instance, if you wish to print a discount amount on the check if and only if the system has applied a discount to the transaction you would use these mode keywords around a standard keyword:
<If Gratuity Defined>
<Gratuity Line>
</If Gratuity Defined>
If the template did not include these mode keywords but, instead used only the <Discount Amt> keyword, the discount line will always appear whether or not a discount was applied to the transaction.
Mode keywords can be used together as indicated in the examples below:
<If Table><If Tab>
<Gratuity line>
</If Table></If Tab>
<If Gratuity Defined><If Reference Defined>
<Customer Count>
</If Gratuity Defined></If Reference Defined>
<If Table><If Gratuity Defined>
<Gratuity Line>
</If Table></If Gratuity Defined>
Please see the Section on Keyword List for a complete listing of all available Keywords.
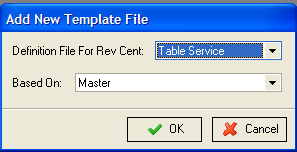
To create a new template for a guest check or sales receipt:
On the template editor use the [Search Keyword] on the bottom of the form and type “bar code, then click on the [Search] button:
Note: You can center the bar code on the guest check using the following print commands in the Guest Check Configuration:
<27><97><1><Bar Code Text><27><97><0>
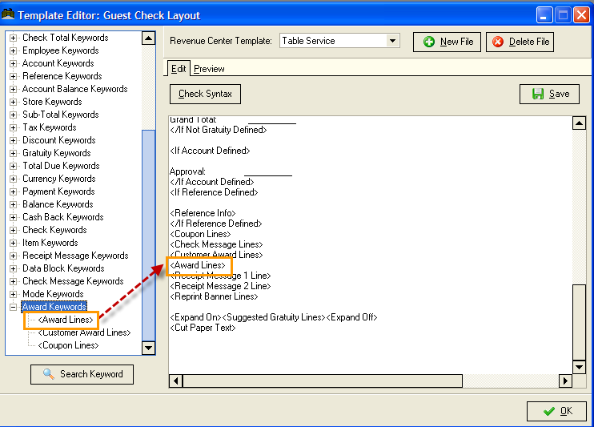
On the template editor use the [Search Keyword] on the bottom of the form and type “award”, then click on the [Search] button:
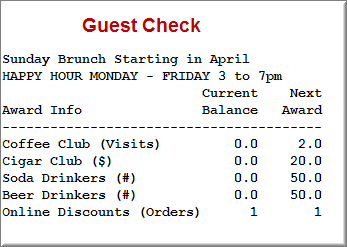
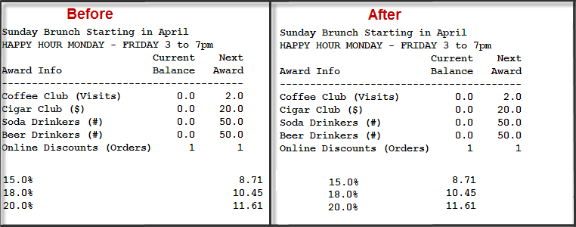
You can affect changes to the positioning and size of the text on the guest check. We will illustrate how to center and expand text using the “Suggest Gratuity Percentage” keyword in the example below.
In the Configurable Guest Check Editor:
The syntax should look something link this:
<Line Width: 30><Center Line on><Suggested Gratuity Lines><Center Line Off><Line Width: 40>
Below is a screen shot of a before and after. Notice the suggested gratuity is now centered:
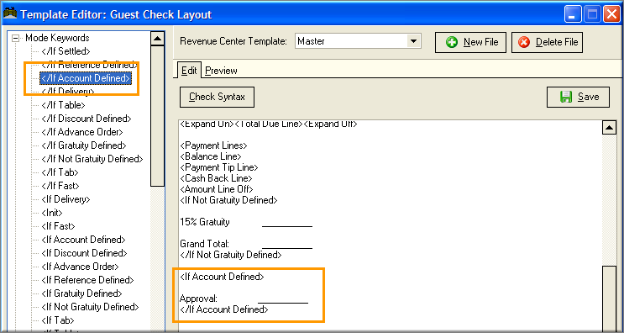
You can add signature lines or other text to further customize the guest check. You can add text to appear any time by simply typing in the text and you can make it contingent on a module or perhaps the account module. In the sample screen shot below, we have placed the parameters on the “Approval:” line to print only when an account has been defined using the Account Mode keywords:
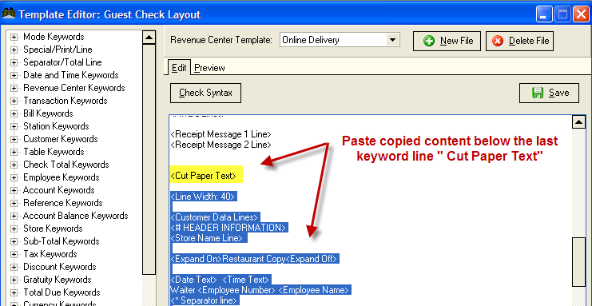
Your establishment may have a need to print several guest check at the same time. In most circumstances this occurs when both customer and the establishment need a receipt. As example, a hotel restaurant may need a signed receipt for their records and need to provide a receipt for the customer needing to be reimbursed. The following are instructions how to program exact receipts and receipts that may vary slightly.
This process is relatively easy. We will accomplish this by doing the following steps:
Now every time an order is printer associated with the Revenue Center (i.e. OO Delivery) two guest checks will print out.
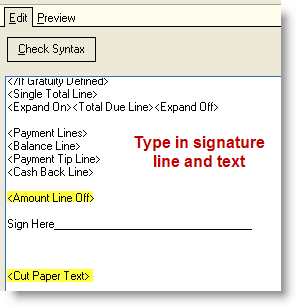
There may be some circumstances where you need two guest checks but the second is abbreviated. In our next example will an abbreviated second copy of the check guest minus the menu items but with a signature line for verification. We will follow we follow the steps outlined in the section above and then do the following:
You may want to add additional space separation between the signature line and cut paper keyword by going to the line directly below the signature line and use the “Enter” key on the keyboard.
The end result should look something like this:

Your system can also issue sales receipts after payment has been processed. The sales receipt shows payment types and amounts, as well as the change due or tip amount. You can print sales receipts in either detailed or condensed format. The detailed format includes all the detail from the guest check while the condensed print both guest checks and sales receipts. Both sales receipts show the basic order number, NOT the check number. The format of the sales receipts cannot be adjusted.
You must configure your system to issue sales receipts from the Revenue Centers Setup Form. Thus, you can choose which sort of receipt to issue for which Revenue Center. You can even configure your system to prompt as to whether or not you wish to issue a receipt.
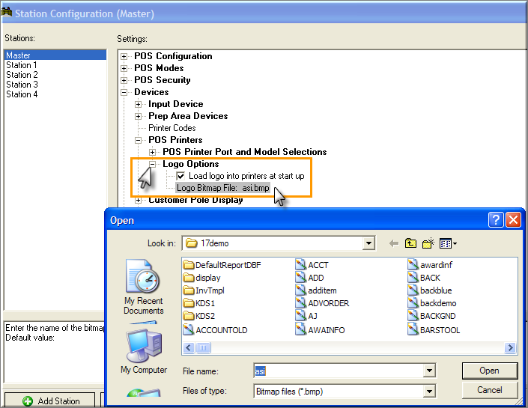
If you are using thermal check/receipt printers you can configure Restaurant Manager to print a bitmap at the beginning of the check.
Restaurant Manager can load a logo to be placed on the guest printer. The logo should be a bitmap with the dimensions of 400X200 that has been formatted in monochrome black and white colors. The following are the steps to place the logo on the guest check: step process:
NOTE: The maximum allowable size for the bitmap is 400 by 200 and should be a design that shows well in two monochrome colors (black and white).
You can print a guest check as many times as you program the system to allow. The typical process is to use the [Print] function button on the Order Entry Screen.
You can control how many times a check can be printed by a line employee by placing a security level on the [Re-Pint] function button using the POS Function Button Layout form.
Printing Multiple Checks at Once
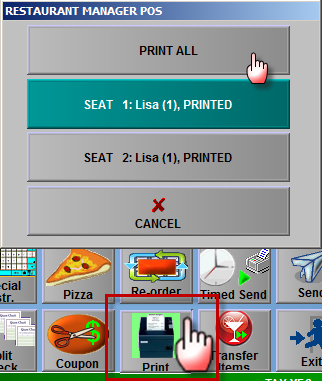
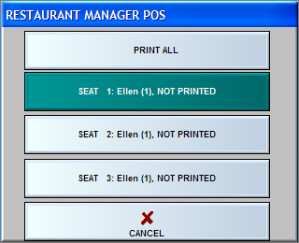
If you have separate check and wish to print all the checks at the same time you can use the [Print] function button and then choose the [Print All] button on the prompt. You can also choose to pint one check at a time using the same prompt.
You can re-print a guest check from anytime within the current year using the [Re-Print] function button typically found in the [MISC] functions of the Main Status screen.
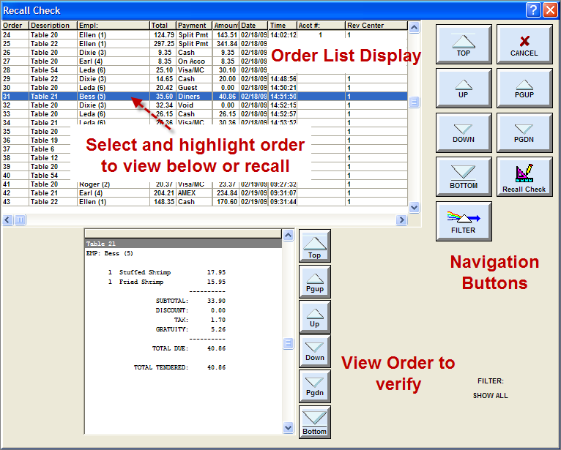
Pressing the [Re-print] button will trigger a viewing screen. On the right of the screen you can use the navigation buttons to move up and down the screen to find more recent orders. You can select and highlight order on the Order List Display section of the screen and view check area on the bottom of the screen. Once a check has been found you can print the check using the [Print] button located next to the navigation buttons.
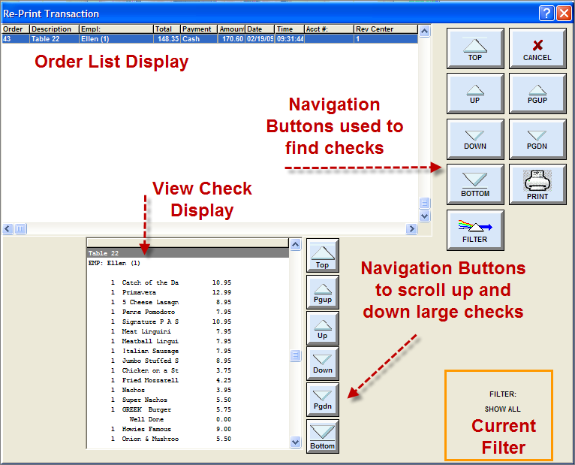
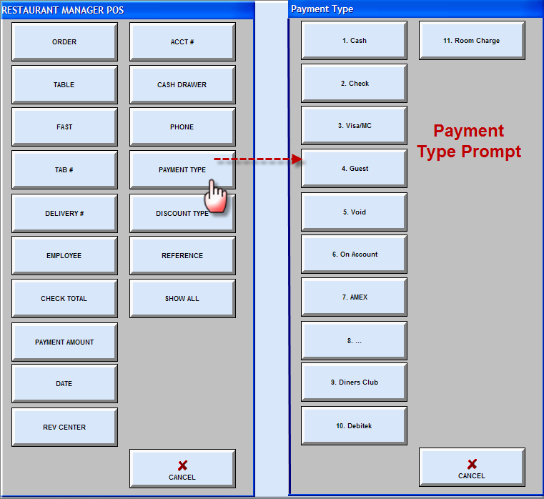
You can use the [Filter] button on the screen to narrow down the search parameters. The filter button will affect another prompt with a list of filters that in themselves will bring about another prompt relevant to the button name.
The Recall Check function requires the TAB Module when using the Table Module Recalled checks will not re-open the table were the order was originated. Rather, recalled check will be placed and named accordingly on the Tab screen This is to prevent from placing one order on top of another (example: table turnover). This function should be used to manipulate items on an order or to re-open if closed by mistake. In the latter scenario, you can transfer the tab to the old table if needed. You can recall a check by using the [Recall Check] button typically located within the MISC functions of the order entry screen.
Recalled delivery orders do not require the TAB Module. Settled delivery orders will be recalled and placed on the Delivery Main Status screen. The same rules for delivery orders apply for Quick Service orders.
The [Recall Check] button will affect a new screen where you can navigate the screen for the wanted order. On the right of the screen you can use the navigation buttons to move up and down the screen to find more recent orders. You can select and highlight order on the Order List Display section of the screen and view check area on the bottom of the screen. Once a check has been found you can recall the check using the [Recall Check] button located next to the navigation buttons.
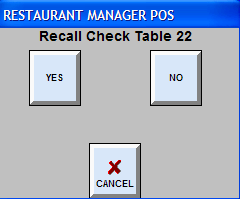
Once you select and recall the order a prompt will appear asking to confirm to process. Select [Yes] if you want to proceed.
Another confirmation prompt will be triggered if you press [YES] to continue the process. This prompt is confirming that the system is removing the payment associated with the order from the system. The system does this to insure proper balancing procedures are in place. The system will always look for the drawer at the station you are recalling the check from. It is best to recall an order from a station that does not have a drawer attached unless the drawer belongs to the employee whom the drawer is assigned to.
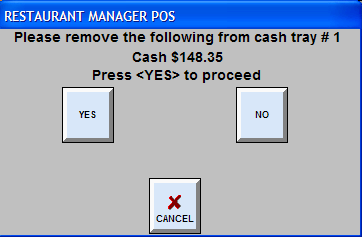
By answering [YES] to the prompt shown above will complete the process and send the order to the Tab screen.
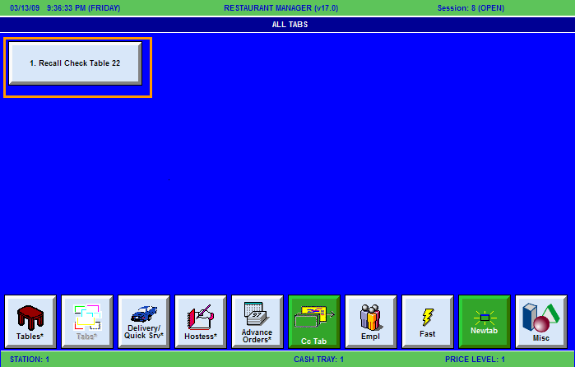
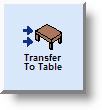
Notice on the above screen shot above the new tab button lists “Recall Check Table 22”. Tabs created from recalled checks will always list this information to make it easily discernable from other tabs. As stated above, you can transfer the tab to a table using the [Transfer to Table] function button found in the [MISC] functions of the Order Entry Screen.
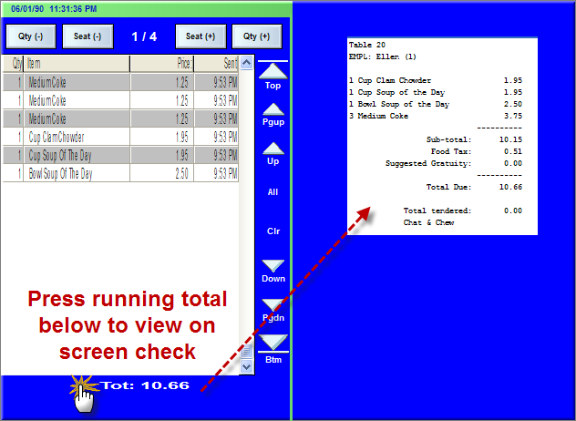
You can always view the check without printing the check by pressing on the running total at the bottom of the Order Detail Area. This feature is useful for establishments limiting the number of re-prints or those wishing to reduce paper consumption.
An alternative to split checks is the Print Seat(s) function more often than not found in the [MISC] function of an Order Entry Screen. The use of the function requires menu items to be assigned seats in advance. This function will print a single check with a seats sub-total or s single check with seat subtotals depending on the parameters entered at the POS.
Printing One Seat
To print just one seat, open an active order, press the [MISC] button, find and select the [Print Seat(s)] button.
Pressing the button will trigger another screen. The screen will display the available seats and a [ALL SEATS] button. The amount of seats shown is dependent on the amount of seats assigned during the ordering process.

Once a seat has been selected (tagged) the seat button will turn red. In the illustration above we selected only one seat. Once we have or seat selected when press the [OK] button to move to the next screen.

The print mode screen gives the user two options: Print Separate and Print Combined. The [Print Separate] option will print separate seat totals and a check total if more than one seat is selected. The [Print Combined] will print combine all seat totals similar to using the Print function. Both will have the same affect when only choosing one seat.
Printing Multiple Seats
To print multiple seats, open an active order, press the [MISC] button, find and select the [Print Seat(s)] button.

Pressing the button will trigger another screen. The screen will display the available seats and a [ALL SEATS] button. The amount of seats shown is dependent on the amount of seats assigned during the ordering process.

You can select several seats by tagging each seat or you can use the [All Seats] if you want to separate and print all seats. Once the seats have been selected (tagged) the seat buttons will turn red. In the illustration above we selected [All Seats]. Once we have or seat selected when press the [OK] button to move to the next screen.
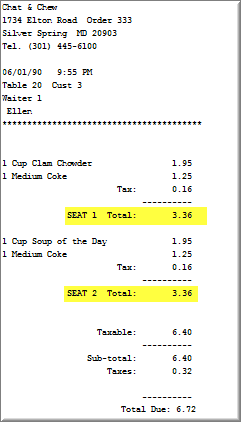
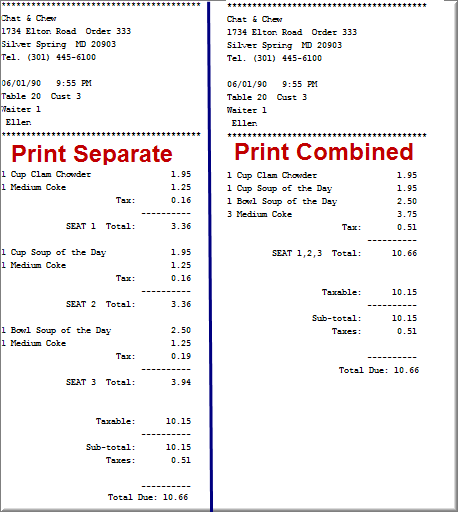
The print mode screen gives the user two options: Print Separate and Print Combined. The [Print Separate] option will print separate seat totals and a check total if more than one seat is selected. The [Print Combined] will combine all seat totals from the seats selected. The illustration below shows how a check will look when we use the [Print Separate] button and the [Printed Combined] button.
The Split Check function allows the end user to take individual menu items ordered and place them onto separate guest checks. This function also is capable of splitting individual menu items and assigning them to any number of seats. When you are working in Table Service or Tab Mode you can actually split a single order into multiple checks that print out separately. The maximum number of split checks is 99. If you wish to fast transaction into multiple checks, you must first transfer the order to a tab. Delivery orders cannot be split into multiple checks.
The Split Check allows for easy navigation for large orders. If you have large amount of items with a seat column you can use the up and down navigation arrows. You can also change the order in which the seat columns are displayed. In addition, the Split Check mode incorporates several methods to transfer multiple items between seats within a split check at a time by clicking on the column heading or using the Select function. The Split Check mode offers two methods to add seats making splitting check all the more easier. The Split Check process is expedited when menu items are assigned seats during the ordering process. Upon entering the Split Check mode, the same number of seats will be created and the menu items associated with these seats will be automatically assigned.
The [Split Check] function button is found on the function button bar or within [MISC] functions of the order entry screen of tables and tabs. The Split Check process is expedited when menu items are assigned seats during the ordering process. Upon entering the Split Check mode, the same number of seats will be created and the menu items associated with these seats will be automatically assigned.
Restaurant Manager uses the terminology of “Seats” when referring to a split check. This terminology is used to remain consistent with the term seat used on the Check Display. ’
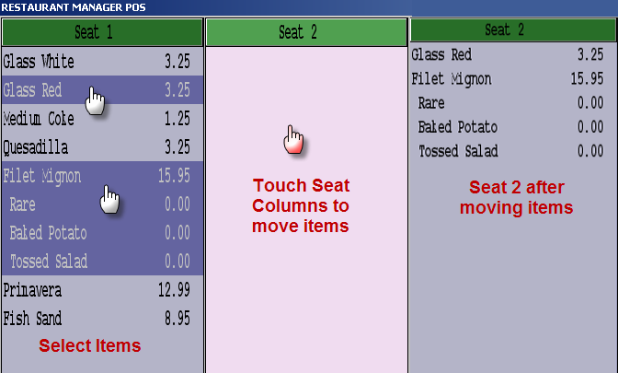
Splitting checks in Restaurant Manager is an easy operation. After opening a table/tab find and select the [Split Check] function button. The default Split Check screen automatically opens two seats. If needed, you can add seats by using [Add] button at the top of the function buttons on the right of the screen or select the [S:1] or [S:2] buttons located at the bottom of each seat column and use the [Add Seat] option. By default, all menu items will appear on the Seat 1 column if not assigned seats during the ordering process. Items selected will remain highlighted until they are touched again. Items with modifiers will be highlighted in their entirety. Select one or several items from a seat column (seat 1). You will notice the item/s will be highlighted and the print will change colors. The next step is to touch the seat column where you want to move the menu items to. Once the items are moved you will notice the column selected will turn a new color.
In the example below, we will select the “Glass Red and the “Filet Mignon” on Seat 1 and move it to Seat 2.
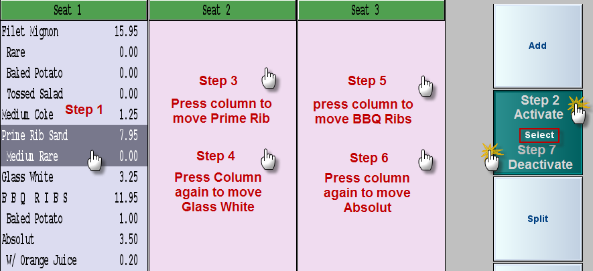
Restaurant Manager has a unique feature that makes splitting large checks relatively easy when menu items have not assigned seats during the ordering process. The [Select] function button on the right of the screen will allow the user to touch one item to be moved in the seat column, select the new seat. Each item listed directly below the original item will follow every time the destination seat is touched. You can add another seat if desired and continue the process. The Select button will turn a cyan color when activated and Seat 1 column will flash. The [Select] button will remain active and must be pressed again to deactivate. Deactivation is verified by the [select] button returning to its original color (gray) and Seat 1 column will stop flashing. This function is best utilized when both food and beverage are ordered in sequence for each seat.
In an example to demonstrate this feature, we will add a new seat and add items to three seats. Notice that entrees and beverages have been ordered in sequence. We want the Filet Mignon and Medium Coke to stay on seat one so we start by highlighting the Prime Rib Sandwich and then press the [Select] button: Next, we touch Seat 2 column again. The “Glass White”, having been located directly under the Prime Rib, will move into Seat 2. To complete the order, we will touch the Seat 3 Column to move over the remaining menu items. Our last step is to press the [Select] button the end the process. If seat assignments are satisfactory, we will save our changes and exit the Split Check mode by hitting [OK].
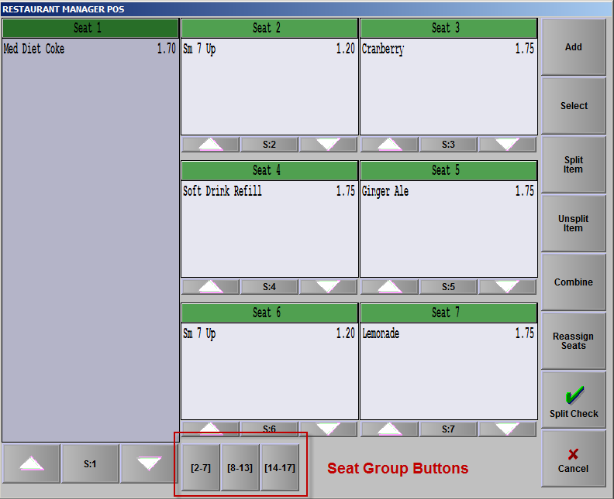
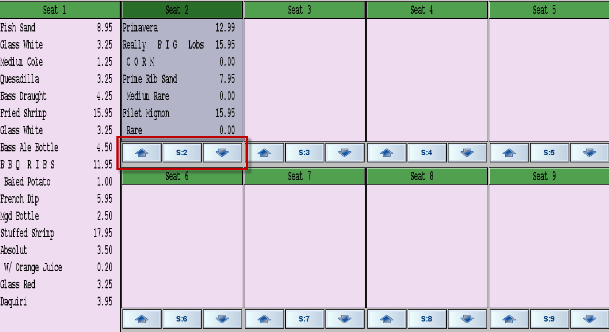
There may be an occasion where you need to add items to a seat on a split check but the seat is not visible. This will happen when the amount of seats exceeds the amount of configured rows and columns allowed for the Split Check screen. Depending on how many columns and rows your split check interface has been configured for, you can navigate seats using the Seat Group buttons on the bottom of the screen. Example: the system is configured to have two rows and three columns. In this scenario, seats 1 thru 7 will appear on the screen by default (see picture below). Adding an eighth seat will create a new group of seats: adding a fourteen seat will yet create another group of seats. The group of seats containing the seat number you wish to move menu items to (or menu items needing to be reassigned to another seat) are accessed by clicking the related Seat Group button.
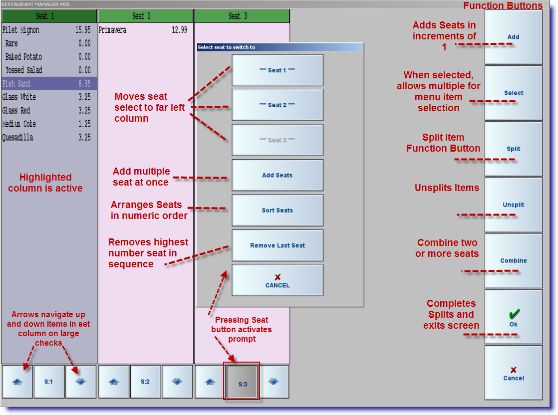
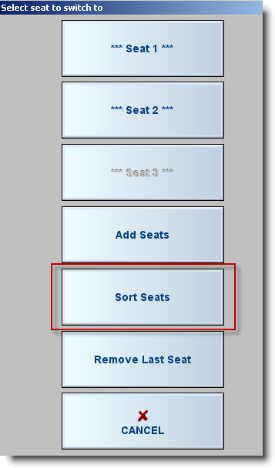
Another method to access seats not visible is to select any seat number at the bottom a cell (e.g. S:1, S:2, S:3, etc) and selecting the seat you wish to access from the available options within the "Select seat to switch to"prompt. Seat cells can be returned to a normal alignment by using the seat number at the bottom of a cell and select the "Sort Seat" option within the "Select seat to switch to" prompt.
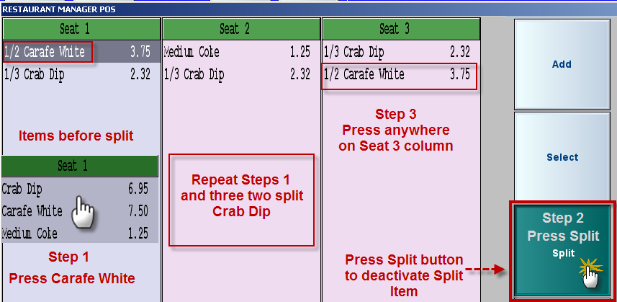
There may be an occasion where customers will be sharing a menu item, require split checks, and want the shared item to be split. Examples may by two people sharing an appetizer or several couple sharing bottles of wines. Restaurant Manager can handle split items in an easy and efficient manner. All you will need to do is select the item you want to split, touch the [Split] function button, and the select the seats where you want to potion the menu item. You will notice the column with the item select will flash signify the “Split” function has been activated as well the [Split] button will turn a cyan color. The last step is to press Select button a second time to deactivate the function.
You can split an item any number of ways. In the example below we will split the “Carafe White” two ways placing the splits on Seat 1 and Seat 3. We will continue by splitting the “Crab Dip” across all three seats. Notice the fractions in front of each menu item signifying the portion of the menu item that each seat will be responsible for. For our example, we will begin by selecting the “Carafe White” and then press the [Split] button. Since seats 1 & 3 are sharing the carafe, we will press anywhere in the Seat 3 column. The carafe will follow but you will notice it now has a (1/2) in front of the name. Next, we will split the “Crab Dip” three ways. We will select the “Crab Dip” on Seat 1 and then touch each Seat column to complete the three way split. If we are satisfied with the split we will finish the process by pressing the [Split] button to deactivate the feature and then [OK].
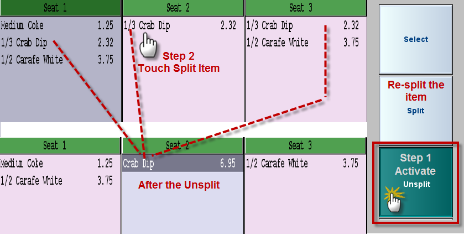
There are two ways to un-split an item within the Split Check function. The first way is when you are still in the Split Item mode. Simply touch the fractional menu item on the seat column that you want to move. The fractional item will move back to the originating seat number. You can then proceed to reassign the item split to another seat if needed. If you have left the Split Item mode you will need to use the [Unsplit] function. Using this function will bring all fractional splits associated with an item back to the original whole amount on whatever seat you select. You can then re-assign the splits using the Split Item function after deactivating the “Unsplit” function.
In our next example, we will un-split the “Crab Dip” using the [Unsplit] function. First we will press the [Unsplit] button to activate the function. You will notice the button will turn a cyan color signifying the function is activated. Next, we have selected the “1/3 Crab Dip” on Seat 2. Once you have selected this all “1/3 Crab Dip” assigned to the other seats will combine into the whole on Seat 2.
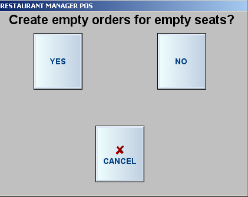
Occasions arise when customers at the same, having requested separate checks, may want two seats combined. An example might be a table of four where two people are married and want their meals combined on one check. Once again, Restaurant Manager provides an intuitive approach to process requests similar to this scenario. In this situation we will use the [Combine] function located on the right side of the Split Check mode. First you need to select the source seat (seat with items to be moved), press the [Combine] button, and then select the destination seat (seat where items will be moved).You do not need to press each item individually. Restaurant Manager will intuitively select all items assigned the source seat automatically for you. Again, you will notice the [Combine] button will turn a cyan color, the source seat column will flash, and the destination seat will flash when the menu item have been moved. This process will produce a seat with no items assigned. This will result in a prompt asking if you want to “Create empty orders for empty seats?” after pressing the [OK] when exiting the Split Check mode. If the seat is no longer needed you should select [No].
We will provide an example of demonstrate the process. The example will illustrate a table of four where seats 2 and 4 want their items combined onto one check. We begin the process by selecting Seat 4 (source seat), press the [Combine] button, and then press anywhere on the Seat 2 column (destination seat). All items on Seat 4 will move to Seat 2. Again we notice the [Combine] button will turn a cyan color and the seat columns will flash showing our active selections. Press the [Combine] button when finished to deactivate the function.
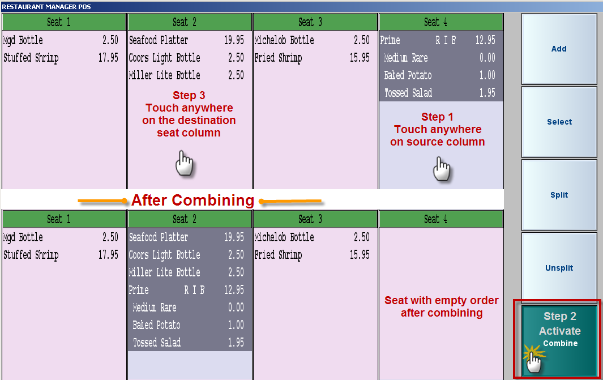
Another method to combine seats is to touch the seat heading at the top of the source column. This will automatically select all items in a column. The next step is to select the destination seat. All items will be moved to the destination seat.
There are two methods to reassign seats at the POS. The legacy method has been using the [Reassign Seats] function button within the Order Entry screen. A new method introduced in version 18 is to use the [Reassign Seats] button within the Split Check screen. Simply touch an item/items belonging to one seat and move it to another seat. Once the items have been assigned to the correct seats , tap the [Reassign Seats] button on the Split Check screen. You will be re-directed to the Order Entry screen after selecting the [Reassign Seats] button. You can verify changes on the Order detail section of the order Entry screen. Note: pressing the Reassign Seats button will not split the check.
The Restaurant Manager Split Check function has two different methods to add seats should the occasion arise. The first method is to use the [Add] button on the right of the screen. Pressing [Add] will add seats in increments of one. To illustrate, if we start with two seats and press the [Add] button, Seat 3 will be created. Repeating the process again will create Seat 4.
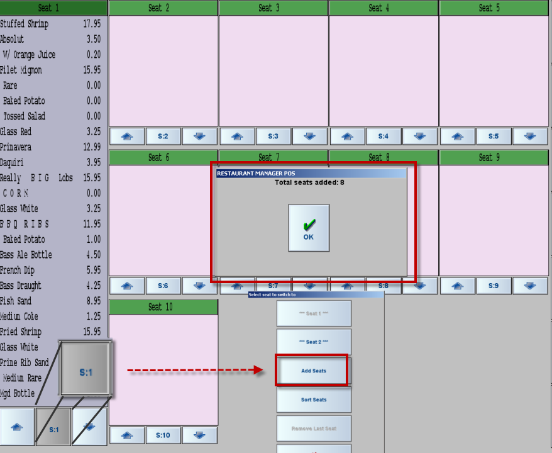
The above process is ideal for smaller tables but does not address large tables. Obviously, if you have a table of ten requiring split checks you would have to hit the [Add] button 8 times (default 2 + 8) before even splitting the items. That would not be considered an efficient use of keystrokes. To address this scenario Restaurant Manager has created s second method to add seats. To add multiple seats at one time, select any of the [S:X] buttons at the bottom of the seat column and select the [Add Seats] option. A numeric keypad will appear: press the required numbers of seats on the keypad you want add to the check. The number you select will add to the base amount you are starting with. So, if you have two seats and want 10, press 8 of the keypad. Press [OK] to exit the keypad. You will receive a message verifying the total seats added.
If you have inadvertently added too many seats you can remove the last seat number in sequence using the [Remove Last Seat] function found under any [S:X] button located at the bottom of each seat column. This function does as described: removes the last seat. Example: Seat 5 will be removed when using this function if you have five seats displayed on the Split Check screen.
However, you may have created extra seats which are often the need if using the “Pivot Point” system. You will need to do this if you want to keep items on the appropriate seat number when placing the order so the runner knows where to deliver the food without asking. In this scenario, you can proceed with the split check process. When you go to accept the split by hitting the [OK] button, you will receive a prompt asking if you want to “Create empty order for empty seats?” At this point answer “No”. This will cancel the empty seats and keep items in order on seats according to the way they were ordered. An example might be we have a split check with items on Seats 1, 3, and 5. Seats 2 & 5 are blank but you want to retain items on the other seats keeping the same seat numbers. Answering no will cancel seats 2 and 4 but keep menu items on seats 1, 3, and 5. The best way to illustrate this is below:
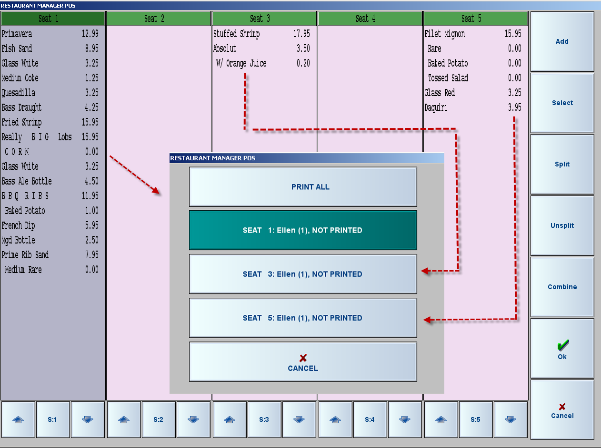
Notice in the above illustration the “Print” prompt shows only checks for seats 1, 2 .and 3.
Large split checks demand easy navigation functionality. Restaurant Manager provides this functionality. At the bottom of every seat you will find arrows pointing up and down. This allows navigation of menu items on Seat One when items have not been assigned seats during the order process. The Split Check screen will allow up to 25 lines per column including both menu items and modifiers. If the orders exceed 25 lines on one column, use the arrow down to access additional menu items. It should be noted that items in the column will appear in the order they were entered.
The navigation arrows will also aid on extremely large orders where Seat columns become smaller.
You can also change the order of the primary seat that appears in the far left Check Display screen. Press any [S:X] button at the bottom of a seat column and select the desired Seat number you wish to move. This will move the source table to the primary position and transpose the original table to the spot the source table occupied. In simple terms, Seat 1 and Seat 6 will swap positions if these are the tables used. See illustration below:
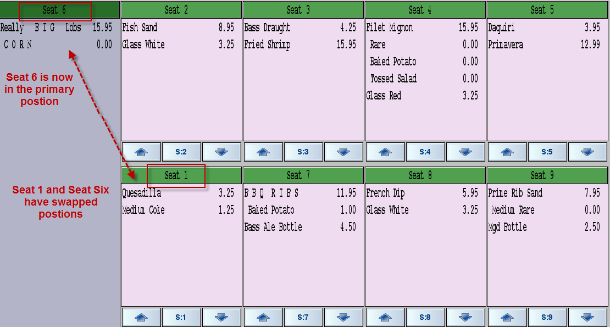
You can return to the original or default seat order by selecting the [Sort Seat] function when pressing any [S:X] button.
Depending on how many columns and rows your split check interface has been configured for, you can navigate seats using the Seat Group buttons on the bottom of the screen. Example: the system is configured to have two rows and three columns. In this scenario, seats 1 thru 7 will appear on the screen by default (see picture below). Adding an eighth seat will create a new group of seats: adding a fourteen seat will yet create another group of seats. The group of seats containing the seat number you wish to move menu items to (or menu items needing to be reassigned to another seat) are accessed by clicking the related Seat Group button.
There are two methods to un-split a check. The easiest method is to use the [Un-Split] button found in the [MISC] functions of the Order
Most system are typically are configured with the Print function button on the Order Entry Screen. Use the Print button to print split checks. After pressing the Print function you will be prompted to enter a specific seat number to print one at a time) or to print all. The number of seat buttons on the prompt is determined by the enters in the Split Check screen.
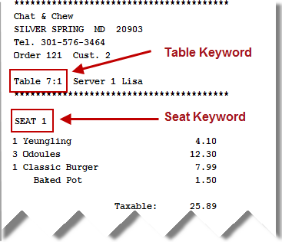
Seat numbers of split checks appear on guest check using Table or Seat Keywords
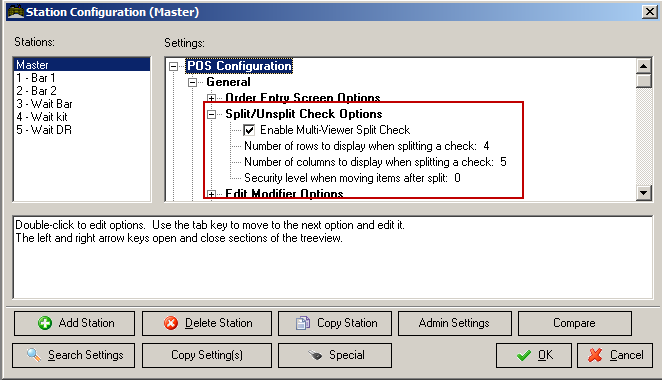
Restaurant Manager allows configuration of the maximum amount of columns and rows that contain the seats. Use the Search Settings] function at the bottom of the screen, type “Split/Unsplit”, and select the option listed in the “Search Results” screen. Use the following setting to customize your screen:
(continued in Function Buttons Macros)