The setup of RMKiosk is done in three parts:
Downloading and installing applications. Note: he RMKiosk app should be installed via iTunes on the rmserver computer.
Configuring Restaurant Manager
Configuring the RMKiosk application on the iPad.
Setup time will vary. Most of the setup will be adding pictures and descriptions to menu items in the RM BackOffice Module. It is recommended that you acquire both images and description well in advance to going live. RMKiosk does comes with a full set of demo data that is fully loaded with a sample menu and high-resolution images for the menu items.
The following Restaurant Manager packages are necessary for RMKiosk and must be install on the rmserver computer. .
Download and install RMWin build RM19.Beta.2013.0829 or later.
Use upgrade.exe to add handheld licenses for RMKiosk. Note- demo systems come with 2 handheld licenses enabled by default.
Download and install the latest WOPKG - RMKiosk uses the same communication infrastructure as the RM Handheld
Make sure you have a backup of the rmwin directory if you are upgrading from a previous version.
Restaurant Manager BackOffice configuration for RMKiosk is performed in the following areas:
Menu Setup - add images and menu item descriptions
Creating a Menu Navigation Set- used to navigate the menu on the RMKiosk app
Creating a dedicated RMKiosk Employee- employee will be linked to orders placed on RMKiosk. Having a dedicated employee will help track sales.
Create a Revenue Center - A dedicated revenue center will help track sales and control prompts at the POS.
Create a dedicated Station Configuration number - A dedicated station configuration for RMKiosk aids in routing prep tickets and linking RMKiosk to a dedicated revenue center
Configure RMKiosk Settings - used to customize messages and logo on the RMKiosk
Additional RM related setup will be required in ASI's SOAP Server Control Panel.
Menu items should be define with an abbreviation just like a RM Handheld item or they will not display on Rm Kiosk. Abbreviations are added under the General tab on the Menu Item Setup Form (Menu Setup) . The Abbreviation field is directly to the right of the Item Name field.
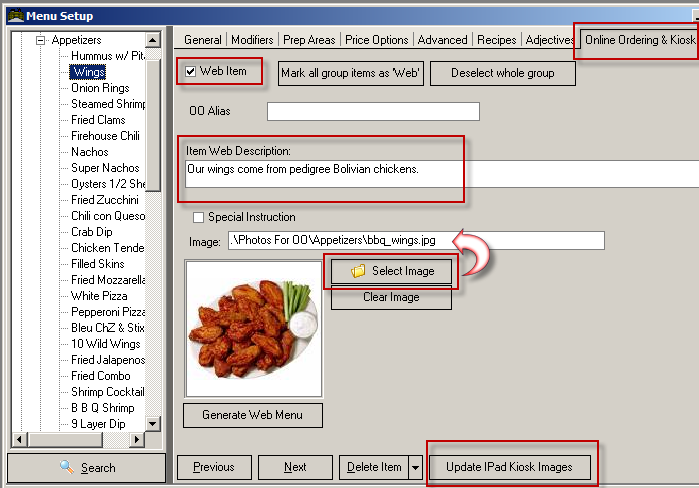
The ‘Online Ordering & Kiosk’ tab is used to add a hi-resolution photo and detailed description. Use the following option to configure how menu items will appear on the kiosk.
Web Item- must be enabled if you want item description to appear.
Item Web Description- Enter a brief description of menu item and/or nutritional values. Web Item must be enabled.
Images- use the "Select Images" button to add an image to the kiosk screen. Imported images should be added to the rmwin folder and may be placed in a sub directory in rmwin.
Update iPad Kiosk Images- use this button to upload image and menu changes to the kiosk. Images should be no larger than 400 x 400 pixels.
Be sure to click ‘Update iPad Kiosk Images’ when you have finished defining your menu or any time after you add new items and images. Item descriptions and images must be the same if using Online Ordering.
Modifiers are programmed as normal by attaching them to the main menu item. Modifiers do not need to be enabled as web items, be given descriptions, or images. Modifiers with prices attached will have the price displayed on the kiosk.
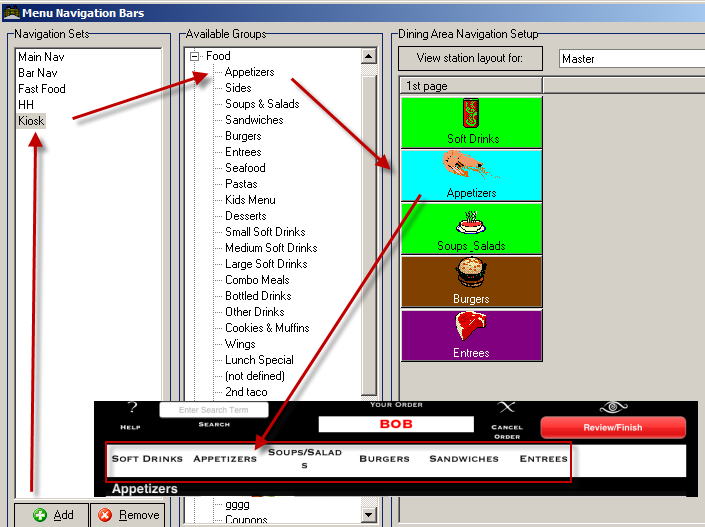
Similar to the RM Handheld, menu items displayed on the kiosk as rows are configured using menu navigation sets. You need to create a menu navigation bar that will correspond to the menu bar at the top of RMKiosk. Menu Navigation sets are configured in the RMWin Back Office Module à Setup à Menu Navigation. Click "Add" to add a navigation set and use the menu tree under the available Groups column drag menu groups to the buttons to the right. Use the "Remove" button to delete the last button in the set.
Additional setup will be needed in the SOAP Server Control Panel.
RMKiosk requires an employee to be logged in and assigned to the kiosk to process orders. A single employee can be used at all kiosks. You may want to consider using different employee numbers at each kiosk. Regardless of the number employees used, it is recommended you create a dedicated employee(s) to RMKiosk orders. Remember that the RMKiosk employee should have sufficient security to ring orders. The employee number and password will be used when setting up the RMKiosk parameters on the iPad.
Note: In case your system is setup to automatically log out employees at session close, it is important to remember that the RMKiosk employee be logged in at the beginning of each shift.
It is recommended that you create a separate revenue center for the RMKiosk. A separate revenue center will allow you to better tracking sales that originate at RMKiosk, assign different price levels if needed, apply a different tax table if needed, and set up unique settlement options. Revenue Centers. Revenue Centers are configured in the Restaurant Manager BackOffice Module. Access the Revenue Center Setup Form by clicking Setup àSettlement and Tips à Revenue Centers.
RMKiosk can take credit cards as a form of payment. Your POS system must have the Restaurant Manager Credit Card Interface enabled, configured properly in the station configuration, and have the necessary forms of payments created in Method of Payments Setup Form. In the Method of Payment payment form you can set up one form of payment for credit cards or have several payment types with each one dedicated for a specific credit card type (i.e. Visa, Amex, Discover, etc). You will also need a MSR attached to the tablet device as the Kiosk does not allow for manually entry of credit card numbers.
Note: Credit Cards are not finalized at the Kiosk. A tab is automatically created at the POS after the credit card is swiped at the Kiosk and a credit card receipt will be sent to the POS stations printer (defined in station configuration). Because the customer may wish to add to or remove items from their order after items are sent, the employee will have to manually finalize the CC transaction at the POS.
Once again, similar to the RM Handheld, you will need to assign the RMKiosk a station number in SOAP Server Control Panel. It is recommended you set up a dummy station configuration number dedicated for the kiosk. The same station number can be used at all kiosks. The benefit to using a station configuration separate from those assigned to the standard POS is that you can setup different revenue centers for sales tracking and price levels in addition to prep printer routing.
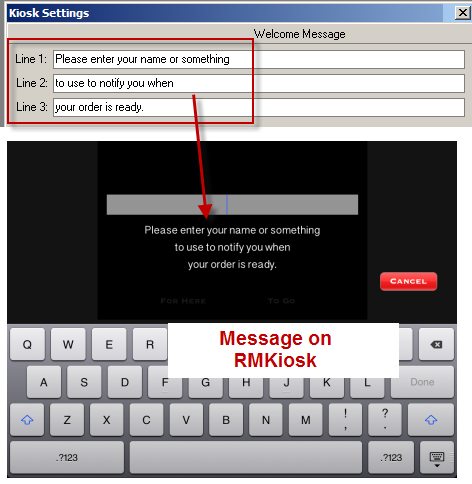
Use the Kiosk Settings Form in the RM BackOffice Module to customize a welcome message and post-send message. You can also add a custom Background image in the Kiosk Settings Form. The Kiosk Setting Form is accessed in the RM BackOffice Module by clicking Setup à General à Kiosk Settings. The Kiosk Form is dived into three sections:
Welcome Message- use the three lines of this section to enter a message that will appear on the RMKiosk after the customer presses the "Order Now" button. The welcome message should give the end user a hint on how to proceed with the order.
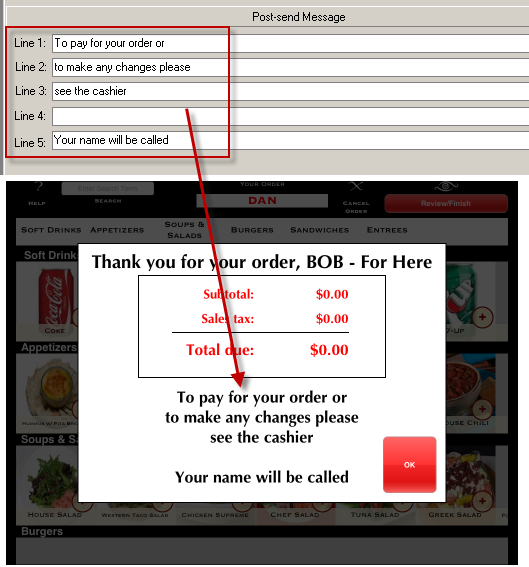
Post-Send Message- use the five lines in this section to customize a message that appears at the RMKiosk after the customer presses the "Finalize Order" button on the RMKiosk. The post send message should give the end user a hint on what to expect after the order has been sent.
Company Background Image - Use this field to add a logo to the default screen on RMKiosk. Use the ellipses button to browse for an image. Images can be PNG, JPG, or Bitmap format. The background image should be 2048 X 1536 pixels.
Use the "OK" button to save your changes.
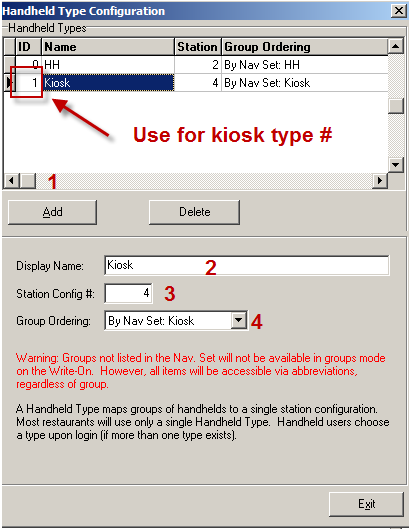
Rm Kiosk, like the RM Handheld needs to be configured to use a specific Station Configuration number and Navigation Bar by using a RM Handheld/Kiosk Type. Defining a kiosk type is done within the ASI SOAP Server Control Panel using the Handheld Type Configuration Setup Form. Only one kiosk type needs to be defined and be be used on all kiosks. Additional kiosks types only need to be created if you are routing prep order tickets to different prep printers or wish to offer different menu selections on each kiosk (using separate navigation sets). The form is accessed by opening rmservicesCPL (.exe), click "Setup" and then "RM Handheld/RMKiosk Types". Use the following steps to configure a kiosk type:
Click "Add"
Type RMKiosk name in the "Display Name" field. Example: RMKiosk, Kiosk, Kiosk2 (if creating more than one Kiosk Type)
Enter the station configuration number to be used in the Station Config# field box.
Use the drop down menu on the Group Ordering field to select the Menu Navigation set created earlier.
Make note of the ID - you will use this on the iPad in the Settings, RMKiosk section “Handheld/Kiosk Type”. iPad settings covered in the section Configure iPad for RMKiosk.
*Note: ID will generate automatically and cannot be changed.
Next Topic- "Configure iPad for RMKiosk"