Terminating RMKiosk Last Topic- "Setting Up RMKiosk "
You will need the RMKiosk app on every iPad you intend to run RMKiosk on. Download the RMKiosk app on the iTunes Store (App Store) using the search term "rm_kiosk".
RMKiosk comes with a full set of demo data that is fully loaded with a sample menu and high-resolution images for the menu items.. The demo mode runs in offline mode only and does not require connection to the server computer. You can launch the application immediately after installing.
If you want to connect Rm Kiosk to a server and run live orders do the following BEFORE you run Rm Kiosk for the first time.
Note: If you started RMKiosk in demo mode, you must first terminate the RMKiosk app before it will upload any changes to the iPad RMKiosk settings in Restaurant Manager. Please see the section on Terminating RMKiosk for instructions.
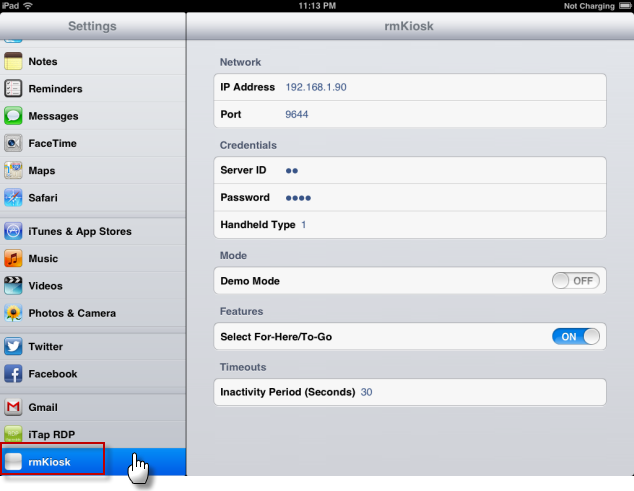
Use the following steps to configure RMKiosk on the iPad:
IP Address- Enter the IP address of the server
Port- The default port is 9644. Normally you will not need to change this.
Server ID - Use the employee number for the RMKiosk employee(s). The employee number defines the employee linked to the orders from this iPad
Password - Use the employee four digit password associated with the RMKiosk employee
Handheld / Kiosk Type- This is the ID number listed in Handheld/Kiosk Type Setup Form
Demo Mode- For online live operation this should be set to OFF. Set to "on" to demo offline using the sample data.
- MSR - Touch this row if you will be accepting a credit payment at the kiosk. There are two choices: Linea Pro and iDynamo. The former is for processing credit cards without encryption. The latter is used with E2E encryption thus is more secure. Encryption is only available for Mercury credit card processing. Credit cards swiped will be processed in RMCCWIN. Receipts can be printed on demand at the POS.
Select For-Here / To-Go - If on, the user will be prompted at the start of each order.
Inactivity Period (Seconds) - 30 seconds is the default setting. If there has been no activity for this number of seconds a message will be displayed prompting the user to "Continue working" or "Cancel". If no input with 15 seconds of the message being displayed, the order will automatically cancel and RMKiosk will return to the default screen.
- Training Video - RMKiosk come with a video that give a brief tutorial on how t place an order. This is an excellent guide for first time users. There are three different option on this heading:
Always show video when starting an order
Don't show video when starting order
Ask customer whether to show video
Choose the option that best fits your operation.
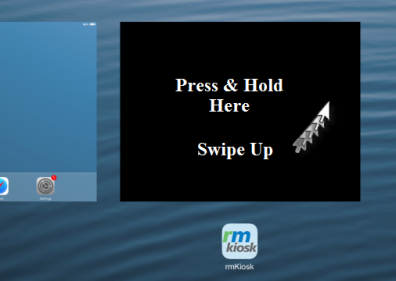
To terminate the program:
Return to the iPad apps screen by touching anywhere on the iPad screen.
The double-tap the home button to display running apps.
Press and hold RM Kiosk image just above the icon and then swipe upwards.
Return to the iPad apps screen by touching anywhere on the iPad screen
The following sections are recommendations to help you configure your iPad for optimum performance. In addition, the document lists some suggestions on how to customize the look of the iPad to make them easier to identify for support purposes.
Consideration should be given to naming conventions prior to the iPad device “out-of-box” setup. The naming conventions used should be similar to naming POS Stations (i.e. Kiosk1, Kiosk2…. etc). For consistency sake, whatever name you use in naming the device should also be used to define RMKioskTypes in the SOAP Server user interface.
Guided access is a feature available in iOS 6 and greater. Guided Access temporarily restricts your iOS device to a particular app and by password protecting the "home" button.
Enable Guided Access
Tap Settings > General > Accessibility > Guided Access to set up Guided Access. From there you can:
Turn Guided Access on or off
Set a passcode that controls the use of Guided Access and prevents someone from leaving an active session
Start Guided Access Session on iPad
Open the KMKiosk app.
Triple-click the Home button.
Click Start.
End a Guided Access session
Triple-click the Home button.
Enter the Guided Access passcode
Though not required, it is suggested that a clean default screen be created show only ASI related iPod related applications. By default, the iPad is preloaded with several apps not relevant the restaurants business needs (i.e. YouTube and Stocks). Unfortunately, only a few of these apps can be removed (see restrictions). For the apps that cannot be removed, you can relocate them to a secondary screen using one of two methods:
Move apps and create screen via iTunes (preferred). After attaching the iPad, go to Devices, click on the device name, and select the Apps tab. Make sure you sync the iPad device after moving the icons to their desired position.
Move the apps using on the device itself using the standard Apple procedures.
You may also store all unused apps in a folder (preferably on second screen) by using the following steps:
Tap one app on the screen, hold finger on app until all apps start jiggling.
Create a folder by tapping one app and drag on top of another
Name the folder when prompted
Continue to tap and drag all applicable apps until finished.
Tap the Home button when finished
The iPad may have Auto Lock enable by default. The Auto Lock option is found under the iPads s"Settings" àGeneral à Auto Lock. The times under this setting determine the time allowed before the device goes into idle mode (lessens battery use). Since the iPad should have the power cord always plugged in and connected, it is recommended that “Never” not be used.
This option can either passcode the iPod every time you awakened the device from idle mode or simply protect assorted settings (i.e. restrictions). This option should be set to "Off" since the Home button and iPad will be secured by an encasement.
Next Topic- "Network Considerations"