Last Topic: "Overview"
RM BackOffice Setup
All Restaurant Manager Reservation Module setup is performed in the RM BackOffice Module. There six main areas in the RM BackOffice where Reservation setup is done:
The settings in each form listed above can be configured to match the restaurants operational needs. Take time to carefully consider security options on POS stations dedicated to taking reservations. Example, you may want to restrict access to many of the buttons in the MISC function button screen. You may also want to give a higher security level to dedicated reservation takers (i.e. Host/Hostess) and configure function buttons and station security to reflect these security measures.
Station Configuration Setup
There are just a few setting in station configuration that will be needed to run the Reservation Module:
-
Enable Reservation Module- you will want to enable this option for any POS station you want to access the Reservation module on.
-
Default opening screen- change this setting to "Reservation" on POS stations dedicated to taking reservations.
-
Require table clear- This option puts tables into an intermediate state (with a different color) after they are settled. This state indicates that the check is settled, but the table needs to be cleared by the Table Setup Coordinator. After the Table Setup Coordinator clears the table, the table can be put into an "available" state by touching it.
If using a dedicated POS station for reservation, you will need to create a separate stations and configure security options accordingly.
Reservation Module Setup Form
The settings in the Reservation Module Setup Form define the behavior and time options of the Reservation Module. The Reservation Module Setup Form in found in the RM BackOffice Module by clicking Setup à General à Reservation Module Setup Form. Use the following settings to custom your system:
-
Reservation Enabled- the reservations sub-module and its options are active when this settings is enabled. Only the wait list sub-module will be active if this setting is not enabled.
-
Use Customer Database- Enable this option if you wish to link reservations to the customer database. When taking a reservation (or putting someone on the waiting list), the customer is stored using their unique customer ID (or phone number). This information is automatically transferred to a table or tab when the reservation is transferred
-
Reservation Taker Must be Clocked In- Enable this option if you want to force your employees to clock in before taking reservations.
-
Prompt When Transferring Un-arrived Guest- When transferring a reservation to a table or tab, this option will provide a warning prompt if the guest has not been marked as "arrived."This avoids accidentally transferring the wrong reservation.
-
Show Preference- Enabling this option will display the pre-configured seating preference (i.e DR, Bar, Patio, etc) on the Customer Information Grid on the Reservation Module Status screen.
-
Reservations Start Hour - Use the drop down menu to choose the hour the restaurant will begin taking reservations at.
-
Reservations End Hour - Use the drop down menu to choose the hour the restaurant will stop taking reservations at.
-
Number of Slots Per Hour- Use the drop down menu to choose incremental time slots. Example: choosing a reservation starting hour of 4:00 pm with a time slot per hour of 30 minutes will produce time slots of 4:00, 4:30, 5:00, 5:30, etc.
-
Estimate Using- The settings under this option determines the waiting time an employee can quote a customer for when they will be seated. This option should not be confused with table duration (when a table will be likely to become available). Restaurants may not want to seat guests even when tables are available because they may not have enough wait staff to pick up tables, the kitchen is behind with orders, etc. The settings available here are used in conjunction with the Wait Estimate (minutes) option on this form and are evident using the "Wait Estimate" function button on the Wait List screen. The settings available on the drop down menu are:
-
Disable wait time function- choose this option if you do not want to use wait time estimates. This option will remove the "Wait Estimate" function button on the Wait List screen.
-
By wait list entries ahead- choosing this option will take all current reservations line and multiple that number by the number entered in the Wait Estimate (minutes) option. Example- I have ten lines occupying the wait list section on the Wait List screen and I have entered 5 entered in the Wait Estimate (minutes). Pressing the "Wait Estimate" function button on the Wait List screen will produce an estimated wait time of 50 minutes. If I added one more reservation to the list, the estimated wait time would become 55 minutes (11 lines x 5 minutes). Note: times are calculated against reservations marked as "Yes" in the "Here?" column on the Wait List screen.
-
By guest count ahead- choosing this option will take the total number of guest on the wait list and multiple that number by the number entered in the Wait Estimate (minutes) option. Example- there is total of 30 guests on the wait list section on the Wait List screen and "4" was entered in the Wait Estimate (minutes)option on this form. Pressing the "Wait Estimate" function button on the Wait List screen will produce an estimated wait time of 120 minutes. If I add a another reservation for one guest, the estimated wait time would become 124 minutes (31 guests not seated x 4 minutes). Note: times are calculated against reservations marked as "Yes" in the "Here?" column on the Wait List screen.
Note the wait time estimate can also be added to on the Wait List screen using the "Set Wait Delay" function button.
-
Wait Estimate (minutes)- enter the number minutes will be multiplied against if using the Wait Estimate function at the Wait List screen. The number here will be multiplied against either the "By wait list entries ahead" or "By guest count ahead" setting used under the Estimate Using option (above).
-
Maximum Capacity per Slot- The number entered in this field determines the total number of guests allowed per time slot. Example, let's say the number entered in this field is 20 and your "Number of Slots per hour" is set to fifteen minutes. Between 4:15 pm and 4:30 pm, a reservation taker would only be allowed to accept reservations totaling 20 guests before a manager override is needed. This option prevents over seating for a particular time slot. A grace number can be implemented using the "Guest excess allowed" option on this form. The maximum capacity number can be adjusted up or down at the Reservation screen using the "Adjust Capacity" function button.
-
Guest Excess Allowed- The number entered in this field allows for a the reservation taker to exceed the Maximum Capacity per Slot number without a manager approval. Example- the number in this field is set to "2" and the Maximum Capacity per Slot is set to 30. At the 4:30 time slot lets say we have 28 guests already entered. Now a customer calls requesting a reservation for 4 people at 4:30. Because we have this field set to "2" the system will allow the reservation because it meets the Maximum Capacity and Guest Excess allowance criteria . In other words the 28 guest reservation plus the four new guest equals the 30 max Capacity plus 2 excess guest allowed.
-
Security Level to Adjust Reservation Capacity- The number used in this option determines who can adjust reservation capacity per time slot (plus or minus) at the Reservation module.
- Reservation Advantage (minutes)- The number entered in this field will add time to a walk-in reservation thus giving a time advantage to a call in reservation for the same time slot. Example- Our setting on this option is set to "2". A walk-in party comes in at 7:03 PM and the employee adds the party to the wait list. The time displayed in the "Time" column of the Wait List screen will show 7:05 (7:03 plus the 3 minute Reservation Advantage time). If used, this option will guarantee walk-ins will always appear after a reservations for a given time slot. This visual advantage makes it easier for employees to identify reservations versus walk-ins.
Reservation Room Preference Setup Form
Restaurants may have different areas in the restaurant where they accept reservations. Guests may prefer to dine in a specific area in the restaurant and request to be seated in this area when making a reservation or when being added to the wait list. To accommodate such requests, you can pre-define a set of room names that will appear when using the "Preference" button in the Wait List or Reservation Customer Data Entry screen. The list of preference will also appear when selecting the Preference cell for a reservation on the Reservation or Wait List customer Info Grid.
Access the Reservation Room Setup Form by clicking Setup à General à Reservation Room Preference Setup Form. Use the following instructions to custom your system:
-
Click "Add" to add a new line
-
Type in the name of the room in the Preference Description Column.
-
Repeat this step to add additional rooms
-
Click "Close" to save your changes and exit the setup form.
Note: the first three rows can not be edited or deleted. If needed, the first three rows can be edited in RES_PREF.DBF. Warning: DBF editing should be done by a trained technicians in a controlled environment.
Table Layout Setup Form
The Table Layout Setup Form is typically used to arrange and number tables to be used on the Tables Module at the POS. However, the two options listed below are used to configure the maximum capacity of a table and to estimate when a seated table will likely become available on the Wait List screen.
Min/Max Customers- Use these fields to define a minimum and maximum number of customers that can be seated at each table in the restaurant. This setting will have a bearing on seat assignments when using the Reservation Module . The number entered in these fields will be displayed on the Table Status column on the Wait List screen.
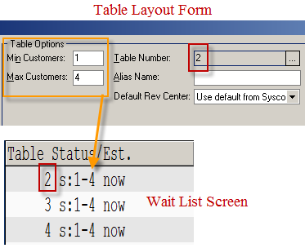
This setting also determines the seats displayed on the Order Entry Check Display if “Advanced Seat Management” is enable in the Station Configuration. In addition,this function is useful when implementing the Pivot Point order taking system.
Table Durations- Enter the Estimated Table Durations (i.e., number in minutes) to define how long a table is usually occupied. The number entered should assume that the more customers there are at the table the more time they are likely to spend at the table. You can create a total estimated wait time AND an estimated time once the check has been printed.Restaurant Manager will use these times to create list estimated wait times on the Table Status/Est column on the Wait List screen.
In the screen shot below, notice that the estimated time for table 31 is 14 minutes on the sample portion of the Table Status column on the right. Table 31 check has been printed, In the Table Duration form below, a table with four customer is configured to print a start a count down starting at 15 minutes. This is reflected on table 31 in the image to the right. In terms of "Total Time" . Table 11 is configured with a max customer count of 4. The estimated time for a four top is 50 minutes and the countdown begins when the table is transferred. Table 31 on the Table Status/Est column of the wait reflects the estimated time the table should be available.
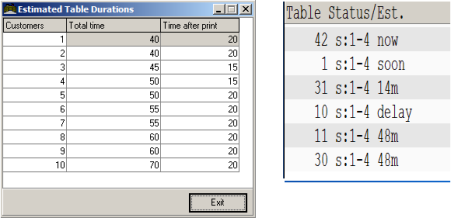
Note: In the image above, the "delay" listed on the Table Status/Est column reflects the table has exceeded the estimated time, "soon" reflects the table needs to be cleared.
PCall Setup Form
Restaurant Manager provides the option to notify a guest when there table is ready via text messaging. When the guests table is ready, the employee will select the cell corresponding to the guest's reservation row on the "Notify" column of the Wait List screen. The setup, including a configurable automated message, is done in the PCall Setup form (RM BackOffice Module > Setup > General > PCall). The Notify function is an extra feature available on a subscription basis. You will need to setup an account with ASI before using this option.
The following information will be used to fill out the fields in the PCall setup form:
-
URL- http://www.rmwservices.com/PhoneNotifier/PhoneCall.asmx. Capital letters must be used when called for.
-
Voice ID- enter “0”
-
Call Number- Enter the number of the restaurant but this field no longer has any functionality as the number will not appear on the customer’s caller ID when using text messaging (see note below).
-
Message- Type in the message you wish the guest to receive (i.e. your table is ready).
-
Rest ID- restid
-
Rest Password- password
Note: .This option does not work with text messaging due to the Telephone Consumer Protection Act which in summary states there must be a way for consumer to opt of a text messaging program. If you call the number that shows in the message you will get a recording telling you how you can opt out. If Restaurant Manager notification system (hosted by CDYNE) showed the restaurant number that OPT function out would not be available. Therefore, the number shown on a customers phone number when receiving a text belongs to CDYNE (they control the opt out function).
Computer Setup for PCall
The following Windows configuration should be performed on any POS computer where the Notify function will be used:
-
Make sure you have an IP scheme on the IP settings including the gateway to the router
-
Go to Internet Options in Control Panel
Save changes and exit back to Windows desktop
Function Button Layout Form
Setup in this form is minimal. Make sure you have the "Reservation" function button placed in the appropriate Module status screen (i.e. Tables, Tabs, etc). In the Reservation Module screen you will want to add the Module function buttons to return to Table ,Tabs, etc. You may want to add a security level to the "Reservation" function button to prevent unauthorized employee from accessing the Reservation Module.
Next Topic: "Use at POS"
.