Last Topic: "RM BackOffice Setup"
The Reservation Module has two basic screens: the Reservation screen and Wait List Screen. Same day or future reservations are made (or changed) in the reservation screen. Future reservations are converted to the Wait List the day of the reservation. Walk-Ins are added directly in the Wait List screen. Most daily functions such as transferring a reservation to a table or tab will be performed in the Wait List. This section of the document will detail the functionality of the Reservation screen, the Wait List screen, and the History mode, and the available reports within the Reservation Module.
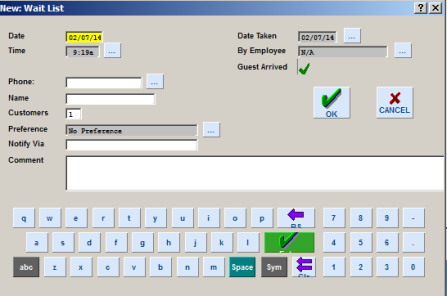
The customer information screen is where reservation or walk-in details are entered or modified. The customer information screen can be evoked using one of several methods. When creating a new record using:
"New Reservation" button in the Reservation screen
"Add to Wait List" button in the Wait List Screen
Existing records can be modified using:
"Edit" cell on the Action column on the Wait List screen
"Edit" cell on the Action column of the Reservation screen.
Individual components of a reservation can be edited in both the Reservation and Wait list screens by touching cells on the respective modes grids but it is only in the Customer Information screen where you can access all customer information screens.
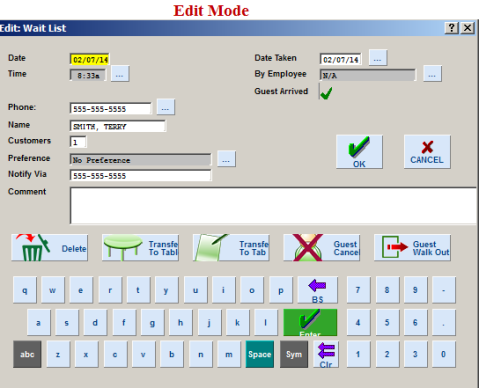
The following is a list of the fields found in the Customer Information Dialog Box:
Date - This field will auto fill to the selected date for reservations and the current date for walk-ins. This field is inactive for walk-ins but can be edited using the ellipsis button to the right in reservations.
Time - This field will auto fill to the selected time slot for reservations and the current time for walk-ins. This field can be edited using the ellipsis button to the right.
Note: adding a time to this field may cause the date to move to the next day when close to the midnight crossover. Example, at 11:50 pm, a wait list record added with 15 minute reservation advantage would cause it to be set as tomorrow @ 12:05 am
Enabled: the customer data prompt will be evoked. When a telephone number is entered the system will attempt to find a match in the customer database and fill in both the "Name" and "Notify via " fields if it does find a match. If a match in the customer database is not found, the user can add the prevalent data in the Customer Information prompt. The new data will be added to the customer database and will then auto populate the "Name" and "Notify via " fields in the Reservation Information dialog box.
Disabled: allows user to add or change the phone number.
Preference - press the ellipsis button to evoke a drop down list a dining area preferences as defined in Reservation Room Preference Form.
Notify Via - if PCall is enabled- enter the telephone number of the customers cell phone where a text message can be sent to. This field is auto populated when Customer Database is enabled in the Reservation Module Setup Form.
Comment - this option allows multi-line entry of birthdays, anniversaries and customer preferences or requests
Date Taken - this field will auto-populate with the date the reservation or walk-in was taken.
By Employee - press the ellipsis button if you wish to record the employee who took the reservation. The employees available on the list are limited to those who are logged in when "Reservation taker Must Be Clocked IN" is enabled in the Reservation Module Setup Form. If disabled, all employees will be displayed.
Guest Arrived - If the record is a walk-in, this filed will auto-populate with a check indicating the guest is on-site. For a reservations, this field will not populate. Selecting the "Here?" field on the Wait List Screen for a given reservation will populate this filed without having to re-enter this form.
The following buttons are only available when selecting the "Edit" cell on the Action column of the Wait list and reservation grids. Some buttons are mode dependent.
Delete - to delete the entry with prompt to confirm
Transfer To Table - to transfer/assign the guest to a table and available for Wait List only
Transfer To Tabs - to transfer the guest to a tab and available for Wait List only
Guest Cancellation - guest informs user to cancel the Wait List or Reservation
Guest Walk Out - user marks the guest as a walk-out or no-show maybe even after repeated notification and available for Wait List only
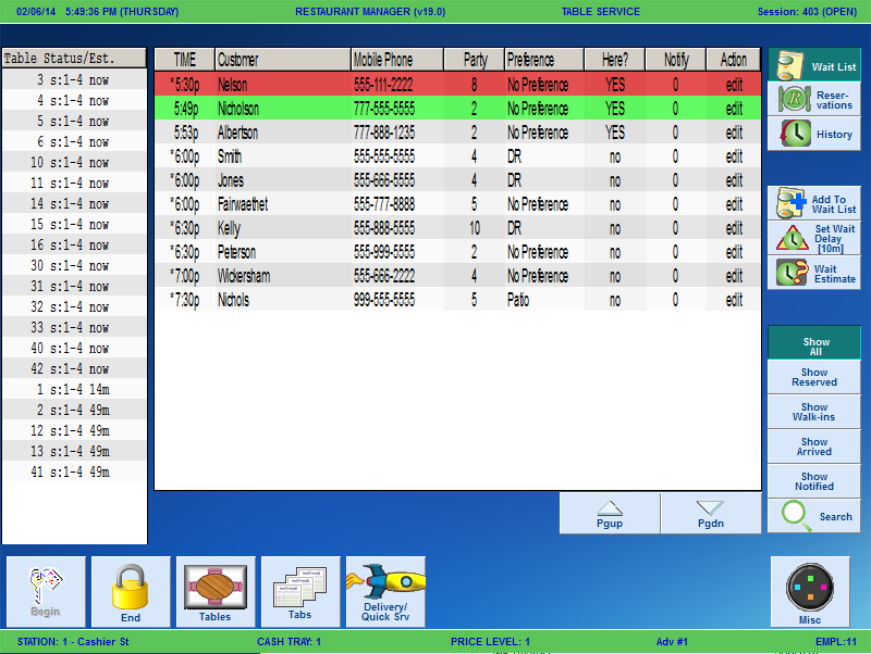
The reservation grid on the Wait List screen is interactive. Pressing a cell on the reservation row on the grid that corresponds a column will evoke an appropriate prompt. Example, pressing the Customer cell for a reservation will evoke a keyboard where you can change/correct the customer name. The "Here" option on the Wait List screen can be used to let all users know when a reservation is on site.The Action cell is used to transfer reservations to tables/tabs, delete a reservation, or register a walk-out. Pressing a column header will sort the grid alpha numerically from least to greatest. pressing the column header a second time will sort the grid again from greatest to least. Information displayed on the Wait List grid can also by limited by using one of the "Show'' buttons on the right of the screen.
The Wait List Screen also provides information employees can use to estimate the time occupied tables will become available. The Table Status/Est Column on the screen shows the availability of each table. All available table will be shown on the top of the list in table numeric order and the estimate time will be displayed as "now" Occupied tables will have estimated times shown to the right of the table. Estimated times are configured in the Table Layout form under Table Durations. Occupied tables on the list are sorted on based on first seated being listed first. Occupied tables needing to be cleared will be marked as "Soon", tables exceeding the duration time will be marked as "delayed" on the list.
Reservation rows on the grid have three basic colors depending on their status. White indicates the reservation is within the given time slot. Green rows indicate the time on the grid has passed the current time on the on the POS. A red row indicates the reservation is fifteen minutes beyond time on the grid. The different colors on the grid will help the user prioritize seating.
Reservation takers are also aided with the optional Wait Estimate function. When enabled, the Wait Estimate function is used to quote walk-in customers an estimated time to be seated. This function is configurable to calculate customer count or reservations count against a predetermined time. Note: times are calculated against reservations marked as "Yes" in the "Here?" column. Employees can adjust wait time estimates using the "Set Wait Day" function. This function adds time to the predetermined time set for the Wait Estimate function. Restaurants may wish to use this function if the kitchen is running behind, tables are moving slower than usual, or there is not enough staff on hand to take tables ( even though there may be available tables).
The Wait List screen is comprised of three sections, the Table Status/Est section, Wait List grid, and the Function buttons outlined below.
The tables listed in the Table Status/Est section are defined in the Table Layout Setup Form with the following criteria::
Enabled
Not locked
Not a decor and are
Assigned to a table group
The table listing is mainly affected by the current table status with which the pecking order goes from available, needed to be cleared, printed then the rest (i.e. split, sent, or just opened).
The table estimates could be displayed as:
Now - for tables that are available
Soon - for tables that are settled and only need to be cleared
Delay - for tables going past the time estimate for printed checks as well as total duration. This is a good indicator for the hostess that a certain table may need some help to get things moving along.
Time in minutes- is the number of estimate minutes that the table will be free. The number of minutes displayed counts down from the minutes defined by the tables max capacity or minutes after printing as defined in the Restaurant Manager BackOffice under Setup à Screen Layouts à Table Layouts à Table Durations button.
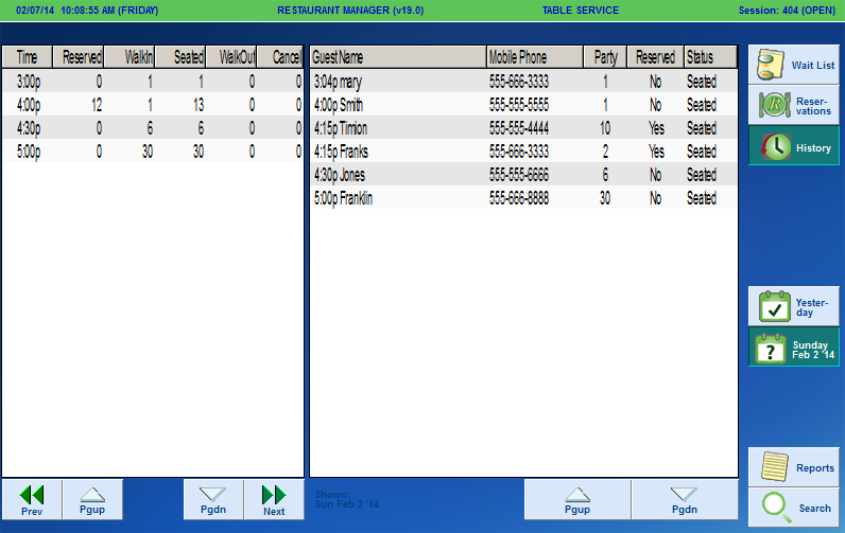
The Wait List reservation Grid takes up the largest portion of the screen. The information on the grid lists the current wait list as well as Today’s reservations. If the reservation period crosses midnight (i.e. period starts at 10 pm and open until 2 am), then tomorrow’s reservations for the current reservation period will be shown as well.
The listing of the records are mainly affected by the date/time of the reservation/wait list but to some extent also whether the entry is a walk-in or reservation or if the guest has arrived.
The columns are touchable to modify various values of the entries, thus, touching:
Time - displays the reservation guest time based on the reservation time slot chosen. For walk-in customers, this might be displayed in the actual time that the wait list record was added. When selected, a time-entry/selection dialog will be displayed. A record with an asterisk in front of the time denotes the record is a reservation, not a walk-in.
Customer - When selected, allows the user to modify the customer name with a name/string entry dialog.
Mobile Phone - if the setting to use customer database is enabled in the Reservation Module Setup Form, evokes a prompt for customer phone number using the customer database. If not enabled, evokes prompt for a phone number. In either case, the guest name should will not be changed.
Party - displays the guest count for the reservation or wait list entry. When clicked, opens up a numeric entry dialog to allow user to change the count.
Preference - displays the guest room preference. When selected, a pop-up dialog will appear to allow the user to choose another room preferred by the guest.
Here? - displays the “arrival” state of the guest. When selected, a pop-up dialog asking the customer if the customer is here is asked. When Yes is chosen, this will show “YES”.
Notify - displays the number of notifications that have been sent to the guests mobile phone. Any number above "0 "means that the customer has already been notified. When selected, depending if Customer Notification has been activated
if activated, follow Notification prompt and will increment the count
- if not activated, prompt “Has the customer <Name> been notified ?” and if the user clicks on
Yes- the notify count will increment upwards
No/Cancel - no change
Action - when selected, a full edit dialog is evoked to allow the user to edit any field of the wait list record.
Background color of the wait list/reservation records may be changed to the following:
Red - if guest is still not seated after 15 minutes of the time on the grid.
Green - if guest is to be seated, and the time on the grid is past the time on POS, but is within 15 minutes of reservation or wait list time
White/Gray - if customer is still in waiting and the time on the grid has not surpassed the time on the POS.
The Wait List function buttons perform three basic functions: switching modes, wait list specific functionality, and filtering. The two mode buttons (Wait List and Reservations) let the user switch between Reservations screen when enabled and back to the Wait List screen. The button with Wait List functionality allow the user to add a record to the Wait List screen (i.e walk-ins) or when enabled, determine wait list estimates. The filter buttons allow the user to limit records displayed on the Wait List grid based on various criteria.
The following is a list of both mode and functionality buttons.
Wait List - displays the default Wait List screen
Reservations - display the reservations screen and is only shown if reservations is enabled in the Reservation Module Setup Form
History - displays the history screen
Add - press to add a new record only to Wait List
Set Wait Delay - sets a system-wide delay to account for seating delays (i.e. kitchen behind, tables turning slower than usual, etc).
if setting is to compute “by wait list entries ahead (default)” - the result: total number of records multiplied by “wait estimate in minutes”
if setting is to compute “by guest count ahead”- result: total of guest count (Party) for all records multiplied by “wait estimate in minutes”
Note: It’s possible that the estimate will not be accurate when the Reservation mode is enabled in the Reservation Module Setup Form. The estimate should be based only on records or guests where party has been marked as arrived (i.e. Here? is set to Yes).
The filter buttons are the last set in the list of button functions as filters and work only to filter the current wait list (1st viewer)
Show All - the default setting that displays all wait list records, cancels any filter or column ordering of the wait list
Show Reserved - limits records displayed on grid to only the guests with reservations (not Walk-ins), is only shown if reservation is enabled
Show Walk-ins - limits records displayed on grid to walk in guests only (not guests with reservations), is only shown if reservation is enabled
Show Arrived - limits records displayed on grid to only the guests marked as "Yes" in the “Here?” column.
Show Notified - limits records displayed on grid to only the guests with a number greater than 0 in the “Notify” column.
Search - to search the current wait list and filter the results. To cancel, click on “Show All”
Restaurant Manager offers the ability to notify customers by text messaging. This is an additional service offered on a subscription basis. You must choose one of the two options at the time of purchase. The notification system can only use one option, not both.
Use the following steps to notify a customer when their table is ready if the customer notification is enable:
Make sure the customer's cell phone has been entered in the "Notify via" field in the Customer data screen
Select the "Notify" cell corresponding to the customer name on the Wait List screen
A screen will briefly appear letting the user know that the message is being sent. Any number above "0 "means that the customer has already been notified. You can notify a customer as many times as needed. The number in the "Notify" cell will increase each time the option is used thus letting the user know how many times the customer has been contacted. The default number "0" in the cell reflects no attempt to contact the customer has been made.
Text messaging does not allow for the number displayed on the customers phone to be the restaurants. The number displayed belongs to the company that hosts the notification application, may appear to be an out of state number, and will vary depending on the customer's cell phone provider. This is due, in part, to the Telephone Consumer Protection Act which in summary states there must be a way for consumer to opt of a text messaging program. If you call the number that shows in the message you will get a recording telling you how you can opt out. If Restaurant Manager notification system (hosted by CDYNE) showed the restaurant number that OPT function out would not be available. Therefore, the number shown on a customers phone number when receiving a text belongs to CDYNE (they control the opt out function).
Important: Due to the different text messaging notification options for each cell phone manufacturer (i.e. set to vibrate), it is critical for the Host/Hostess to tell the customer to pay attention to their cell for the incoming notification and adjust the cell phones to a setting where they are certain they will receive the test (i.e. make sure silent mode is not used). It is also important, given the paragraph above, to tell the customer that the text message may be associated with an out of state telephone number.
Use the following steps to notify a customer when their table is ready if the customer notification is not enable:
Make sure the customer's cell phone has been entered in the "Notify via" field in the Customer data screen
Select the "Notify" cell corresponding to the customer name on the Wait List screen
A prompt will appear “Has the customer <Name> been notified ?” and if the user clicks on:
Yes- the notify count will increment upwards
No/Cancel - no change
Any number above "0 "means that the customer has already been notified.
Reservations are made within the Reservation screen. The reservation screen is divided into three parts; the Time Slot grid, the Reservation grid, and the function buttons. The Reservation screen is accessed by pressing the "Reservations" button.
By default, the current day's reservations will be displayed when entering the Reservation screen. Future reservations can be made by using the button below "Today". This button name will always display the next day's date. Pressing this button will evoke a calender. Press "OK" if you want to add a reservation for the next day or using the calendars navigation buttons to go to a future date. Reservations are added to the screen by first selecting a time slot on the left side of the screen and then pressing the "Reserve New" button on the right side of the screen. Pressing the "Reserve New" button will evoke the Customer Data screen where reservation details are entered. Using the ellipsis buttons next to the "Date" or "Time" fields with the Customer Data screen if the customer wishes to change the date or time of the reservation. A pop up screen will appear on the time button letting the reservation taker know if the same or preferred time slot is still available.
Reservation time slots are configurable by time and guest capacity using the Reservation Module Setup Form in the Restaurant Manager BackOffice Module. The "Avail" column of the Reservation grid on the left of the Reservation screen will inform reservation takers the available reservations allowed for the time slot. This number will depreciated as customers are added to the time slot.Guest capacity per time slot can be overridden on the Reservation screen touching the time slot and then the "Adjust Capacity" button. Time slot capacities can be added to subtracted from using the pop up keypad. The number entered will add or subtract from the existing capacity number limit.
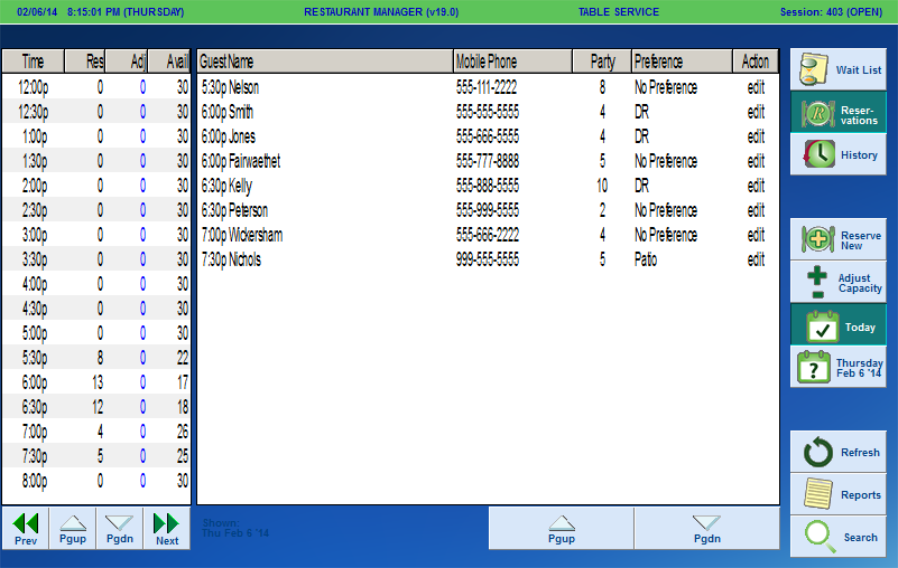
The Time Slot section displays the time slot for the selected day, and is broken down for current reservations, adjustment made and the remaining or unused capacity. When a time slot is clicked, depending on column clicked, the behavior will be as follows:
Time- Show the time slots as defined in the Reservation Module Setup form. Clicking on any time slot will display the reservation for the specified time slot.
"Res"- displays the reservation guest count for the time slot
“Adj” - displays the adjusted capacity amount when changed from its default.Touch the "adj" cell on a time slot will evoke a prompt for security level to adjust the capacity and if provided, prompt for the capacity adjustment to be made. Whether or not the user successfully adjust the capacity or not, update the Reservation grid. However, if the time slot clicked is already passed the time or no longer active, capacity adjust function will no longer be available.
Avail- the "avail" column displays the default seating capacity as defined in the Reservation Module Setup Form. The number will change for any given time slot as reservations are added. The deprecated number reflects the default seating capacity minus reservations made. This number reflects the remaining available guest count for the time slot.
Depending on scenario, the following color schemes will be followed:
Foreground Colors - if displaying the current day, any time-slot that is in the past will be displayed in light-gray color to show them as “unavailable”.
Background Colors - background color of the time slot will follow the color scheme:
White - less than 80% of capacity is reserved
Green - reservation is between 80% of capacity up to the maximum capacity including capacity overage allowance
Red - overbooked
There are 4 buttons available below the Time Slot grid:
“Prev” and “Next” - these buttons allow the user to change the date of the displayed reservation to the previous or to the next day.
"Pgup" and "Pgdn" - these button allow the user to move up and down the time slots for the selected reservation day.
The Reservation Grid display reservations for a selected time slot and is broken down into four columns:
Time - displays the reservation guest time based on the reservation time slot chosen.
Customer - When selected, allows the user to modify the customer name with a name/string entry dialog.
Mobile Phone - if the setting to use customer database is enabled in the Reservation Module Setup Form, evokes a prompt for customer phone number using the customer database. If not enabled, evokes prompt for a phone number. In either case, the guest name should will not be changed.
Party - displays the guest count for the reservation entry. When selected, opens up a numeric entry dialog to allow user to change the count.
Preference - displays the guest room preference. When selected, a pop-up dialog will appear to allow the user to choose another room preferred by the guest.
Action- when selected, a full edit dialog is evoked to allow the user to edit any field of the reservation record.
The following is a list of both mode and functionality buttons.
Wait List - displays the default Wait List screen
Reservations - displays the reservations screen and is only shown if reservations is enabled in the Reservation Module Setup Form
History - displays the history screen
Reserve New - press to add a new record only to Wait List . A time slot must be selected before using this button. When selected, a full edit dialog is evoked to allow the user to edit any field of the reservation record.
Today - sets the “Time Slot” viewer to display the time-slots for the current date.
Day/Date/Year - This button will always display the next day's date. Selecting this button evokes a pop-up a calendar dialog to allow the user to select a specific future date.
Refresh - used to refresh the contents of the current view.
Reports- The Reports function will display the selected days reservations as they would be displayed on the Time Slot Grid. Touching a specific time slot on the report will show reservation details for the chosen slot. Both instances of reports can be printed to the local POS printer.
Search - allows the user to search for a reservation by date, time, guest name, phone number, party count, or notes. Current day and future reservations will be searched for matching content. The search function does not apply to past reservations.
The History screen is accessed by selecting the "History" button on Wait List or Reservation screens.The History screen is where users view past reservations and record walk-ins. Reservation history gives the user a sense of specific dates business flow. With this information, a manager can accurately project stagger times when scheduling, create marketing campaigns for slow reservation periods, or contact reservation that did not show just in case a wrong date was entered. The History screen is comprised of three distinct parts: The History Summary Grid on the left, the History Detail Time Slot grid on the right, and Mode/Function buttons in the far right side of the screen. Each section is detailed in the following paragraphs.
The History Summary grid shows the time slots and shows a summary of activity as follows:
Time- the time slots displayed are for slots that had reservations. Time slots without activity will not appear.
Reserved- displays the total number of seated reservation recorded for the time slot.
Walk-Ins- displays the total number of walk-ins seated for the time slot.
Seated- displayed the total number of guests seated (reservations plus walk-ins)
Walk-Out- displays the customer count of reservations or walk-ins not seated and recorded using the "Walk-out" button in the Customer Information screen (Edit Mode).
Cancel- displays the customer count of reservations or walk-ins not seated and recorded using the "Guest Cancel" button in the Customer Information screen (Edit Mode).
The History Summary grid is interactive. Selecting a time slot row will limit the records displayed on the Detailed Time Slot grid for the time slot selected.
There are 4 buttons available below the History Summary grid:
“Prev” and “Next” - these buttons allow the user to change the date of the displayed history information to the previous or to the next day.
"Pgup" and "Pgdn" - these button allow the user to move up and down the time slots on the History Summary grid.
The History Detail Time Slot grid shows the detail reservations for the selected time period/date. By default, an entire day reservations will be displayed. You can limit the data displayed for a given time period by touching a time slot on the History Summary grid to the left. For walk-ins, the guest record will be included in the closest slot. When the reservation is “disabled”, the settings as to the number of slots per hour will still be followed for historical purposes.The information displayed on the grid are broken down into five columns:
Time - displays the reservation /walk-in time
Customer - Displayed name used for reservation/walk-in
Mobile Phone - Displays the phone number used for reservation/walk-in
Party - displays the guest count for the reservation entry.
Reserved- Indicates if record was a reservation(Yes) or a walk-in (No).
Status- indicates if the party was recorded as seated, a walk-out, or guest canceled
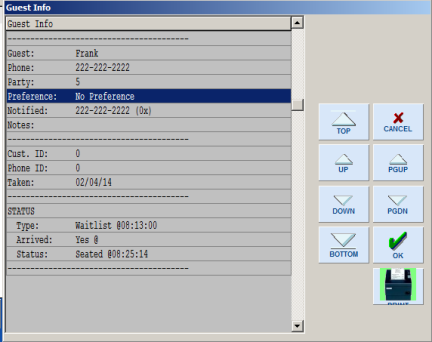
The History Detail Time Slot grid is interactive. Pressing a specific reservation row will evoke a pop up screen with the reservation and walk-in information that can be printed to a local POS printer using the "Print" button (pictured below).
There are 2 buttons available below the History Detail Time Slot grid:
"Pgup" and "Pgdn" - these button allow the user to move up and down the time slots on the History Summary grid.
Wait List - displays the default Wait List screen
Reservations - displays the reservations screen and is only shown if reservations is enabled in the Reservation Module Setup Form
History - displays the history screen (has no affect while in History Mode)
Yesterday - a shortcut button that will bring the History Mode screen back to the day previous to current date.
Day/Date/Year - This button will always display the previous day's date. Selecting this button evokes a pop-up a calendar dialog to allow the user to select a specific past date.
The Reports function will display the selected days reservations as they would be displayed on the Time Slot Grid in the Reservation screen. Reports are accessed in the Reservation and History screens by selecting the "Reports button. In the Reservation screen, the Guest Count report will default to the current day and show all time slots. When in History Mode, the report will default to previous days records and only display time slots with associated activity.
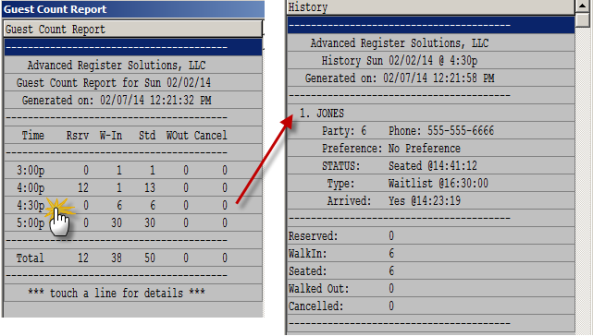
The Guest Check Count Report lists the following data in a column format:
Time- the time slots displayed are for slots that had reservations. Time slots without activity will not appear.
Reserv- displays the total number of seated reservation recorded for the time slot.
W-In- displays the total number of walk-ins seated for the time slot.
Std- displayed the total number of guests seated (reservations plus walk-ins)
WOut- displays the customer count of reservations or walk-ins not seated and recorded using the "Walk-out" button in the Customer Information screen (Edit Mode).
Cancel- displays the customer count of reservations or walk-ins not seated and recorded using the "Guest Cancel" button in the Customer Information screen (Edit Mode).
Touching any row on the Guest Check Count report will evoke the History Reports. This report will list all reservation/walk-in details for the time slot chosen. A summary if the time slots records is found at the bottom of the report .
Note: both instances of reports mention above can be printed to the local POS check printer.