Last Topic "Install Internet Information Services (IIS)"
MS SQL Installation
Prior to installation you will need to download MS SQL Server Express 2008 R2 with Advanced Services. You can download a free version by going to the following address:
http://www.microsoft.com/download/en/details.aspx?displaylang=en&id=25174
When in the Microsoft Download Center make sure that you are downloading the Advanced Services version containing MS Reporting Services. In addition, make sure you are downloading the correct version for your operating system:
- SQLEXPRADV_x86_ENU.exe for 32 bit operating systems
- SQLEXPRADV_x64_ENU for 64 bit operating systems
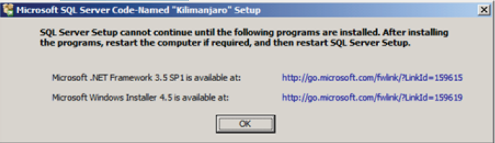
MS SQL Server Express 2008 R2 with Advanced Services requires the following Windows components:
- Microsoft .Net Framework 3.5 SP1.
- Windows Installer 4.5.
- Windows P 1.0
If not already present, you may want to install the components prior to installing MS SQL Express. MS SQL Express setup will check if all of the required components are present. If not present you will have to install the components and re-run setup. Links to the components are found at the bottom of the MS SQL Server Express 2008 R2 with Advanced Services download page.
MS SQL Server Installation
Use the following steps to install and configure MS SQL Server Express 2008 R2:
- Start SQLEXPRADV_x86_ENU.exe if installing for 32 bit Windows operating system (or SQLEXPRADV_x64_ENU for 64 bit versions)
- After file extraction, SQL Server Setup checks to determine if the required Windows components listed below are installed. If not, you will be prompted to install. See the MS SQL Server Express 2008 download page for instructions of how to install :
- Microsoft .NET Framework 3.5 SP1
- Windows Power Shell
- Microsoft Windows Installer 4.5
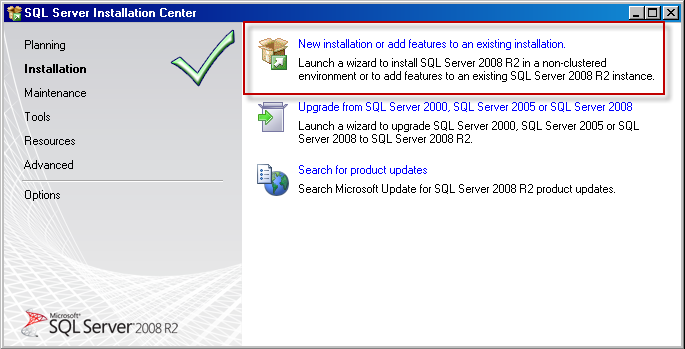
- After the SQL Server Installation Center launches, click on “New installation or add feature to an existing installation” option to start the Installation Wizard.
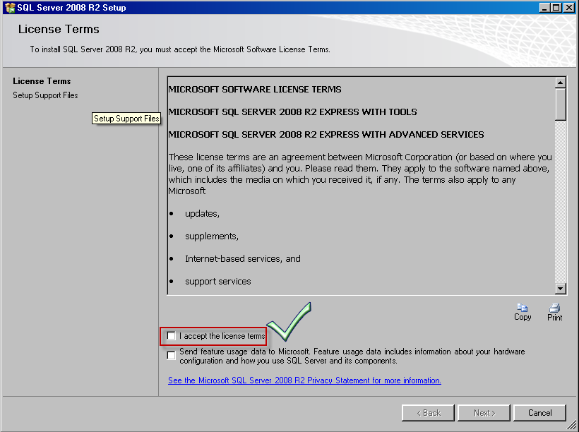
- Accept the license terms in the License Terms dialog box.
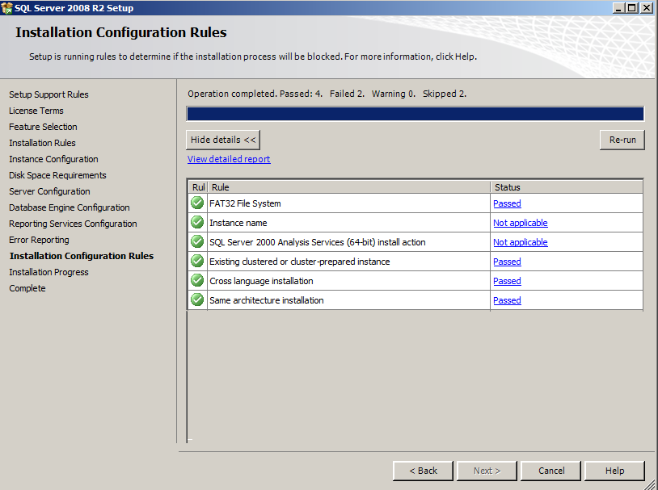
- Setup will check if all of the required components are present. For example, in the screen below you can see that Windows Power Shell has not been installed so the setup cannot continue. Fix all “Failed” items and re-run the test.

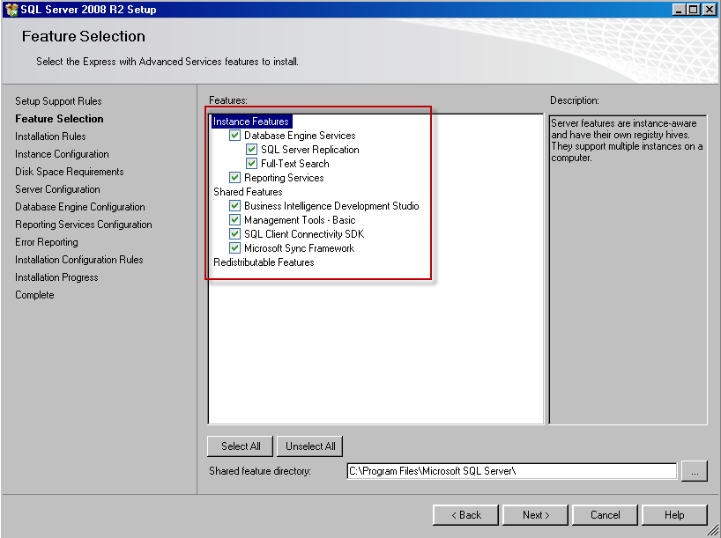
- Make sure all functions are checked off In the Feature Selection window. Use the "Select All" button if needed. Click on the "Next"button to continue.
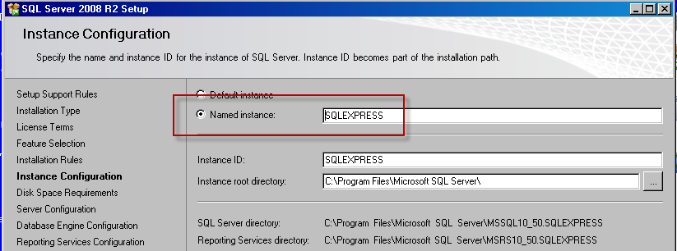
- Select the "Named instance" option in the Instance Configuration window. This step is extremely important. Make sure the correct option is selected and the wording in the entry field reads "SQLEXPRESS". Click the "Next" button when finished to move to the next configuration window.
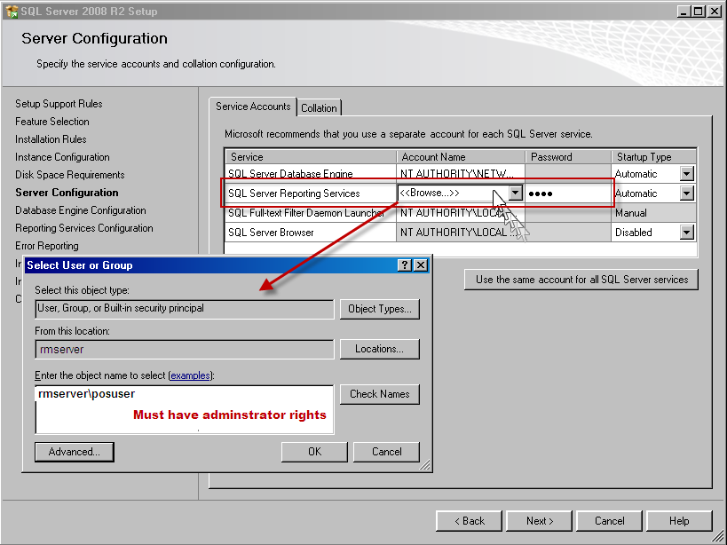
- Review the credentials that will be used for the SQL Server Reporting Services that will be created by:
- Click on the "Account Name" cell associated with SQL Server Reporting Services and select the "Browse" option.
- Select the "Advanced" button in the Select User or Group dialog box
- Click on "Find Now" button in the Select Group dialog box
- Choose your Windows account (must be with administrator privileges) for the Reporting Services . This will typically be the Windows account use log in with at start up (i.e. posuser).
- Select OK to save changes
- In the Server Configuration window, click on the Password cell associated with SQL Server Reporting Services and enter the password belonging to the account.
- Click on the "Next" button to proceed to the next form.
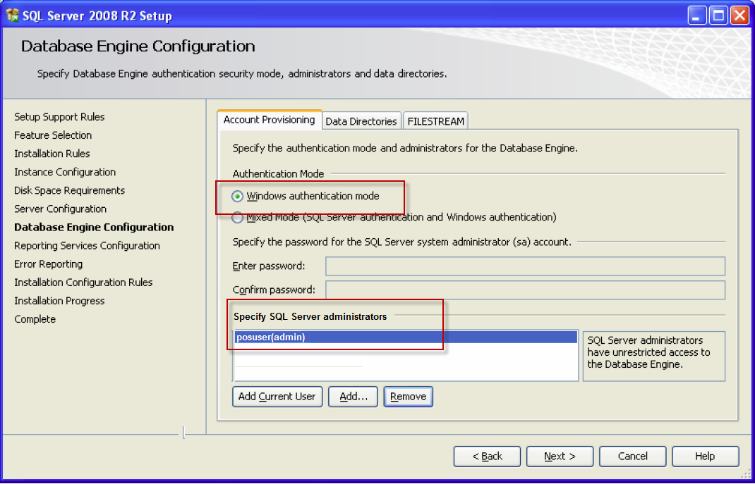
- In the Database Engine Configuration window, select the "Windows authentication mode" option and verify the SQL Server administrator is correct. The account listed here should be a login account with administrator privileges. Use the "Add Current User" button or add button if the default account displayed is incorrect. Use the "Remove" button to remove the default account if incorrect. Click the "Next" button to proceed to next screen after making configuration choice.
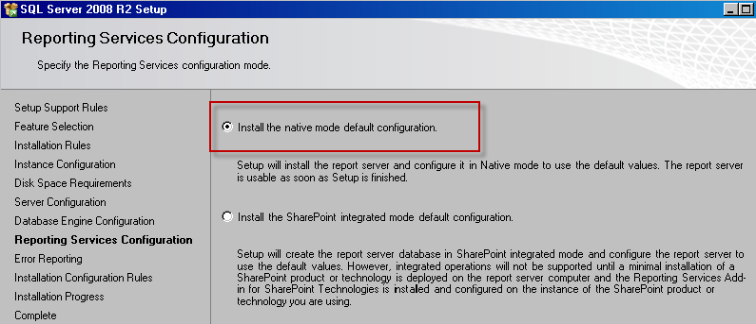
- Select the "Install the native mode default configuration" option in the Reporting Services Configuration window. Select "Next" after making changes to proceed to next window.
- The setup program will start the installation process with the configuration settings selected in the previous steps. Select the "Next" button after installation is complete.
- After the installation process is complete you will be directed to the screen shown below. Click on the update link in the Complete window to check for any Microsoft updates (mainly updates related to SQL Server 2008 R2). As an alternative, use the standard Windows update function to scan and download updates.

- Click the "Close" button in the Complete dialog box to exit the setup process.
Now that we have installed MS SQL Server 2008 R2, our next step is to install and setup the RMSQL Reporting program.
Next Topic "RMSQL Installation and Configuration"