(continued from Menus Modifiers)
This section basically deals with menu related topics outside of the normal parameters of basic menu programming. As example,the Group Scheduling feature allows you to enable/disable menu groups based on a time schedule.Several of the topics are industry segment specific. For instance, Quickservice establishments may offer Combos Meals and restaurants with deli counters may useBarcodes. However, most restaurants will want to take advantage Custom Groupsand Adjectives to speed service at the POS.
Modifiers can be used to change the price and/or inventory depletion for a base item. For example, in a bar environment, a Scotch can be ordered straight up, or On the Rocks, or as a Double drink. Depending on the modifier chosen, the price and liquor content change. In this example, Scotch is the base item, and the modifier choices are “Straight Up,” “On the Rocks,” or “Double.” For the sake of discussion, let’s assume the pricing and liquor content are as follows:
Scotch Pricing
|
Modifier |
Price |
Liquor Content |
|
Straight Up |
$6.00 |
1 oz |
|
On the Rocks |
$9.00 |
1.5 oz |
|
Double |
$12.00 |
2 oz |
In Restaurant Manager, the Scotch can be entered as a menu item with a price of $6.00. For inventory purposes, a Scotch contains 1 fluid oz of liquor. When ordered “Straight Up” no adjustments are necessary; the price and liquor content are correct. But when ordered “On the Rocks” the price is increased by 50% and so is the liquor content. When ordered as a “Double,” the price and alcohol content are both doubled.
To accommodate this, you can assign price and inventory multipliers to the modifiers “On the Rocks” and “Double.” In RM Back office, go to Menu Setup. Find “On the Rocks” and click the “Advanced” tab. To apply a 50% increase, enter 1.5 for both the Price and Inventory Multipliers. For the “Double” modifier, enter 2.0 for the multipliers. In this example, all modifiers have a price of zero.
The Point of Sale program will automatically do the price and inventory adjustments depending on the modifier selected.
Note: Only one Price and/or Inventory multiplier can be applied per item. The multiplier would only apply the multipliers once if you were to select ‘On the Rocks’ twice.
Note; the multipliers only affect the base menu item, NOT other modifiers attached to it. For example, if you were to order:
Scotch - On the Rocks- w/ Lime
‘On the Rocks’ multipliers will affect the Scotch, but not the other modifier “w/ Lime.”
If using Price Multipliers and you want to ensure that item prices come out to an even number, you can set the Station Configuration Option "Price Multiplier Rounding Increment.” You can set the rounding increment to any desired value. Some examples are: .05 to round to the nearest nickel, .10 to the nearest dime, .25 to round to the nearest quarter.
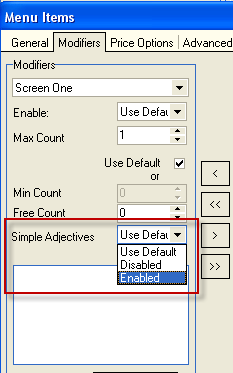
This option can be used to enable/disable the usage of simple adjectives on modifiers. You also have the option of using the Station Configuration “default” setting. Most users incorporating Simple Adjectives will enable this option per modifier screen.
Custom Groups allow you to create Button Layouts for the Menu Area of the Order Entry Screen independent of the Menu Structure configured on the Menu Setup Form. Custom Groups maximize efficiency by displaying Item Buttons from multiple menu groups on a single screen. For instance, Custom Groups may be used to display food and drinks together on a single screen. You may even use Custom Groups to display Menu Items and Modifier Items together on a single screen.
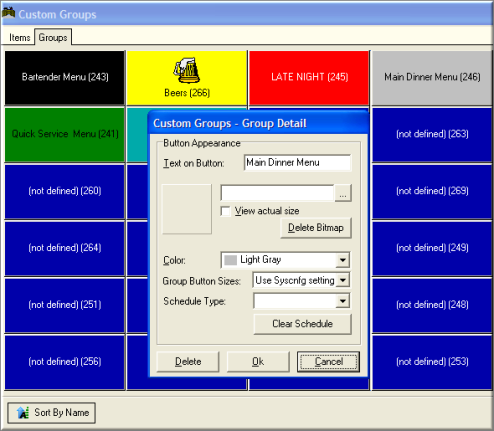
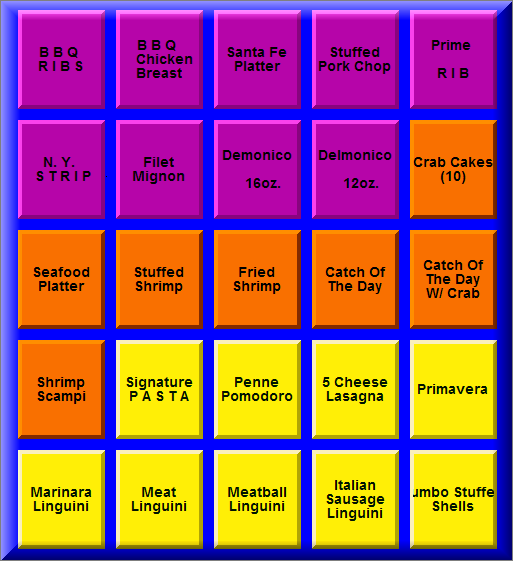
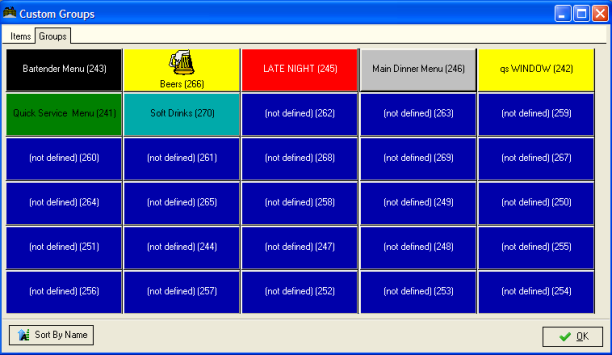
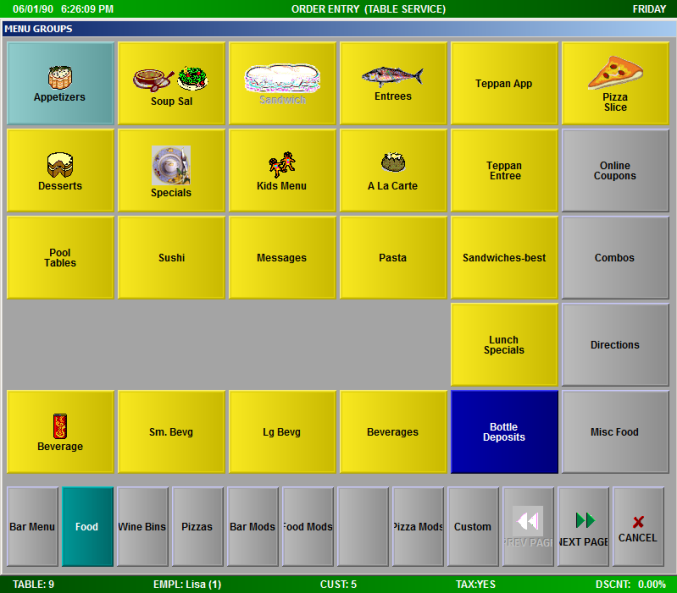
Consider, for example, a restaurant that wishes to carefully track sales sub-totals on various types of entrees. The restaurant might create separate Menu Groups for “Pasta”, “Seafood”, and “Meats”. However, if each of these Menu Groups contained only a few entrees, the restaurant might then create a single Custom Group called “Main Dinner Menu” for displaying all the entrees together in the Menu Area of the Order Entry Screen, as shown in the sample screen shot below:
The configuration settings on the Custom Group Form are organized behind two tabs, the [Groups] tab and the [Items] tab. As these names suggest, the area behind the [Groups] tab is used to configure a Group Button for display on the Menu Navigation Bar. The area under the [Items] tab is used to create custom layouts of Item Buttons for the Menu Area of the Order Entry Screen.
The area behind the [Groups] tab on the Custom Groups Setup Form represents the Group Button layout form used to build the POS Groups Screen:
Most users do not use the POS Groups Screen to navigate the Menu. Instead, they use Menu Navigation Bars. For these users, the area behind the [Groups] tab serves simply to create Group Buttons for display on a Menu Navigation Bar, as detailed below:
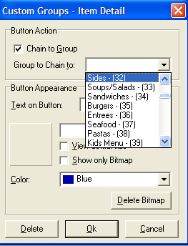
This action calls up the Custom Groups Detail form:
See the section on MenuNavigation for instructions on adding a Group Button to the Nav Bar.
See the section on Default Display for instructions on setting a particular Custom Group to appear every time you access the Order Entry Screen.
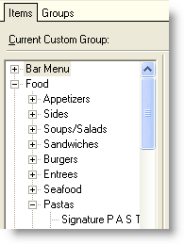
There are three key elements under the [Items] tab on the Custom Groups Form Setup Form: a Group Selection field, a Menu Tree, and a Menu Area Template:
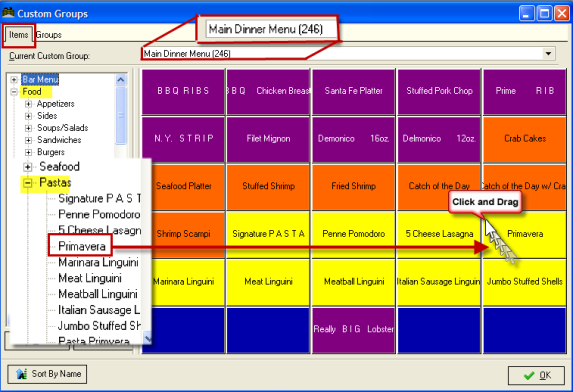
These three elements may be used to configure custom layouts for the Menu Area of the Order Entry Screen:
When you drag and drop Items from the Menu Tree onto a blue button template, all the attributes of the Item you selected are copied onto the button template. You may use a button template to create a Navigation Button by right clicking on the template and activating the [Chain to Group] setting.
To create a custom layout for the Menu Area of the Order Entry Screen, use the drop down list labeled [Current Custom Group] to select the previously defined Custom Group for which you wish to configure the Menu Area Template. Then, use your mouse to execute one of the following operations:
Add an Item to the Template- Left click on the Menu Tree to navigate and locate an Item you wish to appear on the layout. When the item is highlighted on the Menu Tree, hold down the left mouse button and drag the item onto a blank blue button.
Move an Item around the Template- After an item has been added to the Menu Area Template you may move it to a new location on the template using the same drag & drop function you used to add the item to the template
Delete an Item from the Template- To remove an item from the template, use the drag & drop function to move the item to the section of the form where the Menu Tree is located.
Add a Navigation Button to the Template- Right click on any blank button template to access the Custom Groups Item Detail Form. (See the section on Navigation Buttons for more detail.)
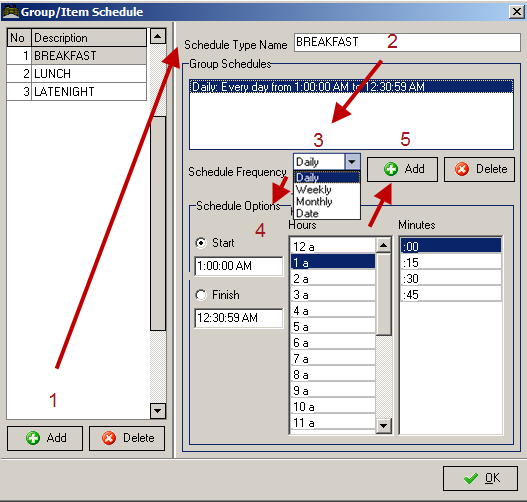
The Group/Item Scheduling feature allows you to enable/disable menu groups and menu items based on a time schedule. All schedule option restrict item availability by time filters throughout the day. In addition, schedules may be based on four different time frequencies:
Set up of group/item schedules is a two part process. First you must set up the group/item schedule and then you must apply the schedule on the Menu Group or Menu Item Setup forms.
First, set up schedule via RM BackOffice > Setup >Menu >Group/Item Schedule. Press [Add] button at the bottom of the form and enter Schedule Type Name in the field at the top of the form. Set the Schedule Frequency using the drop down menu, set Start and Finish times,and then press [Add] in the field below the Group Schedules Display area. When done,the screen may look similar as shown below:
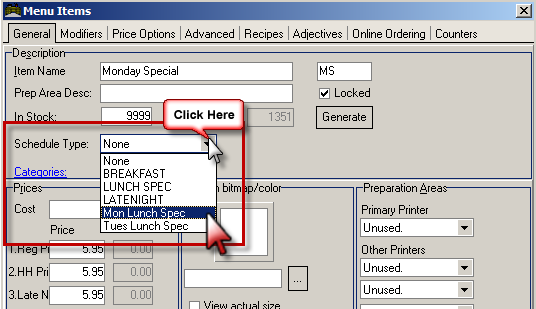
After setting up the frequency schedule, choose the menu group to be scheduled via RM BackOffice >Menu >Menu Setup. Select the Schedule Type as shown below:
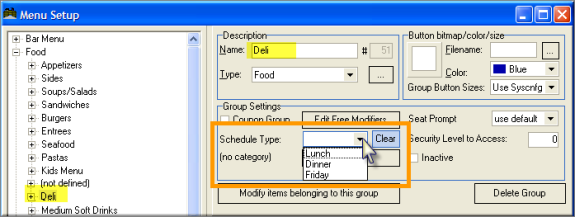
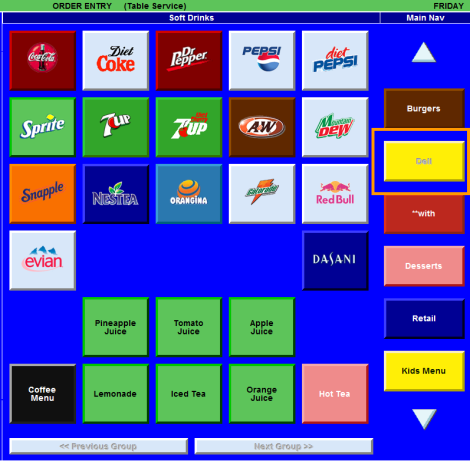
After setting up group schedules in the back office, the POS will not allow choosing a group that is not scheduled; unscheduled groups are displayed as dimmed out (or disabled) buttons. See “Deli” button below:
After setting up the frequency schedule, choose the menu item to be scheduled via RM BackOffice >Setup> Menu >Menu Setup> Menu Item Setup Form (select specific menu item). Select the Schedule Type as shown below:
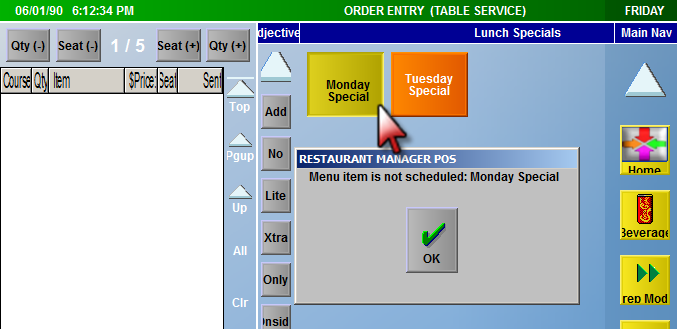
After setting up menu item schedules in the back office, the POS will not allow choosing a menu item not scheduled. The message "menu item is not scheduled" followed the time criteria will be displayed at the POS when trying to select an unscheduled item.
Restaurant Manager provides the ability to quickly add a menu item (or modifier) from a POS station. Though it does not offer all the flexibility of the Back Office, it does give the ability to quickly define an item along with its basic properties such as the price, button color and prep printer. You cannot add a new menu item to a custom group from the POS.
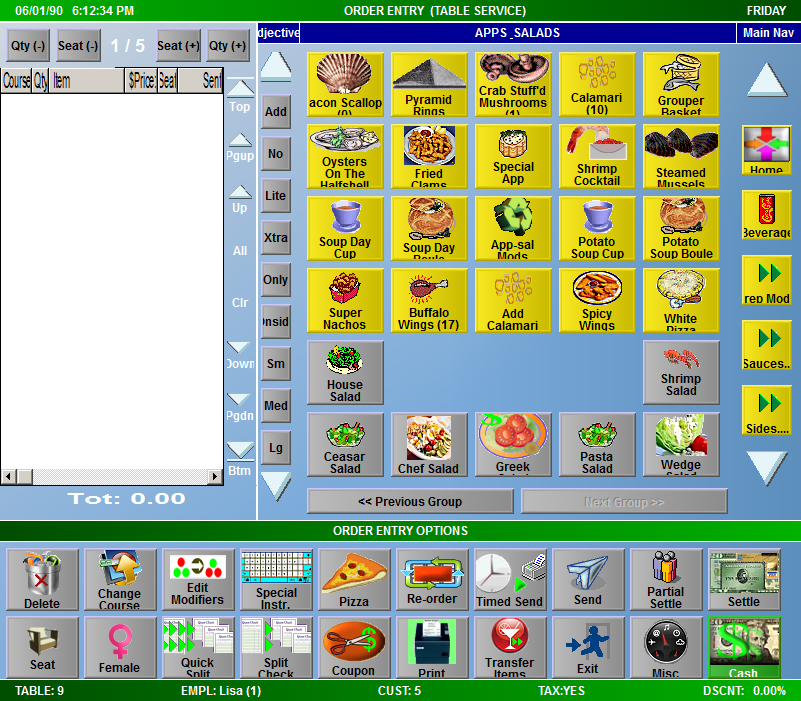
To add an item from a POS station, first go into the “Order Entry” screen and using the [Groups] function button select the menu group in which you want the item added. (Appetizer, in this sample)
Click on “MISC” followed by the “Add Item” button.
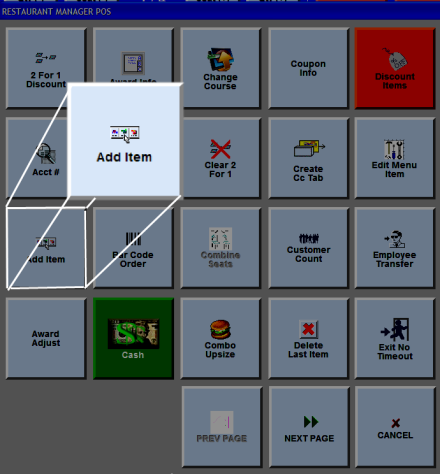
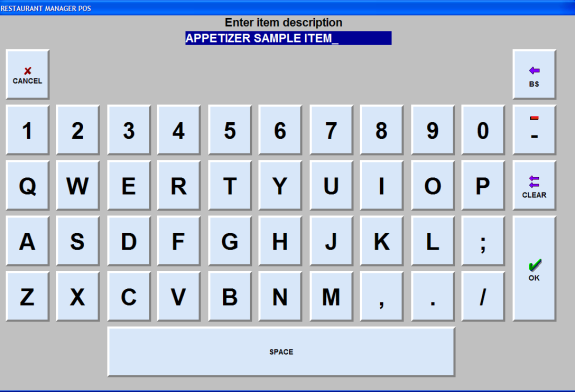
You will be lead through a series of prompts to define the item, including its price, button color and preparation printer.
In the Back Office
There are three options to modify In Stock Quantity in RM BackOffice each dependent on the purpose for registering in stock quantities:
At the POS
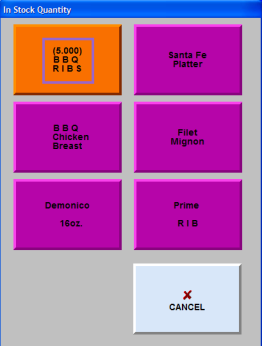
To change the in-stock Quantity from a POS station, first go into the “Order Entry” screen and using the [Groups] function button select the menu group containing the item of interest. (Entrees, on this sample)
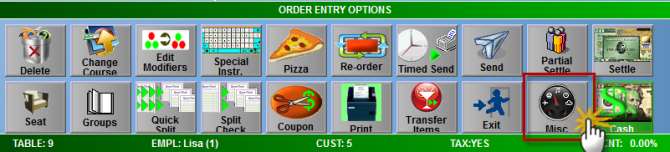
Click on “MISC” followed by the “In Stock Quantity” button.
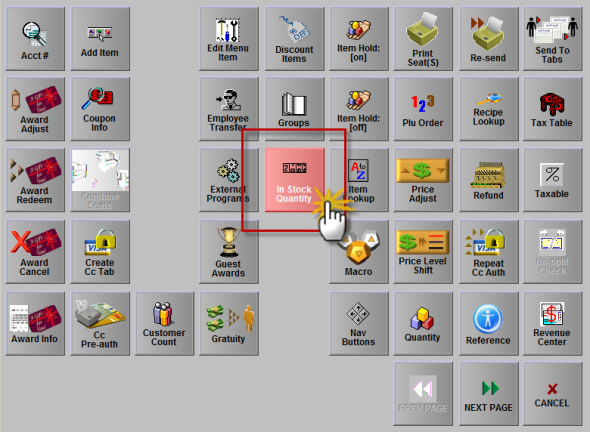
Choose the item of interest from the selection box and enter the quantity left in stock. To display the quantity count down on an item, do not set the “In Stock Quantity” to 9999. The four nine are the default number Restaurant Manager uses not to count down. You can use the four nine only if you do not want the selected item to count down quantities.
The Edit Menu Item function button can be used to make permanent changes to a price at the POS. This function allows the user to change a price of a menu item amongst other changes when access to the RM BackOffice is limited. The following are the instructions to use this function:
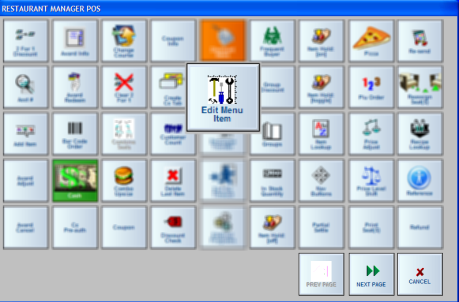
Access an active order and navigate to the menu group that contains the item to be changed. Next, access the MISC Function screen using the [MISC] button on the Order Entry screen, select the [Edit Menu Item] button.
In our example we will use the “Burgers” Pos menu group and change the price of the “Sicilian Burger”. The “Edit Menu Item” edit form will come to the screen after pressing the [Edit Menu Item] button.
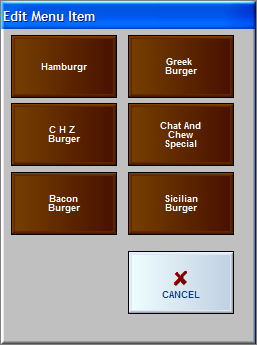
Select the item (Sicilian Burger) to continue with the process. You will get prompts for the following:
There are several ways to adjust prices at the POS. Line Item Discounts, Global Discounts, and Coupons are methods to affect a price of an item. However, there are several two other methods you can use to actually change the price of a menu item
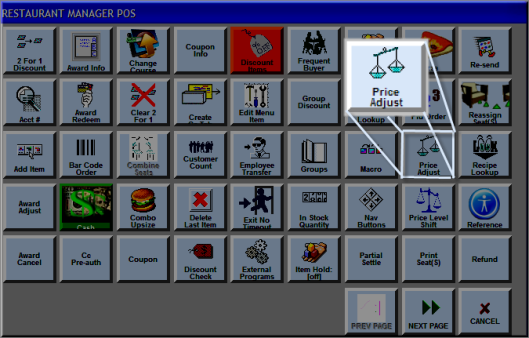
The Price Adjust function button at the POS is used for onetime adjustments. There are occasions were you may need to adjust the price of a menu item, up or down, at the POS. The Price Adjust function button allows you to make these changes at the POS on the fly. The following are the instructions to use this function:
Access an active order and select the item on the check display area to be adjusted. Next, access the MISC Function screen using the [MISC] button on the Order Entry screen, select the [Price Adjust] button.
You will receive a prompt were you can enter in the new price and then hit the [OK] button. You will have to use the [OK] button to scroll though any modifiers screens. This process is also how you can adjust modifiers attached to a menu item.
This is not to be confused with Group Schedules. If you have created multiple menus pages, you can configure your system to work with different Menus pages at different POS stations or to switch automatically from one standard Menu Page to another at a specified time, like Sunday Brunch. You can also manually switch to another Menu from within the POS Module. Use the Menu Schedules Setup Form to schedule menu shifts or to link different menus to different POS stations:
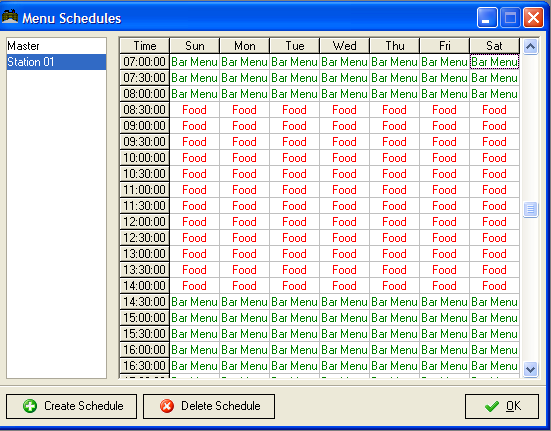
To schedule an automatic switch from one Standard Menu to another:
The "Master" configuration highlighted in the column at the left of the Menu Schedules Setup Form is applied to all POS stations except those for which you create separate Menu Schedules.
Configuration Considerations for Menu Scheduling
POS Button Layout- You may want to add the [Groups] function button to the order entry screen for easy menu page access.
Station Configuration- Use the following Station Configuration settings when implementing Menu Schedules
- You will need to enable "Bring up Menu Groups" in Station Configuration for each station if you wish to implement Menu Scheduling. Enabling this function will make the opening screen an open order default to the scheduled menu page (pictured below).
- You may also restrict certain employees from changing menu pages at the POS using the "Change menu page" option in Station Configuration by associating a specific security level to the operation
Hint: Use the [Search Settings] button to find Station Configuration options.
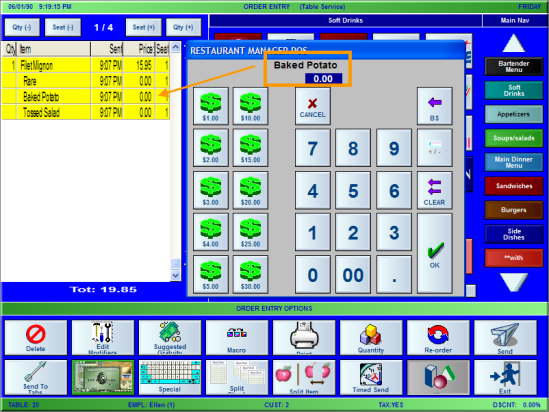
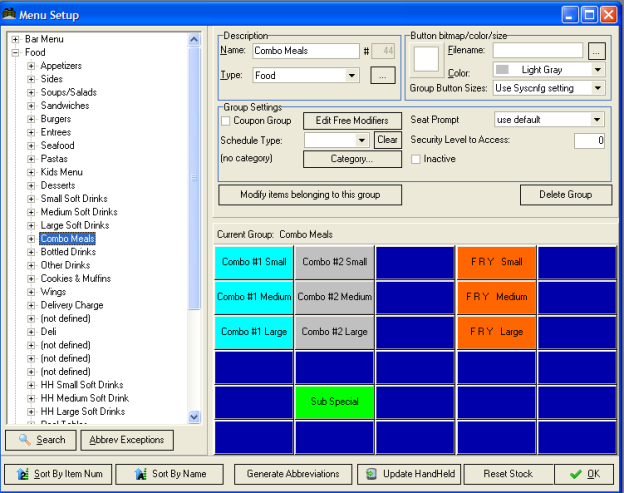
A combo meal is used to offer special pricing on a collection of items. For example, a cheeseburger, small fries and small coke might cost $5.00 if purchased separately, but when purchased together, they constitute a combo meal that is $4.75. ASI provides the facility to program combo meals and automatically apply combo pricing.
You can program up to 999 different combo meals. Each combo meal can have up to 99 different sizes. Sizes can be used to upsize a combo. For example, the combo meal described above might offer a “Super Size” where the regular fries are substituted with a large fries and the regular coke is substituted with a large coke. Upsizing messages can be enabled or disabled for each combo meal for suggestive selling purposes. So when a customer orders a combo, the Restaurant Manager™ automatically displays the upsize options. This not only increases your bottom line, but ensures that your customers don’t leave on an empty stomach.
Each combo meal can have up to 10 tiers. Each tier consists of 1 or more items, any of which can be used to fulfill the tier. As soon as all tiers are fulfilled, Restaurant Manager™ automatically recognizes the combo and applies the combo pricing. The example combo meal above has 3 tiers. The first tier consists of a single item – cheeseburger. The second tier also has just one item – small fries. The third tier however, might have several items to allow a choice of different beverages (e.g., small coke, small sprite, small Barq's, etc.).
Combo meals can be ordered in two different ways:
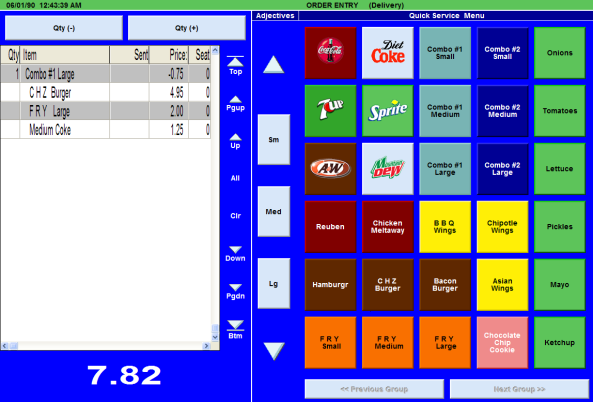
In the above screen shot, the user ordered a cheeseburger, large fries and medium coke. Restaurant Manager automatically detected the presence of a combo and inserted the [Combo #1 Large] item to give a $.75 discount. There is a setting in Station Configuration to enable or disable automatic detection of combos. Note that the combo meal [Combo #1 Large] and the combo items are all menu items. A discussion of entering combo meals and combo items will be described later.
Combo meals are programmed in three steps:
These steps are described in the following sections.
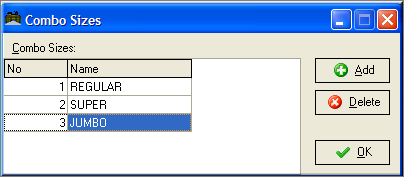
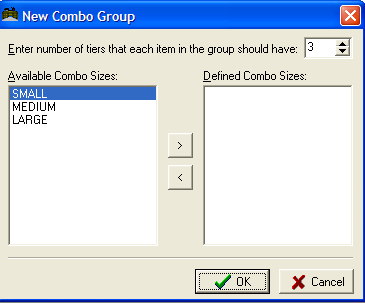
In order to use combos, you must define at least 1 combo size. See screen shot below. Enter descriptions for all your combo sizes (e.g., Small, Medium, Large, etc.). Make sure to enter all sizes that you anticipate using as changing them will require re-programming your combos.
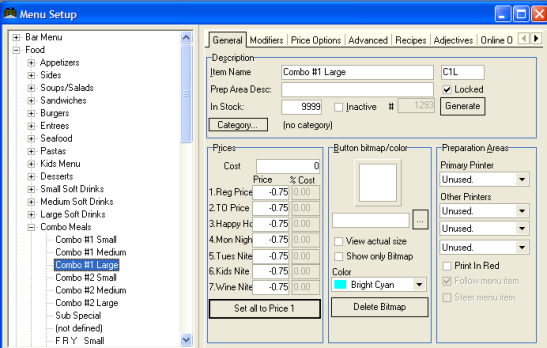
Combo meals as well as combo items are regular menu items just like appetizers and entrees. Only after combo items are linked to combo meals do they exhibit special combo behavior in the POS. So that combo items can be linked to combo meals, you must first define each combo meal and each combo item in your menu.
It does not matter where you position combo meals and items in your menu, but they should all be menu items rather than modifiers. For combo meals, you should create one item for each size. So let’s say you have a combo #1, and it comes in 3 sizes (Regular, Super Size and Jumbo), then you should create 3 items:
If your combo meals offer a discount, as most combos do, you should enter the discount amount as a negative number in the item price field. Though it is not required, you can create a separate menu group for holding the combo meals. This will allow them to appear separately on reports.
After entering combo meals, you should enter your combo items. You must create separate items for different sizes (i.e., Small Coke, Med Coke, and Large Coke). Note: the same combo item can be linked to multiple combo meals without duplicating the item.
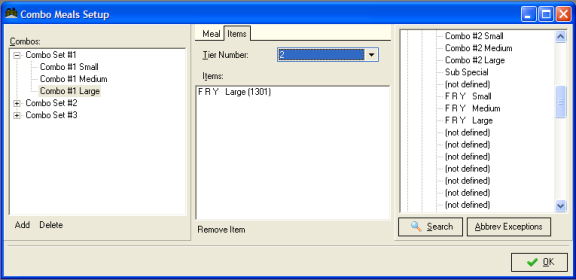
In this step, we link the menu items created in the previous step to actual combo meals.
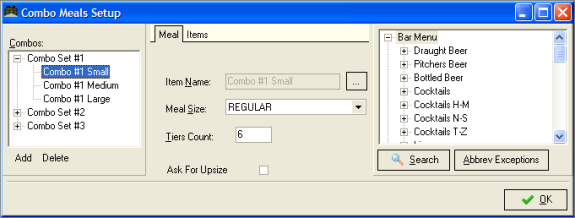
With the screen above, do the following:
To do the above:
Some options are NOT available for combo meals. The special considerations and restrictions are described below.
Also, note that forced modifiers are skipped when you hit the combo meal button.
For sent combos, the whole combo is automatically tagged when at least one of the combo members is tagged before deletion occurs. However, if not yet sent, when the combo is partially tagged, only the tagged combo member items and the main combo item (i.e. Large Combo #1) are deleted.
If you select the option “Delete last item” and the last item is a completed combo, the entire combo is deleted – the main combo item, the combo members and all.
The settings under this section of Station Configuration determine the behavior of Combo Meals at the POS.
By default each Item Button displayed in the Menu Area of the Order Entry Screen links to a single Menu Item. In other words, when you touch a button the corresponding Menu Item is automatically added to the active order. However, when an Item Button is configured with Adjectives, that single button may be linked to multiple Menu Items.
Restaurants that sell soft drinks and other menu items in multiple sizes almost always enable Adjectives on Menu Item Buttons. Many users also configure certain Modifier Items with adjectives.
The partial screen shot below shows soft drink Item Buttons that have been configured with Adjectives: small, medium and large. These adjectives link each Item Button to three different Menu Items. For instance when you touch the [Coca Cola] button, you are prompted to select one of three differently sized (and differently priced) Menu Items:
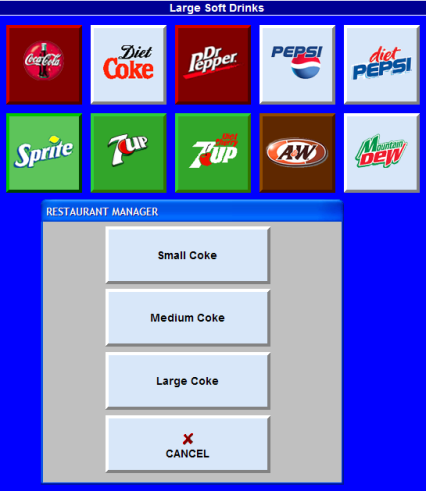
While the Adjective prompt in the screen shot above looks like a Forced Modifier pop-up screen, it’s not prompting for modifiers; it is offering a selection of three different Menu Items. In other words, this sample screen of thirty Item Buttons may be used to order ninety different Menu Items.
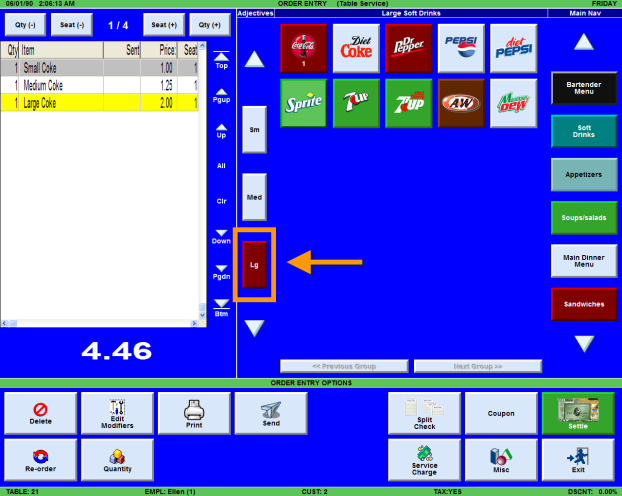
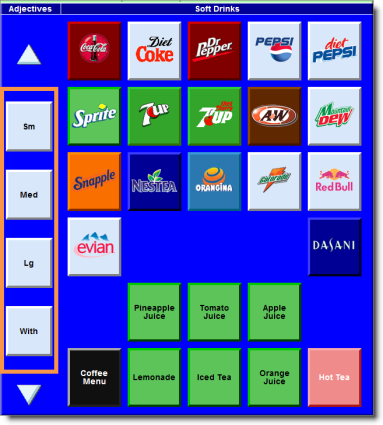
In systems where many Item Buttons are configured with Adjectives it may be more efficient to do away with Adjective pop-ups by configuring the Order Entry Screen with an Adjective Bar. As shown below, the Adjective Bar offers a permanent display of adjective options where, to order a Large Coke you simply touch the [LG] button on the Adjective Bar followed by the [Coca Cola] Item Button:
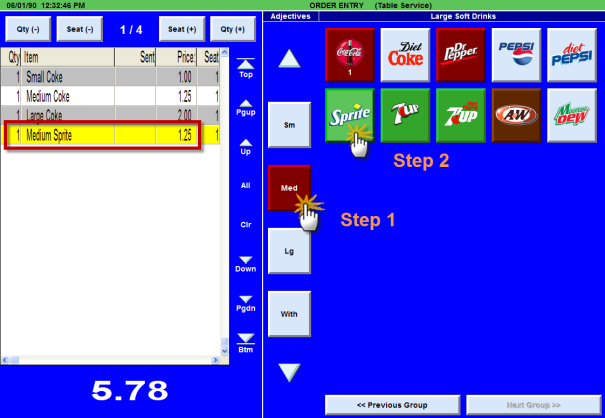
The Adjective Bar is more efficient than the Adjective pop-up because it offers a feature known as “persistence” which means that once you select an Adjective it remains active until you change it. In the screen shot above, for instance, the [LG] red Adjective Button is the active adjective. To add a Large Sprite or a Large Seven-Up there is no need to touch the [LG] adjective button again, you may simply touch the appropriate Item Button. To add a Medium Sprite to the order, however, you must first touch the [MED] adjective button, followed by the Sprite button – at which point the [MED] adjective becomes the persistent, or active, adjective:
The next screen shot is a portion of the order entry screen showing a group of sandwich modifiers where each item button is configured with four adjectives. In other words, each of the Item Buttons below links to four different Modifier Items:
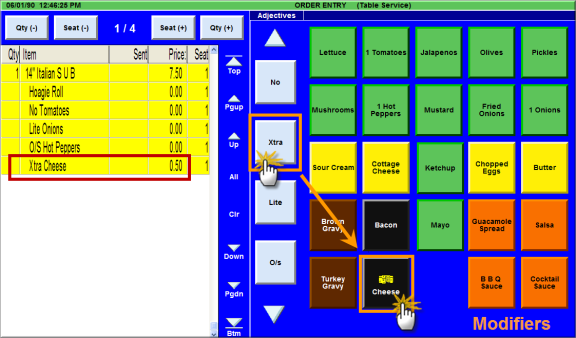
The Adjective Buttons coupled with the Modifier Buttons in the sample screen shot allow you to efficiently order a sandwich with, say, onions, extra mayo and a pickle on the side -- without ever changing the Menu Area display. The twenty four menu item buttons in this sample screen shot allow you to add 96 different modifiers to any given sandwich. And if, for instance, some of the “Extra” modifiers are configured with an up charge, this charge is automatically added to the order as necessary, as shown above in the charge for “Extra Cheese”.
The procedures for configuring Item Buttons with adjectives are the same whether the buttons represent Menu Items or Modifier Items:
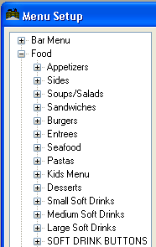
The Menu Tree below shows three different Menu Groups for the Small, Medium and Large soft drinks used in the sample screen shots above. It also shows a fourth group called [SOFT DRINK BUTTONS] which will be used for defining only Item Buttons, not any actual menu items:
Use the Adjectives Setup Form to name Adjectives that correspond to each different Menu Group you have created for use in the Adjective configuration. The screen shot below shows [SM], [MED] and [LG] adjectives:

If you are using an Adjective Bar on the Order Entry Screen you may use the “Persistent” check box to determine what happens each time a button on the adjective bar is pressed. “Persistent” buttons will remain active until you touch a different adjective button on the bar. Non-persistent adjective buttons do not remain active after they’re touched.
The width of the adjective column and the number of adjective buttons are adjustable via settings under Order Entry Screen Options of Station Configuration. The Fractional Screen Width for Adjectives used above is “0.1” You can remove the adjective column entirely by setting the column width to 0.
NOTE: Modifiers configured with Adjectives should not be used in Forced Modifier pop-up screens.
To define adjectives for your restaurant, go to Setup->Menu->Adjectives Setup. The following form is displayed:
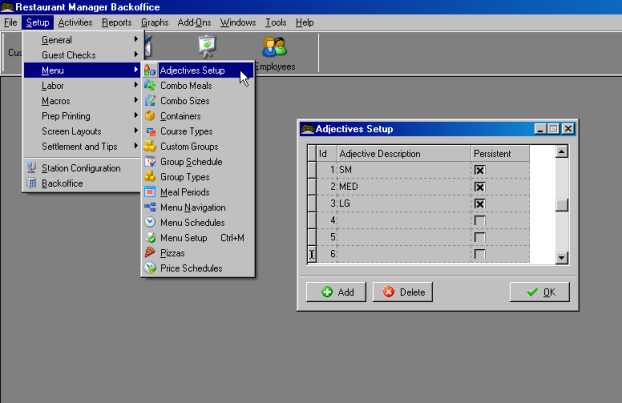
You should give this careful consideration BEFORE entering your adjectives. This first step is relatively easy, but after linking adjectives to menu items (as described in the next few sections), it will be very difficult to delete adjectives or re-arrange the adjective order; doing so will throw off the adjective links in the menu and will require reprogramming.
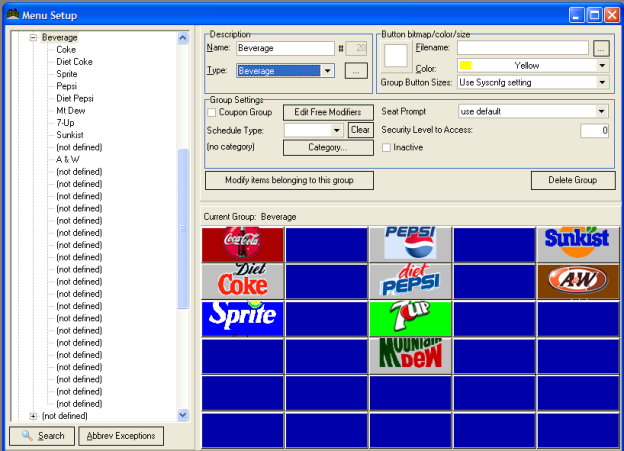
The next step is to create a group of base items in Menu Setup. For the beverage example, you should create a group containing the beverages without specifying the size (e.g., Coke, Diet Coke, etc.). Prices for these items are immaterial as they are simply used as a placeholder to point to the real items below.
After creating base items, you must create adjective items for every base item. These items should be placed in separate menu groups that are not visible to the user. In the beverage example of the previous section, you would create four items for every beverage – one for each size (i.e., Sm Coke, Med Coke, Lg Coke, and XLrg Coke). Do the same for all the other beverages. Remember to define item prices here.
To enable Adjectives for a “base” item, highlight the “base” item in the menu setup form. Click on the “Adjectives” tab and check the option “Enable Adjectives”. Note: The ‘base item’ is the one under the menu group of which you want the user to see, in this example, under Beverage group. When this option is checked, the item is treated differently by Restaurant Manager™. See discussion in the next section.
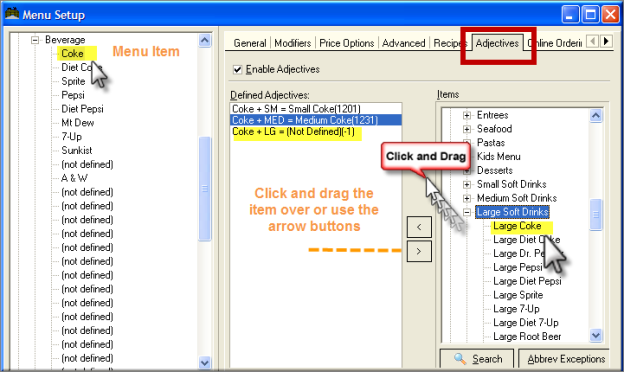
Initially, all entries in the center window (“Defined Adjectives”) will be “Not Defined”. To define an adjective for the base item, first highlight the adjective in the center window, and then find the correct item to link to it in the “Items” tree on the right. Remember that the item belongs to the group which you don’t want the user to see, Adjectives group in this example. Then press the less than symbol “<” to assign the adjective. Repeat this procedure until all valid adjectives are defined. It is OK to leave one or more adjectives “Not Defined” as Restaurant Manager will not allow that adjective to be used with that base item.
To make a particular adjective the default, “Right” click on the adjective and choose the “Make Default” option.
When you are done with these steps, you are now ready to make use of your adjectives in POS.
Another example:
Suppose you sell sandwiches and offer a variety of condiments:
|
Onions
|
No Onions
|
Extra Onions
|
|
Pickles
|
No Pickles
|
Extra Pickles
|
|
Tomatoes
|
No Tomatoes
|
Extra Tomatoes
|
For this application, you would create two adjectives:
Then you would create menu items in the following groups:
- Onions
- Pickles
- Tomatoes
- No Onions
- No Pickles
- No Tomatoes
- Extra Onions
- Extra Pickles
- Extra Tomatoes
Note that in this example, instead of 9 buttons, the user can only see 5. If you prefer to put “Regular” adjective to make it clear for the server, you can also do so.
When using adjectives in Point of Sale, you must first select an adjective, and then press an item. If you forget to press the adjective first, Restaurant Manager will do one of two things. If there is a default adjective for the item, it is selected automatically. If there is no default, Restaurant Manager will display a list of all available adjectives and require you to choose one.
If you choose an adjective that is not defined for an item; for example, if you chose the adjective “Extra” then press the “Coke” button. The POS program will display an error message.
If you select an adjective, then press an item for which adjectives have not been enabled, the POS will ignore the adjective and just order the item.
If you accidentally select the wrong adjective, you can touch it again to deselect it, or you can select a different adjective.
Persistent adjectives remain selected, even after being applied to an item or modifier. Non-persistent adjectives are automatically de-selected immediately after being applied.
Restaurant Manager offers two types of adjectives. “Standard” adjectives are more cumbersome to set up, but offer more flexibility in pricing and inventory adjustments. For example, if you offer three sizes of soft drinks (small, medium and large), by using “standard” adjectives, you can define the exact price and inventory depletion for each size and type of soft drink. To achieve this flexibility, each size and type of soft drink must be defined as a menu item. For example, “Small Coke” “Medium Coke” and “Large Coke” must all be entered as separate menu items and linked to a common base item called “Coke.” For a complete discussion of “Standard” adjectives, refer to <xxx>.
“Simple” adjectives on the other hand are much easier to set up, but offer less flexibility. To create a simple adjective, simply check the “Simple” check box in the adjective set up form.0
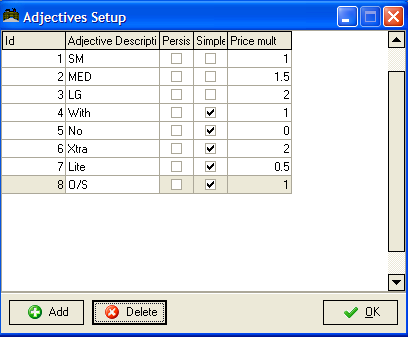
Each “Simple” adjective provides a price multiplier option which multiplies the price of the item to which it is applied. For example, you might define two simple adjectives called “NO” and “EXTRA” to be used with sandwich condiments such as CHEESE, ONIONS, PICKLES, etc. The adjectives would allow combinations such as “NO onions” “NO pickles” and “EXTRA cheese.” Because the condiments may have a price associated with them, the price multiplier can be used to modify the condiment price. Let’s say you normally charge 50 cents for cheese. If you wanted to waive the charge for “NO CHEESE” but double it for “EXTRA CHEESE” then you could enter a price multiplier of 0.0 for the “NO” adjective and 2.0 for the “EXTRA” adjective.
You can also enter a negative amount for the price multiplier. That will not only multiply the price of the item, but will also negate it. For example, suppose you offer an item that includes a standard set of ingredients, but offer a price reduction if one or more ingredients are omitted. For example, a meat lover’s combo pizza might include 4 meat toppings, but if the customer wants a meat lovers pizza without pepperoni, there is a $1.00 price reduction. If your pizza toppings are normally $1.00, then you can create a simple adjective with a price multiplier of -1, so when it is applied to any of the meat toppings, it deducts $1.00 from the amount.
Note: Simple Adjectives do NOT change inventory depletion. In the above example, “NO CHEESE” would have the same inventory depletion as “EXTRA CHEESE.” If you are doing inventory control and need accurate inventory depletion, then you must use “Standard” adjectives.
Simple adjectives may appear in two places on the POS screen – as a column of buttons near the center of the order entry screen.
To control the width of these buttons and the number of buttons displayed, go to RM BackOffice > Setup > Station Configuration, use the [Search Settings] function and set the parameters:
To invoke a simple adjective, press the desired adjective button. The button will change color to indicate that it is selected. Then press an item or modifier button. The item or modifier description will be prefixed by the adjective.
You can decide whether to allow simple adjectives on menu items or on modifiers. There are two settings located in RMWin > Setup > Station configuration:
These two options can be used to restrict the usage of simple adjectives exclusively to menu items or modifiers. For example, the “NO” adjective described in the example above had a price multiplier of 0.0. Applying it to a menu item would cause the item price to be zeroed out. If you wish to prevent that from happening, UN-check the option “Allow simple adjectives on menu items.”
Another place that simple adjectives may appear is along the bottom of pop-up modifier screens.

In RM BackOffice > Setup > Station Configuration, there is an option “Enable simple adjectives on pop up modifier screens.” This is a system wide setting that controls all pop-up modifier screens. You can further tailor your system to display (or not display) simple adjectives on specific modifier screens. In RM BackOffice > Menu > Menu Setup > [Menu Item], in the “Modifier” tab, there is an option for each modifier screen to enable or disable simple adjectives. If you wish to use the system default defined in Station Configuration, set the option to “Use Default.”
Restaurant Manager provides a scanner interface to accommodate limited retail environments such as golf pro-shop, or for selling T-shirts or ball caps or any items with a UPC bar code.
To use this option, you must purchase the Scanner Interface option from ASI and you must have a scanner at each POS station. It is also recommended to have a scanner at the back office for defining bar codes. The scanner should plug into the keyboard port. Currently Restaurant Manager does not support scanners with a serial interface.
To set up the bar code for an item, go to “Menu” setup in the back office, highlight a menu item, and then click on the “Advanced” tab.
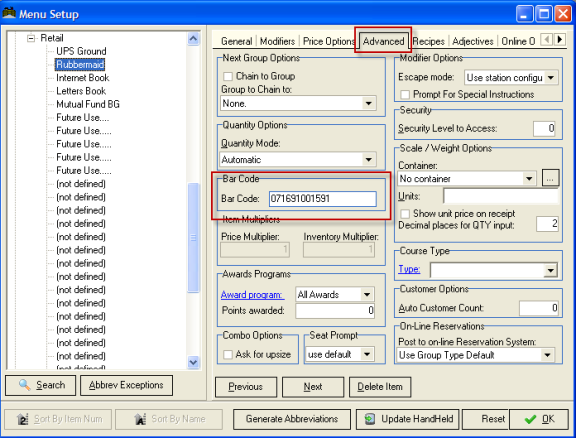
Click on the “Bar Code” field and enter the UPC code for the item. It is strongly recommended that you connect a scanner to the back office computer (rmserver) so you can scan the UPC code; this will not only save time, but it will avoid errors in data entry. If you have a scanner connected to the back office PC, click on the Bar Code field, blank it out if there is anything in the field, then scan the item. Your scanner should stuff the bar code into the field.
To order a bar coded item from POS, simply go into any order and scan the item of interest. RM will append it to the check.
If want to order more than quantity 1, you can scan an item multiple times, or you can change the quantity before you scan the item.
If you sell items by weight and the weighing scale is capable of printing a barcode with the price, then RMPOS can be configured to read the barcode and extract the price. This is common in establishments that offer a deli counter where the person behind the counter weighs the items, but does not take payment.
In order to use price embedded barcodes, you must purchase the optional “Hardware Interface” module. Restaurant Manager provides some flexibility to read priced bar codes with different formats. A priced bar code consists of five parts. Here is a sample bar code output (note the spaces are added for clarity, but a real bar code does not have any spaces). The following sample conforms to UPC-A standards.
2 19577 30389 0
The 5 parts of this bar code are described below from left to right:
To configure the system to be compatible with the scale you are using, go to RM BackOffice > Setup > Station Configuration.
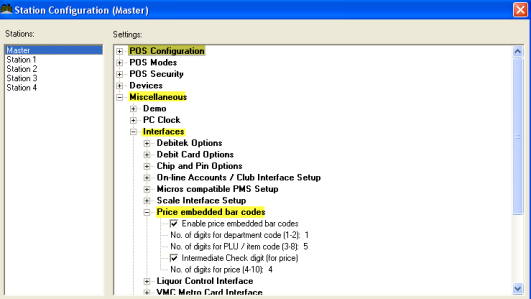
There are several parameters that must be defined. Each one is described below.
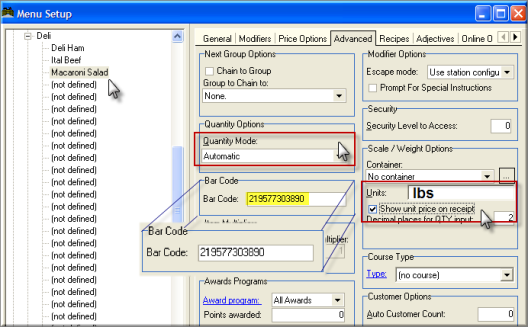
In addition to the station configuration settings, you must configure menu items in Restaurant Manager to act as priced bar code items. In RMWIN, menu setup, enter the item description as usual and also a price for the item. The price you enter is the unit price for that item. For example, if you sell Honey Ham for $4.99 per pound, then you would enter $4.99 for the price.
Next, click on the “Advanced” tab and move to the “Bar Code” field. Use your scanner to scan a bar code that is associated with Honey Ham. Note: the price on the bar code is not important as it will be ignored by the system. Next, in the “Scale / Weight Options” box enter the units and decide whether you want the unit price to be printed on Restaurant Manager receipts. For the “Quantity Mode” keep the default setting of Automatic.
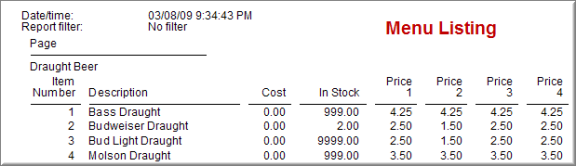
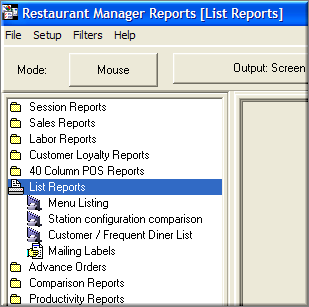
You can print a list of some or all of the items on your menu(s) from the Menu Listing report under the “List Reports” folder in the RM Report Module. The Report can be accessed using the Report Interface typically found on the toolbar in RM BackOffice. By default, the report shows Item Number (plu #); Item Description (name), Cost, In Stock Quantity, and the first for price levels. The report can be customize to arrange the data displayed and filter to specific menu groups and items. More information regarding this report and others can be found under the documentation: Reports User's Guide
Portion Sample