(continued from Advance Order Module)
In bars or counter service operations where transactions are settled as soon as they are rung up, the Order Entry Screen is usually configured as the default display. In other systems, the Order Entry Screen is accessed by touching a button on the POS Status Screen.
Servers record the menu items ordered by customers on the Order Entry Screen. They also use the [Send] button on the Order Entry Screen to communicate the order to the kitchen, the [PRINT] button to prepare customer checks and the [SETTLE] buttons to process payments. These three Order Entry Function Buttons represent only a fraction of the many POS operations that can be executed from the Order Entry Screen.
The layout of the Order Entry Screen is very configurable. The two screen shots on the next page show the same order displayed on two different formats of the Order Entry Screen. In the first example the layout is very simple making it easy to identify the basic areas of the Order Entry Screen:
The second example highlights many of the special features that can be added to the basic layout of the Order Entry Screen, features such as:
At the top of the Order Entry Screen is a Title Bar that displays the date & time as well as the POS Module that was used to open the current order.

Date & time information are read off the internal clock on each POS Workstation. And the internal clock on each POS Workstation is synchronized with the rmserver. In other words, the Title Bar on each POS Workstations should display the same date and time information. If the clocks on the POS Workstations are not properly synchronized your data may get corrupted.
At the base of the Order Entry Screen is a Status Bar that displays key information about the current order. The same Status Bar is displayed at the base of the Settlement Screen. All of the information displayed on this Status Bar can be changed before finalizing the transaction.

For more information on changing the information displayed on this Status Bar see the sections on:
The Menu Area of the Order Entry Screen displays groups of Item Buttons. Any time you touch an Item Button, the associated Menu Item is listed on the Order Detail Area of the Order Entry Screen. In other words, the Menu Area is a tool for adding items to an order.
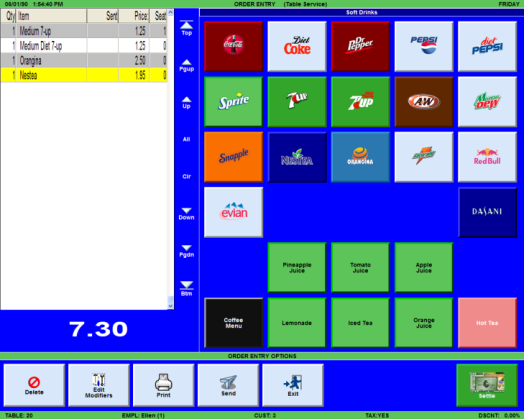
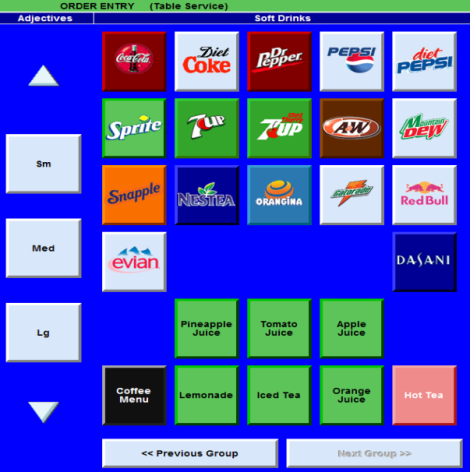
The Menu Area may display Item Buttons from both standard Menu Groups as well as from Custom Groups. The name of the group containing the buttons displayed on screen is shown at the top of the Menu Area. The partial screen shot below displays Item Buttons from a group called [Soft Drinks]:
You may configure how Item Buttons are laid out within the Menu Area using the button layout templates that appear on both the Menu Groups Setup Form and the Custom Groups form.
You may define a particular group of Item Buttons as a Default Display that appears in the Menu Area each time you access the Order Entry Screen. You may change the Item Buttons displayed in the Menu Area by navigating the menu (i.e. by touching a different “Group Button”).
By default the Menu Area on the Order Entry Screen fits up to thirty (30) Item Buttons. But you may configure the area to display 60 Item Buttons.
NOTE:The screen shot above shows the Menu Area configured withAdjective Buttons as well as with Item Buttons. However, the Adjectives feature is an optional configuration setting that is not enabled in all POS Systems.
By default every Menu Item and Modifier Item on your menu is associated with an Item Button that is configured on the Menu Setup Form.
Each Item Button may be configured to display the name of the menu item or an item bitmap or both. The color of each Menu Item button may be configured independently but it is recommended that like items are set to the same color.
Item Buttons may be configured to display quantities such as the amount of stock on hand or the quantity included on the current order. Some of the buttons in the Menu Area may be configured to act as Navigation Buttons or Adjective Buttons rather than standard Item Buttons.
If the restaurant offers specials at limited times of the day, week or year, you may configure the system so that the associated Menu Item Group buttons are not active at the POS Stations until it is made “active”.
Any of the Item Buttons displayed on the Order Entry Screen may be linked to Forced Modifiers or Modifier Prompts. These links guarantee that servers will specify key cooking instructions or side dishes each time they add a Menu Item to a particular order.
Certain attributes of Item Buttons may be changed in real time from the POS Workstations while other attributes must be changed from the BackOffice Module. However, all changes to Item Buttons are implemented in real time regardless of whether a sales session is open or closed.
Item Buttons are organized into groups for display on the Menu Area of the Order Entry Screen. All available groups of Items Buttons are displayed on the Groups Screen.
If you configure an Item Button with Adjectives that button will no longer represent a single Menu or Modifier Item but, will, instead link to multiple items. Configuring Item Buttons with Adjectives allows more efficient order entry of menu items such as soft drinks, etc that are sold in multiple sizes.
Item Buttons are always organized into groups for display on the Menu Area of the Order Entry Screen. Each of these groups is called up using a Group Button and used to change the display of Item Buttons in the Menu Area of the Order Entry Screen. In other words, Group Buttons are used to navigate the menu.
You may create Group Buttons using the button layout templates that appear on both the Menu Groups Setup Form and the Custom Groups form.
It is possible to temporarily remove certain Item Buttons from the Menu Area Layout by making the buttons “Inactive”. For instance, in a restaurant that cycles through different sets of daily specials there might be a “Soft Shell Crab Almandine” that is only available at certain times. To maintain this item on the menu but remove the Item Button from the POS display, you need only locate the item on the Menu Item Setup Form and then click on the check box labeled “Inactive”.
You may also de-activate certain Group Buttons such as a Thanksgiving Menu or a Mother’s Day Menu or even de-activate entire Menu Pages. In other words, the Menu Page Setup Form and the Group Setup Form also include an “Inactive” checkbox.
The Menu Setup Form and the Custom Group Setup Form both include templates for configuring the way Item Buttons are displayed in the Menu Area of the Order Entry Screen. Button layout templates look like a grid of blank blue squares until each button template is configured.
All button layout templates rely on a “Drag & Drop” functionality that allows you to move buttons to specific spots on the template and a Sort function that automatically arranges the buttons in alphabetical or numerical order. The procedures for adding a new Item Button to the template, however, are different for the Menu Setup Form and for the Custom Groups Form.
After a button has been added to the layout template, you may move it to another area of the template. Simply left click on the Item or Group Button, hold down the mouse button and drag image to a new area of the screen.
The Drop and Drag feature works only for moving Item Buttons within a single Group. If you wish to move an Item Button to a different group on the Menu Setup Form you must use the Swap feature.
When configuring a Button Layout you may automatically sort the buttons by number or by name. Simply use the function buttons below that appear under the Button Layout Template:
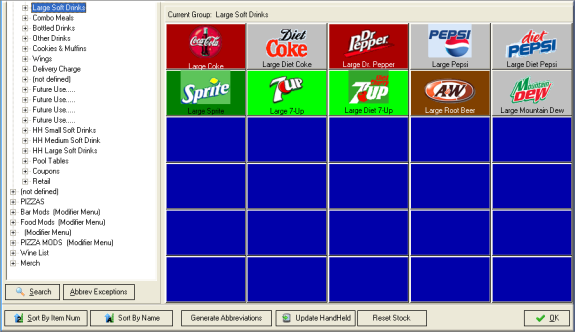
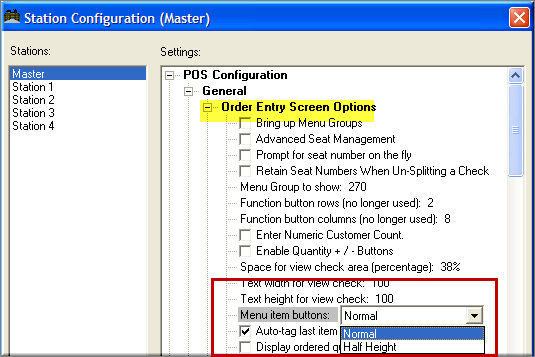
The Item Buttons displayed in the Menu Area of the Order Entry Screen may be displayed as either “normal” size or “half height” buttons. In “normal” mode, the Menu Area displays up to 30 Item Buttons from a single Group. In “Half Height” mode, up to 60 Item Buttons from two consecutive Groups may be displayed together as shown below:
There are two ways to implement the configuration of Half Height buttons. At certain POS Workstations, you may configure the Menu Area, itself, to always display Half Height buttons. Alternatively you may configure certain Menu Groups or Custom groups so that the Item Buttons within the group are always displayed at Half Height along with the buttons in the next consecutive group.
Some special considerations should be addressed when taking advantage of the “Half Height” feature: First of all, the buttons are smaller, so they may be more difficult to press on a small touch screen. Secondly, the buttons may not be able to display as much text – especially if you are using bitmaps – and long Item Names may be truncated. And finally, because consecutive groups are displayed together onscreen, you must give special care to the order in which groups appear on the menu.
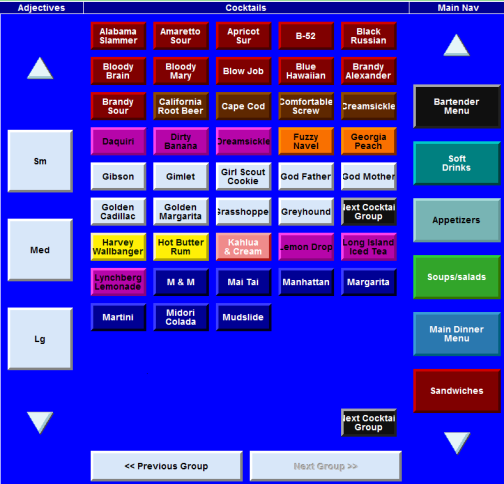
The standard way to configure Half Height mode is to configure certain groups so that all Item Buttons within those groups are displayed at Half Height. Half Height mode is often used in conjunction with Navigation buttons. For instance, as described below, a Cocktail menu of up to 120 drinks might be displayed in two screens of half height buttons with special Navigation buttons for flipping back and forth between the two screens.
When using Menu Groups to configure half height buttons, care should be taken to organize the menu so groups of half height buttons are adjacent to one another.
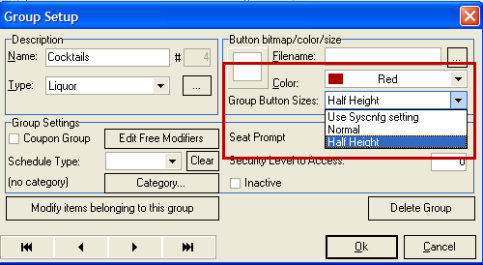
You may use the [Group Button Size] field on both the Menu Groups Setup Form and the Custom Groups Setup Form to enable Half-Height mode for certain groups:
NOTE: “Use Station Configuration settings” is the default setting for Group Button Sizes. This means that configuring the Menu Area, itself, to always display in Half Height modes does not require adjusting the configuration of any Menu Groups.
You may configure certain POS Workstations so that the Menu Area of the Order Entry Screen always displays Menu Buttons in Half Height Mode. Simply use the [Search Settings] button on the Station Configuration Setup Form to locate the Menu Items Button option. Click on the drop down list when the setting is highlighted onscreen, and select “Half Height” option as the display mode to use at the station highlighted on the Station List.
NOTE: This Station Configuration setting overrides settings enabled on the Menu Groups Setup Form.
Each POS Station is typically configured with a default Menu Group so that the same menu item buttons appear in the Menu Area every time you access the Order Entry Screen. Alternatively you may create default menu groups that are linked to the job class of the person using the POS Station, rather than to the station, itself.
If you choose not to define a default menu group you may, instead, set the default to automatically display all the Menu Groups that comprise the entire menu each time you access the Order Entry Screen.
You may also identify default Menu Navigation Bars but the default “Nav Bars” are independent of the Default Menu Groups displayed in the Menu Area.
Once you’ve accessed the Order Entry Screen you may navigate the menu to change the Item Buttons displayed in the Menu Area.
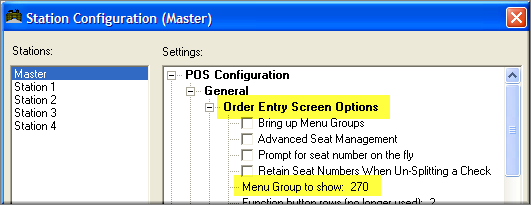
You may configure different POS Workstations with different Default Displays of Item Buttons. Simply note the Group Number of the Menu Group or Custom Group you wish to set as the default display and then use the [Search Settings] button on the Station Configuration Setup Form to locate the “Menu Group to Show” option.
When the setting is highlighted onscreen, type the number of the Group you wish to set as the default display at the station highlighted on the Station List.
NOTE: This Station Configuration setting will be overridden if you enable the “Default Menu Group to Show “setting on the Job Classification Setup Form.
You may link the menu items displayed on the Order Entry Screen to the Job Classification of the employee using the station. When this feature is enabled different employees will see different items displayed in the Menu Area when they first access the Order Entry Screen. For instance, the screen might display alcoholic beverages for bartenders and entrees for Waiters, etc.
Use the Job Classification Setup Form to link the menu items displayed on the Order Entry Screen to the employee using the POS Station:
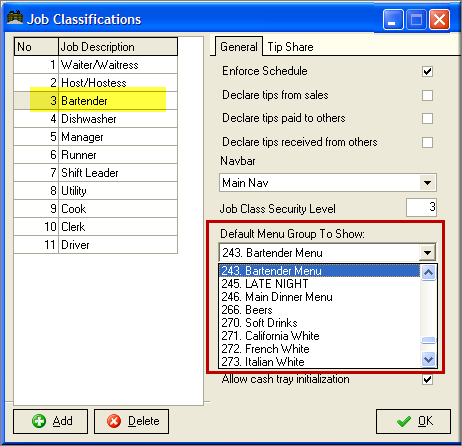
Simply note the number of the Menu Group or Custom Group you wish to set as the default display, highlight a job description on the left side of the form and select the appropriate group number from the drop down list in the field labeled [Default Menu Group to Show]
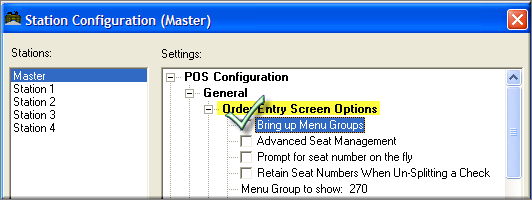
If you prefer not to define a single group as the Default Display you may, instead, give servers easy access to any group on the entire menu. In other words, you may configure the Menu Groups screen to appear each time you access the Order Entry Screen.
Use the [Search Settings] button on the Station Configuration Setup Form to locate the following the “Bring Up Menu Group” option.
Highlight the stations on the Station List where you wish to set the Menu Groups screen as the default display and click on the box corresponding to the setting.
NOTE: This Station Configuration setting overrides all other Default Display settings
Menu Item Buttons may be configured to display one or both of the following quantities:
In-Stock quantity (i.e. how many such items are available in the prep areas)
Order Quantity (i.e. the number of items included on the current order)
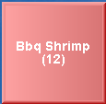
You may configure individual Item Buttons to display how many such items are available in the prep areas. Stock quantities are displayed in parentheses after the Item Name:
The In-Stock Quantity decrements in real time each time you touch an Item Button. Restaurant Manager will block further orders of that item when the In-stock quantity of any item reaches “0”. In the Table Service Module an “out of stock” message is also posted automatically to the Bulletin Board.
This real-time tracking of stock quantities provides a rudimentary Inventory Control that is useful for tracking items in limited stock such as bottles of wine or daily specials, etc. True Inventory Control, however, must be configured in a separate Add-on Module to the basic POS System.
The current In-stock quantity of any given Menu Item may be set using the [In Stock Quantity] function button on the Order Entry Screen. Stock quantities may also be defined or deleted on the Menu Setup Form. When the In-Stock Quantity is set to [9999] the tracking feature is de-activated. When the In-Stock Quantity is set to any amount below [9999], the quantity on hand is displayed on the Item Button.
From the BackOffice Module you may use the Global Menu Change form to adjust In-Stock amounts on multiple items.
Use the [Re-set Stock] function on the Menu Setup Form to reset all menu items to the default setting “9999”.
Use the [In-Stock Quantity] Function Button on the Order Entry Screen to note how much of a given Menu Item you have on hand:
When you touch this Function Button the system prompts you to select the Menu Item you wish to configure and then prompts you to enter the stock amount on hand.
The In-Stock Quantity Function Button is accessible from the POS Order Entry Screen but the exact location of the button is determined by configuration settings on the POS Function Buttons Layout Form.
Note: Items entered in the Advanced Order module will not deplete In Stock Quantities prior to or after order conversion.
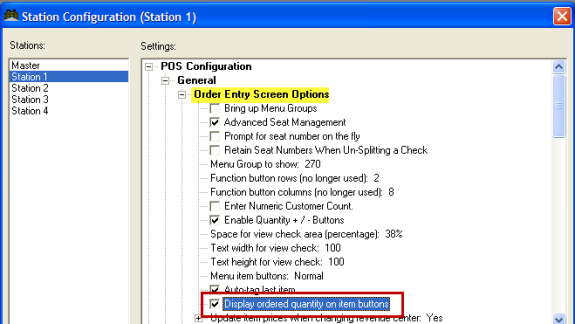
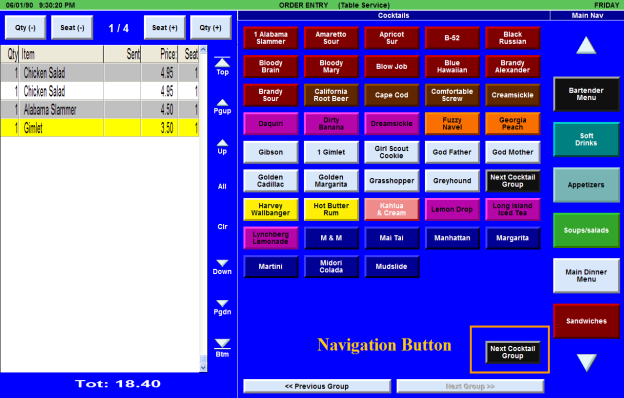
You may configure your system so that each Menu Item Button in the Button Area displays the quantity included on the current order. When this setting is enabled the quantity ordered is displayed prior to the item name and increments every time you touch a menu button. The partial screen shot below shows the quantity ordered displayed on the red button labeled [Chicken Salad]:
![]()
To enable this feature use the [Search Settings] button on the Station Configuration Form to locate and enable the “Display Ordered Quantity on menu buttons” option.
Navigation Buttons may be added to the Menu Area of the Order Entry Screen which is normally populated with Menu Item buttons. However, touching a Navigation Button does not add a Menu Item to the active order. As the name implies, Navigation Buttons simply allow you to navigate to a new Menu Group (i.e. change the group displayed onscreen.) In addition, Navigation Buttons may be linked to both standard Menu Groups and Custom Groups.
Navigation Buttons are commonly used in Modifier Groups that have been configured as automatic modifier prompts. Navigation Buttons may also be used to page through a sequence of related groups. For instance, if a bar menu includes many groups of cocktails; you might use a [Next Group] button to page from one group of cocktails to the next. The black button below labeled [Next Cocktail Group] is a Navigation Button that causes a second group of Cocktails to be displayed onscreen.
It is recommended you always use the same color for Navigation Buttons; a color that you do not use for Item Buttons. It is also recommended that Navigation Buttons always be placed in the same area of the screen, usually the lower right hand corner. Consistent characteristics such as these give servers visual cues that Navigation Buttons are different than standard Menu Item Buttons.
The procedures for configuring the Menu Area of the Order Entry Screen to display Navigation Buttons depends on the type of group displayed a standard Menu Group or a Custom Group.
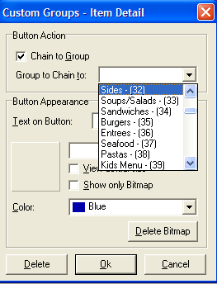
To add a Navigation Button to the Menu Area when a standard Menu Group is displayed:
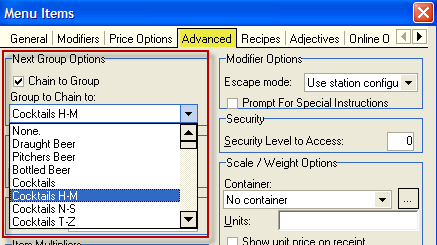
NOTE: You may chain to either a standard Menu Group or a Custom Group. The Custom Groups appear at the end of the drop down list and are best viewed by scrolling up from the bottom of the drop down list.
To add a Navigation Button to the Menu Area when a Custom Group is displayed:
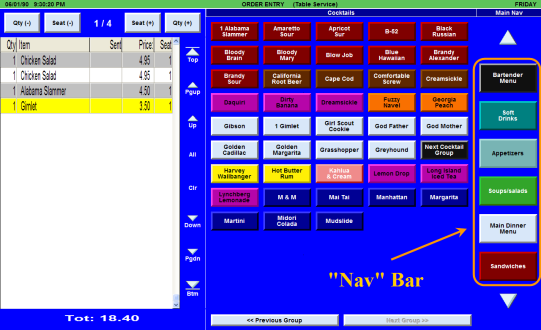
The buttons representing your most frequently used menu groups can be programmed so that you can access a group with a single button press. This column of buttons is displayed along the right edge of the Order Entry screen in POS and is called Menu Navigation Bar (or Nav Bar for short). On previous versions, this was done via macros, so if you are upgrading we recommend you eliminate the group related macros and program them into the nav bar.
You can define different nav bars for different purposes. For example, you might have one nav bar that is used by bartenders and a different one for waiters and waitresses. Or you might have one nav bar for eat-in customers and another one for carry-out. The choice of nav bars to display can be configured to be manual, job classification, or by revenue center.
The first step in setting up the nav bar is to define the settings for the Nav Bar. The next step is defining the actual buttons to display. The set up screen is located under Setup-> Menu->Menu Navigation.
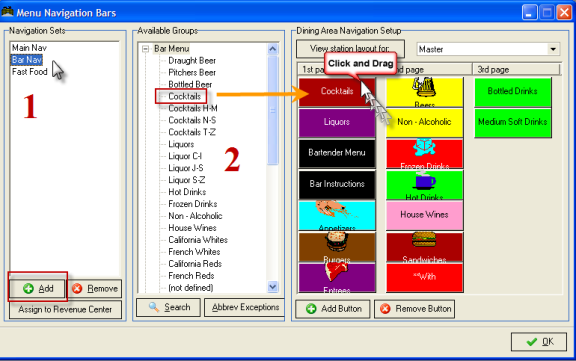
The different nav bars or “Navigation Sets” are displayed along the left side of this screen. You can add and remove them by pressing the “Add” and “Remove” buttons respectively. In the middle part of the screen, your menu groups are displayed in a tree view. To program a nav button, find the desired menu group in the tree view and drag and drop it to one of the nav buttons.
In the sample screen above, the nav bar is configured to display 8 buttons. Buttons after the 8th are accessed from the Point of Sale screen by pressing the Up and down arrow keys on the nav bar.
If you wish to change the nav bar as a function of revenue center, press the button labeled “Assign to Revenue Center. Change the nav bar as a function of revenue center, press the button labeled “Assign to Revenue Center.” The revenue center set up screen will appear.
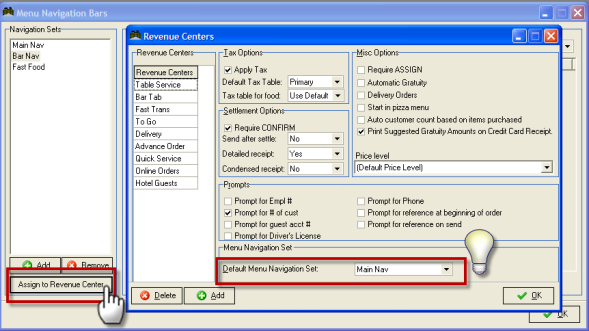
For each revenue center on the left, select a “Default Menu Navigation Set” to use.
On previous versions, you could either change the nav bar manually or automatically based on the revenue center. You can change the nav bar based on the job class of the employee that is assigned to the transaction. Note: this is not necessarily the same as the employee who swiped into the system. For example, a manager could swipe into the system and access the check for a waiter. The manager would see the same nav set as the waiter would when he/she access the transaction.
To change the nav bar based on job class, you must set the option under station configurations. Use the Search function to look for “nav buttons”, and ‘Menu nav buttons mode’ will appear. Double click to show drop down list then choose “Job Class”. Next, you must define the nav set to activate for each job class. This setting is located in RMWin->Setup->Labor->Job Classifications. For each job class, choose the desired Nav set to use.

Previous/next group buttons provide an alternative method of moving between menu groups on the order entry screen. The POS program maintains a record of menu groups that have been displayed. The Previous and Next buttons allow traversing through the previously displayed menu groups, similar to the Back and Forward buttons when browsing the internet. The Previous/Next group buttons are displayed below the menu items on the order entry screen.
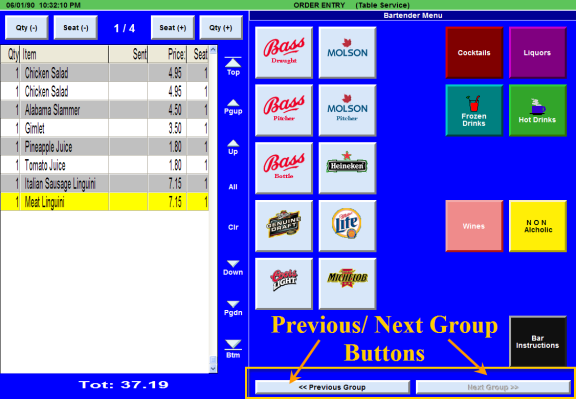
The button height can be adjusted using the Station Configuration parameter “Previous/Next group button height (%).” Set this option to 0 to remove the Previous/Next group buttons, or to any value up to 20% of the screen height.
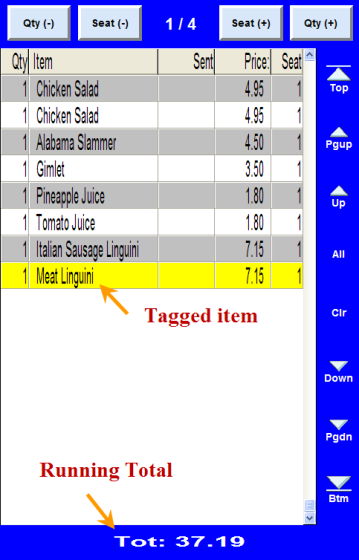
Each time you touch an Item Button in the Menu Area of the Order Entry Screen the corresponding Menu Item is added to the Order Detail Area. In other words, the Order Detail Area displays the Items on the current order. A running total for the active order is displayed immediately beneath the Order Detail Area.
By default, when you add an item to the order it is “tagged” or highlighted in the Order Detail Area, as shown in the screen shot below.
The Running Total located under the Order Detail Area displays to dollar amount of the check including menu items, taxes, and gratuities. Pressing the Running Total will produce an on screen check display where you can see all details affecting the total. In addition, the application of an automatic coupon will occur when pressing the Running Total assuming coupon conditions are satisfied.
You may touch any item on the Order Detail Area of the Order Entry Screen to “tag” it. Tagged items are highlighted in yellow as shown in the screen shot above. By default the last item ordered is automatically “tagged” or highlighted in yellow. If you wish to change this configuration default you must use the [Search Settings] button on the Station Configuration Form to locate and disable the “Auto-tag last item” setting.
There are a number of Order Entry Functions such as [DELETE] or [DISCOUNT ITEMS] that apply only to “tagged’ or highlighted items. In other words, by default, these operations affect the last item ordered. However, if you touch or “tag” any other item listed in the Order Detail Area, these operations may be applied to other items, as well.
There are two buttons alongside the Order Detail Area that assist in tagging and un-tagging multiple items at once. The [ALL] button allows you to tag all the items on an order so that you may globally apply certain operations to all the items on a given order. The [CLR] button allows you to “un-tag” all the items that are currently highlighted.
All of the operations listed below may be applied to individual items on an order. So before you touch the Function Button you must first tag at least one item on the Order Detail Area:
| EDIT MENU ITEM |
|
|
|
|
||
|
|
When the order gets long you may use the buttons on the right to move of the Order Detail Area displays buttons for navigation up and down through the list of items already added to the order. There is a scroll bar under the Order detail area that allows you to move right and left.
You may use the Station Configuration Setup Form to determine how much space this area takes up on the Order Entry Screen. And you may use the Order Detail Area Layout Form to determine the specific information displayed in this area.
The Order Detail Area of the Order Entry Screen can be configured to display any or all of the following data in the order you prefer:
Use the POS View Check Layout form to configure the Order Detail area of the Order Entry Screen:
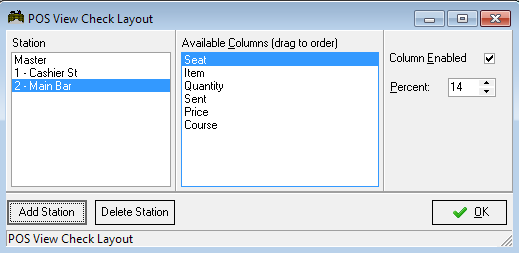
This form shows the Available Columns that can be displayed on the Order Detail Area. The columns enabled on this form are displayed onscreen in the order they’re listed. (i.e., the top item is the leftmost column and the last item is the rightmost column). You can rearrange the columns by clicking on the column of interest and dragging it to a new location. You can also adjust the percentage of the screen to use for each column. If you uncheck the box “Column Enabled” the column is not displayed on screen.
The POS View Layout can be configured to arrange columns in a different order or to remove certain columns if not needed. Example- Station 1 may be dedicated to table service and station two is dedicated to deliveries. In the circumstance, you may want to use all columns on station one but on station two you will want to remove the Seat and coursing columns because they do have any use in delivery. Note: unless a specific station is created, all POS Check View Areas will default to the master.
The following station configuration option will affect the way
Space for View Check Area (percent)- The view check area occupies the left portion of the order entry screen. It consists of a scrollable window that shows the items on the guest check. This option defines the percentage of the screen width to allocate to the view check area. A larger value makes more room for the view check and allows more columns to be visible without scrolling, but reduces the space for displaying menu items. The default value of 38% should suffice for most applications. Note, you can change the height and width of the text in the view check area with the following two options.Minimum value: 20%, Maximum: 50%, Default value: 38%
Text Width for View Check- This option allows you to change the width of the text used in the view check area. The value is defined as the percentage relative to the system default. The valid range is 50-200 where 50 corresponds to 50% of normal width (skinny text), and 200 corresponds to 200% (wide text). Default value: 100
Text Height for View Check- This option allows you to change the height of the text used in the view check area. The value is defined as the percentage relative to the system default. The valid range is 50-200 where 50 corresponds to 50% of normal height (short text), and 200 corresponds to 200% (tall text). Default value: 100
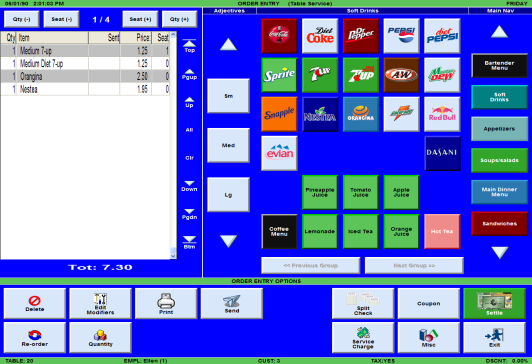
Quantity button can be added to the top of the order Entry Screen. You may configure the way this information is displayed on the Station Configuration Setup Form. Use the [Search Settings] button to locate the following setting “Enable Quantity +/- Buttons” option. The quantity button will adjust highlighted (tagged) items up or down in increments of one.
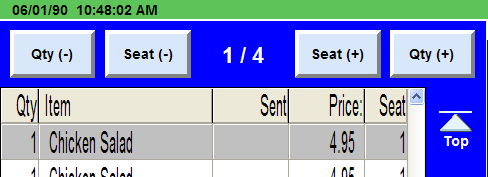
If you configure your system with Advanced Seat Management, the Order Entry Screen will be configured with two additional [Seat] buttons that can be used to easily advance the seat number as you order menu items for customers in different seats. You may configure the way this information is displayed on the Station Configuration Setup Form. Use the [Search Settings] button to locate the following setting “Advanced Seat Management” option.
Once applying this option, a fraction number will be added to the top of the order (e.g. ¼- see above screen shot). The fractional number reflects which seat you are on. An example is ¼ reflects you are adding an item to seat one on a table that seats four. If the number is ¾, you are adding an item to seat three on a table of four. This is designed for establishment using the Pivot Point order taking system. The default seat number for a table can be adjusted in the Table Layout Setup form in RM BackOffice. The base fraction number will automatically will supersede the default setting if “Prompt for # of cust” is enabled for the revenue center and you enter a customer count exceeds the default.
The button area at the lower portion of the screen is made up a configurable function buttons and macros (speed buttons). The following sections details the use of function buttons, the different types, and what happens when you press a specific function button.
The special operations that can be executed from the Order Entry Screen are controlled by POS Functions Buttons. Frequently used Function Buttons may be displayed at the base of the Order Entry Screen while less frequently used buttons may be displayed on a secondary screen accessed by touching the [MISC] button which also appears at the base of the Order Entry Screen.
For more detailed instructions on configuring the Button Area of the Order Entry Screen see the chapter on Function Buttons and Macros.
Most of the Function Buttons that can be activated from the Order Entry Screen are common to all three POS Modules. However there are some functions that may only be activated in one specific module. For instance, the [ASSIGN DRIVER] operation works only in the Delivery Module while the [REASSIGN SEATS] operation works only in the Table Service Module.The following function buttons appear at the base of the Order Entry Screen:
Touch this button to change the menu items that are displayed on screen. Touching this button allows you to display items in a different Menu Group on the active menu. It also allows you to change the active menu if you have configured your system with multiple menus or modifier menus.
Touch this button to delete one or more item from the Order Detail area. You can configure your system from the POS Security Setup Form to prompt for a password if the item is deleted after being sent to the food preparation areas or after the check is printed.
Touch this button to send menu items to printers in the preparation areas. If your system is configured to automatically send all new items to remote printers, you will not need to use this button.
Touch this button to print a guest check for the order that appears onscreen. There are many special print check features that can be activated as described in the section Guest Checks & Sales Receipts. You can customize the format of the guest check as detailed in the sectionConfigurable Guest Check.
Touch this button to access the Miscellaneous Functions screen for the active POS Mode. From the Miscellaneous Functions screen you execute secondary POS functions like splitting a check, adding a suggested gratuity. All Order Entry Macros are created from the Miscellaneous Function screen, too
Touch this button to access the Settlement Screen, record the method of payment and calculate change and tip, or to authorize an online credit card transaction.
Touch this button to quickly record a cash settlement in exact change without stopping at the Settlement Screen to select a payment type or calculate the change due.
This button appears only in Table Service mode and remains grayed out until you split a check or activate the Advanced Seat Management feature. Touch this button to assign seat numbers to items on an order that has been split into multiple checks.
This button allows you to access records in the customer database and link them to the active order. In the Delivery Service Mode it appears as “Customer” at the base of the Order Entry screen. In the other POS Modes this button is on the Miscellaneous Functions screen. Touch this button to link the order onscreen to a record in the customer database.
Touch this button to quit the Order Entry Screen and return to a POS Status Screen.
You can add customized Fast Button Macros to any screen. Macros will re-create several button strokes yet the end user will only have to press one.
If you press the [MISC] button at the base of any POS Status Screen, a selection of secondary function buttons appears.
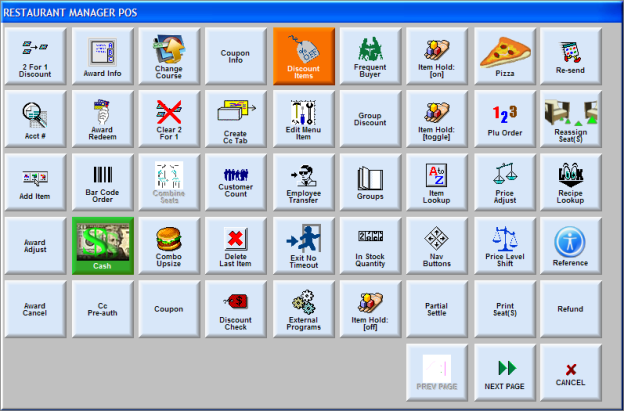
The sample screen above is the Miscellaneous Functions screen that appears behind the Order Entry Screen when you are in Table Service Mode. When you are in Delivery Mode or Bar Tabs Mode some additional buttons appear on this Miscellaneous Functions screen. The listing below includes a description of these additional buttons:
Press this button to select two items from the Order Detail Area and zero out the price on one of them (also known as BOGO).
Use this button to lookup “Guest Account” information including balances. You can disable the account balance being displayed if needed.
Press this button to add an item to the POS. This function will allow you access to the most basic elements to add an item (i.e. name printer assignment, price). You cannot add modifiers with the button.
Use this button to award balances for any award the customer is enrolled in. This should be a password protected function.
Press this button to cancel an award that has been applied to an order. You will receive a prompt of several awards if more than one award has been applied to the check.
Press this button after entering a Frequent Diner’s account number to view award balances.
Press this button if you receive a message on the POS stating the customer has an award waiting. You may also press this button after looking at the Award Info button to determine if the customer is eligible for an award. This button should be used after items have been entered and sent. More information on awards can be found under the topic Awards Programs.
Use if you are having difficulty with a scanner to manually enter a bar-code for menu item.
Touch this button to quickly record a cash settlement in exact change without stopping at the Settlement Screen to select a payment type or calculate the change due
In case you incorrectly apply a 2 for 1 discount on one or more items, RM provides the option of clearing all 2 for 1 discount on a given check. From the order entry screen, press [MISC] followed by “Clear 2 for 1.”
Press this button, if your system is configured, to do a credit card pre-auth.
Important Note: Credit Card Pre-Authorization is supported with Mercury (MPS) only. Attempting to do Credit Cards pre-auths with PC Charge or Datatran may result in undesirable results. Credit card pre-authorization provides the ability to capture and authorize a credit card at the beginning of a sale.
Press this button the change a menu items course. For example, a customer may want an appetizer as a main course. Menu items must be configured with courses prior to using this function.
Use this button two combine two or more seat onto one. Menu items must have seats assigned prior to using this function.
Use this function button to upsize an order that has been configured with menu combos. This function can also be an automatic prompt.
Use this button to apply a coupon. Pressing this button will bring about a prompt if several coupons have been programmed into the system.
Use this button to view coupon information once a coupon has been applied.
This button is typically used in the fast transaction order entry screen in bars and nightclubs where auto-repeat is enabled. Pressing this button will enable a prompt to swipe a credit card. The name of the card will be automatic placed on a Tab.
Press this button to change the customer count on the active order. The customer count on Delivery and Bar Tabs orders always defaults to ‘1’.
Here, you can choose between two ways: (1) by using a numeric keypad as shown below,
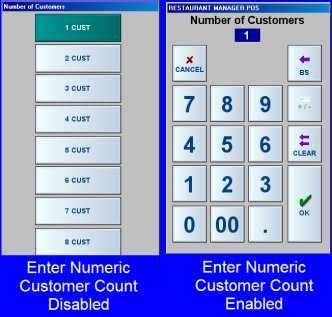
(2) By choosing the customer count from a selection list. The selection list requires 1 less keystroke because you do not need to press the [OK] key. The customer count selection window is shown below:
See Enter Numeric Customer Count to configure the system for this mode. Un-checking this option will enable the selection list. To enter a customer count of 0, or a number greater than 9, press the “Other” key. A numeric keypad is displayed allowing entry of any desired value.
Press this button if you want to delete the last item ordered. However, in this version, the last item ordered is automatically tagged, hence, hitting “Delete” button from the main Order Entry screen deletes the last item ordered. This option conforms to the security settings for deleting items (i.e., delete after print, delete after send). If a security level is set, the appropriate password is required to proceed.
In a quick service environment using a real time Kitchen Display System (KDS), an item is “sent” to the KDS the moment the next item is ordered. Once an item is “sent” to the KDS, the security level required to delete the item is the same as “Delete after Send.” Therefore, if configured with the proper security levels, “Delete last item” can be used to delete the very last item without a password, but if an attempt is made to delete the second to last item, or any other item, then the security level to “Delete after send” is required.
Press this button to apply a percentage discount to the whole check.
Press this button to apply a percentage discount to a specific item(s) tagged on the view check. (See Discounting Items)
Press this button if you want to modify a menu item directly from POS. Be sure to display the group containing the item you wish to modify from the order entry screen before going to [MISC] and pressing this button. Choose the item you wish to change, and the POS program will lead you through a series of prompts to change the basic characteristics of the item.
Note: You can only change the basic information for the item such as the description, price, button color, remote printer. If you need to change any of the advanced settings, you must do it from the RM BackOffice.
This button is no longer functional. Edit Modifiers is now performed by tagging the modifiers on the Check Display
Press this button to transfer the order onscreen to another employee who is logged onto the system.
Use this button, if "Immediate time-out after 1 transaction" is enabled, to exit a guest check and start a new transaction without entering a password again.
Press this button to link the order on screen to the customer database and credit a particular client with the purchase. Pressing this button will lead to a numeric keypad where you can enter the customer identification number.
Press this button to add a gratuity to a guest check. The wording on this button is configurable. You will receive a prompt to add a percentage or a fixed dollar amount gratuity.
Press this button to apply a group discount to a check. Depending how the group discounts is configured, the group discount applied may be a percentage or dollar discount and may require selecting (tagging) menu items on the View Check area on the order Entry screen first.
Use this button to adjust the quantity of a menu item. By entering a number lower than (9999), the system will begin a countdown. Every time a menu item with quantity lower than the four nines is selected, the system will deduct a count of one each time the item is selected. Once an item reaches a menu count of “zero”, the item will be placed on the Bulletin Board. Returning the count to (9999) will remove the item from the Bulletin Board. You must be in the menu group belonging to the menu item before you can use this button. You should use the [Groups] button to select the menu group; this function does not work with items in custom groups.
Press this button when you are in Delivery Mode to view details about the order on screen, including the amount of time it has taken to complete each stage of the order, the customer to whom it is being delivered.
By “Holding” items, you can selectively choose which items you wish to send to preparation printers. Items that are on “Hold” can be “un-held” and sent to preparation printers at a later time
Press this button if you are having difficulty locating a menu item from POS, you can do an alpha search to find the item. You will be presented with two choices for the search – a “quick search” and a “detailed search.”
Use the “quick search” to find all items that BEGIN with the letters you enter. For example, if you do a quick search on the word “SHRIMP”, it will find “Shrimp Cocktail” and “Shrimp Fried Rice”, but it will not find “Stuffed Shrimp” or “Baked Shrimp” because these items do not begin with the word “shrimp.”
Use the “detailed search” to find all items that have your search string embedded anywhere in their description. Obviously, the “detailed search” takes somewhat longer than the “quick search” so you should use the “quick search” option if possible. Both search options will display the first 100 matches found.
If you see the desired item in the search window, you can press the item to order it.
Press this button to create a new “Fast Button” Macro that will appear at the base of the Order Entry Screen. You can also use the [MACRO] button to enable or disable a previously defined macro button.
NOTE: The macros you create in Table Service Mode will also be enabled when you are in Bar Tabs Mode and vice versa. However, the macros you create in Delivery Mode appear ONLY when you are in Delivery Mode.
Press this button to change the menu group set displayed on Menu Navigation Bar appearing on the right side of the order entry screen. This button may have no effect if the Menu Navigation Bar has been assigned to a revenue center.
You must first select menu items to be settled before using this button. Once the items have been selected you may press this function button to settle only those items selected. This is most commonly used in cashier environment and bars (in tab mode).
Press this button to access the Pizza Order Entry Screen. If you plan to use the Pizza Order Entry Screen it is highly recommend you move this button to the order entry screen using the POS Function Button Layout form.
Press this button to enter a PLU number associated with a menu item.
Press this button to adjust the price of one or more of the menu items that appear in the Order Detail Area of the screen. You must first select the menu item to be adjusted.
Press this button to shift temporarily to a secondary price level. The price from this alternative price level will be applied to the next menu item you add to the order. Then the price level will shift back to its default status. If you wish to shift to an alternative price level for more than one menu item, you must return to the POS Status Screen and use the [Price Level] button in the MISC screen on the Main POS Status screen or set up a revenue center to effect the change.
Press this button to print a guest check with seat subtotals. In addition, “Print with Seat Subtotals” will show the auto gratuity amount for each seat.
Note: when printing seat subtotals, the gratuity, discount, and taxes may have rounding errors when compared to the grand totals at the bottom of the check (e.g., if you add up the gratuity for each seat, it may differ from the total gratuity by a few pennies).
Press this button BEFORE touching a particular menu item so that you can order that item in a quantity greater than one.
Press this button to re-order any of the items that appear in the Order Detail Area of the screen. Select items from the Order detail area prior to pressing this button.
Press this button to resend all menu items to their respective prep area printers. You may want to use this function if a prep ticket is lost.
Press this button when you are in Table Service or Bar Tabs Mode if you wish to link particular menu items to particular customers or seats. The customer count MUST be greater than one before you can re-assign seats. After you create seat assignments, the split check feature will automatically create separate checks for each seat. Reassigning seat can also be performed in the Split Check User Interface.
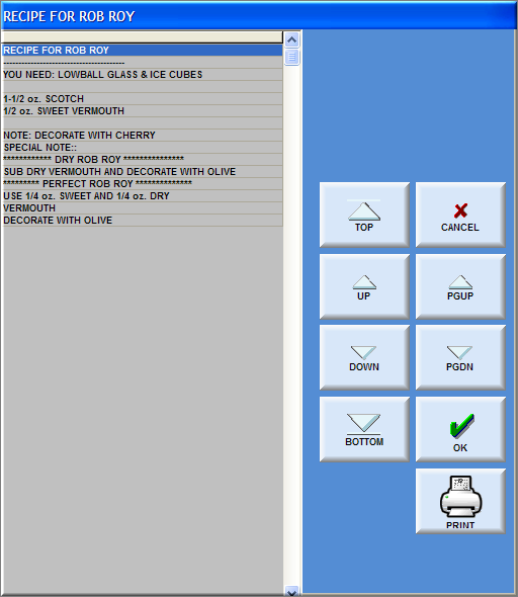
Press this button to look-up any of the recipes you have defined from the BackOffice Module. The feature is most useful for looking up drink recipes at the Bar Station.
Note: On Restaurant Manager, you can print recipes to the local receipt printer. After pressing Recipe Look-up, press an item or use “Search” for an item not seen to view a recipe on screen. Press the “Print” button to send it to the receipt printer.
Press when you are in Table Service or Bar Tabs Mode to tag an order with text that identifies the order. When you are in Tabs Mode the reference appears on the order button and your system is usually configured to prompt you for a reference each time you open a new order. You can use this button to change the text that appears on an order button. When you are in Table Service Mode order reference is only visible from the View Tables Screen.
Use this button to issue a refund. You must first select the items and then press [Refund]. All items will appear as a negative. You can then go to the settlement screen and close the check out to cash.
Use this button when a customer on a credit card tab has reached their initial preauth level. Press this button will allow you to set a new authorization level.
Press this button to change the Revenue Center to which the order is assigned Every time an order is opened, it is assigned to a default Revenue Center based on the POS Status Screen from which the order was opened. You must use the [REVENUE CENTER] button to change this default Revenue Center for the Active order. You may control each revenue center displayed on the prompt using the Enable/Disable settings in the Revenue Center setup form.
Press this button if you want to transfer tables and/or fast transactions to Tabs. Remember that to use this feature, you must purchase the optional “Tabs” POS module.
There are several reasons why this feature comes in handy. In a fast bar environment when the majority of transactions are “Fast” transactions, occasionally a customer might want to run a tab after you’ve already entered his order. Rather than void the transaction and ring in the items again, you can send the transaction to the Tabs module.
Another example is in a busy table service environment, where a waiter might want to seat customers at a table before the cashier has settled the transaction. To quickly clear the table without actually settling it, the waiter can send it to the Tabs module.
A final example is in a cashier banking environment that has a lot of split checks. When a cashier is finalizing one seat of a split check, other cashiers are not allowed access to the other seats on the table. If the table is sent to tabs, each seat becomes a separate tab and cashiers can access them simultaneously.
On fast transactions RM will ask you to enter a tab reference to apply to the new tab. On tables, RM automatically uses the table number/seat number as the tab reference.
Press this button to send special preparation instructions to the kitchen for any menu item you have already added to the Order Detail Area.
Press this button when you are in Tab or Table Service Mode to split an order into multiple checks. The procedure for splitting a tab is identical to a table; the only difference, being, after completing the operation, Restaurant Manager creates individual tabs for each seat.
Once a tab is split, it cannot be combined again. However, the items can be put back together by transferring items between tabs.
Press this button if you want to break up an item into fractions for billing purposes. For example, if 2 customers sitting at a table wish to split the cost of an expensive bottle of wine you can split the wine in two and assign one half to each customer. (See Splitting/Un-splitting an Item in POS)
Press this button if you wish to add a suggested gratuity to an order . If you print or re-print the check after adding a suggested gratuity amount this amount will print on the check. The suggested gratuity amount also appears on the Settlement Screen. If your system is configured with Automatic Gratuities you may press this button to cancel the suggested gratuity (not on list).
Press this button if you wish to apply alternative tax rates to the order onscreen.
Press this button if you wish to exempt the active order from any sales tax.
Press this button to set a delay in sending tagged items to prep printers. See Delay Sending of Items to Prep Printers.
On Restaurant Manager Table and Tab modes, the user can transfer items from one table to another table or from one tab to another open tab. If all items from the source table or tab are to be transferred, the table or tab would be closed and the associated sales record will be voided.
Depending on the security setting of the function, the user may be required for an adequate password.
Table to Table -In table mode, tag the items you want to be transferred and then hit on MISC->Transfer Items. A table selection dialog will pop-up showing the available tables.
If the table to be transferred to is close, it will be opened following the usual procedure and prompts. If it is already open and is a split check, the available seats for the table will be shown on another pop-up dialog. The seat chosen will be the recipient of the items being transferred.
If the source table is itself a split check and all the items have been tagged for transfer, the current (split) check will be removed from the table.
Tab to Tab - In tab mode, hit the tab you want some or all of the items to be transferred from. In order entry, tag the items you want to transfer then hit “MISC->Transfer Items”. A selection window wills pop-up showing all the valid and open tabs. When the user selects the destination tab, the items will then be transferred to it.
Press this button after you have split an order into multiple checks to combine one or more of these split checks.
Press this button after tagging (highlighting) previously split items with the intention to un-split or combined the separate parts back together again.
Press this button to view details about the current order, including a breakdown of the total price that details any applicable taxed, discounts and gratuities. You can achieve the same functionality by pressing the running total button.