Open topic with navigation
(continued from BackOffice and POS Security)
Labor Management
All Restaurant Manager POS Systems include a basic employee database offering enhanced timekeeping & payroll management, sales tracking, security features and comprehensive reporting features.
The Employee Database is built on the Employee Setup Form. Timekeeping is handled from the POS Module where employees use the [EMPL] button to log on and off the system and the [EMPLOYEE BREAK] button to record paid breaks.
Employee passwords are defined in the employee database which makes this database a critical component of any security configurations you may wish to implement.
If you are using the Restaurant Manager system in Quick Service or Carry Out modes only, you are not required to define any employees. And, in fact, you may prefer to manage the Cash Tray or POS station that each employee mans. However, the Table Service and Delivery modes of the system will not be operational: you must enter the name of at least one employee in the Employee Setup Form.
The following Setup Forms are used to define and configure the employee database:
From the BackOffice Module, there are a number of employee management features you may wish to implement:
Employees Setup Form
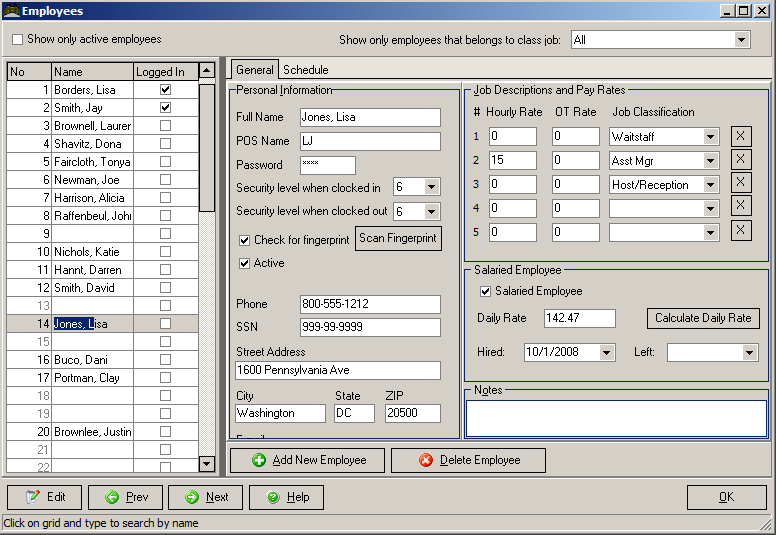
The Employees Setup Form holds information on up to 999 employees:
The Employees Setup Form into the following sections:
- Employee List- This column on the left of the screen displays Employee ID Numbers and the associated Employee Name. Employee ID Numbers are assigned in sequence in the order in which the employees are entered into the Employee Database. The Employee ID Number is used to identify an employee on sales transactions. The Employee Number is NOT THE SAME as the Employee Password.
The name highlighted on this list is referred to as the “Active Employee”. The fields displayed on the body of the Employee Setup Form are used to define the Active Employee.
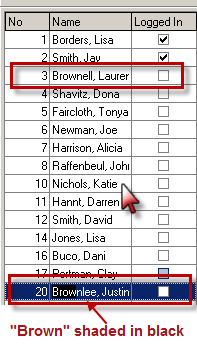
Use the scroll bar to navigate the Employee List or type a Name or Number in the field below the list. Sorting by names is easiest when employee names are entered using the following format: <Last Name, First Name>. You may also search for a specific employee by clicking on any row on the employee list and type a name in the format it was entered. Hint:the system will search for entries in alphabetical order starting from the row the user initially clicked on. Search result will be highlighted in blue and criteria matching typed entries will by shaded in black. Example: clicking on row 10 and typing "Brown" will bring the user to employee 20 (Brownlee, Justin) despite employee 3 (Brownell, Lauren) being first alphabetically. For the reason is suggested you start your search by clicking on employee 1.
- Show only active employee- By default, the Employee Form will display all employee rows blank or occupied with active and non-active employees. Enabling this option will display employees marked as "Active" on the list.
- Only show employees belonging to job class- Use this function to limit employees displayed on Employee list by job class. Click on the drop down menu and select jobclass. Job class' displayed on the list are determined in Job Classification Form
- General Tab- As described below, the fields under this tab allow you to enter personal information about an employee as well as his or her Job Classification(s) and hourly wage(s).
- Schedule Tab- The grid behind this tab allows you to define when employees are scheduled to clock-in to the system. Use this schedule together with the Clock-in Grace Period setting on the Station Configuration Form to indicate when an employee may clock-in without permission from the manager (in form of the manager password). At the bottom of the Employees Setup Form are function buttons:
-
Add new employee– Administrators may use this password protected function to create a new employee record.
-
NEXT and PREV – Click on these buttons to navigate the Employee List on the left( i.e. to highlight a particular employee)
-
EDIT – Click on this button to move from the Employee List to the fields on the body of the setup form.
-
CLOSE – Click on this button to exit the setup form and save any new information.
-
Do not use the [Delete Employee] button until you have read the warning on Deleting an Employee.
Employee Setup Form, fields
The following fields appear under the "General" tab in the Employees Setup Form:
Personal Information Fields
-
Full Name- Use these fields to record the full name of an employee as you wish it to appear on Sales, Payroll and Labor Cost reports. It is recommended that you enter names in the following format: <Last Name, First Name, and Middle Initial>. This format allows you to make most efficient use of the alpha-sort feature.
-
POS Name- If you wish to use a name in place of the Employee ID Number, use this field to define the name each employee should use to identify themselves at the POS Stations. POS Names may also be printed on Guest Checks in place of the Employee ID. To activate the use of POS Names you must use the [Search Settings] button on the Station Configuration Form to locate and enable the Use Employee Name/Number setting.
It is recommended that you use only a first name or a first name with the initials of the last name. This provides your staff with a degree of privacy and security when dealing with customers.
- Password-Use this field to record a unique four digit Employee Password for the active employee. If you are working at a computer configured with a Magnetic Strip Reader you may enter the password by positioning the cursor in this field and swiping an Employee ID card previously coded with a four digit number.
- Clocked in level- The Security Level entered in this field determines whether or not the Employee Password will be recognized for a given password prompt. If you select the <Use Job Class> option, the Security Level of the active Employee will default to the level defined on the Job Classification form.
- Clocked out Level- Leave the Security Level in this field at [0] unless the EMPL login function has been password protected.
- Check for fingerprint- Check this box if the security configuration includes a Fingerprint Reader and then use the Scan Fingerprint button to read the fingerprint of the active employee.
- Active- Click on this check box to toggle employment status between "active" (currently employed) and "inactive" (employment terminated). In other words, use this check box to delete an employee without compromising your year end sales and payroll reports by actually erasing data.. Employees designated as "inactive" will appear grayed out on the Employee List.
- Phone- Use this field to record a phone number where the employee can be reached. (Additional phone numbers can be recorded under Notes.
- SSN- Use this field to record an employee's social security number for printing on a variety of Payroll Reports.
- Street Address- Use the first field under this heading to record a street address, apartment number etc.
- City, State, Zip- Use the fields on the second line under this heading to record City, State and Zip code, respectively.
- Email- enter an employee's email address. The data entered in this field will be used to send emails to employees using the Employee Electronic Mail function.
- ADP File #- This field is used to identify an employee when using the ADP Export. ADP should provide an ADP File number for each employee. Enter the number in this field. More information on ADP Export can be found in the ADP Export Guide
Job Descriptions & Pay Rates
Use the fields under this heading to record job title(s), hourly base pays and overtime rates. Data in these fields will be used with log in and log out times to calculate payroll. Payroll amounts can always be adjusted but you can also prevent inaccurate logins and log outs by defining a set Work Schedule.
By default, the overtime multiplier is set to 1.5 which corresponds to time and a half for overtime. Because some employees rely heavily on tips rather than an hourly pay rate, a simple multiplier of 1.5 may not suffice. Instead, you can explicitly set the overtime rate for each employee and each job they work. For each job class that has a non-standard overtime rate, enter the desired overtime rate. If you wish to use the default overtime rate, set the overtime rate to 0. Otherwise, enter an override value.
NOTE 1: Before you can enter a job title in the Job Description field, you must first define the title in the Job Classification Setup Form.
NOTE 2: If you are using the Delivery Module and have created one or more job titles for your delivery drivers, you must also be sure that you authorize each of the drivers from the Delivery Module Status Screen. See Delivery Service Function Buttons.
Salaried Employees
The salaried employee fields are typically used for management positions. Employees designated as salaried must have logged into the system to appear in most labor reports. Salaried employees hours will appear in most reports but because most establishments consider salaried positions as a fixed cost, salaried employees are not included in labor percentages nor are wages recorded in reports (except for labor productivity reports). The following fields appear under the Job Description and Pay Rates section in the Employees Setup Form:
- Salaried Employee- check this field to designate employee as salaried.
- Daily Rate- enter the daily rate an employee will make (i.e. $40,000 yearly salary divided by 365 days equals a daily rate of $109.09)
- Calculate Daily Rate- Click on button to produce the rate calculator. Enter the known base salary amount for a salaried employee based on the following criteria:
- Hired- manually enter the hired date for employee or click on the down arrow to use a pop calendar.
- Left- manually enter the termination date for employee or click on the down arrow to use a pop calendar.
Note
Use this field to record particulars about an employee such as alternative phone numbers or "Can't work Sundays" etc.
Adding an Employee (Existing Row)
To add a new employee to the system using an existing row:
- Select an existing blank row on the Employee List.
- Type the employee's last name followed by a comma, a space, and the first name…or uses an alternative format for inputting names.
- Press the [Tab] key to display the Employee’s name on the Employee List and to move to the next blank field on the form.
- Continue tabbing through the other fields on screen entering data as appropriate to your employee management needs. (See the Employee Setup Form for more information on each of these fields.)
- Click on the "Active" field
- Click the [CLOSE] button to exit the Employees Setup Form or repeat steps 1-5 to add additional employees.
Adding a New Employee Row
Adding and deleting Employees are password protected operations .Due to PCI requirements, Administrators are the only users who may use the [Add New Employee] or [Delete employee] buttons. To add a new employee row to the system:
- Click on the ADD button at the base of the Employees Setup Form
- Enter an Administrator Password at the Password Prompt.
- The cursor will appear in the <Full Name> field in the Personal Information section of the dialogue and a new Employee Number will appear in the Employee List on the left of the screen. If need, you can add employee information by:
- Type the employee's last name followed by a comma, a space, and the first name…or uses an alternative format for inputting names.
- Press the [Tab] key to display the Employee’s name on the Employee List and to move to the next blank field on the form.
- Continue tabbing through the other fields on screen entering data as appropriate to your employee management needs. (See the Employee Setup Form for more information on each of these fields.)
Click on the "Active" field
- Click the [CLOSE] button to exit the Employees Setup Form or repeat steps 1-3d to add additional employees.
Deleting an Employee
To record that an employee has been terminated:
- Access the Employee Setup Form.
- Scroll through the Employee List at the left of the screen and highlight the employee who has been terminated.
- Click on the "Active" box in the Personal Information section until the check mark disappears. Employees designated as inactive will appear grayed out on the Employee List.
- Repeat steps 3 and 4 until you have changed the status for all terminated employees.
- Click on the CLOSE button to save your changes and exit the setup form.
WARNING: The [Delete Employee] button at the base of the setup form will delete all the data associated with the employee whose data is displayed on screen. However, the employee number, itself, WILL NOT be deleted as there may be sales data associated with it. If you use the record associated with this same employee number to enter data on another employee, sales and payroll amounts on two employees will be attached to a single record. But the name, social security number, etc. of the first employee will be lost. Therefore, if you must delete an employee record, you should do it only at the end of a fiscal year.
Job Classification
The various jobs held by restaurant staff must be defined on the Job Classification Setup Form. These jobs may then be assigned to individual employees on the Employee Setup Form where each employee may be assigned up to five different jobs. The Job Class Summary Report and the Labor Productivity Reports show data broken down by Job Classifications.
The Job Classification Setup Form allows you to configure a variety of things:
- The category of employees who participate in server banking
- The category of employees is involved in tip sharing, and tip sharing allotments, and tips in/outs.
- The category of employees who may work as Delivery Drivers.
- A default Security Level that will be applied to any employee defined on the Employee Setup Form with a <Clocked in> Security Level that defaults to the Security Level of the job they work
- Prompts for revenue reports
- Transfer check/ menu items capabilities
- Allowing cash tray initialization
- Creating ADP Dept codes
The following sections define the settings under each tab of the Job Classifications Setup Form.
Job Classification General Settings
Use the options under the “General” tab to define the responsibilities, prompts, and POS screen defaults.
- Enforce Schedule- Check this box if you are using RM Scheduling Module (available in version 19 or greater) and wish to enforce scheduling at the POS. “RM Scheduling” must be enabled in Station Configuration.
- Declare Tips from sales- Enable this function if you want employees from this job class to declare tips from sales. Enabling this function will call for a prompt at the POS when an employee is logging out. Make sure the box is not checked for all other job classifications that do not require tip declaration.
- Declare tips paid to others- Enable this function if you wish to track the dollar amount that an employee tips out to another. The figure does not track to which employee is receiving the tip. The amount entered for this prompt can be found in the RM Reports module under several reports including TRAC & TRDA Tips reports.
- Declare tips received from others- Enable this function if you want to track tips received from other employees. Bartender and server assistants are examples of job classes that receive secondary tips from other job classes (e.g. waiters) positions. The amount entered for this prompt can be found in the RM Reports module under several reports including TRAC & TRDA Tips reports.
- Navbar- Click on the arrow on the right of this field to display a list of Navbars (Menu Navigation) that can be used and restricted by a certain job classification.
- Job Class Security Level- Use this field on the Job Classification Form to define a default Security Level for all employees who work a specific job. This Job Class Security Level will be associated with any Employee where the “Clocked in” or “Clocked out” Security Level on the Employee Setup Form is set to “Use Job Class”
- Default Menu Group to Show- Click on the arrow on the right of this field to display the drop down menu list of menu groups, including custom groups to select a default menu when opening an order at the POS.
- Driver- Enable this option for a job class if drivers are utilized for delivery purposes. Enabling this option will have any employee assigned this job classification appear under the driver column on the POS “Assign” screen within the delivery screen.
- Prompt for revenue report- Enable this option if you want a prompt to print a revenue report at the POS at the time when the employee is logging out. This should be enabled for servers if you are doing server banking. You may not want this function enabled for bartenders if you are employing “blind balancing” procedures or for job classes that have no balancing requirements what so ever (e.g. cooks).
- Create new transaction- Enable this option for job classifications that have “ringing” or “sales” responsibilities. Disable this option for job classes for whom you do not wish to start a sales transaction. Note: cashiers do NOT need the ability to “Create new transactions” (first option above) if they are only finalizing transactions.
- Allow transfer checks/transfer items.- Enable this function to allow transfers of entire checks or menu items between employees. This includes transferring checks from employee to employee, and/or receiving items transferred from another table or tab. This option is used in circumstances where job classes may share same security levels but you do not want a particular job class to perform these functions.
- Allow cash tray initiation- Enable this function to allow a certain job class to initialize a cash tray. This option is used in circumstances where job classes may share same security levels but you do not want a particular job class to perform these functions. For example, cashiers, bartenders, and servers have the same security level and you want only bartenders to initialize a cash tray.
Note: some POS operations do not put restrictions on which employees can perform the operation. For example, clocking in and out of the system is an operation that allows ALL employees and all job classes.
Use the [ADD] and [DELETE] buttons to add or delete fields on the list of Job Classifications. Then highlight each field in the list and type in a particular job title used in your establishment.
NOTE: If you are using the Delivery Module and have created one or more “Driver” job classifications for your drivers, you must also be sure to authorize each of those drivers from the Delivery Status Screen.
Tip Share Settings
Restaurant Manager provides the option to allocate a portion of an employee’s sales and/or tips into a tip pool for other employees. Tip sharing information is printed on employee revenue reports and can be added to the employee’s cash due amount at the end of their shift.
Tip sharing can be configured independently for each job classification. In addition, the computation can be based on total sales and/or sales by group type. Here are a few examples:
- Waiters and waitresses share 5% of liquor sales with the bartenders and 1.5% of total pre-tax sales with runners.
- Bartenders share 5% of liquor sales and beer sales with the cocktail waitresses and 3% of beverage sales with the runners.
For each job classification, you can define as many tip pools as desired. Each tip pool allows tip sharing from one job classification to another. For example, waiters share their tips with bartenders and runners, while bartenders share their tips with cocktail waitresses and runners.
To configure tip sharing, go to RMWin->Setup->Labor->Job Classifications. Highlight the desired job classification on the left, and click on the Tip Sharing tab on the right.
- Click the [Add] button to add an additional tip pool to the current job classification. For each tip pool, define each setting as described below:
- Job Class: Choose the job classification that is RECEIVING the tips. For example in the case of waitresses sharing their tips with the bartender, choose “Bartender” as the job class.
- Computation Method: Choose the desired computation method. The tip share calculation uses this value as the base amount for computing the percentage tip share.
- Percentage: Enter the percentage of the tip share. This percentage is multiplied by the value chosen by the Computation Method above.
- Group Type: Select a group type for computing the base value of the tip share. Note: this is only used when the computation method is set to “Group Type.” This value is ignored for the other computation methods.
This process can be continued to add additional tip pools for each job classification.
Note: the tip sharing calculation is included on the employee revenue report only. It does not carry through to the back office reports or the accounting interface. Also, the tip sharing feature computes the amounts that each employee must contribute TO the tip pools at the end of their shift. The system does NOT divvy up the money in the tip pools and show how much goes to each employee.
ADP Payroll Settings Tab
Set the ADP Department code for each job class. The user should coordinate with ADP to determine the code to be used to specify each job defined in the system. Enter the ADP Dept code in the Job Classification Setup Form in the RM Back Office module (Setup, >Labor > Job Classifications >ADP Payroll Settings tab). There are two settings in this setup form that only need to be filled out when using ADP Export Format 1 and tracking tips:
- Tipped job regular hours code- a code to be determined by ADP to identify regular hours for a tipped employee.
- Tipped job overtime hours code- a code to be determined by ADP to identify overtime hours for a tipped employee.
For both these settings, the "Tipped job" field must be enabled and the regular hours and overtime hours codes secured from ADP must be entered in the appropriate fields. In most circumstances, this fields will not be used as most restaurants will opt to use ADP Export Format 2.
More information on ADP Export can be found in the ADP Export Guide
Employee IDs
Employee IDs are used to track hours worked, sales generated and gratuities earned for every employee defined on the Employee Setup Form. In other words, employees use their Employee ID to clock in and out of the system and to initiate sales transactions.
POS Operations that may be configured to include a prompt for Employee ID include:
- Starting a New Order
- Assigning a Delivery Order to Driver
- Printing a Check
POS operations that always include a prompt for Employee ID include:
|
Clock In
|
Settle All
|
|
Clock Out
|
Declare Tip
|
|
Employee Break
|
Print Revenues Report
|
|
Transferring Orders to new Employee
|
Send Alert
|
|
Sending E-mail
|
Print Time Sheet
|
|
Auto Cash Settle
|
|
Every employee defined on the Employee Setup Form is automatically assigned an Employee ID Number. If you prefer to use names instead of numbers as Employee IDs you may assign each employee a POS Name that can be used in place of the Employee ID Number to track timekeeping & sales information.
Employee IDs are NOT the same as employee passwords. Passwords are used to control which employees may execute which POS and BackOffice operations.
In systems configured with Enhanced Password Control, however, employees may use their password as an Employee ID when opening new orders
Employee Settings on Station Configuration Form
The following settings explain the functions you may want to consider when configuring your Restaurant Manager system. The following section out the settings available that will control prompts, editing screens, an employee related print outs. Some of these settings will also control employee access to tables, tabs and delivery orders.

Employee Options
Below is a list of Employee options found in Station Configuration.
- Print Employee Time Slip- Check this box to print a basic Time Slip when employees clock out. The time slips shows hours worked and revenues and can be saved by the employee for their records.
- Show Wages on Time Slip- Check this box if you want employee wages appear on the time slip. Note, the employee hourly rate is printed, so this option should be used with discretion.
- Daily Overtime-This option determines whether overtime is computed on a daily basis or weekly basis. Weekly overtime is computed as time and a half (1.5x) for hours worked beyond 40 hours per week. The multiplier (1.5) and the overtime threshold (40 hours) can be changed under Payroll Options.
Daily overtime is defined as time and a half (1.5x) for work beyond 8 hours per day, and double time (2x), for work beyond 12 hours per day. Daily overtime also conforms to weekly overtime rules (i.e., time and a half for hours beyond 40 hours per week). Daily overtime is primarily used in west coast states (e.g. California, Oregon).
Check with your local authorities to verify the method of overtime used in your area.
- Use Employee Name/Number- In many POS functions, you are required to specify an employee number. For example, when clocking in and clocking out, opening table, or when transferring checks from one employee to another. By default, the system will ask you to enter an employee number when performing these operations, but if you have a hard time remembering employee numbers or if you simply prefer not to, you can configure Restaurant Manager to display employee names so you can choose employees from a pick list The employees are color-coded depending on their status. Employees that are not clocked in are shown in gray. Employees that are clocked in are Green and employees that are on break are Red.
- Send e-mail when clocking out from MISC- This option controls whether an automatic e-mail message is sent to employees when they are clocked out by a manager using the MISC option "Clock out employees." If you enable this option, then define the desired text in the e-mail message below.
- E-mail message- Enter a message to e-mail employees that are clocked out by the manager. See previous option.
- Edit employee hourly rates from POS- When the manager clocks out employees from the MISC option "Clock out employees", this option controls whether he has the ability to modify their hourly rate.
Employee Revenue Report Options
Below is a list of station configuration options for the Employee Revenue Report
- Print revenue report- This option gives you the choice of printing employee revenue reports (server reports) before or after they clock out. If set to "after clocking out" then employees are guaranteed to be clocked out in order to get a revenue report; however, they will not have access to the revenue report prior to clocking out for reconciliation purposes.
- Print Employee Login Data on Revenue Report- Produces a listing of login and logout data for the employee to include their meal data
- Print Guest Void Data on Revenue Report- Produces a total of guests the employee has serviced and the number of voided totals associated with the guests.
- Print On-Account Breakdown on Revenue Report- Prints a breakdown of guest account payments; includes a breakdown of gift cards and gift certificates issued and redeemed.
- Print Payments- Enabling this option produces a listing of payment types with their amounts on revenue report.
- Print Revenue Totals Data on Revenue Report- Enabling this option produces a listing of revenue amounts and types.
- Print Sales Summary Data on Revenue Report- Enabling this option produces a listing of sales types with their totals.
- Print Check Discount Data on Revenue Report- Enabling this option produces a listing of discounted items with their type and quantity.
- Print Statistical Data on Revenue Report- Enabling this option produces a listing of statistical numbers of the sales checks from which employee are excluded.
- Print Item Deletions on Revenue Report- Enabling this option produces a listing of deleted items.
- Print Sales Contest Data on Revenue Report- Enabling this option produces a listing of tracked items and groups.
- Print Detailed Transactions on Revenue Report- Enable if you want to produce a detailed listing of transactions at the bottom of the employee revenue report (server report). The listing shows all checks processed by the employee during the shift. It also shows open (or unsettled) transactions.
- Include tip share in cash due portion of revenue report- Use this option if you wish to add the tip share amount to the employee's cash due amount on revenue reports.
- Subtract auto gratuities from cash due amount on revenue report- Enabling this option if you want to deduct automatic gratuities from the cash due amount on employee revenue reports.
- Subtract additional gratuities from cash due amount on revenue report- Enabling this option to deduct additional gratuities from the cash due amount on employee revenue reports. Note: additional gratuities are any gratuities that are not automatic and/or gratuities over and above automatic gratuities.
- Allow revenues report when employee has open checks- Enable this option if you want to allow employees to print revenue reports while they have open checks.
- Show deletions on revenues report/ flash report- Enable this option to show item deletions on revenue reports and flash reports.
- Show zero amounts on revenue report- Use this option to suppress zero amounts on the revenues report and flash report. Enable the option to show zero amounts; uncheck it to suppress them.
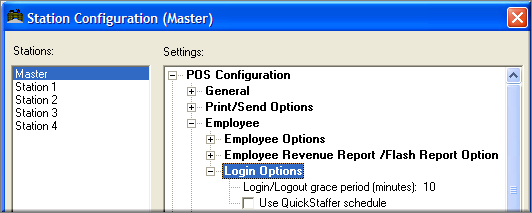
Login Options
Below are Station configuration Login options
- Login/Logout grace period (minutes)- Type in the number of minutes that define the Grace Period to be applied to the clock-in and clock-out times defined in an employee's "Work Schedule". For example, if an employee is scheduled to work at 4:00 PM, and the grace period is set to 10 minutes, the employee will be allowed to clock in without manager approval beginning at 3:50 PM. Similarly, if his shift is over at 10:00 PM, he will be able to clock out as late as 10:10 without manager approval.
- Use QuickStaffer schedule- Enable this option if using QuickStaffer for employee scheduling(no longer available), and create employee schedules via the Employees Setup Form Schedule tab.