(continued from Order Entry Screen)
Cashier banking and server banking are two different methods used by the Restaurant Manager POS System for tracking payments and settlement. Before configuring settlement operations it is important to decide which banking method you will use.
Whichever banking method you select, the staff responsible for processing payments on pending orders will use the Settlement Screen to record amounts tendered and to finalize individual transactions.
The Settlement Screen is used only for processing payments on sales rung up on the Order Entry Screen. It is not used to process other general transactions such as money drops or pay-ins and pay-outs that affect cash drawer totals but not sales totals.
You must select between Cashier Banking and Server Banking when configuring your POS System to track payments and settlement.
In a Server Banking system, waiters and waitresses carry their own banks and settle transactions, themselves. The system simply tracks the server responsible for each order and keeps a tally of sales made by each employee. When employees clock out, the system automatically prints a Revenues Report which shows their sales broken down by method of payment along with other information necessary for reconciling the server’s bank.
Server banking is also the best way to track the sales revenues collected by Delivery Drivers.
To enable Server Banking you must configure the system to track the employee responsible for each transaction. This may be done in one of two ways: enabling Enhanced Password Control or activating the Employee ID prompt.
You must also enable the “Print Revenue Report” setting at all POS Workstations where servers are allowed to clock out. Printing this Revenue Report then becomes part of an automated clock-out procedure. Systems that are configured for Server Banking are usually configured to track Tip Earnings, too. In fact, a prompt for total tip earnings may also be made part of an automated clock-out procedure.
In Cashier Banking cashiers settle transactions to a cash tray and are responsible for balancing their tray at the end of the shift. Cashiers begin their shift by logging onto the system and declaring the starting amount in their cash tray with the [Initialize Tray] function button. At the end of their shift they use the [Finalize Tray] function button to take their cash tray off line and then print a [Cash Tray Report] to reconcile their tray. Cashiers are not allowed to clock out of the system until they declare the final cash tray balance.
Cashier banking requires that:
When configuring your system for Cashier Banking you may wish to configure different stations with different procedures for Accessing the Settlement Screen.
It is recommended that any given POS system be configured to use a single method of banking. However, it is possible to configure some POS Workstations as cashier stations while other stations are dedicated to processing server banking transactions. It is even possible to configure a single station to allow both Cashier Banking and Server Banking by enabling “Dynamic Cash Tray Numbers”.
In Quick Service establishments using Cashier Banking, transactions are usually settled as soon as they’re entered. In this environment, the Settle function is usually linked to the Send function so that orders are sent automatically to the Prep Area (or displayed on the General Message Area) when settlement is processed.
If you allow managers or other authorized personnel to occasionally remove cash from the cash drawer, you must configure your system to properly track these non-sale transactions.
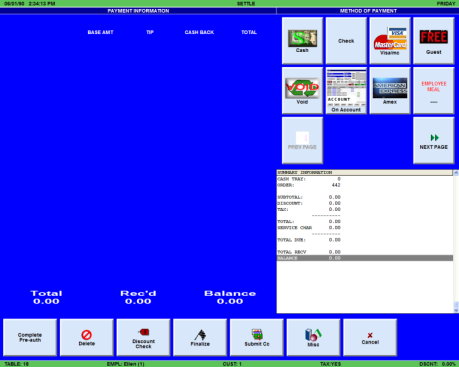
Restaurant Manager uses the Settlement Screen for recording payments tendered and for clearing or “finalizing” transactions.
For systems configured with the online credit card interface, the Settlement Screen is also used to authorize credit card payments. And for systems configured with the Accounts Module or a Third Party Gift Card Solution, the Settlement Screen may be used to issue and redeem Gift Cards as well as to settle transactions to a customer account.
You may configure your system to access the Settlement Screen in a variety of ways. And there are configuration settings on both the Revenue Center Setup Form and the Station Configuration Form that control overall settlement procedures.
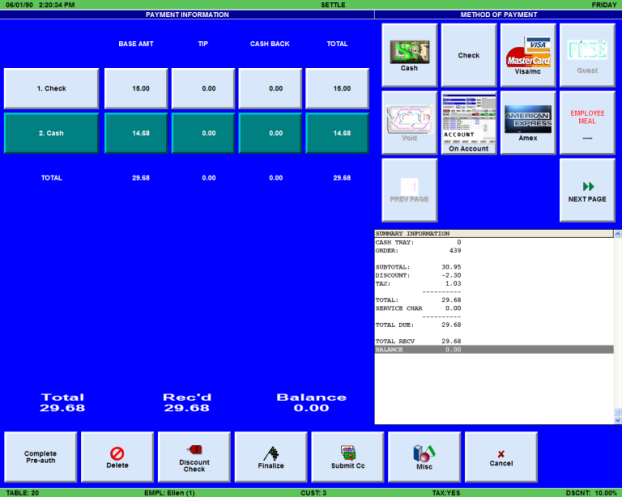
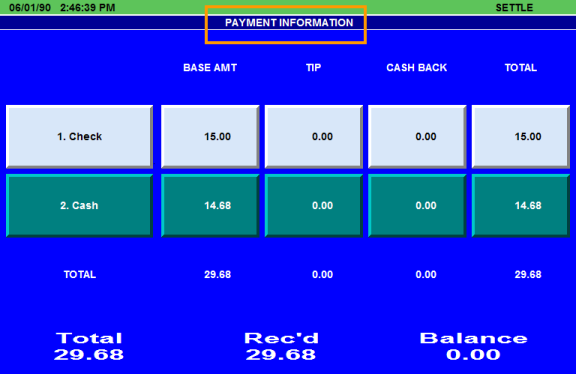
As shown in the screen shot below, the Settlement Screen is comprised of six main areas.
The Title Bar displays the date and time as off the rmserver when RMTime is implemented and displays headings for different sections of the Settlement Screen.

The area at the lower right of the Settlement Screen shows sub-totals for various components of the order. Some of these figures may be adjusted using Settlement Screen Function buttons such as [DISCOUNT CHECK]. Other settlement may be adjusted using Function Buttons found on the Order Entry Screen which is accessed by touching the [CANCEL] button at the base of the Settlement Screen.
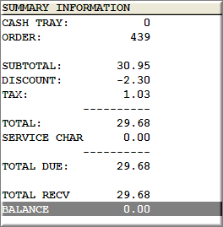
The tax, discount and gratuity information displayed in the Summary Information Area are also displayed on the Settlement Screen Status Bar (below).
The layout of the Summary Information area is not configurable.
Buttons corresponding to the Methods of Payment accepted in your establishment are displayed at the upper right of the Settlement Screen. The amount of space used to display these payment buttons is configurable and is measured in “rows” and “columns”. If, for instance, if you accept 12 forms of payment in your business, you might configure the Methods of Payment Area to fit 3 rows of 4 buttons or columns. To define the screen area dedicated to payment buttons, use the [Search Settings] button on the Station Configuration Form to locate and set numerical values for the following settings:
The payment buttons, themselves, are defined on the Method of Payment Setup Form. The Method of Payment setup form allows you to configure standard forms of payment such as “Cash” or “Check”. It also allows you to create payment buttons that link to third party software for online credit card processing or for adding room charges to a front desk or Property Management System, etc.
Please note, however, the Method of Payment Setup Form is NOT used for configuring gift certificate buttons or to process payments “On Account”. These forms of payment must be configured using the Accounts Add-on Module.
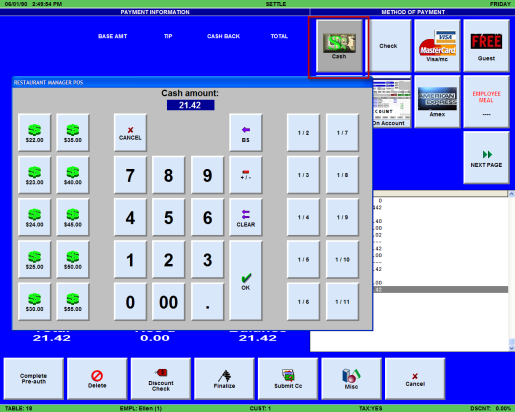
When you touch one of the payment buttons in the “Method of Payment” area, the system displays a configurable keypad that may be used to enter the amount tendered. Once you’ve entered the amount tendered, amount buttons appear in the Payment Detail Area of the Settlement Screen.
The keypad shown below when you touch any allows you to enter the amount tendered after touching a Payment Button. This keypad pop-up may be configured with the three sections shown in the screen shot below or it may be configured to show only the keypad, itself, in the center of the screen shot:
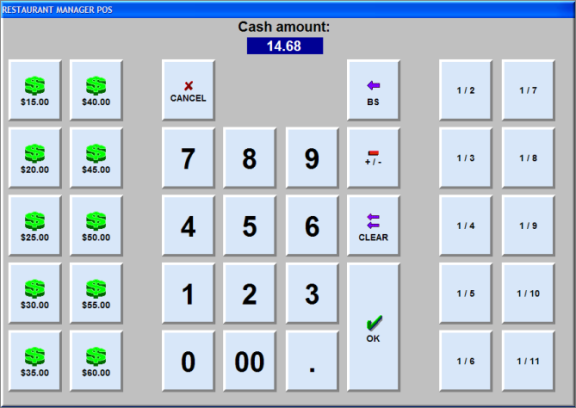
The value of the amount tendered is displayed on interactive buttons that allow modifying detail such as the tip or the cash back amount. The Payment Information Area can display an unlimited number of split payments on a single transaction.
The Payment Area also displays the total amount due. The system may be configured to display this amount due in extra large font so that managers and spotters can more easily verify that the correct amount is rung up.
The POS operations that can be executed from the Settlement Screen are controlled by Settlement Functions Buttons. Frequently used Function Buttons may be displayed at the base of the Settlement Screen while less frequently used buttons may be displayed on a secondary screen accessed by touching the [MISC] button which also appears at the base of the Settlement Screen. For more detailed instructions on configuring the Button Area of the Settlement Screen see the chapter on Function Buttons and Macros .
The following function buttons appear at the base of the Settlement Screen:
The following function buttons supplement those visible at the base of the Settlement Screen. You can access these secondary function buttons by pressing the [MISC] button at the base of the Settlement Screen:
The MISCELLANEOUS function buttons work as follows:
Important Note: Credit Card Pre-Authorization is supported with Mercury (MPS) only. Attempting to do Credit Cards pre-auths with PC Charge or Datatran may result in undesirable results. Credit card pre-authorization provides the ability to capture and authorize a credit card at the beginning of a sale.
Please note, however, that other Function Buttons that control price adjustments appear only on the Order Entry Screen and are not directly linked to the Settlement Screen. If you access the Settlement Screen before applying these price adjustments you may [Cancel] settlement, make these price adjustments on the Order Entry Screen, and then return to the Settlement Screen.
In fact, for any price adjustments commonly made at the time of settlement, it is recommended that you add Macro Buttons to the Settlement Screen that cancel the settlement process, make the necessary price adjustments on the Order Entry Screen, and then automatically return to the Settlement Screen.
The operations listed below are found on the Order Entry Screen but are commonly launched during settlement by touching the [Misc] button on the Settlement Screen:
No matter how you configure the settlement process, you must define all forms of payment accepted in your establishment from the Method of Payment Setup Form, including settlement to Guest Accounts, Employee Meals, and some kinds of coupons. Six forms of payment are hard coded into the system:
These six forms of payment can be disabled if you prefer not to use one or more of them. You can also supplement these forms of payment with up to 93 additional forms of payment.
The Setup Forms listed below may be used to customize the way Restaurant Manager processes payments and finalizes transactions:
Settings described in the chapters on Taxes and Gratuities & Service Charges also control settlement processes.
Most of the settings that control the Settlement Process appear on the Station Configuration Form under the Settlement heading shown below:
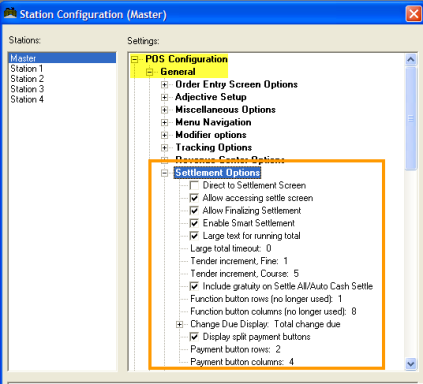
Use the [Search Settings] button at the base of the Station Configuration Form to locate and configure the following Settlement settings:
If Smart Settlement is not enabled, the entire $24.00 is applied to the base amount. Tip and/or cash back must be defined annually. For most establishments, this option should be enabled for faster operation.
Example: Large Running Total
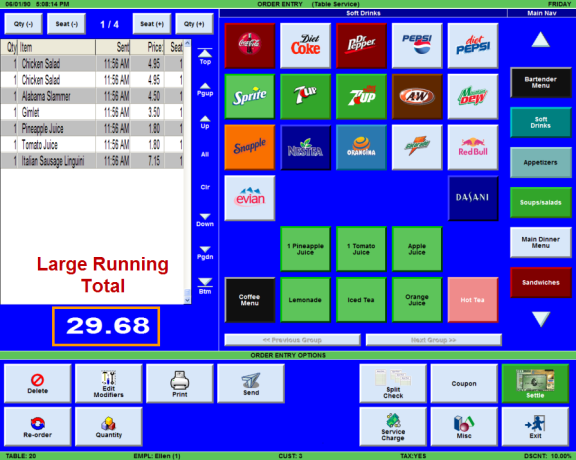
Restaurant Manager provides two options for assisting in this task. It can display a large running total on the order entry screen and the settlement screen as shown above.The second option for assisting spotters is a pop-up window containing the check total in a large bold font that is displayed on screen after finalizing a transaction. See next option (Large Total Timeout).
No matter how you configure the settlement process, you must define all forms of payment accepted in your establishment from the Method of Payment Setup Form, including settlement to Guest Accounts, Employee Meals, and some kinds of coupons. Six forms of payment are hard coded into the system:
You need only access the Method of Payment Setup Form if you wish to supplement the six forms of payment that are hard coded into your system. In the example shown below, more types of payment have been added to the default.
Whether your system is configured with Server Banking, Cashier Banking or both, you can use all forms of payment defined in this setup form.
The setup form is organized as follows:
Use the [ADD] button at the bottom of the Method of Payment Setup Form to add new lines to this list. Then move to the fields on the body of the screen to name and define the payment type.
Forms of Payment appear on the POS Settlement screen in the same numerical order as on this setup form. The first six forms of payment cannot be renamed or deleted. However, they can be disabled if you prefer that one or more of them NOT appear on the POS settlement screen.
NOTE: If employees are charged a discounted price you must also configure an Employee Discount in the Discounts Setup Form and apply this discount to the employee's order BEFORE selecting an Employee Meal method of payment.)
Note: if this option is checked for “On Account” the default amount may also be affected by the account balance. For example, if the balance due is $20, but the operator is settling with a gift card with $10 balance, the amount will default to $10 (the gift card balance) rather than the balance due.
If you wish to put a bitmap on any Menu Item Button: click on the ellipsis button that can be found in this section to call up an alphabetical listing of all the bitmap files in the library. Double click on the bitmap you wish to put. (The image will appear on the Setup Form.)
Although in this example, the amount is merely pennies, it can add up to hundreds, even thousands of dollars over the course of a few months. In some jurisdictions, it is illegal to charge these fees to the waiters/waitresses. Check with your local jurisdiction before using this option.
More on Foreign Currency is found under the topic: Foreign Currency
This function was originally designed for Canada eliminating pennies from their currency. However, this function can be used by any establishment that wishes to eliminate pennies on cash transactions.
Please visit the section Penny Rounding for more details
In Restaurant Manager, forms of payment such as cash, check, etc can be enabled or disabled by station. To enable (or disable) forms of payments, go to RMWin->Setup->Settlement and Tips->Method of Payment. Highlight the payment of interest and click on the “Enable/Disable” tab.
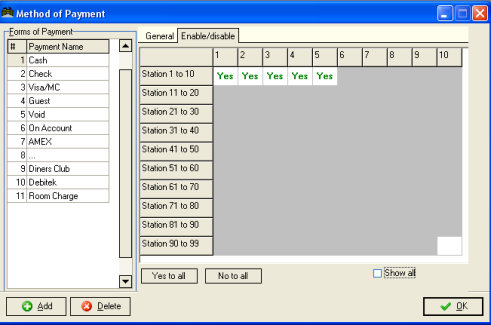
This screen allows you to enable or disable each method of payment by station. Station numbers 1 through 10 are on the first row. To disable a form of payment for a given station, move to the corresponding station number, and click the “Yes” to change it to “No.” Click again to change it back to “Yes.”
By default, this screen only displays the number of POS stations that are enabled for your system. If you have 11 or more POS stations, then additional rows of “Yes/No” options will be displayed. If you wish to display all 99 stations, click the “Show All” option at the bottom right of the form.
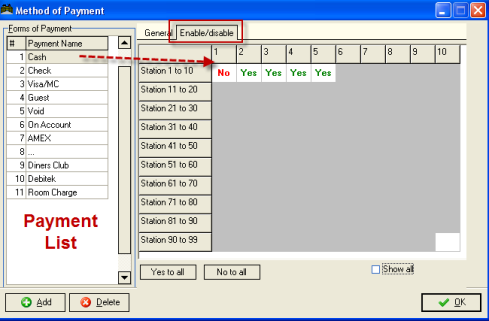
This illustration shows cash is enabled on station 3 thru 5 and disabled on station 1
Use the options “Yes to all” and “No to all” at the bottom of the form to quickly enable or disable a method of payment for all stations. In the example below we used the “No to all” option and manually changed station 1, 2, and 11.
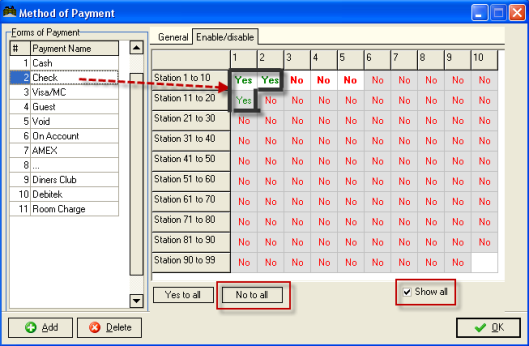
Note the “Show all” option is enabled.
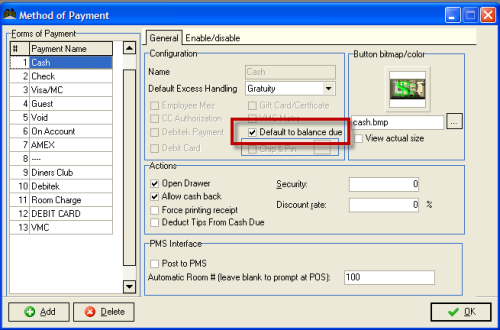
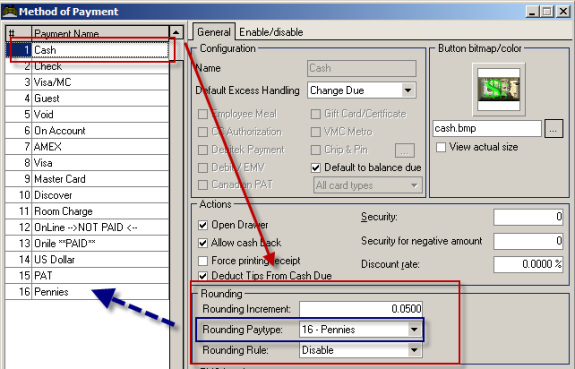
The penny rounding is controlled by linking the Cash method of payment to be rounded to the Rounding paytype which will ‘receive’ the rounded amount to allow the order to balance.
For example, CASH is the payment we want to round. So, we will create a ‘Cash Rounding’ method of payment, and in the CASH settings, we will LINK via drop down box to the CASH ROUNDING payment type. We will also specify in the CASH settings the rounding increment (i.e 5 cents)
Use the following steps to implement Penny Rounding
- Disabled-The POS will not round regardless of the other settings on the Rounding section.
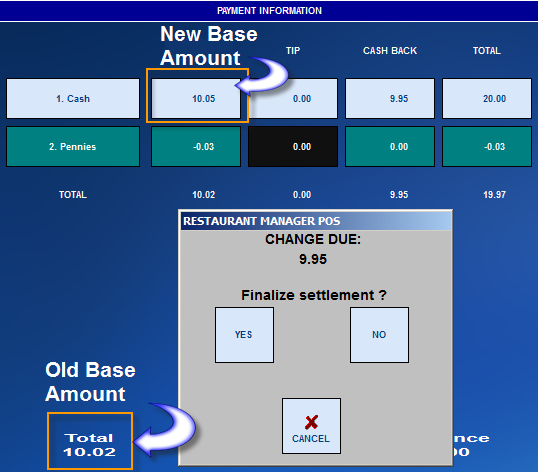
- Up- The POS will attempt to round up to nearest increment. Example, when set to .05 for "Rounding Increment" and to "Round Up, if a guest check is $10.01, the POS will show a base amount of $10.05.
- Nearest- The POS will attempt to round up to nearest increment up or down. Example, when set to .05 for "Rounding Increment", the system will go to the lowest increment (zero) if ending in .01 or .02. The system will round up the next increment (.05) if the dollar amount is ends with .03 or .04.
- Down-The POS will attempt to round down to nearest increment. Example, when set to .05 for "Rounding Increment" and "Round Down", if a guest check is $10.01, the POS will show a base amount of $10.00.
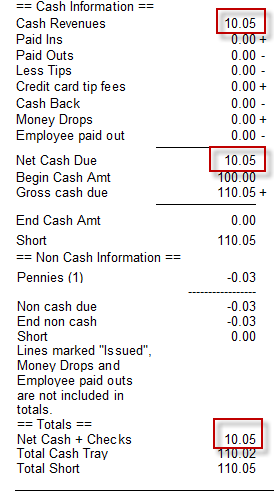
For the screen shot below, we have our system setup for Rounding Up and to increment up to the nears .05. The original base amount is $10.02. To get to the nearest .05, the system uses the "Pennies" form of payment and applies a negative figure. The Pennies form of payment acts as a debit so a positive (credit) can be applied to the settlement. The new base amount in the payment row is now $10.05.
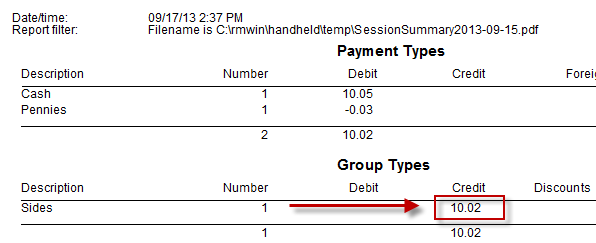
For reporting, the original base amount will show on Net Sales lines on all reports. Example, in our example tramsaction the original base amount was $10.02:
The new base amount is reflected on the Cash Due/Revenue Lines of most reports:
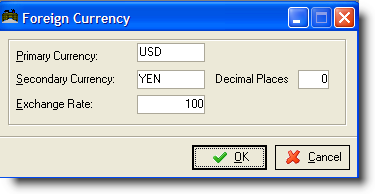
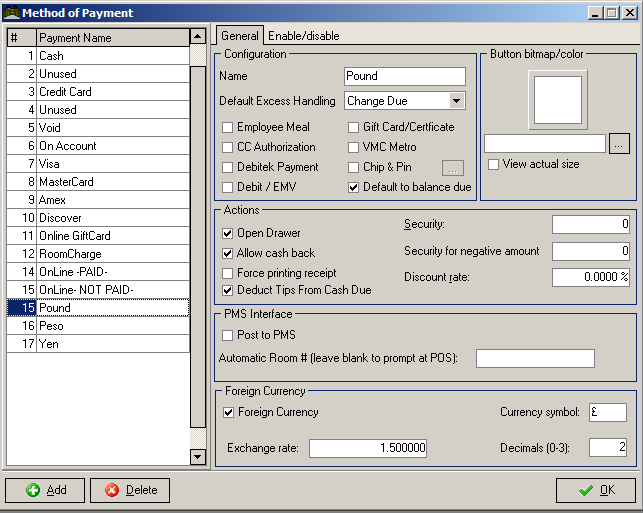
Restaurant Manager has two methods of handling foreign currencies: basic and advanced. The basic method has been existent in Restaurant Manager prior to version 18. The basic method handles only two currencies: primary and secondary. The basic method primarily handles payments at the POS with little reporting tools. Version 18 introduced the advanced method of handling foreign currencies. The advanced method reporting tools are superior to the basic method while handling foreign currencies greater than two. Restaurant Manager users prior to version 18 may continue using the basic method if satisfied with the functionality.
Restaurant Manager basic foreign currencies function handles two currency types -- a primary currency and a secondary currency. The primary currency is the default currency used by the system. In order to accept a second currency, you must enter the exchange rate and other information relating to the secondary currency in the Foreign Currency Setup Form. This information can be changed whenever and as often as necessary. All changes are applied to the POS Module immediately, even when a session is open and orders are pending.
The secondary currency can be applied during the settlement process to calculate change, etc. To settle a transaction using a secondary currency, press the [MISC] button on the Settlement Screen followed by tapping the [Currency] button. Note the Currency button may be moved to the Settlement screen via the Function Button Layout function.
For reporting purposes all transactions settled in a secondary currency are converted to the primary currency using the exchange rate in the Foreign Currencies Setup Form.
The following fields appear in the Foreign Currency Setup Form:
NOTE: If you only use a single type of currency, it is recommended that you set the secondary currency type to the same as the primary, and enter an exchange rate of 1.000
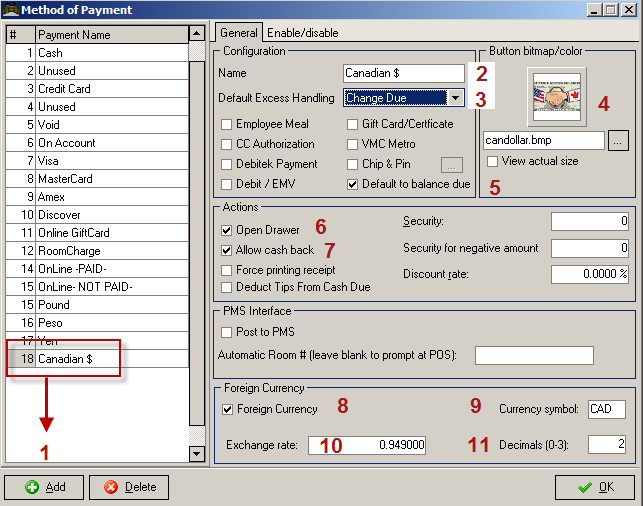
The advanced foreign currency functionality may be used if your establishment handles more than two types of currencies or if you simply are looking for enhanced tracking method using reports. Differing from the basic method, advanced currency handling is setup in the Method of Payments Form rather the Foreign Currency Setup Form. Each foreign currency is assigned a different form of payment type. At the POS, users will select a form of payment designed as a foreign currency in the settle screen.
Restaurant Manager requires a separate payment type for each foreign currency exchanged. Foreign currency payment types are configured in the Method of Payments Form in the RM BackOffice Module (Setup > Settlement and Tips > Method of Payment). At the bottom of each method of payment form is the Foreign Currency section:
We demonstrate the setup process assuming the U.S. dollar is our primary currency and the Canadian Dollar is the secondary currency. We start in the Method of Payment Form and add the payment by:
Note: ** are optional field settings and may be configured differently depending on individual restaurant policies.
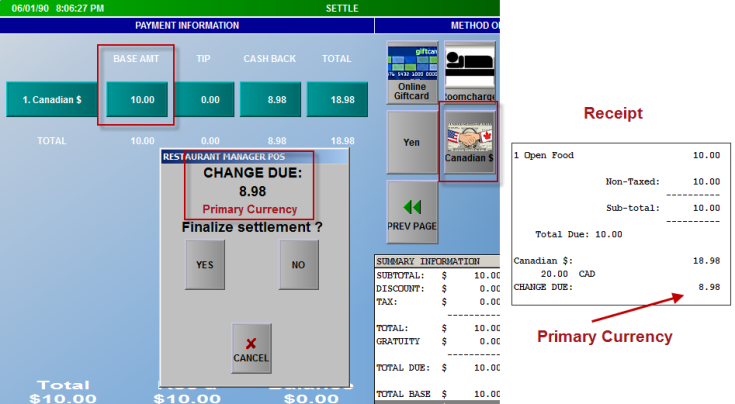
Guest check settlement performed using the exact same procedure as settling with a primary cash payment type. However, it is important to note that change given will always be displayed using the primary currency. Example, the base amount of the check is ten dollars and the customer pays the check using a Canadian $20 note. Using the exchange rate provided in the section above, the customer would receive $8.98 in US currency (primary).
Foreign currency is reported in the Non Cash Information or Method of Payment sections of most payment handling reports. For cash handling purposes, foreign currencies not considered as non cash payment since change given will always be in the primary currency. Handling foreign currency in this method will guarantee proper accounting of primary cash currency. Below is a list of some of the reports where foreign currency is reported:
In this section we will explore the numerous ways to a settle guest check totals and what to do if we make a mistake. We will also discuss how to handle cash when a sale is not involved.
There are a variety of ways to adjust transaction amounts before processing payment. You can read more about these operations in the sections below on:
If you wish to allow users to access the Settlement Screen from a particular POS Workstation you must use the Station Configuration Form to configure that station to “Allow Accessing Settlement Screen”.
NOTE:If your system is configured with Cashier Banking you may wish to allow access to the Settlement Screen only at Cashier Stations.
When the setting above is enabled, the Order Entry Screen is usually configured with a [SETTLE] Function Button that provides access to the Settlement Screen. Some systems may also be configured with a [CASH] button that not only calls up the Settlement Screen but also sets the Form of Payment to cash by default. Use the POS Function Buttons Layout Setup Form to determine whether the [SETTLE] and/or [CASH] buttons appear at the base of the Order Entry Screen.
If the “Direct to Settlement” setting has been enabled, you may access the Settlement Screen directly from the POS Status Screens. This setting may be enabled at any POS Station that is used only to settle transactions but not to process food orders. It should only be enabled at stations configured to do Cashier Banking.
In Quickservice establishments you may configure your system to automatically send items to prep area devices every time you access the Settlement Screen.
You may also create Macro Buttons on the Order Entry Screen that access the Settlement Screen automatically after applying other POS operations such as a price adjustment or a discount to a transaction. You may also wish to create a macro for settling checks by [CREDIT CARD] especially in systems configured with Automatic Credit Card Detection.
Even when a given station is configured to allow access to the Settlement Screen you may still control whether or not transactions may be finalized at that particular station.
When customers present payment you must:
Use the [Cancel] button to exit the Settlement Screen. When you use the [CANCEL] button to exit the Settlement Screen you will NOT delete payments already recorded and displayed in the Payment Detail Area.
NOTE:To delete a payment from the Payment Detail Area you must use the [DELETE]button.
The [CANCEL] button on the Settlement is also useful for making price adjustments to a transaction. Many of the Function Buttons that control price adjustments are part of the Order Entry Screen. So if you access the Settlement Screen before applying these price adjustments you must “cancel” settlement, make these price adjustments on the Order Entry Screen, and then return to the Settlement Screen.
You can delete a single payment by using the [Delete] button on the bottom of the settlement screen. You must first select (highlight) the payment and then hit delete if applying multiple payment to an order. This process must be repeated if you have more than one form of payment to delete.
Use the same process described above when deleting a credit card payment before submitting. No transaction record will hit the card holders account since the card number has not been submitted. However, once you submit the card and then delete, the deletion is process as avoid and will be reflected as so on the card holders account. You may want to enable the station configuration setting to print a void confirmation slip after deleting the payment if you are using Mercury for processing.
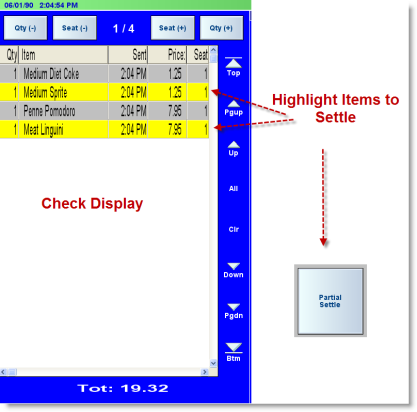
Partial Settlement allows settling a portion of a transaction without the need to split the check. For example, if a transaction has 10 items, you can pick 3 or 4 items and just settle those. This feature can be used when a customer from a larger party wishes to settle out, but only wants to pay for his or her items. Partial Settlement is allowed on Tables, Tabs, and Delivery orders; however, it is NOT permitted in Fast mode.
To perform partial settlement, you must first tag the items of interest in the view check area, then choose the [Partial Settle] option located under [MISC] of the order entry screen. The system will immediately display the settlement screen, but only the tagged items will be settled.
If you realize that one or more items were tagged incorrectly, you can cancel the settlement and the system will automatically return to the order entry screen with the items still tagged. You may then tag or un-tag additional items, and choose [Partial Settle] again. If you exit the order entry screen out to the main POS status screen, then Partial Settlement will be canceled and must be re-initiated after re-loading the order
If using “Advanced Seat Management” or if the current transaction has seat number assignments, you can perform Partial Settlement without tagging items in the view check area. If there are no tagged items when executing Partial Settle, the system will display a list of all seats on the current transaction allowing you to choose a seat to settle. After choosing a seat, Partial Settlement proceeds in the same manner as above.
If you wish to print a guest check during Partial Settlement, you must enable the option “Print check on partial settlement” located in RMWin > Setup > Station Config. When performing Partial Settlement, the system will print a check showing just the Partial Settlement items.
The system will attempt to maintain an accurate customer count when performing partial settlement. So for example, let’s say there is a table with 4 customers and you perform partial settlement on that table. The system will put 1 customer on the partial settlement, and change the customer count to 3 on the main check. The end result will be two transactions, one with 3 customers and another with 1, retaining the correct total customer count of 4.
During partial settlement, if credit card is chosen as the method of payment, the system will remain in the settlement screen for the entire process from pre-authorization through tip adjustment only if "Immediate Submit / Print" has been enabled in the Station Configuration form. If "Immediate Submit / Print" is enabled, the partial settlement transaction will leave the settlement screen once the payment has been submitted. The credit card payment will be held in the Settle Screen and can only be finalized when the rest of the items on the checks are ready for settlement. The guest check for the remaining guests will reflect the partial settlement and display the remaining balance due.
The following restrictions apply on partial settlements:
From the POS Settlement Screen you may apply multiple forms of payment to a single transaction. Applying multiple payments to a check is a process known as “Split Payments”. Split Payments does not involve creating separate or “Split Checks” which are described separately in the chapter on Guest Checks & Sales Receipts.
From the Table Service and Delivery Modules you may settle multiple orders simultaneously to cash. This feature is not available in the Tabs Module. Because this operation affects more than one single order, it must be launched from a POS Status Screen, not the Order Entry or Settlement Screen. When you use the [Settle All] function (in Table Service) or the [Auto Cash Settle] function (in Delivery) the system will NOT access the POS Settlement Screen. Instead, you will be prompted to select an individual employee and all the open orders linked to that employee will automatically be settled to cash.
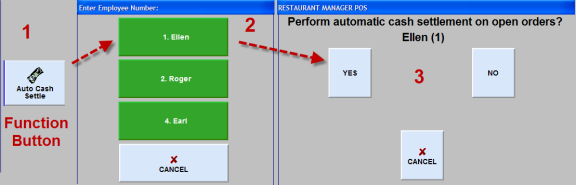
If you wish to include automatic gratuities and delivery charges in the amount waiters or drivers owe “to the house” when settling all their open orders to Cash you must access the Station Configuration Form and use the [Search Settings] button to locate and enable the Include Gratuity on Auto Cash Settle option.
Your system can be configured to process settlements in different ways described in detail: Method of Payment Configuration. In most configurations, checks are settled as follows:
Press the table button (or order button) on the POS Status Screen that corresponds to the order you wish to settle.
Press the [SETTLE] button at the base of the Order Entry Screen to call up the Settlement Screen.
NOTE: As described in the topic Settlement Function Buttons, you can press the [CASH] button instead of the [SETTLE] button, to record and finalize a cash payment with the touch of a single button.
Press the button corresponding to the type of payment presented by the customer. A dialogue box appears with the actual amount of the check in the payment amount field, a numeric touch pad for editing this amount and a series of buttons representing round dollar amounts:
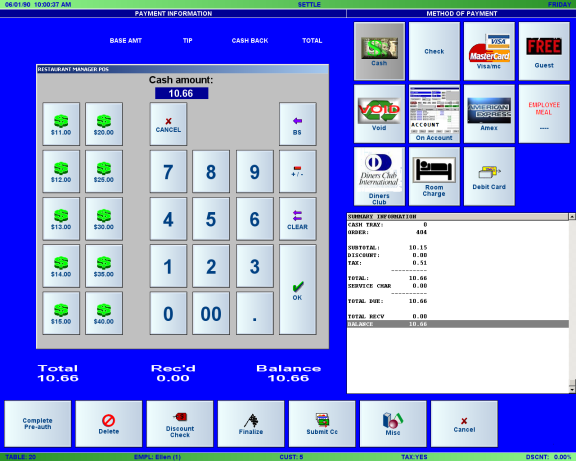
You can press [OK] if the customer tenders exact change. Or press the appropriate round dollar amount button. Or type in the exact amount presented by the customer.
NOTE: If you type in an amount less than the total amount of the check, Restaurant Manager will process split payments as detailed inSplit Payments.
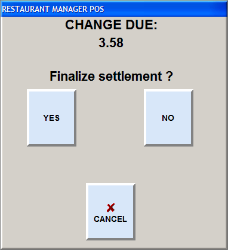
When you have entered payment amount(s) to cover the check in full, Restaurant Manager can be configured to prompt for a review all settlement information on screen and finalize settlement by pressing [YES]. When you confirm settlement, the POS Status Screen appears again. You will notice that the table button (or order button) corresponding to the order you just settled no longer appears on the Status Screen.
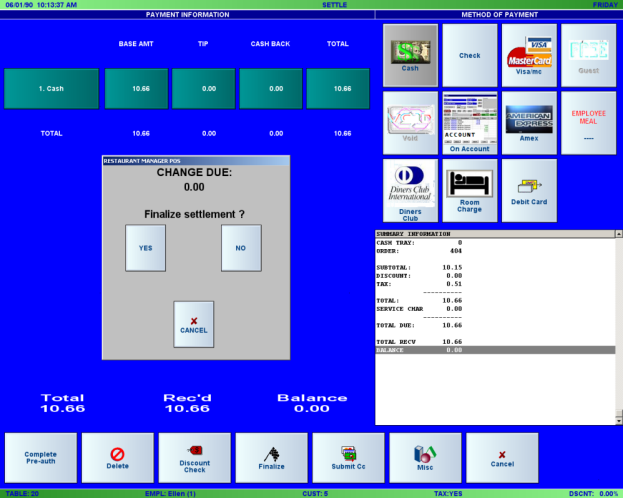
If there is an error in any information on this screen you must press [NO] or [CANCEL] to adjust the payment information.
In the Table Service Module, the “Send to Tabs” button can be used to remove a transaction from a table without actually settling the transaction.
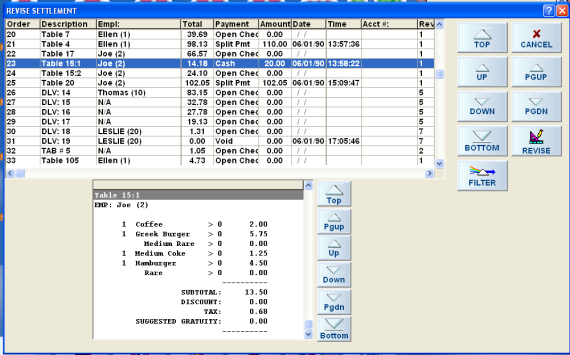
While a POS Session is open, employees or managers may revise payment details associated with orders that have already been settled. The Revise Settlement Screen below can be protected with a password prompt and may be accessed by touching this Function Button located on the Main Status Screen of each of POS Module:

To correct transactions settled during the current session:
The list of checks displayed on the Revise Settlement Screen can be filtered on any of the data fields that appear on the Filter Popup below:
Note: payments can only be revised at the POS within the same session. However, payment types and revenue centers, not the amounts, can be changed using Session View (RM BackOffice > Activities)
This option provides a means of revising settlement for all transactions for a specific employee. This can be used to efficiently enter tip adjustments at the end of a shift. To access this option, choose MISC from the main POS screen, then “Revise by Emp.”
The system will ask you to choose an employee for the operation. After selecting an employee, the system will display all the employee’s transactions for the current session. Note, if the employee has more than one clock in for the current session, transactions from both clock-ins are displayed.
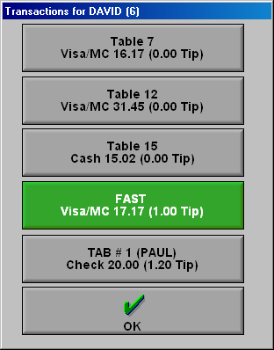
Each button contains information on a specific transaction. To revise a transaction, or enter a tip, simply touch the transaction of interest and the POS program will display the revise settlement window for that transaction. After you have completed the revise settlement process, the system will return to this window and the “revised” transaction is changed to green. This helps give a visual clue as to which transactions have been revised and which have not.
There are a number of options that control how this feature works. The options are located in RM BackOffice > Setup > Station Configuration and are described below.
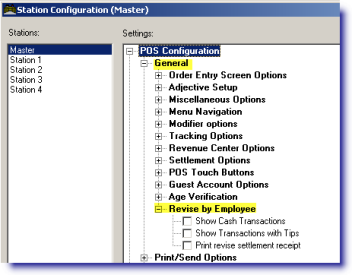
Show Cash Transactions- This option controls whether transactions that were settled to cash are displayed in the transaction list. If this option is not checked, then all cash transactions will be omitted from the list.
Show Transactions with Tips- This option can be used to filter out transactions that have already had a tip. If you are using “Revise by Emp.” to make tip revisions, then you should UN-check this option so that only transactions that do NOT have a tip are displayed.
Print revise settlement receipt- Uncheck this option if you do not want to print a receipt for each revised transaction. This option is audited using the same settings as “Revise Settlement.
Note: payments can only be revised at the POS within the same session. However, payment types and revenue centers, not the amounts, can be changed using Session View (RM BackOffice > Activities)
Refunds provide a means to give money back to a customer after an order is finalized. They can be used to reimburse customers for defective or improperly cooked foods.

If you answer “Yes” then all items on the current order are marked for refund. When applying the refund, Restaurant Manager will change the quantity from positive to negative. For example, if you have Qty 2 Hamburgers, it will be changed to Qty -2 Hamburgers. The gross value of the refund (not including tax) is saved to the audit trail.
Alternatively, you can apply a refund to specific items on the check by tagging the items first, then choosing the “Refund” option. Only the tagged items are refunded.
To cancel a refund, you must tag the items in the view check area, and then choose the “Refund” option. The “Refund” option acts as a toggle, items that are not refunded are marked for refund, while items that are already refunded, have the refund canceled.
Note: if you apply a refund to a pizza, you are no longer allowed to edit that pizza from the Pizza Edit screen.
Refunds and Coupons: It is important to ring all items, apply the coupon, and then use the Refund function button. Unexpected results may occur if refunding partial items on an order when the items are requirements for a coupon. An example might be if a coupon is setup to discount every fourth appetizer. There may be undesired behavior if you ring four appetizers, apply a coupon, and then try to refund two of the four appetizers.
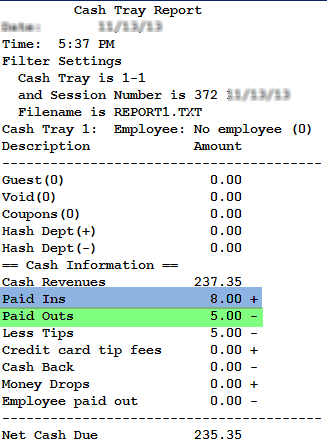
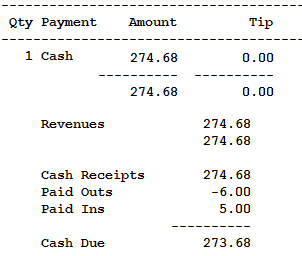
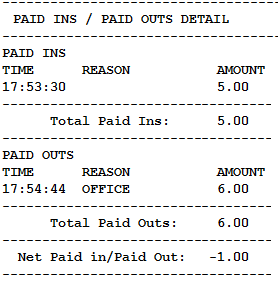
Your Restaurant Manager system will track all non-sale transactions that affect the cash drawer balance. Most non sales transactions in Restaurant Manager will be handle using Paid Ins, Paid Outs, or Hash Departments. These transactions are recorded in any POS or RM Reports report that details Cash Tray activity. Non-Cash Transactions will not add to revenues but are recorded in any POS or RM Reports report that details cash handling activity (i.e Cash Tray or Employee Revenue Reports).
One method of tracking non-sale transactions is using the "Paid In" or "Paid Out" function buttons on the POS Status Screen. Paid Outs will subtract from cash due to lessen the amount exposed to possible theft or loss while paid ins will do the opposite. Examples of Paid Outs might be paying a vendor out of the a cash drawer or refunding lost money in a vending machine or game table. Paid Ins are performed when an amount of the cash is added to the cash drawer. An example of a Paid In would be if an employee preforms a $10.00 paid out to get supplies from the store and the supplies only costs $8.00. The employee will return with the $2.00 and would create a paid in to reconcile the difference.
There are two methods for recording Paid Ins and Paid Outs: One method is strictly using a cash tray and the second method is to is to allow servers to perform this operation with server banking. Performing Paid In and Outs through a cash tray has more restrictions and controls, typically is more secure, and centralizes this type of transaction. Letting servers do Paid Ins and Paid Outs allows for greater flexibility and is ideal for restaurants with minimal management. The POS procedures for either method are exactly the same and only differ on how they are set up in station configuration.
There are a number of setup forms in the RM BackOffice Module that allow you to configure how your system configure Paid Outs/Ins:
Require cash tray init for Paid Ins/Outs- this option must be enabled if you want the cash drawer to be initialized before Paid Ins / Paid Outs. This options is enabled by default. Disabling this option will allow any employee with adequate security level to perform a Paid In/Out.
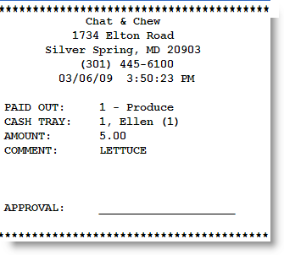
Cash Paid Out Receipt- enabled this option if you wish to print a receipt with every cash paid-out. Sample receipt below.
Print Paid In/Out detail on Revenue Report- Use this option to print Paid In/Paid Out detail on revenues report.
Use the "Search" button at the bottom of the Station Configuration screen to locate the options above.
There are a number of setup forms in the RM BackOffice Module that allow you to configure Paid Outs/Ins for server banking:
Require cash tray init for Paid Ins/Outs- this option must be disabled if you want to use Paid Outs/Ins for server banking. This options is enabled by default so you must change it.
Cash Paid Out Receipt- enabled this option if you wish to print a receipt with every cash paid-out.
Print Paid In/Out detail on Revenue Report- Enable this option to print Paid In/Paid Out detail on revenues report.
Use the "Search" button at the bottom of the Station Configuration screen to locate the options above.
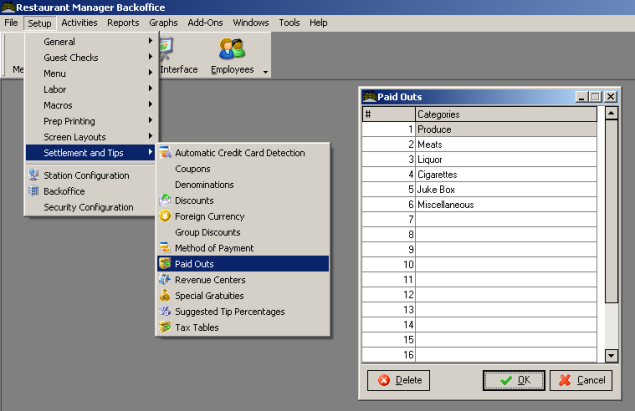
Use the Paid Out Setup Form to define up to twenty categories for tracking Paid In and Outs that may be processed during a POS session. These categories can be used to identify both "Paid In" and "Paid Out" transactions (i.e. cash deposited into and cash removed from a Cash Tray.)
The setup form is organized in two columns:
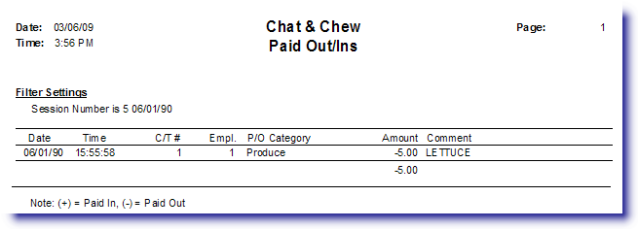
NOTE: If your system is configured with the Guest Accounts Module and you expect that some customers may wish to pay their account balance at one of your POS stations, you should create a Paid In category called “On Account”.
The Paid In /Out reports for a particular sales session are listed at the bottom of the Cash Tray Report.
Cash Tray Report
Employee Revenue Report
You can also issue a separate report detailing each non-sale transaction in RM Reports.
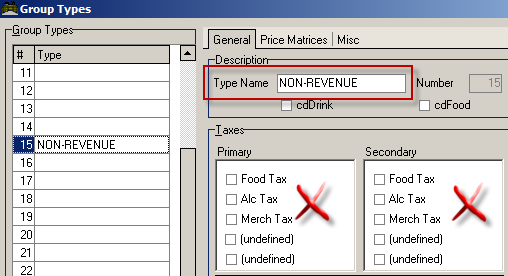
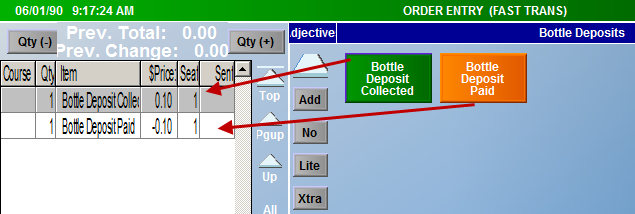
Hash Departments are typically considered as non-item revenues not counted towards item sales but reflected in money (forms of payment) collected.Typical to basic cash registers, hash departments are departments not items. When programming a PLU on a basic cash register you normally link the PLU to a department. This process is similar to RM but with the addition of one extra step. In RM the department is a group type that is assigned to a group and the item belongs to the group. It should be stated that there may be instances where items in hash departments may be taxable and will have to be reflected in tax categories. Hash Departments can also have a positive or negative value (e.g. bottle deposit refunds). Special consideration should be given when implementing Hash Departments to incorporate tax possibilities and +/- values.
Below is a list of possible scenarios for hash departments and examples where they may be used:
Hash Departments are programmed as a menu item in the Menu Item Setup Form within Menu Setup. Menu items are defined as hash departments items under the Advanced Tab of the Menu Item Setup Form.Hash department items may be programmed in any menu group. However, special consideration should be given to where you place a hash department item as it is subject to the reporting and tax attributes of the menu group. You may also want to consider additional menu item attributes such a quantity setup, making an item non-taxable at the item level, etc.
Security is added to a hash department menu item at the item level using the "Security Level to Access" field under the Advanced Tab in the Menu Item Setup Form or at the Menu Group level on the Menu Group Setup form.
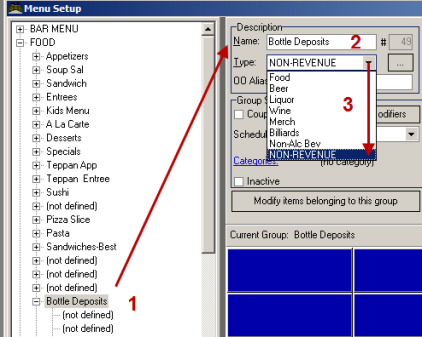
For our example we will setup two hash department items for bottle deposits: one positive and one negative. We need both types of has departments as we need to collect for bottle deposits when selling an item and need to pay out cash for when the empty bottles are returned. We also want to easily track the different hash department items so we need to associated the hash departments with their own Group Type and Menu Group:
Menu Item Setup- Create hash department menu item within group type:
- Hash - (minus)- Assigns menu item a negative revenue hash department item. When ringing menu item at POS, item will appear as a negative sale on the guest check.
- Hash +(plus) - Assigns menu item a positive revenue hash department item. When ringing menu item at POS, item will appear a positive sale on the guest check.
After finished the Hash Department items should appear as pictured below:
Reporting of hash departments is entirely dependent on how they have been programmed. ASI suggests you use separate group types and menu groups if you wish to track detailed hash department totals. There are two dedicated hash department reports found in the RM Report Module:
Hash departments totals are reported separately by default on the following reports:
You may also filter any of the specific item sales and employee contest reports to track specific hash department items rung.
You have several options if you are using Cashier Banking to track sales transactions. You can initialize a cash tray to a single employee or you can initialize a cash tray to a generic employee (employee 0). Initializing a cash tray to an employee restricts who has access to the tray: specifically, the employee the tray is assigned to. This is ideal in for scenarios where you have a ratio of one employee to one POS station (i.e. bars). This option should be used when you have Multiple Cash Drawers attached to the station.
If you allow several employees access to a cash tray and still want to track transactions then you will want to initialize a tray to a generic employee. You will have to disable the Link cash tray to employee option in the station configuration to do this.
There are several options one can use to initialize and finalize and cash tray. For more information see the topic: Cash Tray Management.
In the event that you lose your internet connection or if your credit card processor is down and you are unable to process credit cards, Restaurant Manager provides a means of storing the credit card transactions in an “Offline batch” and submitting them when the credit card system is restored. At this time, offline credit card processing is available for Mercury Payment Systems only.
To put the credit card system in “offline” processing mode, choose [MISC] from the main POS screen, then [CC Options].
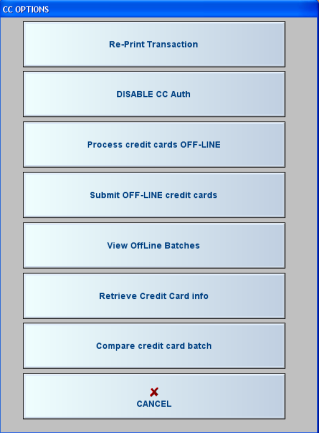
Then choose the option “Process credit cards OFF-LINE.” (Note: if the system is already offline, the option will read “Return to processing Online” so the option changes depending on the state of the system). This option can be executed from any POS station, but it is a system wide feature and therefore affects all POS stations, including handhelds.
Note: When processing offline, it is recommended that you take a mechanical imprint of each credit card. In case of a problem later on, this will greatly simplify any corrective action that may be needed.
Once offline, the system will remain offline until it is manually restored online using the MISC option described above, or until the offline batch is successfully submitted. The following are a few key points about offline credit card processing:
At the time that the system is put into offline mode, there may be credit cards that were submitted, but not yet finalized. Those transactions will be placed in the offline batch and submitted when the offline batch is submitted. When a system is restored back online, any transactions in the offline batch will remain there, to be submitted with the offline batch. Therefore, offline credit card transactions will stay offline, even if the system is put back online.
The system will provide notification when it is operating in offline mode. The notification is provided when each POS station is started up, and when opening and closing the session (provided the “NOASK” option is not used).
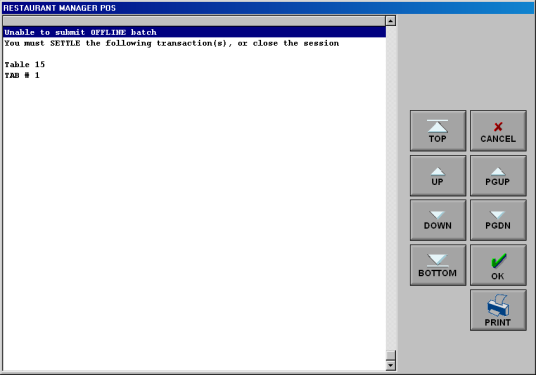
Before submitting the offline batch, you should check to make sure your internet connection has been restored and that you are able to process credit cards normally. In addition, any credit card transactions in the offline batch must be finalized (i.e., settled). If there are unsettled credit card transactions in the offline batch, Restaurant Manager will not allow submitting the offline batch. Instead it will display a message showing the offending transactions, and require that they be finalized before submitting the offline batch.
To submit the offline batch, choose “MISC” from the main POS screen, then “CC Options” and choose the option “Submit OFF-Line credit cards.” Restaurant Manager will attempt to submit ALL offline transactions irrespective of the date or session number. If you have been processing credit cards offline for several days, then Restaurant Manager will attempt to submit all the offline transactions. The transactions are put in the current credit card batch. For this reason, the credit card batch report from your credit card processor may not match the Restaurant Manager session reports.
If one or more transactions in the offline batch are declined, you will be given the option to retain the “declined” transactions in the offline batch and retry them later. If ten transactions are declined, Restaurant Manager will abandon submitting the offline batch. If corrective action is necessary, you should fix the problem; submit the batch again after the problem has been corrected.
After submitting the offline batch, Restaurant Manager will display a report on screen showing a detailed listing of card numbers and amounts.
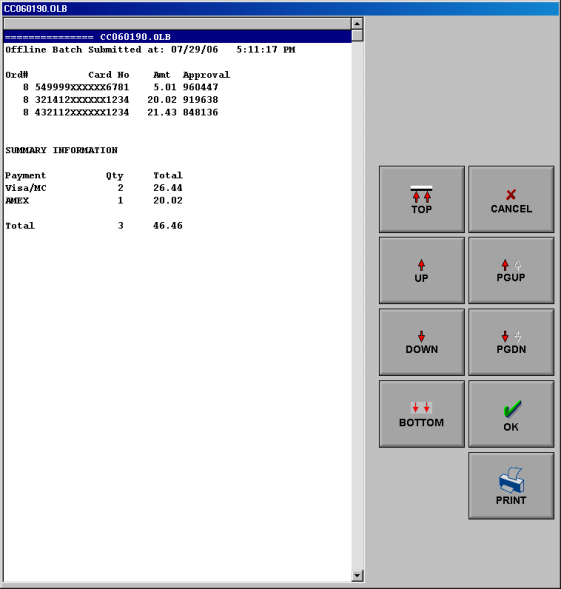
To send the report to the receipt printer, press the “Print” button at the bottom right of the display. Offline batch reports can be reviewed at any time by choosing “MISC” from the main POS screen, then selecting “CC Options” and “View Offline Batches.” Offline batch reports are stored on the computer hard disk as ASCII text files with the filename: CCmmddyy>.OLB
Where [mmddyy] is the month, day and year the offline batch was submitted. So an offline credit card batch that was submitted on July 3, 2006 will be stored in the file CC070306.OLB.
For the most part, you can do anything in offline mode that you normally do online including split payments, tip adjustments, revise settlement, etc. The adjustments made to the base amount or tip amount are saved offline and submitted along with the offline batch. Just keep in mind that unless you call for a voice approval, offline transactions are not guaranteed to be approved when submitting the offline batch.
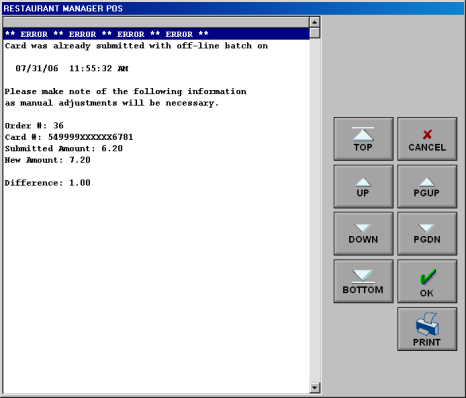
There are a few restrictions when doing offline processing. The first has to do with revise settlement. If a transaction is processed offline, and it has already been submitted with the offline batch, you will not be allowed to perform revise settlement on that transaction. Attempting to do so will result in the following message.
One other restriction relating to offline processing has to do with credit card pre-authorizations (pre-authorizing credit cards before settlement). The “Repeat CC Auth” function is not available during offline mode. Because credit cards are not actually submitted during offline processing, performing a “Repeat CC Auth” is not meaningful in this mode.
If using the credit card pre-authorization feature, transactions should be handled the same as online mode, but without using the “Repeat CC Auth” function. When you are ready to finalize a transaction, use the “Complete Pre-auth” function.
On occasion, it may be necessary to retrieve the full credit card number from a past transaction in order to make adjustments, or to issue a credit, etc. Since this information is considered highly sensitive, you must enter an administrator password in order to gain access to this feature. In addition, your system must be configured to store credit card information.
To enable credit storage, go to RM back office, Setup, Station Configuration. Place a check mark on the option “Save CC Info in payment file” and enter a value in the parameter “Number of days to store CC Info.”
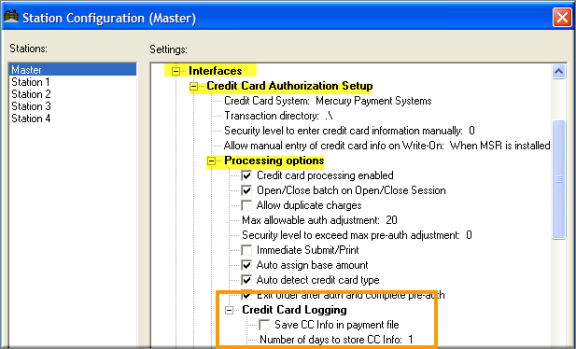
Note, for the number of days to store CC info, you can enter any value from 1 to 99 days. To minimize the potential for credit card fraud, and to minimize your liability in case credit card data is stolen from your establishment, it is recommended that you set this option to the smallest value that meets your business needs. For example, if you find that you rarely need access to credit card numbers more than 1 week after the transaction, then you should set the “Number of days to store CC Info” to a value of 7.
To look up a credit card number on a past transaction, select “MISC” from the main POS screen. Then choose “CC Options” then “Retrieve Credit Card Info.” The system will ask you to enter an Administrator password.

Administrator passwords must be at least 7 characters in length and must also contain both alphabetic characters (A-Z) as well as numbers (0-9). For PCI compliance, each time an attempt is made to access administrator functions; the attempt is logged in the file PWLOG.DBF for auditing purposes.
If you enter a valid administrator password, the system will display a window showing recent transactions. Find the transaction of interest, then press [CC Info] to display the credit card information associated with the transaction.
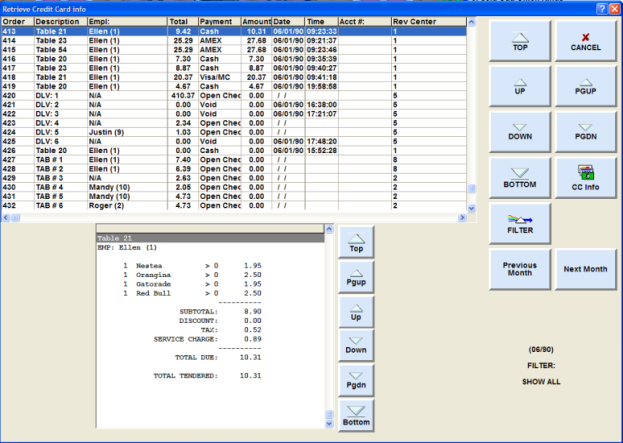
Note: once this window is displayed, there is a 15 minute timeout for viewing credit card information. Once 15 minutes has elapsed, an attempt to view another card will display a timeout error and the window is automatically closed.
For PCI compliance, any cards that were viewed while using this feature are logged in the file CARDVIEW.TXT. This file is for auditing purposes only and shows the date, time, employee # and the credit card that was viewed.