Revenue Centers serve multiple purposes in Restaurant Manager by providing:
In other words, before defining any Revenue Centers you must:
For reporting purposes, Revenue Centers should be set up as the equivalent of accounting system "departments". Revenue Centers might be used, for instance, to distinguish Carry Out sales from Delivery sales or bar sales from Dining Room sales, etc. All sales reports can be filtered to show sales by Revenue Center and some reports include sub-total sales by Revenue Center.
NOTE: If you wish to exclude certain transactions from standard sales reports, you can create a Revenue Center called "Special Transactions" and then use the report filter to exclude that Revenue Center from the reports.
There are tax settings on the Revenue Center Setup Form that allow you to apply different types of taxes to different types of transactions or to make certain transactions tax free.
Other settings on the Revenue Center Setup Form control procedures at the POS station. For instance, all the settings in the “Prompts” area of the form control prompts for phone numbers etc that can pop up on a POS screen.
When you enable a configuration setting on the Revenue Center Setup Form you must also access the POS Modes section of the Station Configuration Form to define when and under what circumstances a particular Revenue Center is linked to a given transaction at each separate station. Options on the Station Configuration Form allow you to either:
This link between Revenue Center configuration and Station Configuration is especially important on systems configured with more than one POS Module.
For example, in a business that runs both delivery and carry out operations, phone number prompts and driver assignment are operations that would probably be enabled only for transactions linked to the Delivery Revenue Center.
In new systems, the default configuration includes a Revenue Center named for each of the available POS modules (Table Service, Tabs, Delivery/Quickservice, etc). Each of these sample Revenue Centers are configured with the operational defaults most appropriate to that module.
Revenue Center configuration options work not only in tandem with settings on the Station Configuration Form, they can also work together with a setting on the Table Layout Setup Form to set a default Revenue Center for transactions opened at a particular table.
The active Revenue Center can be changed on the fly from any of the POS Modules by touching a Revenue Center function button. If you use the Revenue Center function button on the Order Entry Screen the selected Revenue Center will apply only to the current order.
After a transaction has been settled and the Sales Session closed, you may change the Revenue Center that was linked to the transaction from the Session View screen in the BackOffice Module.
Each restaurant is unique in regards to how they handle transactions and reporting needs. Proper programming of revenue centers will help your restaurant achieve your goals. This chapter will explore the different options of the Revenue Center Setup form and the other settings in the RM BackOffice Module associated with revenue centers.
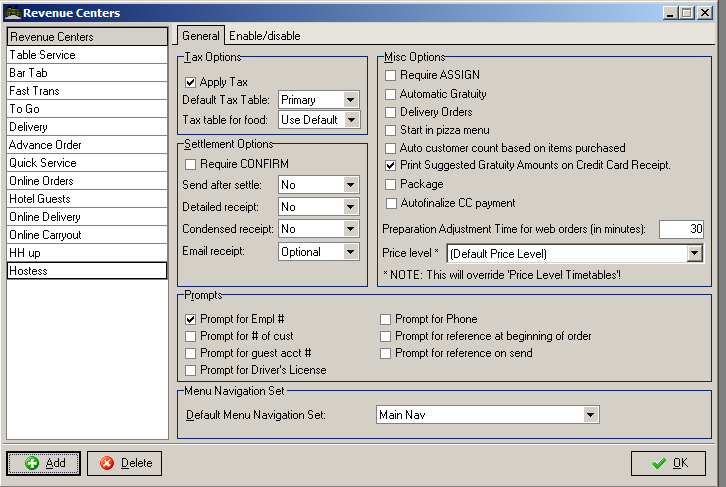
You can use the Revenue Centers Setup Form to define an unlimited number of Revenue Centers and to set some operational defaults for processing transactions linked to each Revenue Center. Revenue center options are found under two tabs General and Enable/Disable. The most common settings are configured under the General tab. The settings under the Enable/ Disable tab allow the user to limit the visibility of certain revenue centers when a revenue center prompt is invoked.
The General tab contains most of the setting that containoptions for prompts, printing, taxes and additional behaviors at the POS. The setting under the General Tab is organized as follows:
The vertical column on the left of the setup form displays the names of existing revenue centers.
Use the [ADD] button labeled at the base of the form to add a new Revenue Center to this list. Or highlight a name on the list to edit the operational defaults that will be used for all orders linked to this Revenue Center.
Use the fields described below to customize how Restaurant Manager processes the transactions linked to a particular Revenue Center.
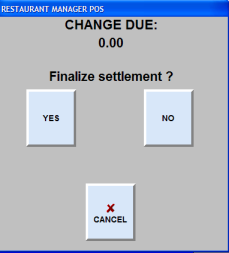
Disabling this option will remove the prompt when the [Finalize] button is touched. You should only uncheck this box if there is no need to calculate the change due on the transactions linked to this Revenue Center.
Set this feature to "yes" when most of the transactions linked to the highlighted Revenue Center will be fast transactions that will be settled as soon as they are entered.
Set this feature to "Optional" if you want the system to display the following prompt at settlement: Do you want to SEND items? YES / NO
Set this feature to "No" if no orders should ever be sent to the prep area printers when an order is settled.
NOTE:The condensed receipt is simply the bottom half of the detailed receipt. If you choose to print both a detailed and a condensed receipt, then you will simply print two copies of the bottom half of the detailed receipt. This can be useful if you wish to give one receipt to the customer and keep another for your records.
If you are using the Delivery Module to track eat-in or carry out orders as well, you will need at least one additional Revenue Center in which this feature is NOT ACTIVATED for processing non-delivery orders.
Next you must define the customer count for each item on your menu. For example, you may want entrees to count as 1 customer and appetizers to count as 0. Or you may have a “Surf and Turf combo for 2” in which case, you would set the customer count to 2. Customer counts are configured in the Menu Item Setup form under the “Advanced” tab in the section “Customer Options”
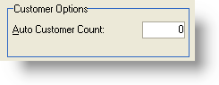
Once this option is configured, Restaurant Manager will automatically scan through the check after finalizing a transaction and set the customer count based on the items purchased.
The Price Level option allows the user to set a price option for each revenue center. This feature is useful for establishments that charge different prices for same items sold contingent on the area of the restaurant sold. Some establishments will charge more for menu items sold for delivery compared to like item in-store sales to make up for extra packaging costs. More on price levels can be found under the topic:
The Table Service Module allows you to override the default Revenue Centers defined on the Station Configuration Setup Form by linking Revenue Centers, instead, to a specific table. You can use the Table Setup Form to link a given Revenue Center to every order opened at a specific table. This topic is covered in detail under the section: Default Rev Center
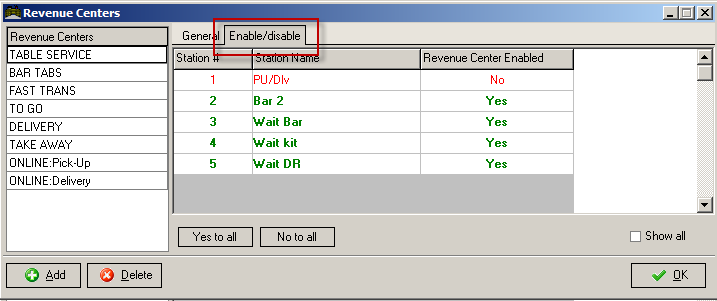
Use the settings under the Enable/Disable tab to control by POS Station what revenue centers will appear when a prompted is invoked.Your establishment may make use of prompting for revenue centers to control prompts or steering sales figures when taking orders. This is a common practice for a Pizza Delivery restaurants that may take orders for Dine-In, Pickup (Carry Out), or Delivery. However, your restaurant may take On Line Orders which requires it's own revenue center. In the case, you may not want the On-Line Delivery revenue center to appear when prompted.
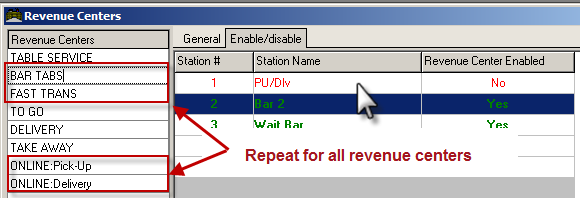
The Revenue Center Enable/Disable form takes the form of a grid and is separated into three columns. The amount of rows on the grid is determined by the amount of licensed POS stations purchased. The station column is the default number assigned in the Station Configuration form. The information displayed under the Station Name column are configured in the Station Name Setup form. The Revenue Center Enabled column displays if a revenue center has been enabled or disabled. After selecting a revenue center on the Revenue Center list, click on a station row to toggle the settings between Yes (enable) or No (disabled). Use the "yes to all" or "No to all" buttons to enable or disable revenue centers displayed across all stations. The "Show all" option allows viewing of all stations (beyond licensed stations) when using "phantom" stations on Write-On setup.
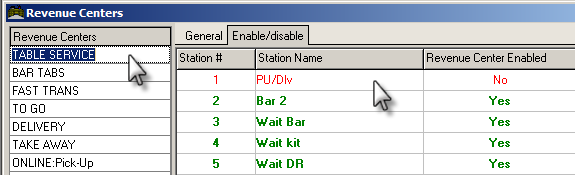
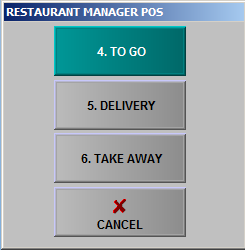
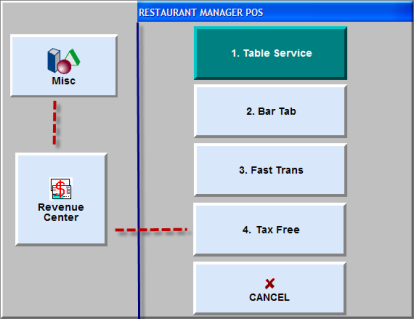
Lets demonstrate the use of disabling revenue centers on a station. For our demonstration, we have a full service restaurant including a dining room and a bar. The restaurant also offer pickup and delivery. Our restaurant places take out and delivery order at station one (dedicated for these types of orders). We set our Station Configuration for Station 1 to "prompt for revenue center at Start". We want to limit the revenue centers displayed on the prompt to TO GO, Delivery, and Take Away. We accomplish this by:
The prompt on the screen shot below shows what the prompt would look like at the POS.
Note: this option also affects revenue displayed when using the "Revenue Center" function button.
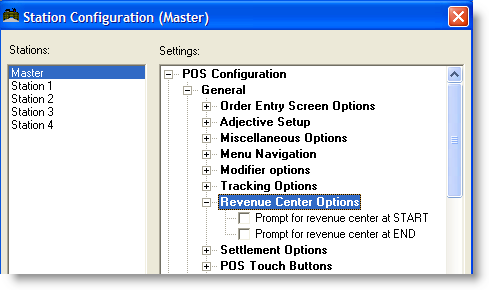
Use the [Search Settings] button at the base of the Station Configuration Form to locate and configure the following Revenue Center settings:
NOTE: Because you can manually change the Revenue Center that is assigned to a particular transaction from any POS station, you should only configure your system to prompt for the Revenue Center on each transaction, if you expect to process many transactions that will be assigned to a Revenue Center other than the default Revenue Center.
Because revenue centers are so essential to tracking sales and controlling POS behavior, it is mandatory that you set up a default Revenue Center in the following modules:
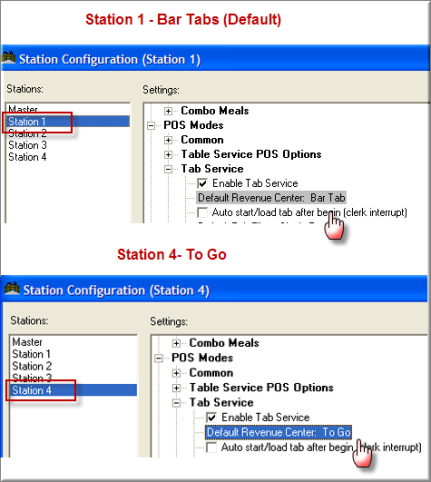
Restaurant Manager creates revenue centers and logically assigns them to a POS Mode at default installation. You may change the default revenue center per station if needed. An example might be if you have one station using Tabs for take-out (To Go) orders and all other stations use the Tabs mode for bar orders. In this circumstance you would want to select the station from the station list in Station Configuration, go to POS Modes > Tab Service, and change the default Revenue Center to “To Go”. The illustration below show how this might appear in the station configuration.
The option exists to restrict or expand orders from printing certain menu items assigned a prep printer based on revenue centers. This is useful if you send same menu items to different prep areas. An example is you have an upstairs and a downstairs bar and want to route orders based on revenue center per station thus eliminating the need to setup different menu items.
Once the prep area printers have been configured and added to the menu items effected, you will need to go the Setup > Station Configuration. On the Master station go down to Devices > Prep Area Devices select the printer you wish to affect and expand the menu tree by clicking on the (+). Click on the on the ‘Enable Prep Printer Filtering”. Next select the “Remote Filter Filters” to access the setup form.
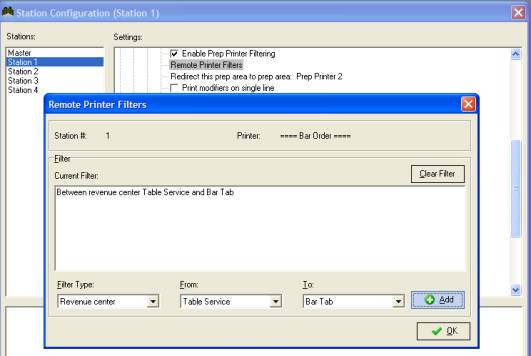
The Filter Type will always default to “Revenue center”. Select the revenue centers in the “From” and “To” fields and click the [Add] button to apply the filters. More information on this topic can be found here: Prep Area Filtering.
Restaurant Manager tries to handle Revenue Centers in the background requiring very little user intervention. Assigning default revenues centers as mentioned above and using the destination revenue centers when transferring checks are examples of the effort Restaurant Manager takes to make this an intuitive process.
However, circumstances may dictate user intervention necessary. Establishments that offer both delivery and pick up may want to enable “Prompt for Revenue Center”. Another example might be: an employee may have selected a wrong revenue center when being prompted. Another example is that you have set up a tax free revenue center and have the need to change tax status on the fly.
To have your system prompt for revenue centers require a change in system configuration settings. First you must create a revenue center if using a revenue center outside of the defaults. You certainly can use an existing revenue center. Next you will need to go to Setup > Station Configuration and use the [Search settings] button at the bottom of the form and type “prompt for revenue”.
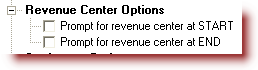
You have a choice on when the prompt will appear. Most users choose to have the prompt at the start. Choose the option which best fits your operation.
Note: Revenue centers displayed when a prompt is evoked are controlled at the station level using the Enable/Disable settings in the Revenue Center Setup form.
Restaurant Manager allows the user to change revenue centers for whatever reason needed. The [Change Revenue Center] function button, typically found in the MISC functions on the order entry screen, is the mechanism you will use to affect your changes. You may allow all employees to use this function or you may want to restrict the use of this function to managers. The [Change Revenue Center] button can be password word protected or moved to the Order Entry screen using the POS Function Button Layout form.
You may also want to cut key strokes down or limit the revenue centers displayed by creating Macros to change revenue centers. More on programming macros can be found here: Macro Buttons
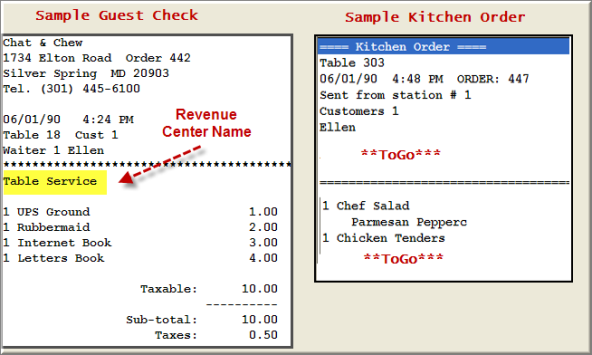
You can configure the revenue center name used on a transaction using the Configurable Guest Check Editor. Placing the revenue center name on the guest check provides another method of tracking orders. When this option is used, most users place the revenue center keyword at toward the top of the order. However, Restaurant Manager allows the user to place the revenue center name where ever they like on the guest check.
You will want to put the revenue center name on prep area chits if you have different areas of sales that require different packaging. An example is if you establishment offers dine-in and delivery and delivery orders are packaged in “to go” containers. Putting the revenue center on the prep area chit eliminates the need for verbal communication and frees up your staff to remain on the floor. This may also be used for bars and establishments that use different glassware for patio service. If the printer permits, you can define the color of the name to make it stand out. You may place the revenue center anywhere on the chit and even have it appear on several different areas on the same chit. Revenue center names are added to the prep area chit using the Printer Templates Editor located in the RM BackOffice under Setup > Prep Printing.