(continued from Promotional Pricing)
A gratuity is a monetary amount received by an employee (usually in a service position) from a service rendered. Gratuities can be freely given by customers or required by the “house” after meeting certain criteria. In turn, gratuities may be shared between employees when the receiving employee. Example: a server tips out a bartender or bus person.
Gratuities can also be referred to as Service Charge. In the Delivery segment of the hospitality, service charges (delivery charge) are often the property of the business where it by be divvied up at its discretion. Certain localities may impose a tax of Service Charges that added to the check (forced). Check your local laws to see if this applies to you.
Nightclubs, bars, or various other establishments may require a patron to pay a cover charge. A cover charge is typically a flat fee for entry to defray the cost of entertainment such as live musicians, singers or a DJ, or for the use of a dance floor, pool tables. Cover charges may also be added to a guest check in lieu of tips, or to pay for uncharged items such as bread and water
There are three ways to configure the Restaurant Manager system to automatically add a service charge to the guest check:
Important: In 2014 mandatory gratuities (Auto Gratuities) will need to be handled differently than regular tips. In fact, the IRS considers “automatic tips” service charges that should be considered part of the employee’s regular, non-tip wages. This topic is covered in the section: Auto Gratuities as Wages
Your Restaurant Manager™ system can be configured so that, under certain circumstances, a gratuity will automatically be applied to a guest check. Restaurant Manager applies an Auto Gratuity when the following conditions have been met:
With two different gratuity modes ("Basic" and "Special"), Restaurant Manger can handle most gratuity needs:
From the Table Service POS Module, you can override automatic gratuities simply by pressing the "Gratuity" button from the Print Check screen and “manually “entering a new gratuity percentage and/or amount.
With Restaurant Manager you can apply tax on “Basic” gratuities. The gratuity amount can be taxable whether it is an automatic gratuity or manually applied gratuity and whether it is a percentage or fixed amount.
To make the gratuity amount taxable, go to Station Configuration. Set the Gratuity mode to “Basic.” Then under the “Basic Gratuity Computation”, choose a “Group type for taxing gratuity.” The gratuity amount is added to the chosen group type when computing the tax.
For example, let’s say you choose group type “Food” and the gratuity amount is $5.00. When computing the tax, $5.00 is added to the “Food” total and the result is used in the tax computation.
If you do not wish to apply tax on “Basic” gratuities, set the group type to “0” (disabled).
There is an alternative method using coupons to add a gratuity to a guest check that can be used in some extreme circumstances where additional criteria (i.e. maximum amounts) are needed. More on this is covered under the section Negative Value Coupons
The setting under the Gratuities section of the Station Configuration control gratuity computations and gratuity methods. use the [Search Settings} button at the bottom of the Station Configuration Form to locate these options.
Restaurant Manager has the ability to add automatic gratuities. With two different gratuity modes ("Basic" and "Special"), Restaurant Manager can handle most gratuity needs.
With gratuity mode set to "Basic," the gratuity amount is computed as a percentage of the total check amount. "Basic" gratuity mode also allows for fixed gratuity charges, for example, a fixed delivery charge which is independent of the check amount.
"Special" gratuity mode offers greater flexibility in the sense that the user can assign different gratuity percentages for different group types (i.e., you can apply a 10% gratuity on wine and a 15% gratuity on food and beverage).
In order for a gratuity to apply, several conditions must be true. First of all, auto gratuities must be enabled for the revenue center of the transaction. This is done via the Revenue Center Setup Form.
If enabled, one of two conditions can trigger the auto gratuity feature -- either the customer count meets or exceeds the "Minimum Customer Count" OR the check total meets or exceeds the "Minimum Check Amount." Note: if an auto gratuity is triggered, it can be manually canceled or overridden in the POS.
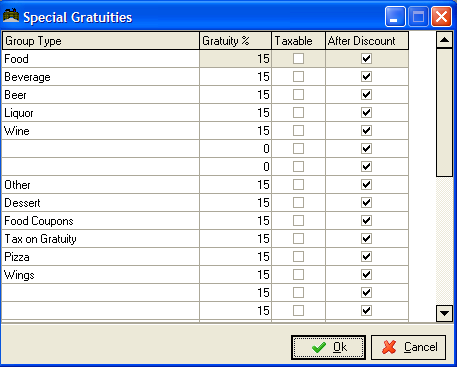
If "Gratuity Mode" is set to "Special" you must also configure the Special Gratuities Setup Form.
Special Gratuities are calculated based on varying percentages applied to different Group Type. They are defined in the Special Gratuities Setup Form. Use this form only when you have configured the Auto Gratuity setting under Station Configuration to activate the Special Gratuities mode.
The Special Gratuities Form is divided into four columns:
To print suggested gratuity amounts at the bottom of the guest check, you must first define the gratuity percentages you wish to appear (i.e., 15%, 18%, 20%, etc.). Suggested Gratuity Percentage configuration is found and accomplished in the RM BackOffice > Setup >Settlement and Tips >Suggested Tip Percentages.

You will also need to configure the following Station Configurations settings for Suggested gratuities:
After defining the gratuity percentages, you must enable the suggested gratuity in Setup >Settlement and Tips >Revenue Centers. For each desired revenue center, check the box
“
After defining the gratuity percentages, you must enable the suggested gratuity in Setup >Guest Checks >Configurable Guest Check Editor.
You can configure the guest check to show suggested gratuities by using the [Search Keyword] function on the bottom of the form and typing “Suggested”. Click on the keyword. This will lead you to the keyword line < Suggested Gratuity Lines>. You must then click and drag the keyword into the syntax box to the right. You can add this to selected revenue centers by creating/adding a template based on revenue centers.

Some establishments pay certain employees (i.e. servers) a reduced or minimum wage with the expectation tips will suffice in lieu of a higher wage. Considering the last statement, most government tax collecting agencies consider gratuities as income. Therefore it is an important for an establishment to track employee tips.
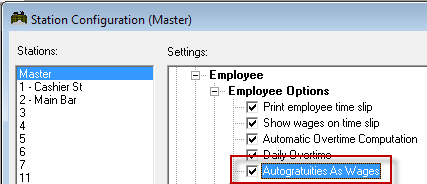
As of January 2014, any gratuity applied automatically to an order will need to be handled differently than regular tips. In fact, the IRS considers “automatic tips” service charges that should be considered part of the employee’s regular, non-tip wages. With Auto Gratuities As Wages, there is a station configuration option that must be enabled (by station). When enabled, Auto Gratuities should will be subtracted from cash due, but rather counted as wages to be paid to the employee on their paycheck. If disabled, Auto Gratuities will be deducted from cash due. The Auto Gratuities station configuration setting can be found in the RM Back Office Module by clicking Setup > Station Configuration > POS Configuration > Employee > Employee Options. This setting must be enabled on all stations (using Copy Settings).
The following report are capable of displaying Auto Gratuities as wages
Autogratuities will not deduct from cash due on the following reports:from cash due.
There will be circumstance where you will need to track a specific tip. In this case, a customer has usually called into question the tip added to the check. Perhaps they believe the tip added was inaccurate (i.e. a double tip) or you may want to review a specific tip out of curiosity. Regardless the reason, there are several method to review individual tip transactions.
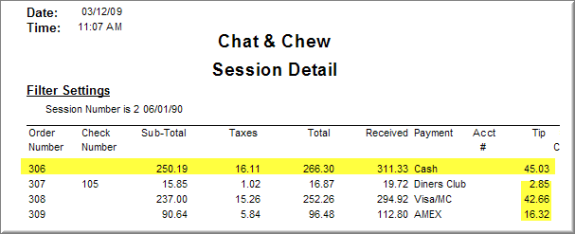
You can track tips at the POS using the Employee Revenue Report. Access to the Revenue Report is accomplished using the Revenue Report function button located in the [MISC] function of the Main Status screen. You can also configure your system in the Job Classification form and Station Configuration to print out the report by using the [Empl] log out function. You must also configure your system to print “Detailed Transactions” on the Revenue Report. The Detail Order Listing section of the report will appear at the bottom:
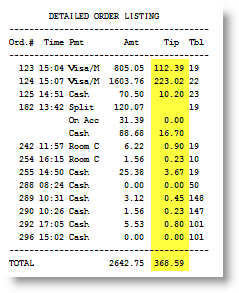
In the sample portion of Revenue report above, you can see each individual tip in the Tip column associated with each transaction. The tips listed in the sample include both Credit Card Tips and gratuities add to the check.
You can track all individual using several methods:
Restaurant Manager allows for the end user to determine how the system allocates excess credit card amounts. Specifically, how will the excess be handled when the credit amount exceeds the check total. Most establishments choose to have the system determine the excess amount to be counted as a tip. There is a setting in the Credit Authorization Setup located in the Station Configuration, “Prompt for excess handling”, the will trigger a prompt at the POS asking the user how to handle an excess when one occurs.
Credit Card tips are typically added at the time between finalizing a transaction and after submitting a credit card to the processor. However, Restaurant Manager allows the end user to add a tip at the time of being submitting as a result of an automatic gratuity add to the check or per verbal instructions from the customer. Tips can also be added or adjusted after the transaction has been finalized.
Credit Card tips can be paid out the same day by deducting from cash or be stored as a gratuity to be paid out at a later time. Credit cards tips can be tracked by individual or can be tracked or in total gross amounts. Tips can also be tracked and report on for almost any period of time using the RM Reports Module.
The typical process of processing a credit card in to process the card at the POS via the {Submit] button, present a CC slip to the customer to sign and add a tip, then add the tip and finalize the transaction. There are two methods one can add a tip to add a credit card tip after submitting:
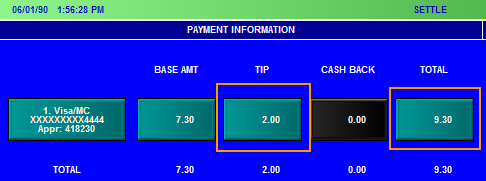
Using the first method, the user will enter the settlement screen with the credit card already being submitted, and press the [TIP] button located in the payment row displayed on the Payment Information section of the settlement Screen. In the example below we will add a $2.00 tip using the [TIP] button.
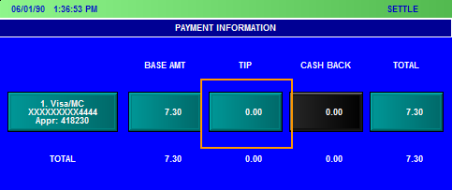
Pressing the [TIP] button will trigger a numeric keypad prompt. Use this prompt to enter the tip and hit the [OK] button when finished.
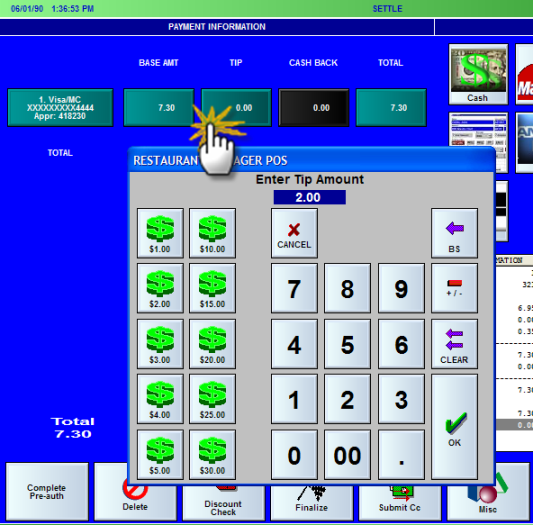
You will notice in the illustration below that the tip is now $2.00 and the “Total” is now $9.30 (base $73.0 = $2.00) the total amount should match the total on the “Store Copy” of the CC slip.
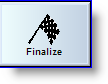
If everything is correct you can finish the process by hitting [Finalize] at the bottom of the Settlement screen. If the total does not match you can repeat the process above before finalizing.
The second method to adding a tip after being submitted is entering in the total from the “Store Copy” CC Slip the customer has manually added using the [Total] button. This process is similar to the method mentioned above.
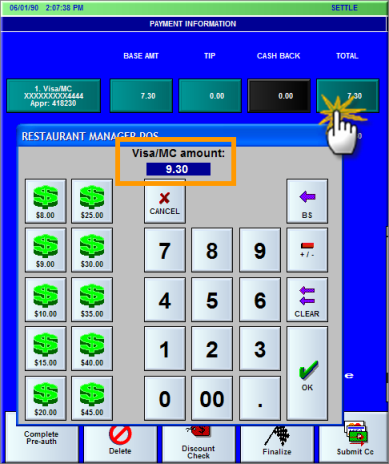
This method will calculate the access ($9.30 - $7.30= $2.00) and fill in the tip cell automatically. You can follow the finalization process as described above.
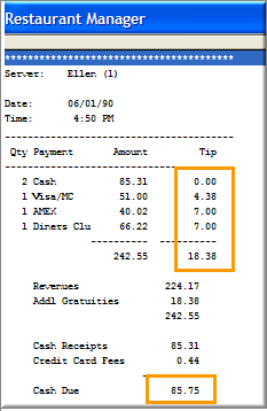
Most establishments will payout credit card tips the same day they were earned. For most employees, the Revenue Report is used to calculate the cash due including credit card tips. Credit Card Tips are categorized separately by form of payment under payment Information at the top of the Revenue report. This Credit card Tips are totaled and summarized again as “Addl Gratuities”. Credit Card Tips are subtracted from “Cash Receipts” thus reducing the “Cash Due” to the restaurant. See a portion of the Server Revenue Report below:
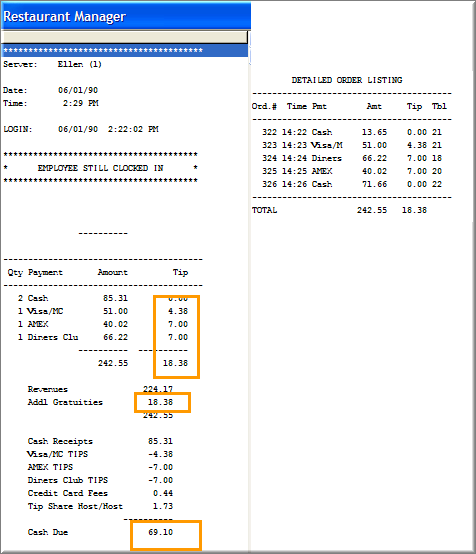
The accuracy of this report depends on the accuracy of the data input. You can use the “Detailed Order Listing” section of this report for an audit against individual receipts. If this information is accurate, then the summarized totals under the Payment Information section will be accurate.
The following should be enabled on the Employee Revenue Report Option in Station Configuration
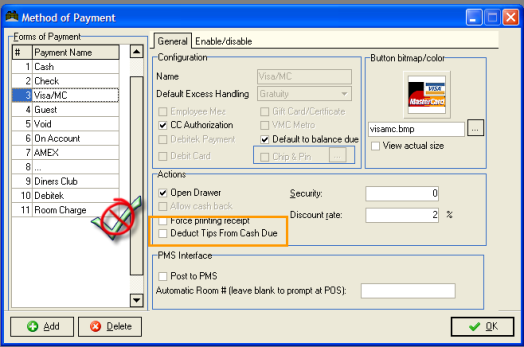
As card cards usage has increased over the years more restaurants have turned to paying credit cards tips out at a later date (i.e. paycheck). Restaurant Manager can accommodate this by disabling the “deduct Tips from Cash Due” option on the “Methods of Payment Form”. Enabling this option on each credit card form of payment will prevent cash due being deducted on the server revenue report.
You can process credit cards normally through the shift. At the end of the shift you can still run a revenue report to audit credit card payments but now it will not deduct from cash due:
Restaurant Manager has a full array of reports to track credit card tips for various reporting purposes no matter how you pay out tips. Most of these reports are found in the RM Report Module under the Labor reports folder:
|
Gratuities |
Job Class Detail |
Employee Tips |
TRDA Tips |
|
Wage Details |
ATIP Tips |
TRAC Tips |
Employee Sales and Tip Totals |
As described below, your Restaurant Manager™ system can be configured to automatically include a per person "cover charge" on every individual guest check. The cover charge amount is defined on the Menu Items Setup Form and the feature, itself, is activated on the Store Information Setup Form as described below:
As part of creating a menu item called "Cover Charge" you may need to go through the full process of defining:
If you have a large menu, you may even wish to put the "cover charge" menu item on a secondary menu:
Note the number of the "Cover Charge" menu item you have just defined and then click on the [CLOSE] button to exit the Menu Items Setup Form.
NOTE: Once you have created a menu item called "Cover Charge" you can add this item manually to any guest check, just the way you add any other menu item. The cover charge item is automatically added to a check only if you entered the number of this menu item in the Store Information setup form.
Your Restaurant Manager system can be configured with a “Drink Minimum” that requires the number of drinks on a guest check be equal to (or exceed) the number of customers at the table. If the drink minimum is not satisfied, the check cannot be printed or settled.
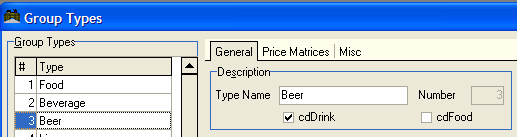
To configure the Drink Minimum you must first determine which Menu Items the system should count toward the drink minimum and create one or more Group Type(s) to include them. Examples of typical Group Types used to apply Drink Minimums might include "Beers", "Wines", and "Liquors". For each of these "Group Types" you would check the "Drink" check box under the "General" tab (see screen shot below). If there are certain beverages that should not count toward the drink minimum, you may wish to create another Group Type called "Beverages" in which you would leave the "Drink" check box blank.
After you create the appropriate Group Types, you must use the Search Settings button to locate and activate the "Apply Drink Minimum" setting on the Station Configuration Form for every POS Station where you wish to apply Drink Minimums to a check. If a nightclub, for instance, charges a drink minimum in the back room where live music is performed but not in the front room where the juke box plays, then you would only enable the “Apply Drink Minimum” setting at the POS Stations in the back room.
Because the Drink Minimum depends on an accurate customer count on every order, it is usually enabled in conjunction with a setting to automatically prompt for the number of customers on every order. If the customer count prompt is not enabled you must use the Customer Count Function Button to manually record the customer count whenever you wish to apply a Drink Minimum.
NOTE- When assigned to the appropriate Group Type, both Menu and Modifier Items are counted toward drink minimums
Warning: Drink minimums work best when there is a one to one ratio between customer counts and required drinks on guest checks that have not been split. It also works well on split checks where there is one check per customer. However, careful consideration should be given in environments performing split checks on a frequent basis. Drink minimums will not be satisfied if a guest check is split when several dining guests are assigned to seats. Restaurant Manager divides the customer count equally when an order is split. Example: A table of seven people is into four checks. Seat numbers 1,2,3 will be assigned customer counts of two, seat four will be assigned a customer count of one. If seat two only has one drink assigned for a single customer, the drink minimum will not be satisfied because it will have a pre-assigned customer count of two. In this scenario, you will have to re-enter seat two and add another menu item (i.e. no drink) to satisfy the minimum.
Restaurant Manager allows for the inclusion of Delivery Charges for delivery operations. Restaurant Manager offers many choices for delivery charges. Delivery charges can be set up to be either automatically or manually applied. More choices come if you want to apply the delivery charge as a dollar amount or a percentage. Delivery charges’ can be implemented in three different ways:
If delivery charges’ are implemented as gratuities, then the automatic gratuity feature of RM cannot be used (i.e., you can have one or the other, but you cannot have both delivery charges and auto gratuities on the same transaction). If configured, the POS program automatically applies delivery charges when the “Automatic Delivery Charge” option is enabled in Setup->Stations and the revenue center is “delivery.” Otherwise, delivery charges are disabled and the gratuity feature is implemented as before. If delivery charges are implemented as a menu item, then you can apply an ADC as well as an auto gratuity on the same transaction.
Note, if delivery charges’ are applied as gratuity the delivery charge amount is discarded when performing “Auto cash settle” in the Delivery Module or “Settle All” in tables mode. If you wish to record the ADC amount as gratuity for the driver (or employee), you must check the station configuration option, “Include gratuity on Settle All/Auto Cash Settle.”
Automatic Delivery Charges are the most common used and are relatively easy to set up. All of the programming is done within the RM BackOffice Module. This topic will cover ADC’s applied as either a gratuity or menu item. First you should decide if you want to apply the delivery charge as a gratuity, or as a menu item. ADC”s applied as a gratuity by default will go to the driver and be reflected as a tip on the “revenue report” for the driver or the person assigned the order and added as a separate line on the guest check. You may want to apply the ADC as a menu item if your establishment retains the delivery charge. Using this method (delivery charge as a menu item), Restaurant Manager will automatically add an item to the order. Unlike the first method, the delivery charge is included in the restaurant sales. Depending how the menu item is configured the delivery charge will appear in the “Group Type” category on the individuals revenue report and the flash report at the POS. More detailed reports can be run in the RM Report Module to determine ADC’s
If you have determined ADC as a gratuity is best for your business you will need to configure the ADC in the following areas:
Starting in RM BackOffice go to Add-Ons >Customer Street Database > Automatic Delivery Charge tab. The “Automatic Delivery Charge” setup form has three column headings: #, Description, and Amount. Delivery charges are assigned a number when created. The “Description” column lists the name of current delivery charges. Your system comes with two default delivery charges: Standard Delivery and Special Delivery. The amount column lists the dollar amount associated with the delivery charge. In the illustration below we find #1 Standard Delivery is set for 3 dollars.

You can add or delete delivery charges by using the [Add] and [Delete] buttons on the bottom of the form. You can change both the description of the delivery charge and amount charged by clicking on the cell and type in the changes. You must define at least one delivery charge in order to automate delivery charges. If your establishment charges the same amount on every delivery; then you will need one and only one delivery charge.
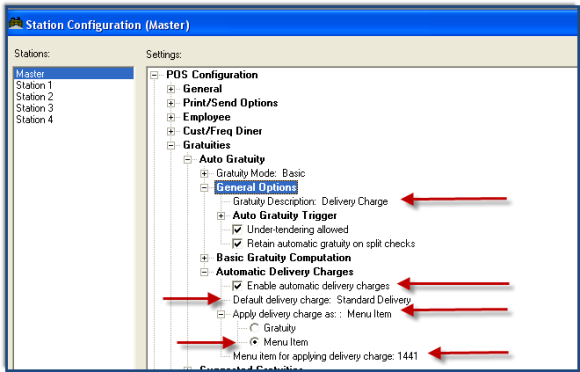
Next we will configure our ADC variables to be applied at the POS. You will need to configure the ADC options for any POS Station where you will invoke the delivery charge. In the RM BackOffice, go to Setup > Station Configuration > [Search Settings] and type in “Automatic Delivery Charges”. Open the ADC menu tree by clicking on the plus next to the name. Configure the following settings:
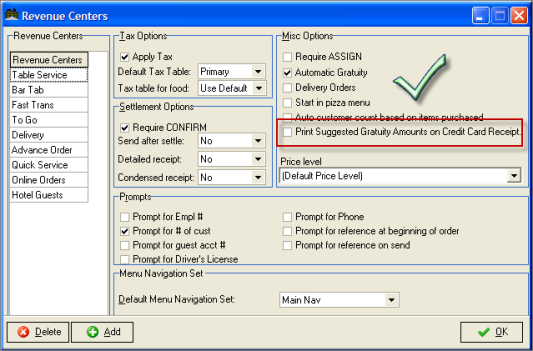
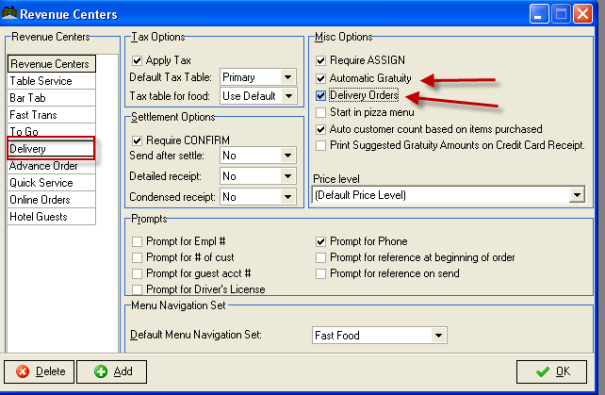
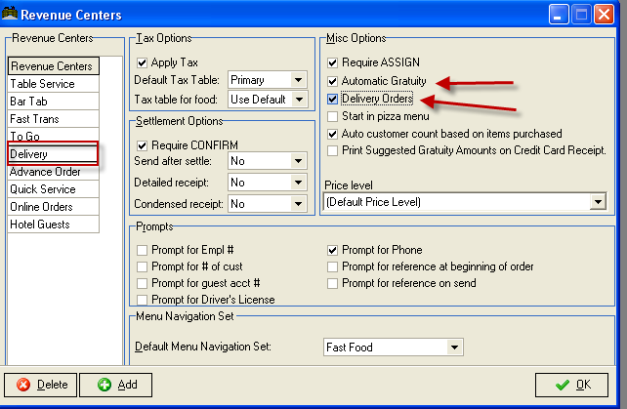
To continue our ADC as gratuity setup, we need to stay in RM BackOffice and go to Setup > Settlement and Tips > Revenue Centers. Within the “Revenue Center” setup form you will need to enable the “Automatic Gratuity” & “Delivery Orders” options under the “MISC Option” sections. You must enable this on every Revenue Center associated with a delivery charge. Only enable this function if you wish to automate the process. Leave this disabled if you wish to apply the delivery charge manually.
Once the ADC’s have been configured you can associate a delivery charge with each street in the Street Database. If your establishment charges the same delivery charge on every delivery; then you can set the ADC to “Default delivery charge” and use the global setting defined in station configuration. Note the Street Database is an optional module of Restaurant Manager. Make sure you have purchased the "Delivery Database" module if you wish to use this feature.
The setup for an ADC as a menu item is very similar to the setup for an ADC as a gratuity. The main differences between the two is that you need to create a menu item to associate the ADC with and change the Station configuration setting “Apply delivery charge as” to menu item.
If you have determined ADC as a menu item is best for your business you will need to configure the ADC in the following areas:
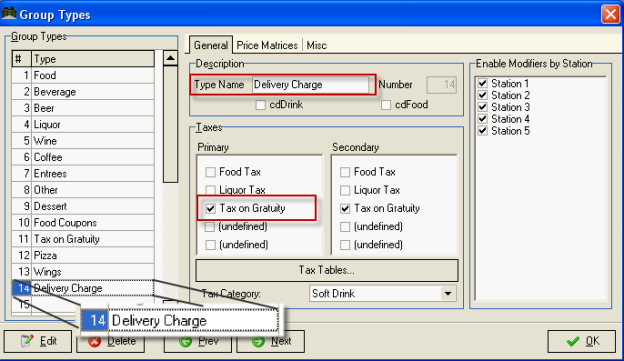
To apply delivery charges as a menu item, you must first create a “Group Type” in RM BackOffice > Setup > Menu>Group Types. You should put it in a separate menu group by itself so it will appear separately in reports, and make it a non-taxable / taxable item according to local laws. You may also want to set up a separate tax if you want to track this number as well.
Once in the “Group Types” setup form, select an open field in the “Type” list and type in a new name in the “Type Name” field. You may either enable a current tax to associate the tax with the new group type or disable tax by leaving the tax option unchecked. In our example below we create group type # 14 Delivery Charge and marked the tax “Tax on Gratuity”
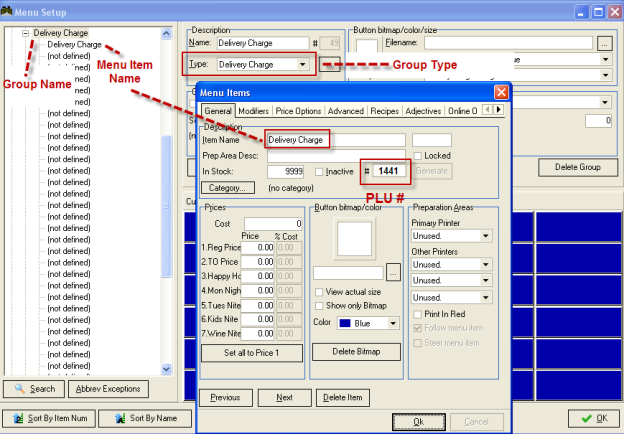
To apply delivery charges as a menu item, you must next create an item in RM BackOffice > Setup > Menu>Menu Setup. Name the item appropriately for your business (e.g., “Service Charge,” “Delivery Charge,” etc.) and configure it according to your needs. In most cases, you should put it in a separate menu group by itself so it will appear separately in reports, and make it a non-taxable item. The price is not relevant as it will be set automatically when applied to a check. After creating the menu item, make note of the item number (or PLU #) as indicated below.
Each time a delivery charge is applied, the POS program will add the delivery charge item to the check. The price is set according to the delivery charge setup options
Starting in RM BackOffice go to Add-Ons >Customer Street Database > Automatic Delivery Charge tab. The “Automatic Delivery Charge” setup form has three column headings: #, Description, and Amount. Delivery charges are assigned a number when created. The “Description” column lists the name of current delivery charges. Your system comes with two default delivery charges: Standard Delivery and Special Delivery. The amount column lists the dollar amount associated with the delivery charge. In the illustration below we find #1 Standard Delivery is set for 3 dollars.
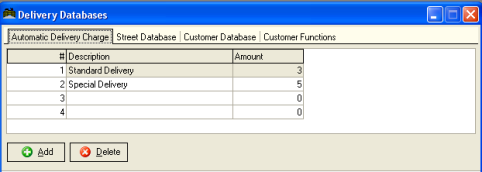
You can add or delete delivery charges by using the [Add] and [Delete] buttons on the bottom of the form. You can change both the description of the delivery charge and amount charged by clicking on the cell and type in the changes. You must define at least one delivery charge in order to automate delivery charges. If your establishment charges the same amount on every delivery; then you will need one and only one delivery charge.
Next we will configure our ADC variables to be applied at the POS. You will need to configure the ADC options for any POS Station where you will invoke the delivery charge. In the RM BackOffice, go to Setup > Station Configuration > [Search Settings] and type in “Automatic Delivery Charges”. Open the ADC menu tree by clicking on the plus next to the name. Change the following settings:
To continue our ADC as menu item setup, we need to stay in RM BackOffice and go to Setup > Settlement and Tips > Revenue Centers. Within the “Revenue Center” setup form you will need to enable the “Automatic Gratuity” & “Delivery Orders” options under the “MISC Option” sections. You must enable this on every Revenue Center associated with a delivery charge. Only enable this function if you wish to automate the process. Leave this disabled if you wish to apply the delivery charge manually.
Once the ADC’s have been configured you can associate a delivery charge with each street in the Street Database. If your establishment charges the same delivery charge on every delivery; then you can set the ADC to “Default delivery charge” and use the global setting defined in station configuration. Note the Street Database is an optional module of Restaurant Manager. Make sure you have purchased the "Delivery Database" module if you wish to use this feature.
ADC's are only applied if the following conditions are met:
Only when all these conditions are met are ADC's applied. If one or more of these conditions changes, then the ADC amount is re-evaluated and changed accordingly. For example, if changing from a "delivery" revenue center to a non-delivery, then the ADC is automatically removed. If the revenue center is changed back to "delivery", then the ADC is automatically reinstated. Or, if the customer phone number is changed, and the new customer has a different ADC, the check is adjusted accordingly.
When a customer calls for the first time, the POS program will first try to use the delivery charge defined in the street database. If it is not defined, it will then use the default delivery charge specified in Setup->Stations.
If still not defined, it will display a selection box allowing the user to choose the delivery charge. The selected delivery charge is saved with the customer information and is automatically applied each time the customer calls.
When defining a new customer from RM BackOffice, the ADC is NOT linked to the street database. If you wish to define an ADC, then you must set it explicitly, or set it to “Use Default” (use setting defined in RMWin->Setup->Station Config > Gratuities> Automatic Gratuities).
The delivery charge can be changed for a given customer by selecting [MISC]”, then [Delivery Charge] from the order entry screen. The POS program will display a list of delivery charges allowing you to choose from the list. After selecting a new delivery charge, the POS program will update the customer database with the selected delivery charge and apply it automatically
When using Basic Gratuities for delivery charges, the full amount of the delivery charge is included in the employee’s tips unless configured differently in the Station Configuration. The option may be preferred if you are not using the Delivery Module for deliveries and have only one delivery charge You can set up delivery charges as either a percent or dollar amount using this method. If using manual application you will be using the default [Gratuity] function button found in the [MISC] functions. However, you can re-name this function button in Station Configuration
If you have determined ADC as basic gratuity is best for your business you will need to configure the ADC in the following areas:
To apply delivery charges as a menu item, you must first create a “Group Type” in RM BackOffice > Setup > Menu>Group Types. You should put it in a separate menu group by itself so it will appear separately in reports, and make it a non-taxable / taxable item according to local laws. You may also want to set up a separate tax if you want to track this number as well.
Once in the “Group Types” setup form, select an open field in the “Type” list and type in a new name in the “Type Name” field. You may either enable a current tax to associate the tax with the new group type or disable tax by leaving the tax option unchecked. In our example below we create group type # 14 Delivery Charge and marked the tax “Tax on Gratuity”
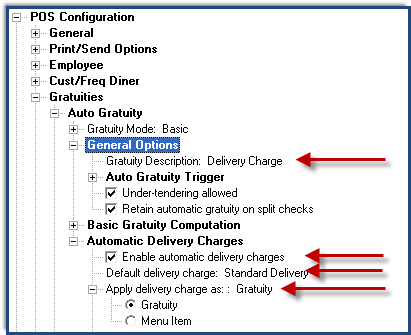
To setup this type of delivery charge, open RM BackOffice, and go to Setup > Station Configuration > click on the [Search Settings] button and type in “Auto Gratuity” and select Auto Gratuity in the search list. Expand the following headings on the menu tree by clicking on the plus box next to each heading: General Options, Auto Gratuity Trigger and Basic Gratuity Computation.
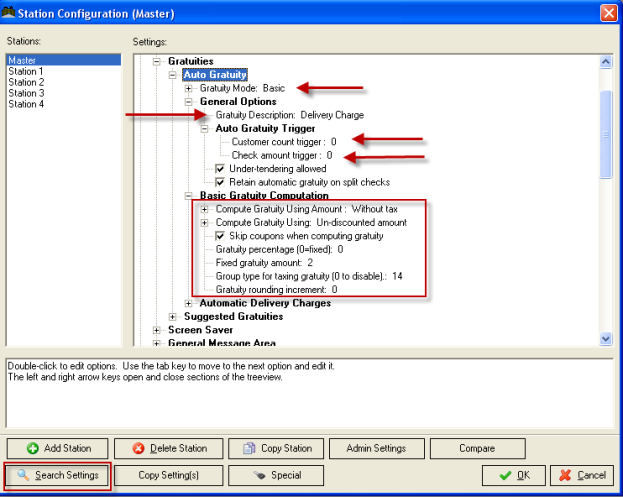
We will need to configure the following settings:
To continue our ADC as gratuity setup, we need to stay in RM BackOffice and go to Setup > Settlement and Tips > Revenue Centers. Within the “Revenue Center” setup form you will need to enable the “Automatic Gratuity” option under the “MISC Option” section. You must enable this on every Revenue Center associated with a delivery charge. Only enable this function if you wish to automate the process. Leave this disabled if you wish to apply the delivery charge manually.
When using Special Gratuities for delivery charges, the full amount of the delivery charge is included in the employee’s tips unless configured differently in the Station Configuration. The option may be preferred if you are not using the Delivery Module for deliveries and have only one delivery charge You can only set up delivery charges as a percent amount using this method. If using manual application you will be using the default [Gratuity] function button found in the [MISC] functions. However, you can re-name this function button in Station Configuration
If you have determined ADC as basic gratuity is best for your business you will need to configure the ADC in the following areas:
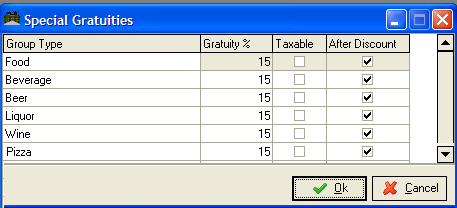
Starting in RM BackOffice go to Setup> Settlement and Tips > Special Gratuities. In the “Special Gratuities” setup form you will find four column headings; Group Type, Gratuity %, Taxable, After Discount. Items listed in the group type column reflect everything that was set up in the menu form “Group Type” You can set the gratuity percentage by clicking on a cell and type in the numeric value. Each group can have a separate rate if desired. You can make the percentage taxable by placing a check mark in each cell. The “After Discount” column allows us to apply the delivery charge (gratuity) before or after any discounts being applied. Note that you will not be able to use the functionality afforded with assigning delivery charges in Street Database or Customer database when using the “Special Gratuity” method.
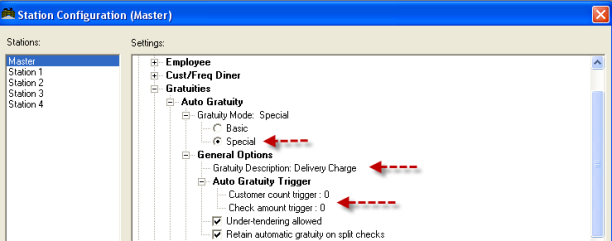
Next we must go to our Station Configuration to setup the application of the delivery charge. In the RM BackOffice, go to Setup > Station Configuration > [Search Settings] and type in “Gratuities”. Under the “Auto Gratuity” heading change the “Gratuity Mode” to “Special”. Next, change the “Gratuity Description” under the “General Options heading to “Delivery Charge” Under the “Auto Gratuity Trigger” Change the “Customer count trigger” and “check amount trigger” to zero. Changing these settings to zero will guarantee that the delivery charge will be triggered at the onset of a new order if configured in Revenue Center.
To complete our delivery charge as “Special Gratuity” setup we need to stay in RM BackOffice and go to Setup > Settlement and Tips > Revenue Centers. Within the “Revenue Center” setup form you will need to enable the “Automatic Gratuity” option under the “MISC Option” sections. You must enable this on every Revenue Center associated with a delivery charge. Only enable this function if you wish to automate the process. Leave this disabled if you wish to apply the delivery charge manually.