(continued from Messages Alarms and Alerts)
Your Restaurant Manager POS System can issue many basic 40 column reports right from the POS Workstations. For more detailed analysis of your business you should access the RM Reports Module. This module allows you to:
NOTE: The Reporting Module not only allows you to create new report formats that can be generated from the BackOffice Module on 8½ x 11 paper. It also allows you to create new 40 column report formats that may be printed from the POS Workstations.
Restaurant Manager can also display much of your sales and labor data in graphical formats that offer a quick snapshot of your business. Both the Session Monitor Form and the Sales Statistics Form may be used to generate charts and graphs.
The nature of the information that appears on reports depends, in part, on how your POS System has been configured. The configuration of Revenue Centers and Groups Types are two of the key configuration options that affect how sales data is organized for reporting purposes.
Restaurant Manager can report on sales sub-totals by Menu Group and by Group Type. For instance a bar that offers a large beer menu may wish to track sales of Domestic and Imported and, at the same time, see aggregate sales totals for all beers. In this case, you should create multiple Menu Groups such as “Domestic Beers (Bottled)” and “Imported Beers (Bottled)”, etc. and then categorize all these Menu Groups with the Group Type “Beers”.
When the menu is configured with priced modifiers it may be important to assign certain Menu Groups and Modifier Groups to a single Group Type for the purpose of generating accurate sales totals. For instance Pizza Pricing is based, in part, on priced modifiers. So to get accurate pizza sales totals all the Menu Groups and Modifier Groups that contribute to the price of a pizza should be given a separate Group Type of Pizza.
You may use Revenue Centers to track sales by transaction type. For instance, a delivery business also offering carry out service might want to use different Revenue Centers to track these different transaction types. Or a hotel restaurant that is open to the general public might wish to use one Revenue Centers for ringing up checks for hotel guests and a second Revenue Center for customers who walk in off the street.
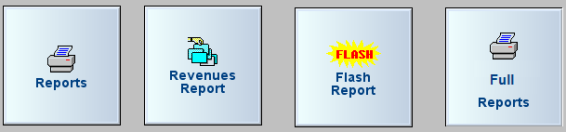
You may issue a number of different 40 column reports from the Status Screen(s) of your POS Module(s). Depending how it is configured, the Flash Report will give you an up-to-the-minute sales report or a snapshot from a sales daily sales period. Revenue Reports will tell you what a server has sold for the day. The “Reports” function offers several reports that range from items to groups sales, employee attendance, and table turns. The full power of RM BackOffice reports can be realized with a user friendly “Full Reports” program. You can choose whether you want to view these reports on screen or have them print to the local station printer.You can find sample print-outs of these POS Reports appear in a separate publication titled “ Report Sample Booklet".
To issue a report from a POS Workstation touch, one of the POS Function Buttons described below.
NOTE: If the Function Button has been password protectedyou will only be able to issue the report if your Employee Password is set at a sufficiently high security level.
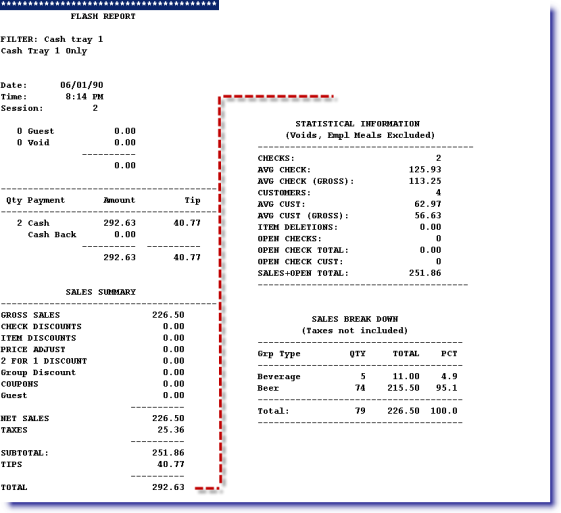
The POS Flash Report gives an overview of all sales activity during the current Sales Session. Several different flash reports can be created and defined by a sales period, revenue center, employee, etc. To issue a Flash Report, access any POS Status screen and touch the button below.

NOTE: The Flash Report button is usually accessed by touch the [MISC] button at the base of the Status Screen.
You can define preset filters for the POS Flash Report (e.g., filter by revenue center, employee, cash tray, time of day, etc.). To create flash report filters, go to RM BackOffice->Setup->General->POS Flash Report Filtering. The following dialog is displayed.
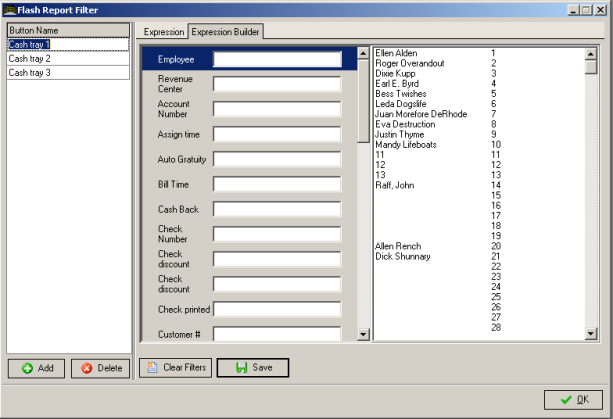
Creating filters is done in the same fashion as the reporting module. You can create as many filters as you like. When printing the flash report at the POS, you are given the option of using one of the pre-defined filter conditions, or no filtering.
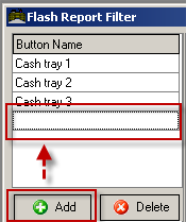
The Flash Report Filter form is broken down into two sections: Button Name Column and the Expression Builder. You can add a new Flash Report filter by clicking on the [Add] button and typing the description in the open field in the Button Name Column.
After creating the description you can add any number of filters to refine the information displayed on the report. You may want to filter sales data for a specific sales period (e.g. lunch vs. dinner) or for a particular area of a restaurant. You do this by clicking on any field in the filter column of the “Expression Builder” tab. Once you have chosen a filter field you can select the information in the information display fields on the right.

Multiple filters can be added to a single report. You can verify the filters under the “Expression” tab. Once you are satisfied with your filters you must hit [Save] at the bottom of the form to retain the filter settings.
Sample Flash Report
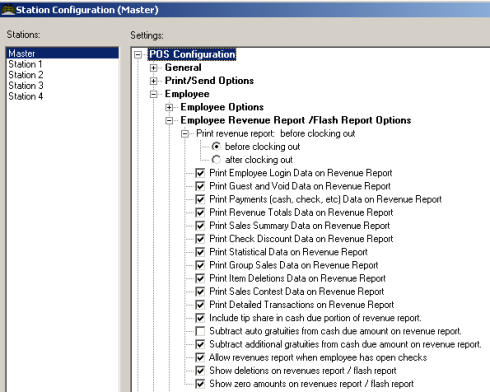
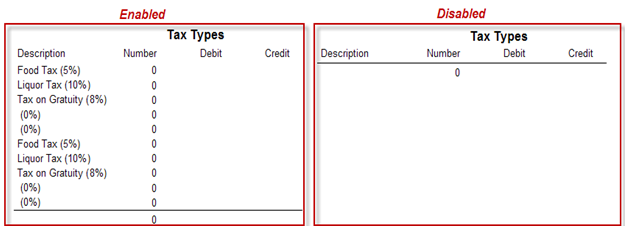
Both the Flash and Employee Revenue Reports are further configurable under in the Station Configuration under POS Configuration > Employee > Employee Revenue Reports/Flash Reports Options. You can disable any option to remove the information from showing on the report.
You can designate specific menu items or menu groups to be summarized on the flash report and employee revenue reports. This information can be used to track how well certain items are selling, or for employee contests. For example, to see who sells the most appetizers, or desserts, or who sells the most of a specific item.
To define tracked items and groups, go to RM BackOffice->Setup->General->Contests. The following form is displayed.
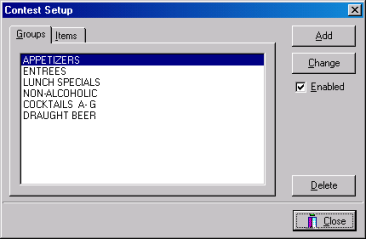
Click on the “Groups” tab to modify the tracked groups and the “Items” tab to modify the tracked items. Click the “Add” button to add a new entry. If you want to stop tracking a group or item, you can either press the “Delete” button, or UN-Check the “Enabled” box for the corresponding item. More information can be found under the topic: Employee Contests
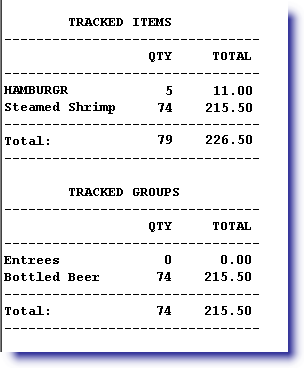
Above is a sample section of Tracked Items and Groups from Flash/Server Revenue Report
If you wish to prohibit employees from printing the revenues report while they have open checks (i.e., tables, tabs or delivery orders), go to RM BackOffice->Setup->Station Configuration > [Search Settings] and uncheck the box “Allow revenues report when employee has open checks.”
The standard flash report/revenues report shows total item deletions. To show a detailed breakdown of item deletions, go to RM BackOffice->Setup->Station Configuration > [Search Settings] and check the option “Show deletions on revenues report/flash report”.
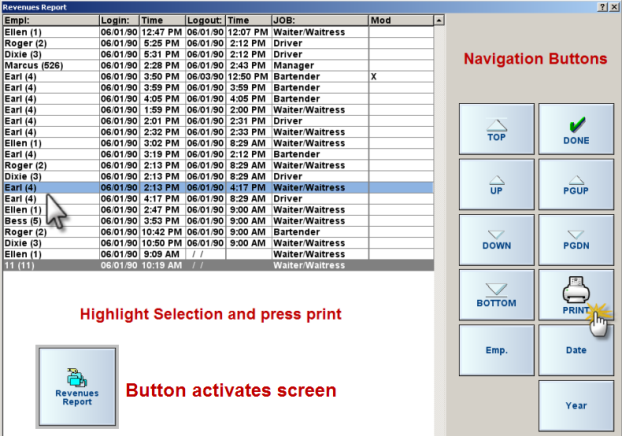
Employee Revenues reports (server reports) can be printed at any time by selecting “MISC” from the Main POS Status screen and choosing the “Revenues Report” option. Revenue reports can be printed for a current shift or a past shift including shift from previous years. A selection list is displayed on screen; where each item in the list corresponds to a single employee work shift. You can scroll through the list using the navigation buttons (up, down, page up, page down). You can also use [Empl], [Date], and [Year] filter buttons to further refine your search. When the desired work shift is highlighted, press the [PRINT] button to print the report.
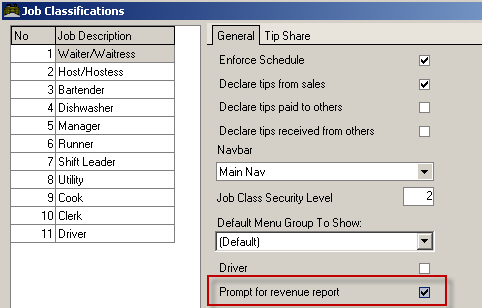
You can also set a prompt for “Employee Revenue Report” when logging out from the system. You can set this parameter by enabling the option “Prompt for revenue report” in Job Classification Setup Form (Setup > Labor> Job Classifications).
Restaurant Manager provides seven hard coded reports under the [Reports] function button typically found under the MISC function on the main POS status screen. The “Reports” function can be moved to the main POS status screen using the Function Button Layout form. The reports are designed to give information for the current session and reset automatically when at the beginning of a new session. All the reports under this function are 40 column reports and can be viewed on screen and/or printed. Use the navigation buttons on the on screen reports to move up and down the report. Below is a list of the reports and a brief description:
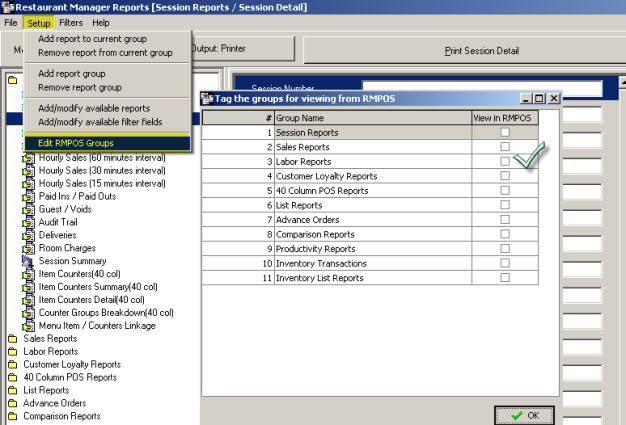
RM Reports at the POS is configurable to allow the user to setup specific report groups. The report groups can contain reports configured to produce user specific and relevant information. Passwords can be added for extra security and you can even limit what report groups are shown at the POS (shown below). Report groups must be marked as viewable first before they can be seen at the POS. Please see the Reports Manual for more information on how to configure and generate back office reports at the POS.
All back office reports are available at the POS by using the [Reports] function button in the MISC function on the Main POS Status screen. Pressing the button will launch the RM Reports module.
A special touch screen mode is automatically enabled that allows you to control the reporting without use of a keyboard. Although you won’t be able to print (only view on the screen) all of the back office reports on a receipt printer because of size and format limitations, you will be able to print the ones are formatted for 40 columns.
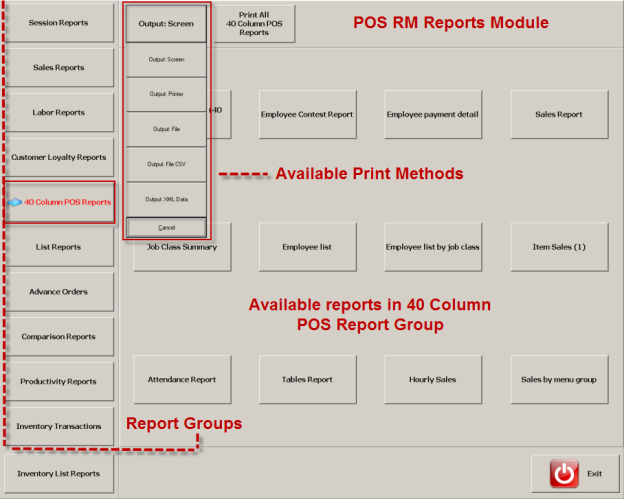
Once you have opened the RM Reports module, select a report group column on the left. You can print all reports in the report group by using the “Print All” function at the top of the screen or you can select a specific report within the group and use the “Print” function located on the upper right corner of the screen. You can determine the report output using the “Output” function and select the method” (e.g. print to screen or a printer).
If needed, you can re-define report filters in the RM Reports module at the POS by selecting a report within a report group. By default, the report filters will default to “basic” mode. The [Show All Filters] button at the bottom of the screen will bring up all hard coded filters associated with the report. The [Show All Filters] button will change to [Basic Filters Only] when selected. You may toggle back to “basic’ mode by pressing the button again.
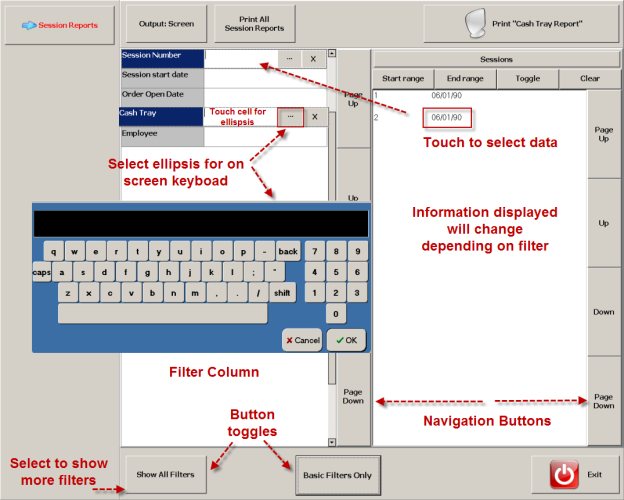
Filters are edited by touching a selection (Session Number) in the filter column. Next, you must select data displayed in the far right display area to move it to the chosen filter. You can use the on screen navigation buttons associated with a column to move up and down the screen. Certain filter may not have data to display in the display area. In this circumstance you can use the ellipsis button […] to use an on screen keyboard to enter data.
List of available 40 column reports
|
Attendance Report |
Item Counters Summary |
|
Cash Tray |
Item Sales (1) |
|
Counter Groups Breakdown |
Job Class Summary |
|
Employee Contest Report |
Sales by menu group |
|
Employee List |
Sales Report |
|
Employee List by Job Class |
Session Summary |
|
Employee payment detail |
Tables (Tables Turn)Report BackOffice Reports |
|
Hourly Sales |
|
|
Item Counters |
|
|
Item Counters Detail |
|
Restaurant Manager provides a comprehensive set of reports within the RM Reports Module. The report module contains over 13 reports broken down into categories including but not limited to: session, sales, and labor, customer, and productivity reports. Reports groups can be added to agree with individual restaurant reporting needs. Individual reports can be filtered to reflect just the right information needed to make business decisions. More information on how to use the RM Reports module and the reports themselves can be found here:
RM Reports Guide and Report Samples (Start > Programs > Restaurant Manager Version xx > User Guides).
RM Reports Modules
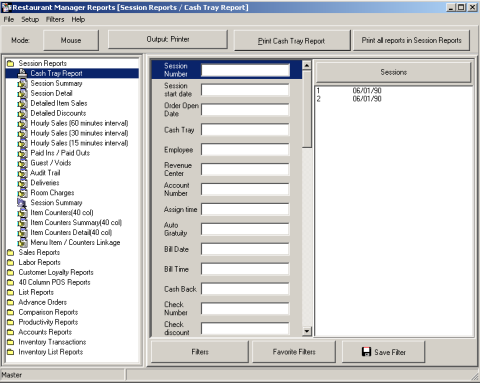
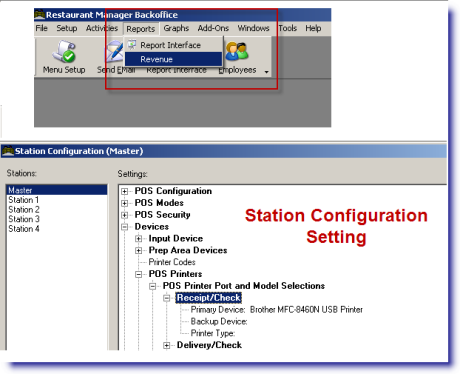
You can access the RM Reports module in the RM BackOffice using the “Report Interface icon on the toolbar or using “Reports” > Report Interface on the menu bar.
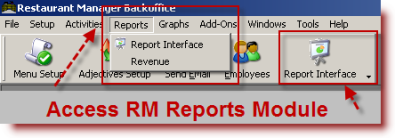
If configured, you can also access the RM Reports module buy using the “RM Reports” icon located on the windows desktop or in the Windows Start Menu > Programs > Restaurant Manger Version XX > RM Reports.
There are a few setting found in the BackOffice and RM Reports Modules that affect information displayed on several reports. The next two sections describe the function and where they can be found.
There are two settings that affect reports in the Restaurant Manager BackOffice rarely used but need mentioning:
Report Mode- Two options exist for the setting: Default and Filter. If you select the "Filtered" option, a field called "tagged" will appear in Session View screen . This option enables you to "tag" certain orders by setting the filter field to either TRUE or FALSE for a specific report. If it is set to TRUE, then that specific order will not be included in the selected RM report (i.e. Session Detail). The Report Mode setting is found in the RM BackOffice Module under Setup Menu > Backoffice > Reports tab (Administrator Password required).
There are a few settings in the RM Report Module that affect information displayed on various reports:
• Customer Invoices- You can enable taxes to be shown on account invoices in addition to setting the message displayed at the bottom of the customer invoice.
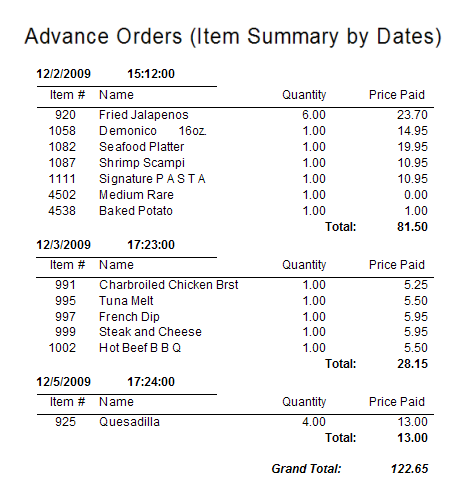
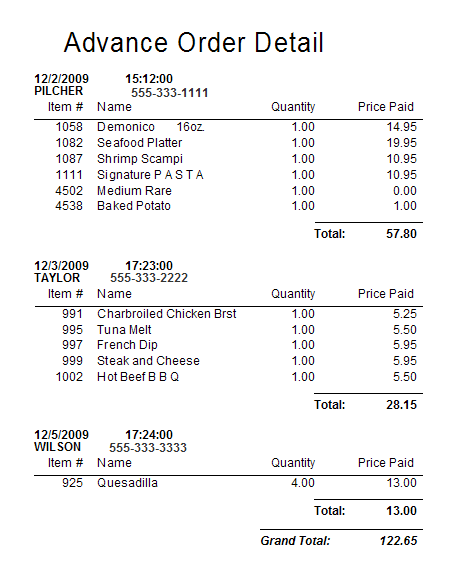
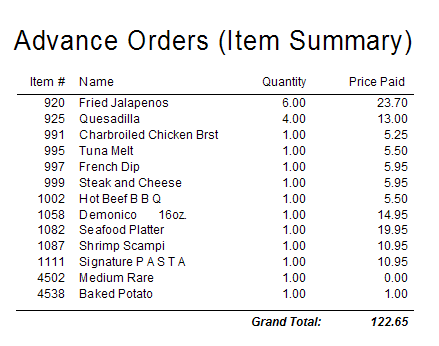
There are three reports in the RM Reports Module for advance orders you can use to determine prep times, items to be prepared, and for general tracking purposes.. Use report filters to limit viewable data. There are several different filters to choose from but the best filters to use would "Delayed Send Date" and "Delayed Send Time".
The RM Report Module has over 135 available reports that are highly configurable. More information on RM Report Module option can be found in the document: RM Report Guide
RESTAURANT MANAGER allows you to view or print charts and graphs on a variety of sales statistics for any date range you wish. Simply click on the “Charts” icon (or select the "Sales Statistics" option under the "Graphs" drop down menu) to access the Sales Graphs screen:

This screen is organized as follows:
Click on the down arrow beside this field to indicate the data set you wish to view. Options include: Sales
|
Customers |
Average Spend |
|
Tables |
Labor Cost per Customer |
|
Labor Hours |
Customers per Labor Hours |
|
Labor Cost |
Labor Cost per hour |
Click on the down arrow beside this field to indicate the time period you wish to view. Options include:
NOTE: If you select “Manual”, you must enter the year you wish to work with in the field to the right of the “period” field.
Click on the down arrow beside this field to indicate the resolution you wish to see on the graph. Options include:
The data you have selected using the fields above is displayed on the body of this screen in a variety of graphical formats. Click on one of the colored icons at the center of the icon bar to change the format of the display. You can enable the “Compare to previous period” for comparison reports. The other icons on the icon bar are described below.

Click on icon and drag left mouse button to zoom on portion of graph

Click on icon and drag chart to rotate position.

Click on icon to drag and position graph within screen

Click on icon to magnify portion of graph

Use to enhance 3D border effects

Use to enable/disable 3D effects

Use to access Editing Chart form for enhanced editing

Print Graph/ Print Preview

Save Document
To print a revenues report in RM BackOffice, choose “Reports” from the menu headings on the tool tar then select “Revenue.” The same window is displayed as when printing a revenues report from POS. The device used to print the report is defined by the parameter “Receipt/Check printer” located in RM BackOffice > Setup > Station Configuration. When configuring the printer, you can select any networked printer listed as the destination printer.
Most restaurants require all guest checks to be closed to run an Employee Revenue Report to prevent servers from reconciling with open checks. However, there may be a need to run the revenue report for an employee who has open checks. Restaurant Manager has a function allowing you to do this by following these steps:
First, we need to enable the “Allow revenues report when employee has open checks” option is Station Configuration. You can access this setting in the RM BackOffice Module by going to Setup > Station Configuration > Search Settings and type “Allow revenue reports”. Make sure the option is enabled (check mark next to option) for the Master Station.
You can view the Revenue Report in the RM BackOffice Module by going to Reports Menu at the top of the screen and selecting the “Revenue” option. Use the navigation and filter buttons on the right side of the Revenue Report form to locate the desired employee and then print the either to the screen or local printer.
Additional setup is required if you wish to view this report from the POS. This can be easily accomplished by going to the External Programs Setup form in the RM BackOffice Module. This option is found by selecting the Setup Menu at the top of the screen > General > External Programs. In the External Program Setup form, select the “Add” button to add a new program. In the “Options Settings”, type a description in the Description field setting (i.e. Revenue Report-MGR). In the Command Line field, type “Revenue.exe”. This is the executable file that will launch the Revenue Report program at the POS. Make sure the “Wait for Completion” field is not enabled. Last, set the security at appropriate level so only managers can access this report at the POS.
After configuration, you can now access the Revenue Report option under the External Programs function button found in “MISC” options on any POS Main Status screen. You may also create a “Macro” leading to the new button for easier access.
Restaurant Manager offers two methods of sending and receiving a report on a scheduled basis. The method used depends where you want to send the reports:
Receive reports remotely- Use RM Alerts in conjunction with the RM Report Module to email reports automatically on a scheduled basis.
Send reports locally- You can schedule and send a report / report group to a local printer.or to a specified file located on a computer on the network. In this case, you will want to read the section on Scheduled Local Report Printing
No matter what method you use, once set up, there is very little you will have to do for maintenance.
Restaurant Manager provides the capability for automated emailed reports. The ability to schedule and email reports is excellent for off site management. Reports will be received as attachments. The computer sending the reports (Rmserver) does not require an email program (i.e. Outlook), just an email account. The individual receiving the email will require an e-mail program and a method to read the report depending on the format sent (i.e. PDF).
You can configure your system to email a single report or a set of reports. You can also define the time and date frequency to send reports.This is a two part setup process that requires minimal setup in the Report Module and in RM Alerts. The following is a step by step process to set up email reports.
It is highly recommended that you create separate reports in a separate folder for sending reports. You will not want to use existing reports because they will be used for other purposes and employees may inadvertently change report filters. In addition, Restaurant Manager will send all reports in a folder at the scheduled time. For example, let’s say you scheduled to send the report folder “Sales Reports”. Restaurant Manager would send all thirty reports contained in the folder to the recipient at the scheduled time. Obviously, this would be an undesirable action. For these reasons, it is best to create new report folder containing the specific report(s) relevant to the recipient.
The name of the new folder should be distinct and easily identifiable (i.e. EODEmail, Robert’s Reports, etc.). You can set up as many new folders as needed. However, each recipient is capable of receiving only one report for per massage definition. You will need to set up a separate message definition if more than one report folder is to be sent.
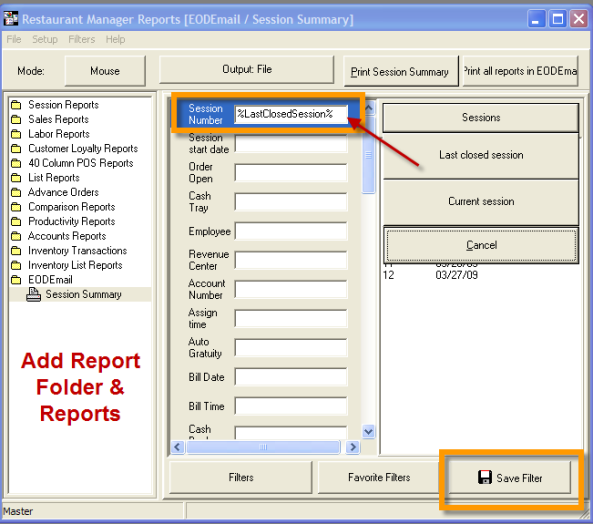
Report folders can contain as many reports as needed. Each report will need a at least a date filter. This can be either a date or a session (session is preferred). It is best to use filters using percent (%) symbols on both ends of the filter (i.e. %LastClosedSession%). Avoid using specific dates: reports will continue to use the date until changed. Using the preset date will avoid having to adjust the reports on a daily basis.
In the screen shot below, we have set up a separate folder named “EODEmail”. The folder contains two reports. Both reports use the Session number filter.
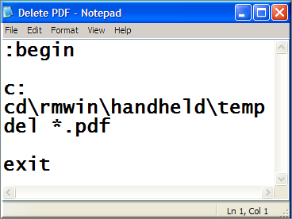
When generating the reports, Restaurant Manager will automatically assign a filename where it will place the reports. This is typically, the Handheld > Temp folder within the rmwin directory (i.e. c:\rmwin\handheld\temp). The reports in this folder will remain until they are removed. You may do this manually or create a batch file using the following command:
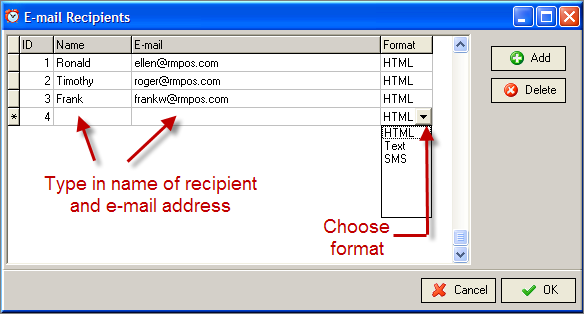
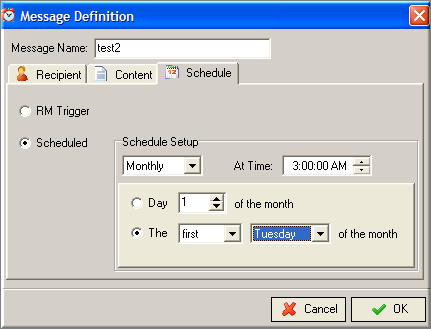
The following are instructions for creating and defining report definitions and triggers to email reports. The instructions assume that you have RM Alerts setup on your system. If you do not, please refer to the Alerts User Guide for installation instructions. All email and trigger setup is done in the Message Definition form and is accessed by using the RMMsgdef.exe.
Restaurant manager will automatically assign the recipient ID number when adding a new recipient.
By use of a task scheduling utility or a batch file you can configure RMREPORTS to print the reports in any report group automatically at any given time using the command line syntax described below.
RMREPORTS.EXE <Working Directory> <Output Destination> <Report Group Name>
The above command is broken down and explained in the following:
<Working Directory> is the directory where Restaurant Manager resides.
<Output destination> is /PRINT for output to the printer, /FILE for output to a text file and /CSV for output to a text file in comma delimited format.
<Report Group Name> is the full report group name as it appears in the RMREPORTS tree view.
Example: RMREPORTS.EXE F:\rmwin /PRINT “Daily Reports”
Note that if there are any spaces in the report group name you must enclose the name in quotes.