(continued from Revenue Centers)
Menu Configuration affects the features and functionality of the entire Restaurant Manager POS System. In other words, it involves much more than naming and pricing menu items as they are listed on a printed menu. Before defining a single menu item, it is important that resellers use ASI’s POS Setup Questionnaire to determine:
The Restaurant Manager menu is built of Menu Items and Modifier Items which are defined and organized as follows:
Modifiers Items are usually linked to Menu Items via Forced Modifier prompts but they may also be added to orders manually.
NOTE: If you wish to define a menu that includes more than 3,600 Menu Items, see the section on Expanded Menu (> 3600 Items).
This pre-defined hierarchy of Menu Pages and Menu Groups is reflected on the Menu Tree in the BackOffice Module. It is also reflected on the Menu Groups Screen in the POS Module.
The first step in configuring a new menu is to access the Group Types Setup Form and create broad sales categories for reporting and tax purposes. Next you should access the basic Menu Setup Form, itself, to define the modifiers service staff will use to communicate with kitchen and bar staff. Only after the Modifier Items are defined should you use the Menu Setup Form to configure the actual Menu Items and prices.
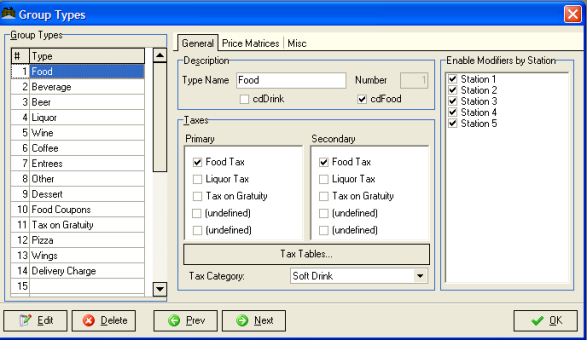
Menu Group Types serve as "departments" or broad categories of menu items. As the name implies, these categories are created by assigning multiple Menu Groups to a single Group Type. In fact, every time you define a Menu Group the system forces you to assign it to an appropriate Group Type.
Group Types are useful categories for analyzing sales data. For instance, if your Bar Menu Page includes different groups of [Bottled Beers], [<Draft Beers] and [Pitcher Beers], you might create a [Beer] Group Type and assign these three groups to it.
The Group Type category also serves to link tax rates to Menu Items, allowing you to tax different types of items at different tax rates. For instance, in jurisdictions with an alcohol tax, you must create, at a minimum, one Group Type for “Food” and another for “Liquor”. You must then link each Group Type to the appropriate tax rate. And, finally, you must ensure that each Menu Group and Modifier Group is linked to the appropriate Group Type, as well.
Group Types are used to configure:
Use the Group Types Setup Form to create broad categories of Menu Groups and to link those categories to specific taxes on the Tax Tables:
The setup form is organized in five sections:
On the left side of the form is a column for displaying the names and reference numbers of each Group Type category. By default the list of Group Types is sorted by number. But you may also click on the [Type] heading to sort the list alphabetically by name.
Add a new Type to the list:
The following function buttons appear at the base of the Group Type Setup Form:
As described in the chapter on Taxes this section of the Group Types Setup Form is critical to proper tax configuration. It displays the taxes already defined on the Tax Table Setup Form. To link a particular tax rate to a certain Group Type, click on the checkbox beside each tax that applies to this Group Type. You can link up to five taxes from each Tax Table to each Group Type.
NOTE: If no taxes appear in this section, click on the Tax Table button at the base of the screen to access the Tax Tables Setup Form and define new taxes.
This section is used for Ontario, Canada taxes. See Taxes for Ontario, Canada.
The checkboxes in this section may be used to disable forced modifier pop-ups associated with certain types of menu items at certain POS Stations. For instance, many bartenders prefer that forced modifier pop-ups be disabled on drinks they ring up themselves. (They don’t need to consult a prep ticket to know what the customer just requested.) But when they prepare a drink rung up by a waiter at a different station they do need to see the modifiers on the prep ticket.
The Menu Setup Form is actually a special screen for displaying multiple setup forms related to menu configuration. To access the Menu Setup Form, click on the Setup Drop Down list and select the ‘Menu Setup” option. Or click on the icon labeled “Menu Setup” on the Custom Toolbar of the BackOffice Module:

The Menu Tree on the left of the Menu Setup Form and the buttons at the base of the form are static elements that do not change. But the body of the form displays different fields depending on which part of the menu is highlighted on the Menu Tree.
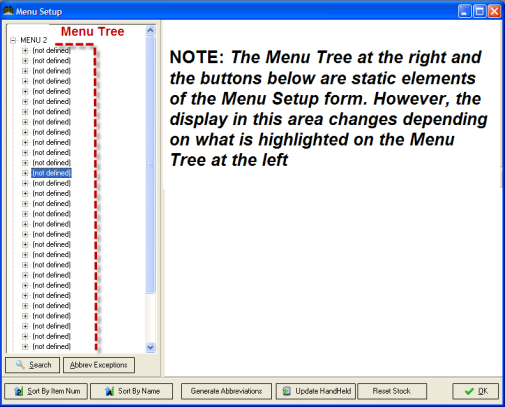
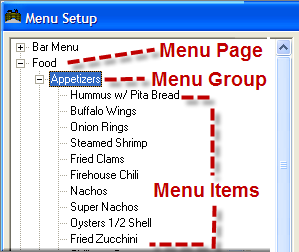
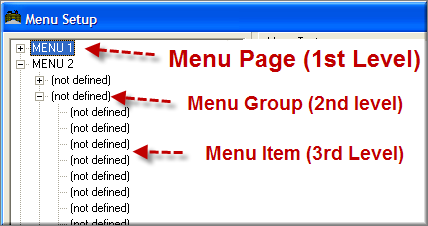
The Menu Tree is a tool for navigating among the multiple sub-forms that comprise Menu Setup Form. The Menu Tree is displayed on the left side of the Menu Setup and reflects a three tiered structure as described in the Menu Overview. The screen shot above shows this pre-defined menu structure before any Menu Pages or Menu Groups have been defined. The partial screen shot below shows the same three tiered menu hierarchy after some Menu Pages (“Bar” and “Food”), Menu Groups (“Appetizers”) and Menu Items (“Buffalo Wings”, “Onion Rings”, etc.) have been defined:
You may navigate the three tiers of the Menu Tree using standard Windows procedures for expanding and collapsing the list:
The basic structure of the Menu Tree may not be changed. In fact, Items are assigned a PLU Number based on their location within the tree structure. Items may be moved from one section of the tree to another using the Copy/Swap function but moving an Item changes the associated PLU Number.
Once a Group or Item has been defined you may locate it on the Menu Tree using the [Search] button at the base of the Menu Setup Form.
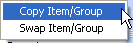
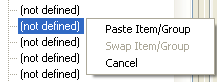
The Copy and Swap functions may be activated by highlighting any Group or Item on the Menu Tree and clicking the right mouse button.
Prior to version 19 the Copy and Swap functions could only be used when all POS Stations were down and the Sales Session is closed. This is no longer required. However, the time that you perform this function is critical. Performing copy swap functions will affect the days reporting and it is recommended that you perform Copy and Paste functions prior to the days business.
The Copy function allows you to copy any group or item and paste an identical group or item at a new location on the Menu Tree. The copy function is particularly useful when creating large menus of similar items such as bar menus where many drinks have the same price and the same set of forced modifiers, etc.
To Copy a Menu Item:
NOTE: The copy function is one of two methods you may use to create multiple Menu or Modifier Items with identical attributes. The other method is described in the section on Block Menu Changes
The Swap function allows you to move a group or item from one location on the Menu Tree to another. When you use the Swap function to move an item or group the associated PLU Number is also changed.
To swap an item to a new location on the Menu, follow the procedures above for copying a menu item except, at step 3; select the <Swap Item/Group> option.
NOTE: If you swap an existing item to a new location on the Menu Tree the sales history remains linked to the original PLU Number, not the Item Name.
Some of the buttons always appear at the base of the Menu Setup Form no matter which tier of the Menu Tree is highlighted:
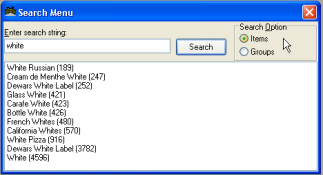
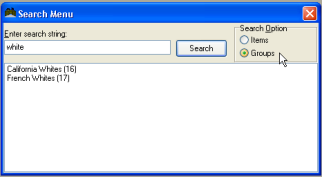
The screen shots below show different results for Items that contain the work “white” and Groups that contain the word “white”.


NOTE: Some of the buttons at the base of the Menu Setup Form relate to the Write-On Handheld POS System and so are not defined in this manual.
As described in the Menu Overview, the Restaurant Manager POS System is pre-defined to accommodate up to four pages of Menu Items and four pages of Modifier Items. The Menu Page Setup Form is one of multiple setup forms that may displayed on the body of the main Menu Setup Form. To access the Menu Page Setup Form you must use the Menu Tree to highlight any first tier branch of the Menu Tree, as shown in the screen shot below:
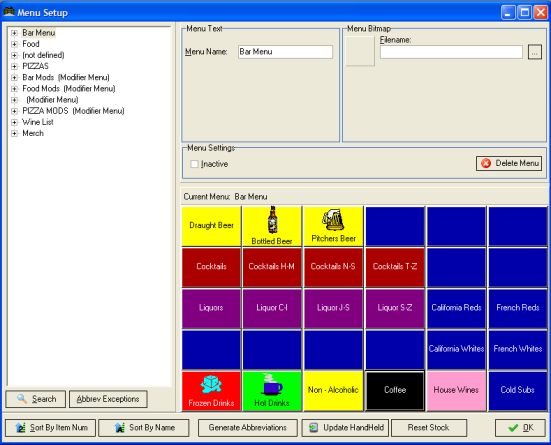
When a first tier is highlighted on the Menu Tree, the body of the form displays fields for configuring a Menu Page Button as well as a button layout template for configuring the Group Buttons that comprise the active Menu Page.
You may use the following fields at the top of the Setup Form to configure the Menu Page Button that appears on the POS Groups Screen and to add the Page Name to the active tier on the Menu Tree.
Keeping with the menu hierarchy, the thirty Menu Groups listed directly under the Menu Page correspond to the buttons displayed on the body of Menu Setup Form. If you right click on one of these Group Buttons or if you highlight a Menu Group on the tree you may then configure the Menu Group, itself.
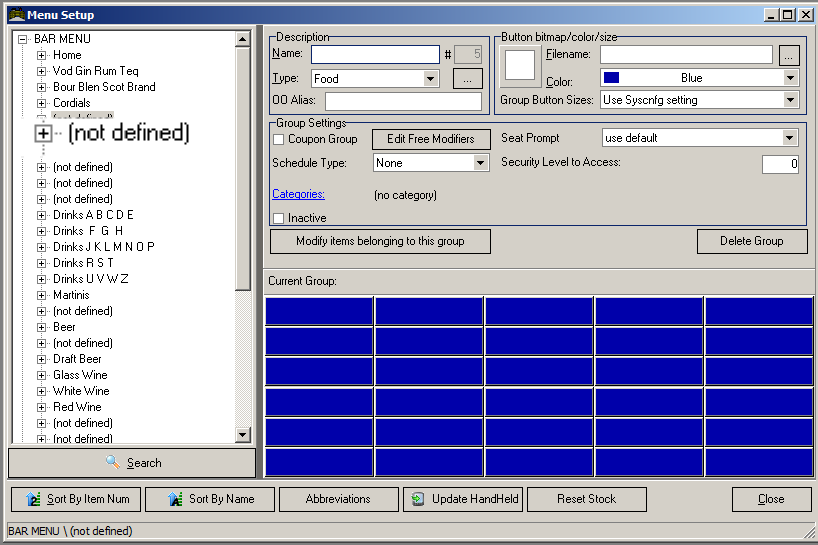
When a Menu or Modifier Group is highlighted on the left of the Menu Setup Form, the body of the form displays fields for configuring the Menu Group and displays buttons corresponding to all the Items that comprise the highlighted group:

In this state you may use the Menu Setup Form to configure various Menu and Modifier Groups . Note the information bar tell you your position in the Menu Setup Form.
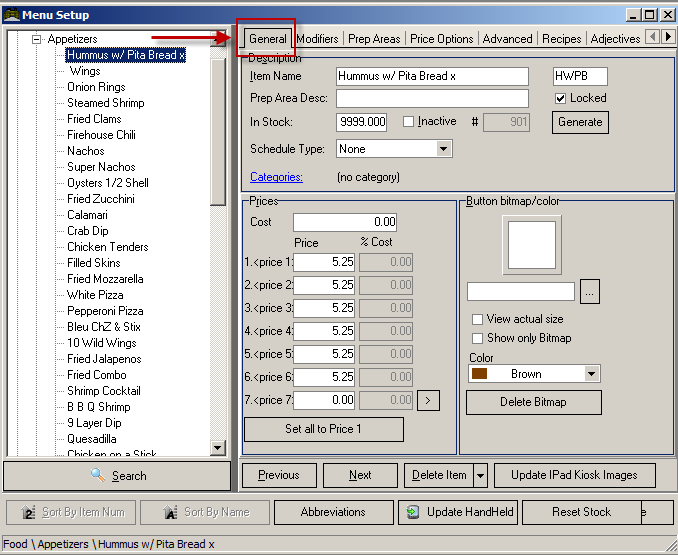
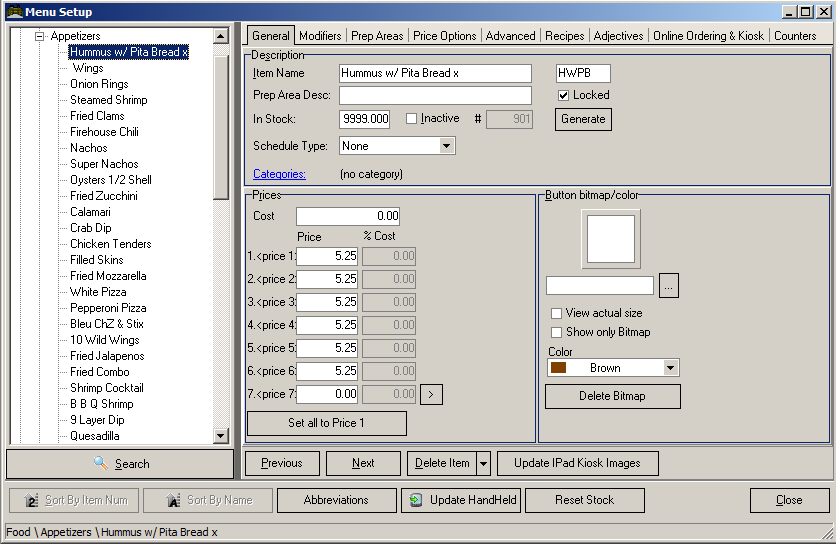
When an Item is highlighted on the left of the Menu Setup Form, the body of the form displays fields for configuring the item that are organized behind seven different tabs:
The column on the left of the Menu Setup Form always displays the same list of Menus, Menu Groups and Menu Items
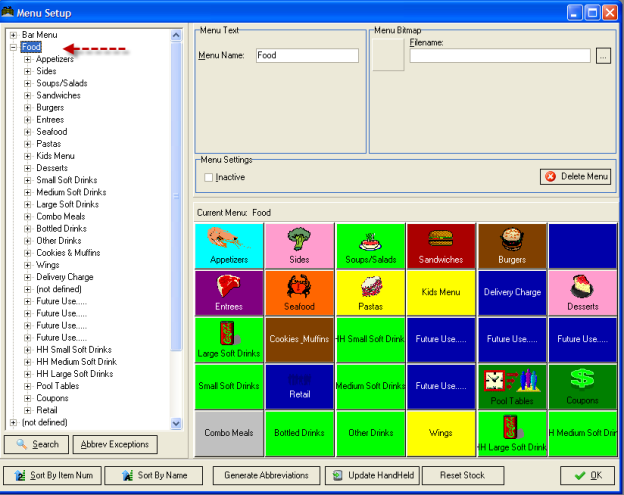
However, the body of the Menu Setup Form changes completely, depending on what is highlighted on the Menu List. When one of the main menus is highlighted on the menu list, the body of the screen displays:
The screen shot above shows the appearance of the Menu Setup Form when the main Food menu is highlighted on the list at the left of the form. The screen shot below shows how the Menu Setup form changes when you highlight the Appetizer Menu Group instead of the Main Food Menu. The body of the screen has changed to display detail relating only to the highlighted Appetizer group rather than to the entire Food Menu as in the screen shot above.
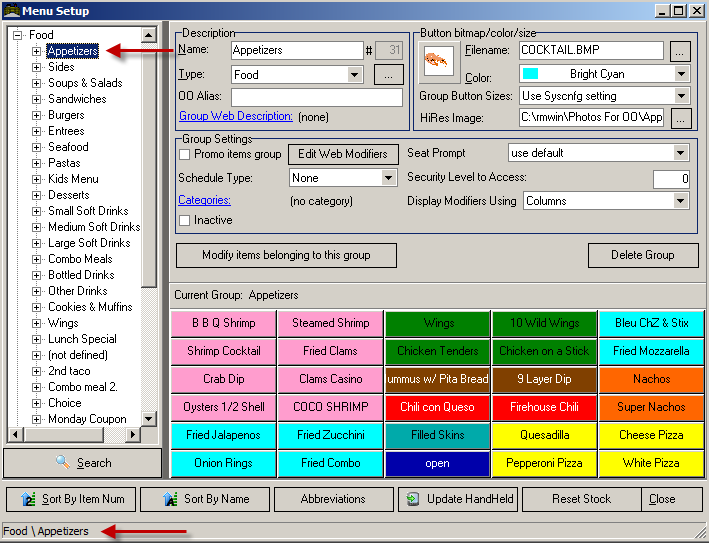
The Description Area now shows the fields that are used to define an individual Menu Group. Notice that the button color for the Appetizer Menu Group is set to “Bright Cyan” -- precisely the color that was displayed on the Appetizer Group button in the previous screen shot.
But the Button Area, itself, is now displaying buttons that correspond to all the items in the Appetizer Group; the same items that appear under the Appetizer heading in the list on the left of the form. In fact, if you were to highlight one of the menu items listed on the left, the body of the screen would change again to display the fields used for defining that individual menu item:
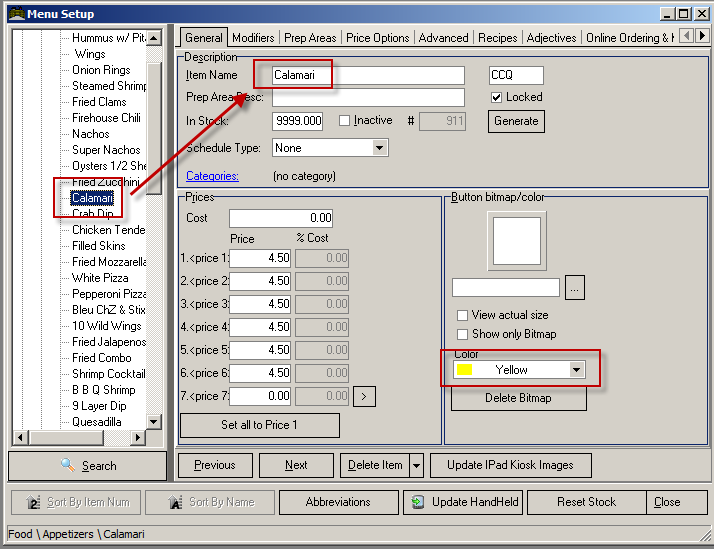
So let’s continue working with the sample screens by noting there is a yellow button on the screen shot above for a menu item called Calamari. If you were to highlight this menu item on the list at the left of the form, the body of the screen would change to display the fields required to define an individual menu item:
The Menu Page Setup Form is one of multiple setup forms that may displayed on the body of the main Menu Setup Form. To access the Menu Page Setup Form you must use the Menu Tree to highlight any first level branch of the Menu Tree, as shown in the screen shot below:
Each Menu Page is pre-configured with slots for thirty Groups. The Menu Setup Form displays this pre-defined format on the Menu Tree.
Many sales reports give sub-totals by Menu Group so it’s important to determine how you wish to report on sales data before defining your Menu Groups. All Menu Groups must be categorized into broaderGroup Type categories such as "Food" or "Beverage".
Every Menu Group has an associated Group Button that controls the Item Buttons displayed in the Menu Area of the Order Entry Screen. These Group Buttons may be incorporated into Menu Navigation Bars or accessed from the POS Groups Screen. When a Menu Group contains fewer than fifteen items, however, it is not recommended you use the Group Button to navigate the menu. Instead you should configure Custom Groups for displaying Item Buttons in the Menu Area of the Order Entry Screen.
Depending on the nature of your business you may wish to create Menu Groups for non-food items. For instance, if you accept fixed price coupons, you must create at least one Menu Group of “Coupons”. Or you may wish to add a group for the “Cover Charge” that gets added to every guest check.
The Groups Setup Form is one of multiple setup forms that may displayed on the body of the main Menu Setup Form. To access the Groups Setup Form you must use the Menu Tree to highlight any second level branch of the Menu Tree, as shown in the screen shot below:
The (+) sign to the left of the Main Menu in which you wish your group to belong. The tree view will expand to show all the Menu Groups contained in the Main Menu as shown below. To create a new group, simply click on “(not defined)” on the left side, and then fill out the fields described below. This setup form is organized as follows:
- Use default- this will use the default setting configured in Station Configuration
- Prompt- Use this function will cause a seat prompt at the POS for any menu items rung under the menu group selected.
- No prompt- Selecting this option will override the Station Configuration setting for seat prompts if enabled thus blocking the seat prompt when items ordered in the group are ordered.
Seat prompting is typically used with pivot point ordering in conjunction with runners.
Default- Follows the station configuration setting for Pop- Up or Column Modifiers to be displayed at POS.
Pop Ups- displays modifier screens 1-5 in a series of single pop screens . This setting overrides the station configuration setting but is overridden by the similar menu item setting.
Columns- displays modifier screens 1-5 in column format (opposed to legacy pop up modifiers). This setting overrides the station configuration setting but is overridden by the similar menu item setting.
- Click on the ellipsis button in the right side of the Filename to call up an alphabetical listing of all the bitmap files in the library
- Double click on the bitmap you wish to add to the Menu Group touch button. (The image will appear on the Setup Form.)
- Use Syscnfg setting- this setting will follow whatever is set in the station configuration.
- Normal – as the name implies, this setting allows you to see the buttons in the normal size.
- Half-Height – this setting allows two consecutive menu groups to be shown on the screen. See screen shot under Menu Item Buttons.
Delete Group- Pressing this button will delete the menu group highlighted.
Modify Items Belonging to this Group- Click on this button to update the configuration of multiple menu items at once.
Text on Button- Use this field to enter up to (20) characters that will be displayed on the Custom Group button.
Bitmap- To display a bitmap on the Custom Group Button, follow the procedures for displaying a bitmap on a standard Group Button. Remember, however, that bitmaps are not usually recommended for Group Buttons displayed on Menu Navigation Bars.
Color- Use the drop down list in this field to select a color for the Custom Group Button.
The information on the lower bar informs user of exact location in menu. Example: BAR MENU\BEER indicates the user is currently within the Beer menu group within the liquor menu page. This is particularly helpful when establishments have similarly named menu groups.
To change the position of a group as displayed at the POS, simply click, drag and drop the group button on the new position. The group being replaced will move to the original position occupied by the group moved.

The screen shot above shows the result if in the screen shown above, you click, drag and drop the Non-Alcoholic menu group to the upper right corner.
Highlight the Menu which contains the group you want to edit. Right click on the Group button whose data you wish to edit. The Group Setup form will appear as shown below.
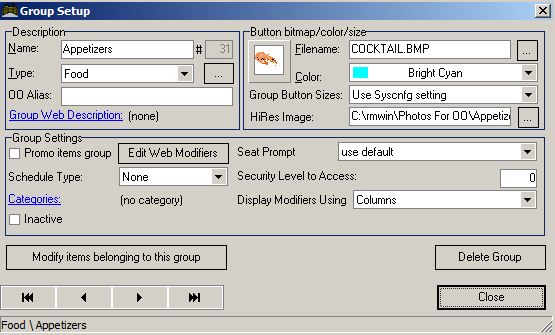
All the configurable fields have already been discussed above except the arrows. The leftmost arrow will take you to the first group on the menu. The next arrow (to the left) will take you to the previous group, while the arrow to the right will take you to the next group. The rightmost arrow will take you to the last group of the specified menu.
Restaurant Manager includes a special dialogue box that allows you to make global changes to your menu according to certain parameters such as raising prices by 10% or changing the forced modifiers linked to a group of items, etc. This topic is covered in greater detail under the topic: Changing Multiple Items at Once
There are multiple setup forms that must be used to configure both Menu Items and Modifier Items. These various forms may be displayed on the body of the main Menu Setup Form by navigating the Menu Tree to highlight any third level branch of the tree.
When an Item level branch is highlighted on the Menu Tree, eight tabs appear across the top of the Menu Setup Form. The fields displayed on the body of the form change, depending on which tab is active. In the screen shot above the [General] Tab is the active tab.
The eight different setup forms used to configure Menu Items and Modifier Items are accessed via the following tabs:
When an Item level branch is highlighted on the Menu Tree, three additional buttons appear at the base of the Menu Setup Form:
PREV and NEXT- Instead of using the Menu Tree to move to another menu item, click on these buttons to navigate the Menu Items list (i.e., to move from one Menu Item to another).
DELETE ITEM - Click on this button to delete the highlighted item. Note this button has a drop down menu containing options affecting deletion confirmation prompts:
- Confirm deletion- the options affects a confirmation prompts every time the Delete Item button is used. Selecting this option helps prevent accidentally deleting an item.
- Delete without confirmation- no confirmation will appear when selecting the Delete Item button.
Note: choosing either option on one menu item affects the confirmation prompt availability on all menu items
The following is a description of each option under the General Tab
Note: Items entered in the Advanced Order module will not deplete In Stock Quantities prior to or after order conversion.
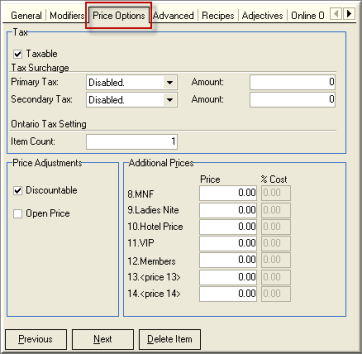
Use these fields to record up to fourteen prices for each menu item. You can configure your system to work with different prices at different POS stations or to switch automatically from one price level to another at a specified time. (You can also manually switch the price level from within the POS Modules.) By default, when you type in Price 1, Restaurant Manager copies that price into the remaining thirteen price fields. This ensures that every menu item does have a price if you do ever switch Price Levels. You can override the default prices simply by typing over them. Remember, you can enter prices for items on the Modifier Menus but you are not required to do so.
From within the POS Module, any of these standard pre-defined prices, can be adjusted manually on a particular order. If you adjust the price to zero, however, the item will not print on the guest check unless you activate the "Print Zero Price Items" feature in Station Configuration..
- View actual size – check this if you want to view actual size of display in POS
- Show only Bitmap – check this if you do not want the name of the item to show with the bitmap in POS
- Delete Bitmap button – press if you want to delete bitmap
Side dishes and other modifiers accompany standard menu items and are printed on the same prep printer as the menu item, itself. Modifiers can be configured to print independently on prep area printers but most commonly are not. It is more common to program the parent item to two printers. Thus, if a steak dinner can be accompanied by a house salad that is prepared in another area, you must use the [OTHER PRINTERS] fields on the Steak Dinner record to send the salad to the salad prep area.
If your establishment includes multiple kitchens and dining rooms, you may wish to route a single menu item to different prep area printers depending on the POS station that generates the order. In this case, you must create a separate configuration for each POS station in the Prep Printer Setup Form.
If there is certain information about a Menu Item that must be communicated to prep areas each time the item is ordered, use this section of the Menu Setup Form to link “Forced Modifier” pop-up screens to the Menu Item you are currently defining. Forced Modifiers are useful, for example, in forcing servers to select a particular dressing when ordering a House Salad or a cooking temperature such as Rare or Well Done when ordering a Filet Mignon. See section on Modifiers for detailed information.
The fields settings under this section are a continuation of the price levels form the General Tab
The miscellaneous configuration options grouped under the Advanced Tab of the Menu Item Setup Form are specialized options that may not need adjustment when tailoring the Restaurant Manager POS System to your particular business needs.
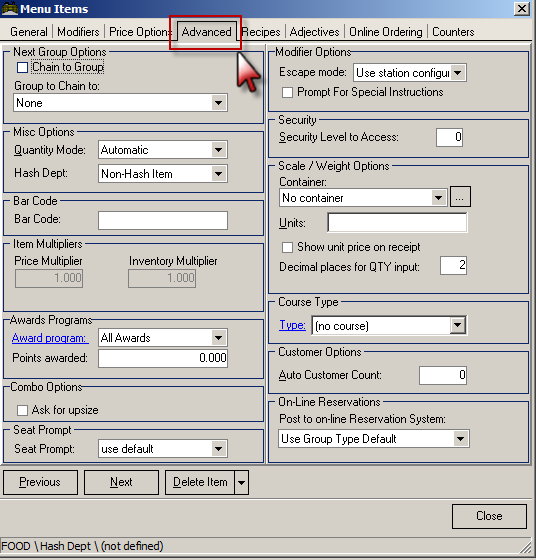
The following describes the field setting for the Advanced Tab of the Menu Item setup form:
Chain to Group- Use this check box to create a navigation button on the Menu Item Area of the Order Entry Screen. “Next Group” buttons looks like Menu Item buttons but functions like a navigation button. In other words, mark this box if you wish to link two menu groups so they can be accessed successively from the POS stations with a single keystroke. Enabling this field setting means you are creating a touch screen button that does not correspond to a menu item. Thus, when the button is touched no item is added to the guest check, but rather a second Menu Group automatically will appear on the POS touch screen. (Obviously, the name given to such a dummy menu item should read "MORE" or "NEXT", etc.). As example, if most customers in your establishment order appetizers and if you have both "Hot Appetizer" and "Cold Appetizer" menu groups, you may wish to use the Chain to Group feature to create a dummy menu item in "Hot Appetizers" that instantly links to "Cold Appetizers". The server would then be able to order the appropriate hot appetizers, press the dummy key labeled "MORE", and jump immediately to the screen for the cold appetizers to finish placing the entire appetizer order. You could, of course, do the same to link groups of entrees or groups of desserts, etc.
Group to Chain to:- In addition to working in tandem with the "Chain to Group" field setting as described above, this field can be used independently to call up another Menu Group immediately after a true menu item is ordered. By default this field is set to “None “so that the active menu group in the POS Module does not change when an item is ordered. Click the arrow to bring a drop down menu and choose a group. The menu groups listed in the drop down menu are sequenced in the same order in how they would appear on the menu tree. Restaurant Manager will automatically change the active menu group each time the item is ordered. An example of using the next group filter is if a soup & salad combo is a specialty on your menu, you could use this field to ensure that every time the soup was ordered the salad menu group appeared.
Click on the arrow to bring down choices under Quantity Mode:
- Automatic- This means that when this item is ordered, Restaurant Manager automatically takes an order of Qty=1.
- Manual- If set to manual, Restaurant Manager will prompt you at the POS to enter the quantity of the order for this item.
- Scale- This setting requires the Scale interface. If enable you will receive a prompt asking to put the item on the scale. Additional configuration is required in the Scale/Weight Options in the same tab.
Whenever a timed item is ordered from POS, the POS program automatically multiplies the price per hour by the number of hours since the transaction was started and uses the result as the item price. The quantity of a timed item is always set to 1.
Some pool halls charge a different hourly rate depending on the number of players. To handle this situation, you must create several different timed items, one for each player count.
If the player count changes, for example, 3 people are playing pool, then one person leaves and 2 are remaining, then you must select the 3 player item to apply the charge for the 3 players, and then reset the clock on the table. RM does not provide a clock reset option; however, transferring the ticket to another table achieves the same result. When the 2 players are finally finished playing, you would press the 2 player item to add-on the charge after the first player left. Note: if the transaction is not transferred, the POS would charge the 2 player rate for the entire time in addition to the 3 player rate for the first portion.
Operation at POS: Open a table at the time you want the "clock" to begin: add the menu item (i.e. 1 Player) at the time you want the "clock" to end. The timed menu item will calculate the price of the item against the current time (time menu item was added) and the time the order was opened. Example: We have created a menu item priced at $1 for one hour. The order was opened at 10:00 PM and the timed menu item was added to the order at 10:10 PM. Divide 10 minutes by 60 and you get 1.6666. The system will round the time and price the timed item add at .17 cents. To extend this, if the same item is timed against 40 minutes, the price will be .67 cents.
- Hash +(plus) - Assigns menu item a positive revenue hash department item. When ringing menu item at POS, item will appear a positive sale on the guest check.
- Hash - (minus)- Assigns menu item a negative revenue hash department item. When ringing menu item at POS, item will appear as a negative sale on the guest check.
See the section on Hash Departments for detailed information
The options under these fields are only active for modifiers.
Awards Programs-If you click on this link, it will give you the Awards Setup Form where you can setup an award program. If the program already exists, just click on the arrow to bring down a list. Choose which program will qualify this item.
Points awarded-Enter the number of points to be awarded when this item is ordered.
- Use station configuration – choose this setting to keep what’s the setting in the station configuration.
- Compulsory (esc not allowed) – in this setting the “Done” button is suppressed and modifiers are compulsory.
- Skip to next mod – this setting causes the system to skip the current modifier but continue asking for additional modifiers if defined.
- Skip remaining modifiers – this setting completes the item and skips all other modifier selections.
Note: To access this section, you must choose “Scale” in Quantity Mode.
Note: You may also want to adjust the number of decimal places when displaying or printing quantities. use the station configuration option "Number of decimal places for displaying/printing quantities". This option defines how many decimal places are displayed and printed in the POS module for items having non-integer quantities. For example, if this option is set to 2, an item has a quantity of 1.2345, the POS screen will display 1.23, and that is also what will print on the guest check as well as the kitchen printers.
To accommodate customers who may, for instance, order an appetizer as an entree, there is a Function Button on the Order Entry Screen that allows you to change the course of an item on a particular order.
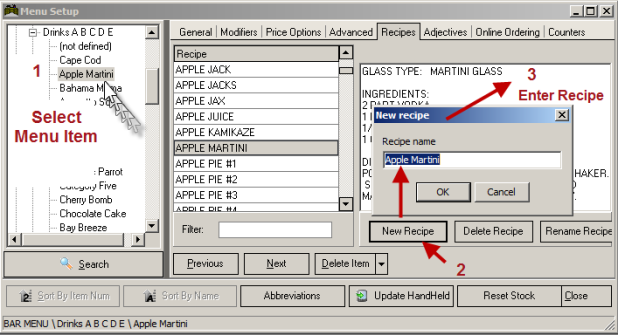
You can create recipes for any item on your menu. Recipes can be used for a variety of functions. The obvious use is to enter recipes. However, recipes can also be used to store customer dining information, driving directions, or dietary information. Recipes can be viewed from any POS terminal or sent to print on Prep Printers in any food preparation area.
To configure your system to send recipes to print on Prep Area printers whenever a menu item is ordered, see Prep Printers Setup Form. And see how to view a recipe on screen at a POS Station.
To create a new recipe for a menu item:
To delete an existing recipe for a menu item:
To edit an existing recipe for a menu item:
To rename an existing recipe for a menu item:
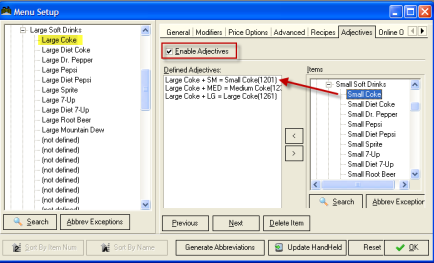
See Linking Adjectives to a Menu Item.
Right click on the Menu Item button whose data you wish to edit. The Menu Items Setup form will appear as shown below.
You may change any attribute of any Menu Item or Modifier Item and see those changes reflected at the POS Stations in real time. Some of these changes may even be implemented from the POS Stations while other changes must be made from the BackOffice Module.
The [Edit Menu Item] Function Button within the Order Entry Screen function buttons allows you to change the name, price or button color of a specific item from the POS Order Entry Screen. From the BackOffice Module you may use the Menu Setup Form to change any attribute of an individual item. You may also make global changes to multiple items at once, such as raising prices by 5% or adding a new side dish to multiple Forced Modifier Pop-ups, etc.
To edit individual items and prices from the Menu Setup Form:
 button to locate the item you wish to change on the Menu Tree.
 button at the base of the Menu Setup Form or repeat step 2 to locate the next item you wish to modify.
NOTE:As soon as you complete step 4 the change you made will be implemented in real time and you may access the Order Entry Screen to test it.
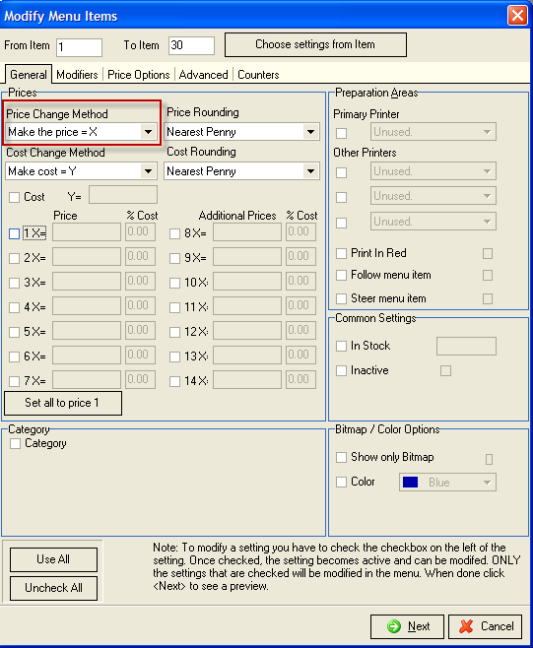
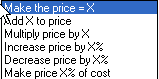
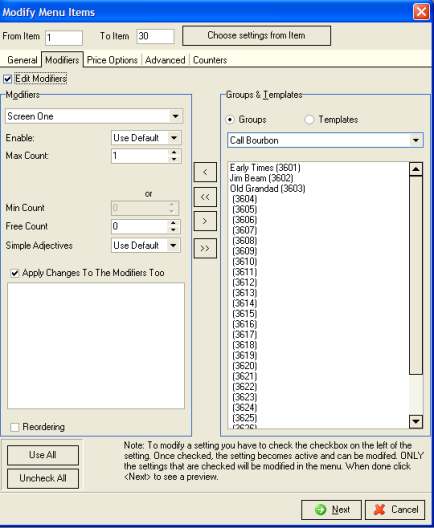
Restaurant Manager includes a special dialogue box that allows you to make global changes to your menu according to certain parameters such as raising prices by 10% or changing the forced modifiers linked to a group of items, etc. The Modify Menu Items dialogue box not only let’s you configure parameters for making global changes like these, it also allows you to preview the changes and how they affect each menu item before you actually implement the change(s):
To make global changes to menu pricing:
To make global changes to forced modifiers attached to the items in a particular Menu Group:
Modifier Items may be added to any order from the Order Entry Screen of the various POS Modules. Modifier Items specify how a standard Menu Item should be prepared. Modifier Items may include cooking instructions (like "Medium Rare") or side dishes (liked "House Salad” or “Cole Slaw”) that instruct kitchen staff how to prepare a dish. Some Modifier Items like “Extra Whipped Cream” may carry a price. But all Modifier Items must be linked to a Menu Item before then can be added to an order, including the priced modifiers.
Creating prompts for Modifier Items is one step in the definition of a standard Menu Item. Therefore it is important to complete the configuration of the entire menu of Modifier Items prior to configuring standard Menu Items, themselves.
Use the fields under the Modifier tab of the Menu Setup Form to create one or more Forced Modifier pop-up screens for any Menu Item or Modifier Item highlighted in the Item List Menu Items Setup Form.
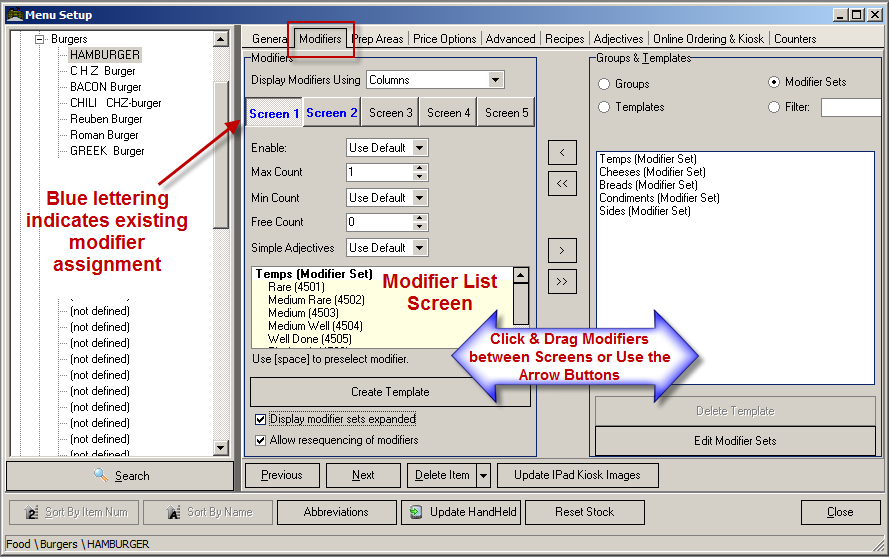
Each parameter applies to a specific modifier screen"Screen One” through “Screen Five”) with the exception of "Display Modifiers Using".
Default- Follows the station configuration setting for Pop- Up or Column Modifiers to be displayed at POS.
Pop Ups- displays modifier screens 1-5 in a series of single pop screens . This setting overrides the station configuration and the Menu Group setting.
Columns- displays modifier screens 1-5 in column format (opposed to legacy pop up modifiers). This setting overrides the station configuration and the Menu Group setting.
For example, if you offer an entree with a choice of two side dishes, you can set this option to 2 to REQUIRE the server to choose at least two sides. This makes the side dishes compulsory. If you do not want to make the side dishes compulsory, set this value to 0. When the modifiers are displayed on screen, a [Done] button will allow skipping the side dish selections.
If you check the option “Use Default,” the item will ignore the value of the Min Count Field and behave according to the station configuration parameter “Effect of Done button during modifier selections.” That option determines whether modifiers are optional, or compulsory, and also controls what happens when canceling a modifier selection. Refer to the on-line documentation of that option for additional information.
Generally, Min Count should be less than or equal to Max Count, but if Min Count is set to a number larger than Max Count, the POS program will automatically set Max Count equal to Min Count (i.e., it will pop up this modifier screen Min Count times).
Click single left arrow button (<) to move the item(s) highlighted under the Groups & Templates section to the pop-up screen of an individual menu item.
Note: Quite often you will want to add a modifier on the fly as you are building the modifier screens for a Menu Item. For example, when adding the salad dressing options to a salad, you might have forgotten to define the “Ranch” style dressing. You can now right click on an empty modifier in the modifier list to bring up the Item Setup form and enter all the relevant information for the “Ranch” dressing.
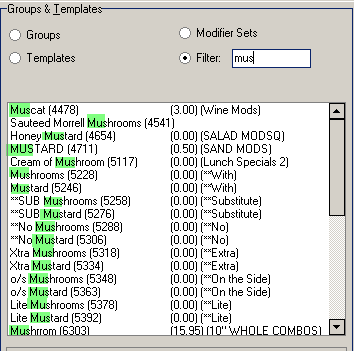
This section of the modifier tab offers several methods to find and list modifiers:
- Item Name
PLU number
Associated price
Parent Menu Group
Items are listed in plu order lowest to highest.
You may configure any given Menu Item to prompt for Modifiers using one of three methods:
Modifier Items should be defined prior to defining standard Menu Items. Before defining standard Menu Items, you must create a menu of Modifier Items that include all the cooking instructions and side dishes that must be communicated to kitchen staff. The last four pages on the Menu Setup Form may be used to organize and configure these Modifier Items.
If a price is associated with a modifier, Restaurant Manager adds the amount to the price of the standard menu item, or it would just list the price with the modifier. See Modifier Roll-up Mode. For instance, if a modifier "with whipped cream" were priced at 25 cents, then a cappuccino with whipped cream would cost 25 cents more than a plain cappuccino.
From the Menus Setup Form, you can define up to four Modifier Menus of up to 900 items each. PLU Item numbers 3601 through 7200 on the last four menus are for modifiers.
Because items on the Modifier Menus are processed differently than items on Standard Menus you must be sure to name Modifier Menus clearly so you do not accidentally put a standard menu item on a Modifier Menu or vice versa. Typical Modifier Menu names include "Side Dishes", "Cooking Instructions", "***NO****", and "Pizza Mods". However, special consideration should be given when naming Modifier Groups when using ASI’s Online Ordering program. The name of the modifier menu group will appear as a selection heading on the Online Ordering portal.
NOTE: Follow the same steps to create a Modifier Menu as you follow to create a standard menu. And follow the same steps to add a group or an item to a Modifier Menu as you follow to add a group or an item to a standard menu.
Once you have added items to a Modifier Menu you can create pop-up lists of modifier options that appear automatically when a particular menu items is ordered. See Forced Modifiers.
By default modifiers do not print on the guest check. See Modifier Roll-up Mode to change this default setting.
If you wish to print Modifiers in red ink at the prep area printers, you must activate the red ink feature and make sure you’ve entered the red ink codes in the Printer Codes Setup Form.
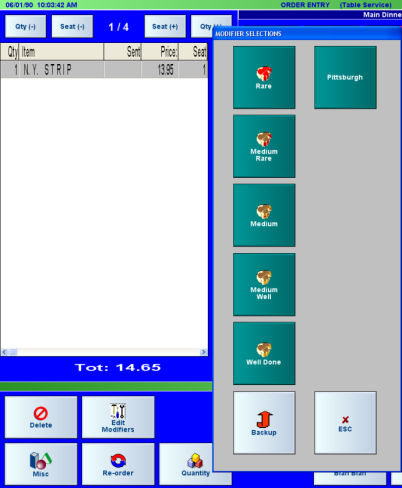
Forced Modifiers are short lists of selected Modifier Items that pop up automatically every time a certain Menu Item is ordered. As the name implies, Forced Modifiers force servers to select one Modifier Item off a short list that appears automatically each time a Menu Item is added to an order. Cooking instructions such as “Rare”, “Medium” and “Well Done” are examples of Modifier Items typically displayed on Forced Modifier Screens. Forced Modifiers are a key feature on the Order Entry Screen and are usually used to facilitate communication with food preparations areas. Modifiers are sometimes also used to control the pricing of a given menu item.
The sample Order Entry Screen below shows a Forced Modifier pop-up screen of cooking instructions that appeared automatically when the [N.Y. Strip] Menu Item button was selected.
Configuration of Forced Modifiers must be done AFTER all basic Modifier Items have been defined. It is one step in the process of configuring a Menu Item. The adding of Forced Modifiers is done via fields under the Modifier tab of the Menu Item Setup Form.
Any given Menu Item may be configured with up to five different Forced Modifier Screens. Modifier Items, themselves, may also be configured with Forced Modifier. These are referred to as Nested Modifiers. For example, a "House Salad" Modifier Item could be configured with a Forced Modifier screen listing all available salad dressings.
Forced Modifier Screens may display a minimum of one modifier button or a maximum of 45 modifier buttons on a single screen for Pop Up Modifier screens or 17 for Column Modifier screens. If only one modifier button appears on a screen, you may wish to consider configuring the system to auto-select single modifiers.
You may disable Forced Modifier screens on certain types of menu items at certain stations. For instance, bartenders usually prefer to ring up drinks without taking the time to record modifiers that don’t affect pricing, such as “on the rocks” or “with a twist”. In this case, you could use settings on the Group Types Setup form to disable Forced Modifiers at the Bar Station(s).
Before configuring Forced Modifiers, it is recommended that you familiarize yourself with the Adjectives feature in Restaurant Manager. When defining similar items sold at different sizes such as Small, Medium, and Large Sodas adjectives usually work better than Forced Modifiers. However, Simple Adjectives such as No, Extra, On Side can reduce menu programming when using either Pop Up or Column Modifier screens.
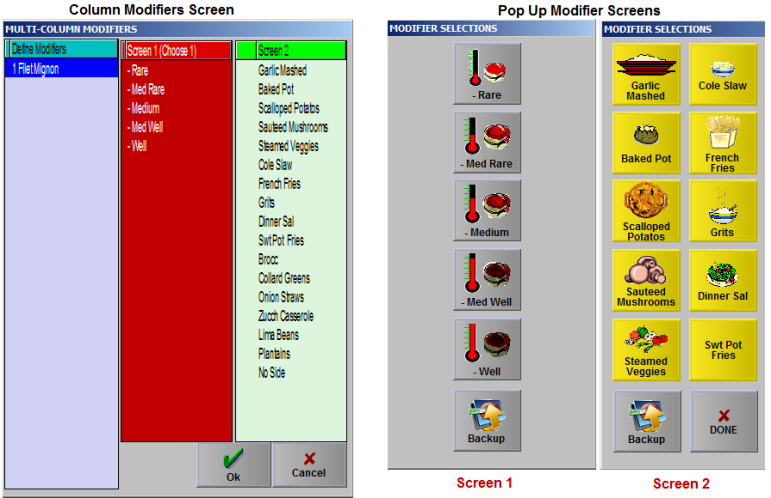
Restaurant Manager has two options to display forced modifiers at the POS: Pop Screens and Column Screens. Pop up modifier screens appear in a sequence (1-5) and can be configured to proceed to the next pop up screen using the "Max Count" option on the Modifiers Tab of the Menu Item Setup Form. In contrast, Column Modifier screens show all available modifiers in a single screen. In the screen shot below, we have added a Filet Mignon to the order. You can easily see in the screen shot how all modifiers appear on the Column Modifiers screen where the Pop Up screens appear separately.
You can configure your screen to use both Column Modifiers and Modifier Pop Up screens. You can even use Column Modifier screens to be used with Modifier Pop screens (or vice verse) when using nested modifiers (modifiers attached to modifiers). You can program Column Modifiers or Pop Modifiers in one of three ways:
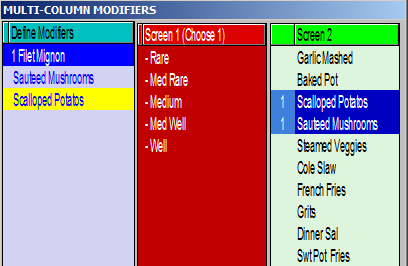
The Column Modifier screen shows the menu item being ordered under the Define Modifier column. Modifiers can be added to the menu item from any screen and in any order. The system will add modifiers to the menu item in the order of how they were programmed by screen. Example, an employee can choose a modifier from screen 2 first, then screen 1, but the system will list the modifier from screen 1 above the modifier on screen 2 directly under the menu item. Mandatory modifiers (where you must select at least one) will have columns completed shaded in red until a modifier from that column is select. In addition, the instruction (Choose 1) will appear on the column heading for mandatory modifiers. Modifiers selected on the screen will be highlighted blue on the modifier column along with the number one. The last selected modifier is highlighted yellow on the Define Modifier column.
Up to 17 modifiers can be displayed per column. Use the "Pgup" and Pgdn" buttons at the bottom of the column to navigate to modifiers when more than 17 have been assigned. Use the "Ok" button at the bottom of the screen save your selections and exit out of the Column Modifier screen. Use the "Cancel" button to remove all modifier selections and exit out of the Column Modifier screen. Doing so will automatically remove the menu item form the Order Entry window.
Pop Up Modifier screens appear after selecting a menu item at the POS. You may configure menu items to have just one Pop Up screen or up to five. Each Pop Up Modifier screen can have up to 45 modifiers. A "NEXT PAGE" button will appear on the Pop Up screen where you can access modifiers above 45. Unlike Column Modifier screens, you can add images to modifiers on Pop Up screens.
Two buttons will appear on Modifier Pop Up screens: the "Back-up" button and the "DONE" button. Both buttons can be particularly useful when ordering menu Items configured with multiple Modifier Pop Up screens. The "Back-up" button allows you to return to a previous Forced Modifier screen while the "DONE" button, by default, allows you to skip to the next Forced Modifier pop-up screen. The "DONE" button will not appear on the Pop UP screen if the menu item has a mandatory selection assigned (Min Count). This forces the server to add the correct number of modifiers before proceeding to the next Pop Up screen or completing the order. There are, however, settings on the Station Configuration Form that allow you to disable this "DONE" button or change the text that appears on the button, etc.
Because each Forced Modifier pop-up screen is linked to an individual menu item, defining these pop-up screens is part of the process of defining an individual menu item. However, once you have created a pop-up screen for a particular menu item, you may convert it to a Template that can be used with any other menu item.
IMPORTANT: You cannot create Forced Modifier pop ups until AFTER you have defined the modifier menu items, themselves.
Locate the menu item you wish to modify on the Items List in the Menu Items Setup Form. You can use the Search button for this. When the item you wish to modify is highlighted, click on the "Modifiers" tab at the top of the setup form.
NOTE: When configuring a new system from the BackOffice Module, it can be helpful to run the POS Module in another Window (or even on another POS terminal) so that you can test the configuration as you go along. To test your changes in POS, hit MISC->Re-load Sys Config to ensure that your changes has taken effect in POS.
Once you have created a modifier pop-up screen for a particular menu item, you can duplicate that pop-up screen as a "template" that can be linked instantly to any other item on the menu. To create a Forced Modifier Template:
You must first follow steps 1 to 9 above for creating a Forced Modifier pop-up screen. Then, when you have a list of modifier options displayed in the Menu Items Setup Form:
If you wish to verify that you have properly created the template, click on the Templates check box on the right of the screen and then click on the down arrow on the field right below it. Scroll through this list until you see the name of the template you just created.
Once you have created this template, you may link it to many other menu items as described below.
If you have already created one or more Forced Modifier Templates, you will find that it is much more efficient to link a menu item to a modifier option template than to recreate the same pop-up screen over and over. To create a modifier pop-up screen from an existing template:
If you want the server to be able to select more than one item from this pop-up screen, enter the number of items that can be selected in the "Count" field.
If you wish to create a second pop-up screen associated with this particular menu item, click on the down arrow beside the [Screen 1] field and select Screen 2. Then repeat steps 4 to 8 above. (Screen 2 doesn’t give 2nd pop-up screen)
When you have completed creating all the modifier pop-ups needed on this menu item, click on the EXIT button to activate the changes and exit the Menu Items Setup Form.
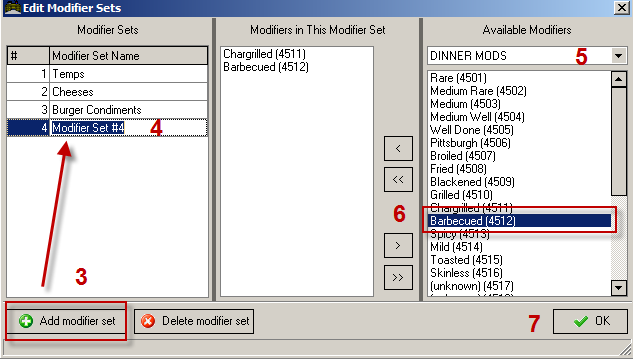
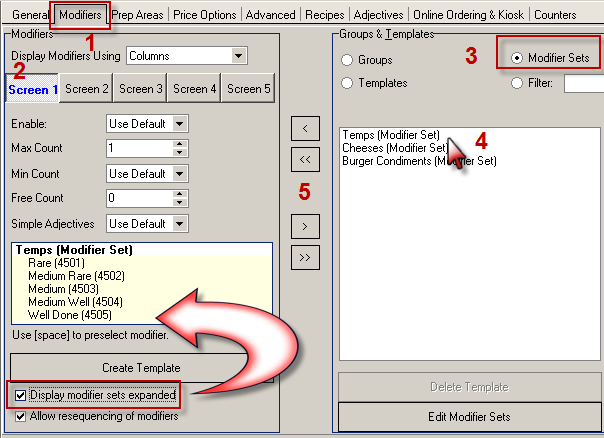
Modifiers Sets are similar to Templates where you can create a specific list of modifiers that may be used on like items. For example, a Cheese burger and a Bacon Cheese Burger may have the same temperature, cheese, and side choices. The benefit to Modifier sets is you can add an modifier to an existing set and it will automatically be applied to all menu items the modifier set is attached to. This is not necessarily the case with Templates.
Create a modifier set using the following steps:
Delete a modifier set using the following steps:
Add a modifier set to a menu item using the following steps
Enable or disable the "Display modifier sets expanded" to view modifiers contained within the set in the Modifiers pane.
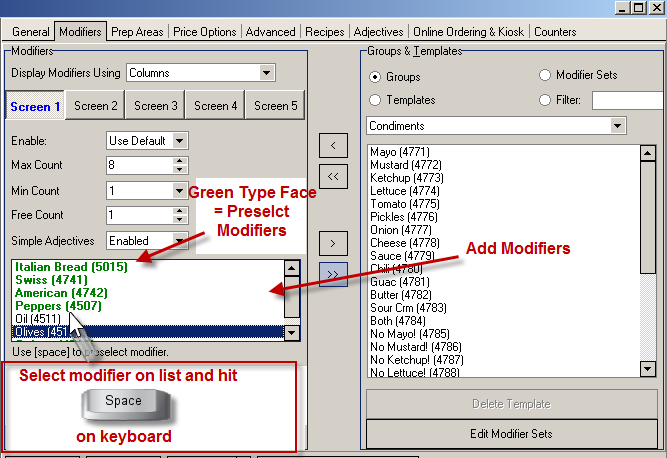
Restaurant Manager allows for specifying certain modifiers for menu items as being "preselected". Preselect modifiers will be displayed as highlighted at the POS and automatically added to the menu item just as if they had been selected by the user.This is helpful in restaurants that want the POS user to be able to see exactly what is on the menu item as described in the menu. This is specifically useful in counter service when the guest asks the menu item and can expedite the ordering process.
Note: Preselected Modifiers only work when used in conjunction with Column Modifiers screens.
Preselected Modifiers are configured in the Modifier tab in the Menu Item Setup form using the following steps:
Note: the "Max Count" setting must be equal to or greater than the number of modifiers added to a single screen.
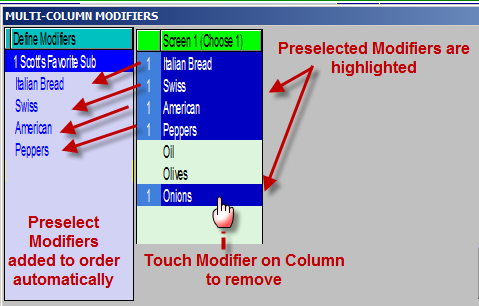
All Preselect Modifiers appear under the Define Modifiers and Screen columns on the Multi-Column Modifier window at the POS. Preselect Modifiers are highlighted on the screen column. Tag a modifier on the Screen Column to remove a preselect Modifier from Define Modifier Column. Tag the modifier again to re-add the modifier to the define Modifier Column.
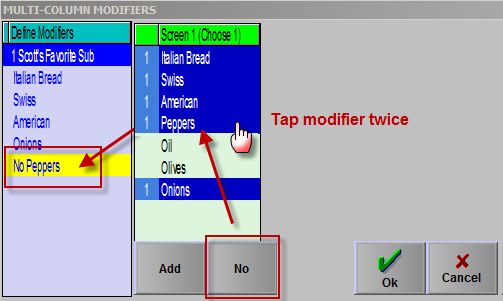
Simple Adjectives can be used with Preselect Modifiers. In some establishments, it may be preferred that "NO" precede the modifier rather than having it left of the list of modifiers on the prep ticket. In the screen shot below we added "NO" to "Peppers" by tapping the "No" simple adjective button on the bottom of the screen and then tapping the "Peppers" modifier on Screen 1 twice.
Note: Simple Adjectives need to be set up and enabled in advance.
There are a number of settings on the Station Configuration Form that control how Forced Modifiers work.
Modifier Options
Use the Search Settings button on the Station Configuration form to locate and configure the following settings for Pop Up Modifiers screens:
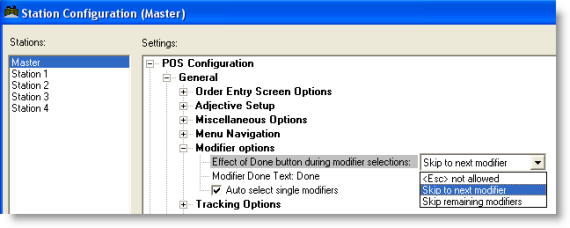
Effect of Done button during modifier selections-Use this setting together with the setting below it to control the [ESC] button that appears on Force Modifier Pop-up Screens (except on individual Menu Items configured to deviate from the Station Configuration setting.) To update this setting, double click on it and select one of the following options:
[Esc] not allowed – This option disables the [ESC] button and requires that a modifier selection be made.
Skip to next modifier – This option sets the system to exit the current Forced Modifier pop-up screen and skip to the next one if the menu item is configured with multiple Forced Modifiers.
Skip remaining modifiers – This option exits the current Forced Modifier Pop-up Screen and skips any subsequent Forced Modifiers that also be linked to a given Menu Item.
Modifier Done Text- All Forced Modifier Pop-up Screens display a button for exiting the screen. By default the text displayed on the button reads “ESC” but you may display alternative text such as “Done” or “OK” by typing the alternate text in the field beside this setting.
Auto select single modifiers-Use this setting to disable Forced Modifier pop-ups at the Order Entry Screen if only a single modifier button appears on the pop-up. The modifier will be automatically sent to the appropriate kitchen printer(s).
This setting is used in a variety of situations such as the following:
All entrees are accompanied by a standard House Salad that is prepared at a salad bar with a dedicated prep area printer. To ensure that kitchen staff is alerted each time they must prepare a salad the system automatically sends the <House Salad> Modifier to the dedicated salad printer every time an entrée item is ordered.
NOTE: When you enable the “auto-select” setting you may also wish to disable the [Follow Menu Item] setting on the Modifier Setup Form.
Default Mode When Adding Modifiers to Items
Use the Search Settings button on the Station Configuration form to locate and configure the following settings for Forced Modifiers screens:
Restaurant Manager the capability to add up to 999,999.00 menu items if needed. The default setup will have the original 4 menus of menu items, 4 menus modifiers, and the custom group menu. Any new menus added will only add “menu items”, not modifiers. The first menu groups of the first menu added will range 271 to 300 and menu items will start at number 8101.
New menu additions are programmable in “Menu Setup” located in RM BackOffice. Right click using a mouse anywhere in the menu tree field to add a new menu. Choose the “New Menu” option in the drop down menu, click on [Yes] to confirm, and the [Yes] again to continue. You can then proceed to name and add menu groups and items.
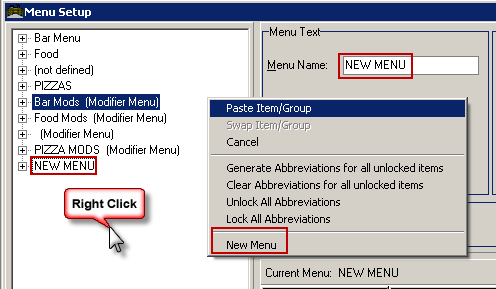
Note: new menus can only be added when a session is closed
By default, Restaurant Manager has gives the user an access point to the individual groups and items defined within the MENU structures, this user access point is the miscellaneous button titled “Groups” (see below). The [Groups] button whenever enabled / pressed would start a process by which the user could gain access to every item defined within the MENU.

The defined menu groups, accessed via their display buttons found along the bottom of the default screen (before adding extra menus). See illustration below:

In order to allow access to the expanded menu this bottom portion of the screen has two new options for the user to use. The new additional option buttons which are named “Prev Page” and “Next Page”, will allow the user access via a display of the new group definitions that must proceed the defining the new menu items.
The following is how the bottom of the first screen of the “Groups” option when enabled, is now displayed to the user.

The group buttons do not changed in operation at all.
Note; the “Prev Page” is not enabled upon start up, only when the user has enabled a new page with defined groups. The “Next Page” is enabled upon start up of the option, but it will lose that status if there are no defined groups to display.
In order to complete the following explanation of the new operational program changes made to the “Groups” option 2 groups were added to a sample file and named “Wine List” and “Merch” The following picture is a representation of additional menu items assigned to the newly defined group “Wine List”, after the “Next Page” button has been enabled / pressed.
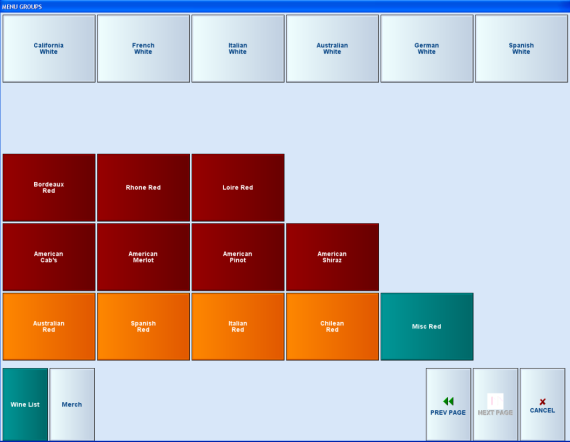
Note:the “Prev Page” which is now enabled for usage