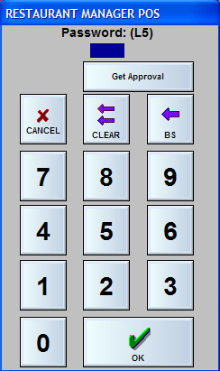
Restaurant Manager’s powerful security settings allow all POS and BackOffice operations to be password protected. Users who wish to execute protected operations must identify themselves with a password, an ID card or a fingerprint reader at the POS. Passwords to access the RM BackOffice Module are typically entered using a keyboard. However, MSR and finger print reader may be used if necessary. The system uses this input to verify the user is authorized to execute the protected operation and then tracks details of the operation for security audits and other reports.
You can protect all BackOffice Setup Forms and Functions by assigning them a Security Level greater than zero (0) on the BackOffice Security Form. Each protected BackOffice Function is grayed out unless the Employee currently logged in to the BackOffice Module has a Security Level equal to or greater than the protected function. Assigning a Security Level to a BackOffice Function does not generate a password prompt the way it does for POS Operations
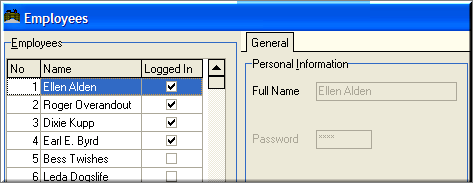
The sample screen shot below shows the Employee Setup Form with a number of fields grayed out to prevent access by a user with a Security Level insufficient to access these fields:
All RM BackOffice functions are assigned security levels in the BackOffice Security Form. The Form is accessed by going to Setup > BackOffice. Because BackOffice Security is so important to the integrity of your whole system, this form is protected with an Administrator Password Prompt. As described below, the area under the “Security” tab on the BackOffice Security Form allows you assign a Security Level to specific BackOffice Functions while the settings under the “Reports” tab allows you to control special report parameters that are detailed separately in the chapter on the Report Module.
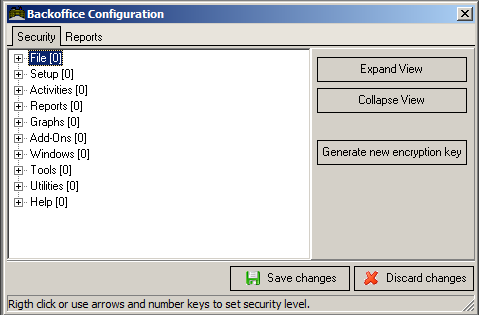
In the center of the BackOffice Configuration Form is a white box that organizes BackOffice functions under the ten drop down menu headings found at the top of the Main Screen of the BackOffice Module.
Click on the [EXPAND VIEW] and [COLLAPSE VIEW] buttons to view the various functions on this list. When the display is collapsed you can double click (or click on the “+” sign) on one of the nine menu headings to display only those functions that fall under that particular heading.
To adjust the security level of any BackOffice function simply highlight the item in this list, click on the right mouse button and select the appropriate level of security from the pop-up list.
TIP: It is recommended that you DO NOT assign a security level to the menu headings that appear in the "Collapse View" format. Rather, you should assign security levels only to the specific setup forms and dialogue boxes that appear under the "Expand View" format.
Click on this button on the BackOffice Security Form ‘to create a new code that controls the encryption of credit card data. To meet standards of PCI Compliance, a new encryption key must be generated at least once a year. See the RM and Reseller PCI Guidance document for instruction on generating a new encryption key.
The features controlled under the “Reports” tab of the BackOffice Setup Form are described in the chapter on the Report Module as are additional security settings controlled from the main screen of the Report Module, itself.
If you wish to control the sale of certain menu items, you may configure your system to display a password prompt when a specific Menu button is touched. This feature is particularly useful in controlling the sale of high priced specialty items like expensive champagnes, etc.
To add a password prompt to a Menu Item, access the Menu Item page of the Menu Setup Form and set the Security field to any Security Level greater than zero.
Recognizing security needs, Restaurant Manager allows for security on the application of security for applying a coupon and the ability to override the coupon criteria. Security levels are applied in the Coupon Setup form under the General Tab. The “Security Level to Apply Coupon” field setting is used to restrict the application of the coupon. The “Security Level to Override Invalid Coupons” allows an employee with higher security level (managers) to override a coupon when the coupons criteria is not met and where a lower level employees are restricted from applying the coupon. Placing securities levels allows greater flexibility in application of coupon rather than placing the security on just the Coupon function button.
Coupon and promotions can also be protected by removing the name on the Coupon selection list at the POS and use a barcode scanner to apply the coupon. This prevents a user from randomly applying a coupon.
Security levels can be applied per discount on the “Sec. Lvl” column on the Discount Setup form. This allows you to pick and choose the specific discounts that can be applied by line employees and which can be applied by management. Placing the security level on the Discount function button does not allow as great as flexibility as placing security levels on the individual discounts themselves.
If you choose to access program outside the POS Module (external programs) you may wish to place security level on those programs being accessed. Restaurant Manager programs will still honor configured security levels when accessed through the external program function. However, there may be some programs not associated with Restaurant manager that you wish to limit access. This is especially true in single terminal configurations or systems where the Restaurant Manager does not reside on a file server. Security levels are assigned in the External Programs Setup form on the “Security level” field. Security to access all external programs can be set on the POS Function Button Layout form.
Each individual form of payment can be password protected by adding a security level. Perhaps your restaurant only accepts personal checks with manager approval. In this case you will want to password protect the “Check” form of payment. You can also limit which payment type appears on which POS station. You can add security level for each payment type in the Method of Payment Setup form. You can also handle security on manipulating a form of payment once it has been assigned to a check. You will want to pay careful attention to function buttons such as the [Delete] button on the settlement screen or the [Revise settlement] function button found within [MISC] functions on the Main Status screens.
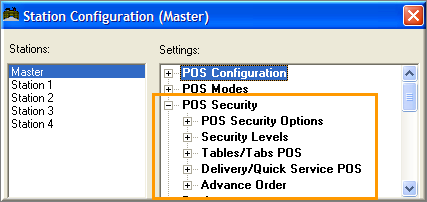
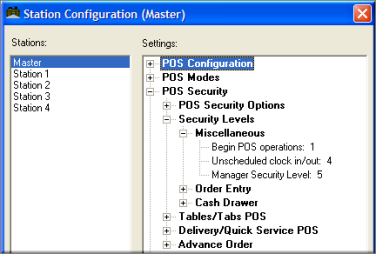
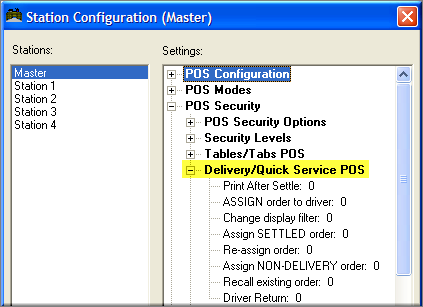
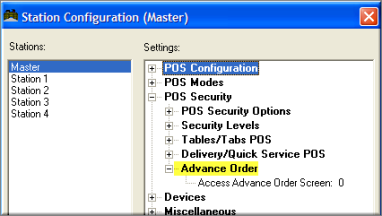
Bars and restaurants vary on the concept of which employees can access other employees tables and tabs. Table and Tabs access security settings are found under the Station Configuration form found in the RM BackOffice module. The following are examples where a restaurant may wish to restrict access to open tables and the how they are implemented at the POS. This section only deals with variable table access settings. Many of these same restrictions can be applied to tabs as well using the appropriate setting in the Station Configuration form. Specific POS functions security is covered under the topic: Function Buttons Button Layout Form
Example One
In this scenario servers are restricted from accessing other server tables: managers are allowed access to other manager tables in addition to servers tables. This scenario typically occurs at a busy table service restaurant with more than one manager on shift.
This is implemented by configuring the following Station Configuration settings:
Using the above settings, if a Level 2 waiter logs on, all other tables belonging to other employees will be blocked out by the POS. However, if a manager (Level 7) logs in, they will have access to any tables by Level 7 or lower employees.
Example Two
In this scenario employees of equal security levels are restricted from accessing each other tables including managers: managers are allowed access to all tables opened by employees with lesser security levels. This may be the case for restaurants that want ultimate security at the POS but typically has only one managers on the floor for any given shift.
This is implemented by configuring the following Station Configuration settings:
If a Level 2 waiter logs on using the above settings, all other tables belonging to other employees with an equal security level will not be accessible at the POS (including managers).In addition, tables will not be accessible to employees with a lower security level. However, tables can be accessed by others a security level of 4 or higher (typically a manager).
Example Three
In this example, we are concerned with just limiting access to open tables to a particular security level. In this scenario employees of the same security level are allowed to each other tables. Security levels above this level will also have access. This scenario is typically used in a cashier environment where servers ring orders but a cashier or bartender can add to,adjust, print or finalize orders.
This is implemented by configuring the following Station Configuration settings:
When a Level 2 waiter logs on using these settings, all other tables belonging to other employees will be accessible at the POS. Tables will not be accessible to employees with a lower security level but can be accessed with any employee with a higher security level (i.e. bartenders and managers).
Example Four
In this example, a restaurant allows access to all tables by all employees with the same or greater security level. This scenario is typical for restaurants where table sharing is common (i.e. banquets) or where customer service has more importance than security.
This is implemented by configuring the following Station Configuration settings:
When employees log on, all tables will be accessible at the POS by all employees with a security level the same or greater entered in the "Add to table" setting. . Tables will not be accessible to employees with a lower security level set in the "Add to table' setting. However, an employee who logs into the POS with a security level equal to the "Add to Table" setting will have access to order opened by employees with a higher security level.
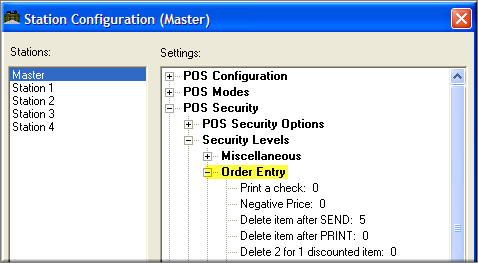
There are a number of settings on the Station Configuration Form that control the security configuration of your POS System. Most of them simply allow you link a password prompt to a specific operation. But the settings under the POS Security Options heading control the options detailed below.
From the POS Security options under Station Configuration, you can indicate which POS operations should be protected at any one of the nine levels of security described previously. You can set system wide security levels by highlighting the “Master” station in the column at the left of the setup form. Or you can create individual configurations for individual POS stations by highlighting specific stations on the Station List.
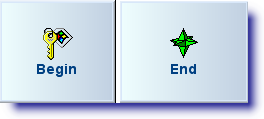
If enabled, user will have to enter their password before starting a POS operation. If enabling this function, you will have to add the “Begin” and “End” function buttons to the Main POS status screen.
If you wish to prevent servers from accessing each other’s tables, set this option to a security level that is HIGHER than the server security level, but lower than or equal to the manager security level. This will allow managers to access all tables; servers can only access their own.
This option does not put any restrictions on accessing tables that are available. For example, let’s say employee 2 is assigned to a table. As long as that table is open and occupied, then employee 2 is the only server that is allowed access to the table. Once the table is settled, then it becomes available and any employee is allowed access to it.
Note: this option takes precedence over the option "Share tables between peers." For example, if waiters are security level 3, and this option is set to security level 5, then waiters are NOT permitted to access each other’s tables, even if "Share tables between peers" is enabled.
Avoid using a large time-out value if you want to prevent employees from ringing orders on a different employee's sign-in. For example, one employee could sign in, enter his or her order and walk away from the POS terminal. If another employee uses the terminal before the time-out occurs, then it is possible that transactions are tallied to the wrong person. To ensure this does not happen, you might want to consider using the “Immediate time-out after 1 transaction”.
However, you may want to extend the time out period at a busy bar where only one person has access. Extending the password time out period will prevent the employee from having to enter their password every time they place an order. It is suggested that you train the employee to “End” button if leaving the POS station for a prolonged amount of time.


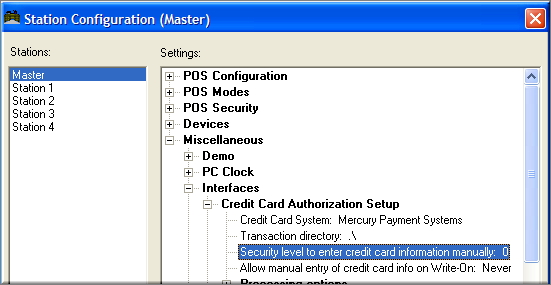
Users who login to the BackOffice Module as an Administrator are granted special access to Configuration Settings that control Credit Card data processing and Employee Passwords. To ensure that these Admin Settings are properly displayed on the Station Configuration Form, users must click on the Admin Settings Button at the base of the Station Configuration Form:
Setup > Station Configuration > [Admin Settings]

Before using the [Admin Settings] button the Station Configuration Form displays only the following settings related to credit cards:
After using the Admin Settings Button, additional settings are displayed on the form:
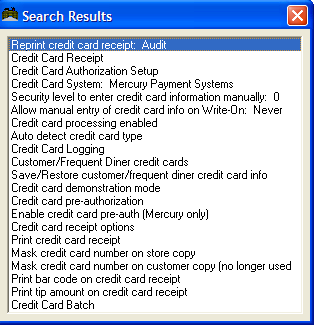
Enter credit card information manually:- This defines the security level for manual credit card entry. This prevents credit card fraud by requiring a password to manually key in a credit card number. Accessing this function requires an Administrator Password
Audit Reports help users track the employees involved in specific POS Operations. By default, your Restaurant Manager system always audits:
You can add a line of text or a “Reference” to any transaction that is audited in this way to give details on what happened.
You can also configure your system to audit up to 26 additional POS operations. For any operation that is audited you can issue an Audit Report detailing how many operations of that type were executed by whom during a given session. If your system is configured to prompt for a "reference" on all audited transactions, the "reference" or reason for the operation will appear on the reports, as well.
The POS operations that can be audited are listed under Audit Trail in Station Configurations. At the top of the form is a checkbox that allows you to enable to disable the whole auditing process.
Enable Audit Trail- The audit trail provides tracking for sensitive POS operations such as price adjustments, 2 for 1 discounts, tax changes, and any action out of the norm. Check this option if you wish to audit one or more sensitive operations, then set the "Audit Trail Levels" below. Uncheck this option if you wish to disable the audit trail completely.
Audit Trail Levels- For the following options, click on the “+” sign on the left of the option to reveal choices of levels: The options are “No Audit”, “Audit”, and “Audit with Reference”. The last option will cause a prompt to appear at the POS to type in a message. The message will appear in the “Audit Trail” report found in the RM Reports module.
|
Price Adjust |
Change revenue center |
Transfer items |
Reprint Check |
Partial Settle |
|
Check Discount |
Change customer count |
Transfer check |
Guest settlement |
Refund |
|
2 for 1 discount |
Enter guest account # |
Change menu |
Void Settlement |
|
| Line Item Discount | Change tax table |
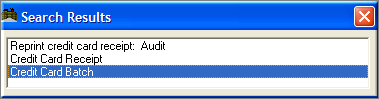
Reprint credit card receipt |
Recall Check |
|
| Item price level change | Change reference |
Un-split check |
Send to tabs | |
|
Split Check |
Revise Settlement |
Transfer tab to employee |
Group Discounts |
Consult the Restaurant Manager publication entitled “Reports User's Guide” for a detailed description and sample print out of the Audit Trail Report. To issue this report:
Your system automatically tracks all items that are deleted from an order after the order has been sent to the kitchen. You can configure your system to prompt for a line of text or a “reference” each time an item is deleted by checking the “Get Reason for Deletion” checkbox on the General POS Configurations.
If you plan to require a reason for deletions, it can save time to pre-define the most commonly repeated reasons in the Deletion Codes Setup Form. (Of course, you can still type in the unique particulars while processing the order)
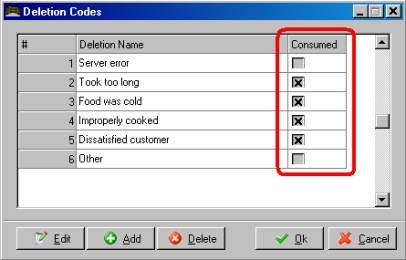
Use the [ADD] key to add blank lines to the setup form and simply type the phrases you wish to use in the column titled “Deletion Name”.
These reasons always appear in the order in which they are entered so you may wish to take some care to put the most common reasons first on the list or alphabetize the list.
During the course of operating your restaurant, you may need to delete items from customer’s checks. In some cases, the item was consumed or wasted, and in other cases, the item was not (i.e., can be sold at a later time).
Let’s say a customer orders a Filet and it is overcooked. If you decide to refund the price of the Filet by deleting it from the check, you want the reports to show that 1 Filet was sold, but the amount received was $0.00. In addition, if you are using the inventory control module, you want the inventory system to register that 1 Filet was removed from inventory.
On the other hand, if the server accidentally rings up a Filet by mistake and sends it to the kitchen, but he deletes it before it is put on the grill, then the Filet should NOT be removed from inventory and the reports should show 0 Filets sold.
To distinguish between items that are consumed versus those that are not, Restaurant Manager provides a setting in the “Deletion Codes” located in RM BackOffice >Setup > General .
For the types of deletions where the item (or items) are consumed or wasted, place a check mark in the “Consumed” field of the corresponding row.
Note: when using coupons use the "Reason for applying coupon" Setup Form located in RM BackOffice >Setup > General