(continued from Accounts Module (Guest Accounts))
Restaurant Manager allows you to define a variety of tax types:
You may configure default parameters that determine when different taxes apply to different sales. These parameters may be based on the:
Type of Item Sold- Certain taxes are based on the category (or “Group Type) of each item sold (ex. Menu Items categorized as “Food” may be taxed differently than Menu Items categorized as “Alcoholic Beverages”)
Type of Transaction- Certain taxes depend on the type of transaction or Revenue Center to which the transaction is assigned (ex. Transactions assigned to the “Carry Out” Revenue Center may be taxed at different rates than transactions assigned to the “Dine In” Revenue Center.)
Type of Customer-The person or entity making the purchase (ex. Diplomats and non-profit organizations with tax free status need not pay taxes on their purchases.)
Regardless of how these default parameters have been configured you may manually change the way a given transaction is taxed from the POS Module by:
Configuring your system to apply appropriate taxes to each transaction usually involves four different Setup Forms:
NOTE: If your system is configured with the Frequent Diner Module tax parameters may also be controlled from the setup form for this module.
The logic for taxing transactions works as follows: Every POS station on the system links transactions to a default Revenue Center. Each Revenue Center, in turn, links to a default Tax Table and each tax in the Tax Table is linked to appropriate items on the menu via the Group Types Setup Form.
For an example of how these various setup forms work together, see the section on Adding a New Tax.
In addition to configuring default tax parameters, you may also configure the BackOffice Module to:
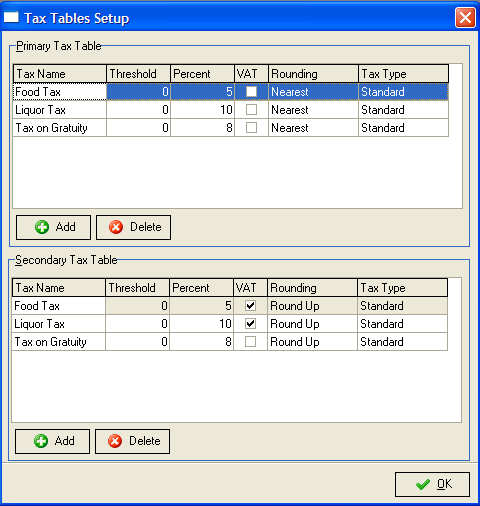
The Tax Table Setup form allows you to define both a Primary and a Secondary Tax Table. However, in most installations the Revenue Centers all link by default to a single “Primary” Tax Table and there is no need to define a Secondary Tax Table.
You can define up to five types of taxes in a Tax Table. Examples might include a 5% State Sales tax, a 1% City Sales Tax, an 8% State Liquor Tax, a 3% Grocery Tax, etc. Multiple taxes from a Tax Table may be applied to any given transaction, depending on the types of Menu Items being sold. You cannot, however, apply taxes from different Tax Tables to a single transaction. Use the Tax Tables Setup Form to define a Primary Tax Table:
You can define up to five different taxes in each Tax Table by using the following data entry columns:
Round up
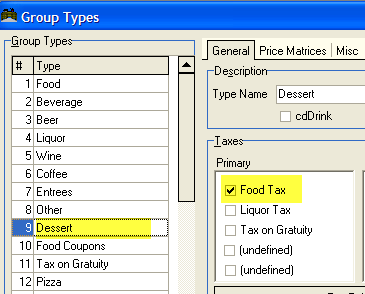
NOTE: After you define A Primary Tax Table with all the taxes that apply to sales in your locality, you must access the Group Types Setup Form in order to link the taxes to the items on your menu.
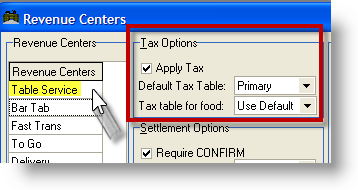
As noted above, Restaurant Manager links every POS transaction to a Revenue Center or “department”. The Revenue Centers, in turn, link to a Tax Table which defines the types of taxes applicable in that Revenue Center. By default all Revenue Centers link to the Primary Tax Table. If you wish to link some of your Revenue Centers to a Secondary Tax Table you must change the Default Tax Table on the Revenue Center Setup Form.
Using a Secondary Tax Table allows you to tax the same menu item at different tax rates that might apply to different types of transactions. For instance, in some localities, the Sales Tax applied to Carry Out sales is different than the rate applied on Eat-In sales. In this case you would need to define a tax called “Sales Tax” on both the Primary and the Secondary Tax Tables and enter the Eat-In tax rate in the Primary Tax Table and the Carry-Out Tax rate in the Secondary Tax Table. You would then need to create separate Revenue Centers for “Eat-In” and “Carry Out” sales and default to the Primary Tax Table for the first and the Secondary Tax Table for the second.
The Secondary Tax Table also allows you to use VAT taxes on selected transactions while applying standard sales taxes to other transactions. This is a popular configuration in bar / restaurants where drink prices in the bar often “include” tax when customers order drinks only. (See the section on “Smart Tax” for details on configuring your system to accommodate VAT taxes on selected transactions.)
IMPORTANT: The Primary and Secondary Tax Tables are completely independent of one another. You cannot apply taxes from these different tax tables to the same transaction.
Restaurant Manager defines the VAT (Value Added Tax) as a tax that is included in the sale price of a particular item. For instance if you define a beer with a price of $5.00 and link that beer to a 10% VAT tax, Restaurant Manager will bill the customer $5.00 and record the transaction as a $4.55 sale and a 45 cent tax. If the beer is priced at $5.00 and taxed with a standard 10% sales tax, Restaurant Manager will bill the customer $5.50 and record a sale of $5.00 and a tax of fifty cents.
There are VAT checkboxes alongside each tax in the Primary and Secondary tax tables that allow you to indicate whether the tax is a VAT or not. Restaurant Manager’s Smart Tax feature allows you to apply the VAT selectively.
NOTE: In addition to including tax within the sale price, Restaurant Manager™ gives you the option of processing transactions that include no tax at all, see Tax Free Sales.
To add a 5% sales tax to food and an 8% sales tax to alcohol when ringing up sales at the POS Station(s) on the dining room floor:
- Highlight the first Group Type to which the new tax should be applied.
- Click on the new tax name in the list of Primary Taxes.
- Repeat steps all Group Types to which the new tax applies.
NOTE: If your system is configured with a Secondary Tax Table you should define the new tax on this this tax table, too, before linking the taxes to menu items via the Group Types Setup Form.
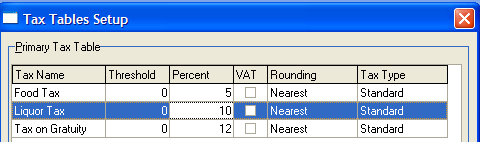
To change the rate of a particular tax:
Warning: It is highly recommended you change taxes before business hours
To determine the tax (es) that will be applied to the sale of a particular Menu Item:

If your system is configured with VAT taxes you may wish to adjust the layout of guest checks and receipts. By default the guest check is configured to print tax totals under a sub-total.
There are various Setup Forms in the BackOffice Module that can be used to configure the processing of tax free sales:
- Some businesses wish to report separately on all their tax free sales. The easiest way to do this is to create a special Revenue Center called “Tax Free Sales” and then manually assign sales to this Revenue Center from the POS Module each time you process a tax free transaction.
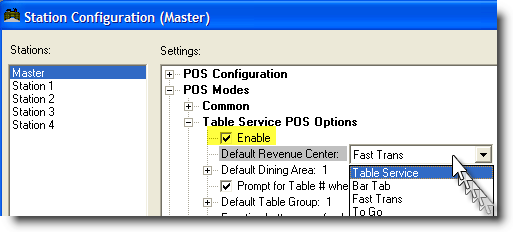
- Some localities do not tax certain types of transactions, such as Carry-Out transactions. To make sure transactions of this type are never taxed, you must create a Revenue Center where taxes are not applied and then configure the system to prompt for the appropriate Revenue Center at the beginning or end of each transaction. Alternatively, if one or more POS stations are normally dedicated to processing transactions that should be tax free you may use the POS Modes section of the Station Configuration Set-up Form to set a tax free Revenue Center as the default for these particular POS stations.
Some restaurants that operate both a bar and a dining room choose to use different types of taxes in the bar than they use in the dining room. They generally apply VAT Taxes to drinks ordered in the bar and apply standard Sales Taxes in the dining room. But when customers in the bar order food, the business may wish to apply standard Sales Taxes in the bar, as well.
Restaurant Manager’s Smart Tax feature identifies bar transactions that include food and automatically switches between the “Primary” and “Secondary” tax table when food is added to a bar order.
The Smart Tax feature is activated when you enter a Tax Table in the field labeled “Tax Table for Food” on the Revenue Center Form. However to fully configure the Smart Tax feature you must access three different setup forms:
Tax Tables- Access the Tax Table Setup form and create both a Primary and a Secondary Tax Table that each includes all of the taxes applicable in your locality. The tax names and tax rates should be the same in both Tax Tables. However, the VAT check boxes should only be activated for the taxes on one of the Tax Tables, usually the Secondary Tax Table.
Revenue Centers- Decide which Revenue Center will be the default used at each of the POS stations in the bar and access this Revenue Center on the Revenue Center Setup Form. Make sure the field labeled [Default Tax Table] displays the Tax Table where the VAT checkboxes were activated, usually the Secondary Tax Table. Then access the field labeled [Tax Table for Use with Food> and enter the other Tax Table, usually the Primary Tax Table.
Group Types- Decide which menu items are considered to be “food” and then use the Group Types Setup Form to define them as such. When you access the form, highlight each Group Type that is used to categorize food items and click on the “Food” checkbox.
To disable the Smart Tax feature for given revenue center, simply set the field labeled “Tax Table for Food” to “Use Default.”
NOTE: When you open a POS order that is linked to a Revenue Center where Smart Tax is enabled, the tax table cannot be changed manually. To change the Tax Table in this situation you must first switch to a Revenue Center where Smart Tax is not enabled.
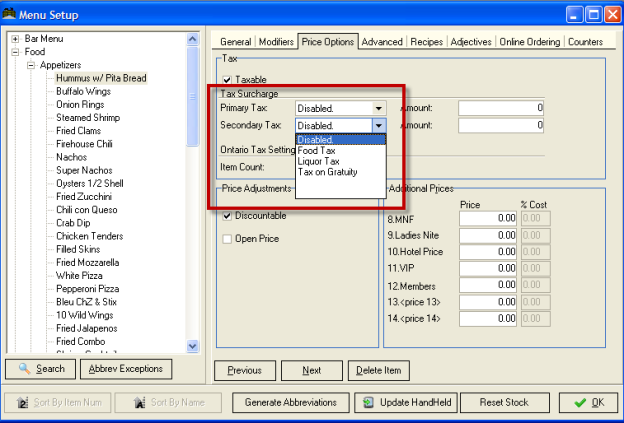
Some localities levy a tax based on the alcoholic content of certain beverages. For example, some areas might charge a 10 cent surcharge per ounce of alcohol content. In these situations, a standard percentage tax based on the selling price of the beverage cannot be used; instead a fixed tax surcharge must be applied to the sale.
Fixed Tax Surcharges can be linked to specific Menu Items or Modifier Items. If the bar menu is configured with modifier pop-up screens for selecting between brands of liquor it is recommended that you add the fixed tax surcharges to these modifier items.
You must use three different Setup Forms to configure your system to apply Fixed Tax Surcharges:
To define the name of the Fixed Tax Surcharge:
To link this new tax to specific types of Menu Items:
To update an existing menu with the specific amount of the Fixed Tax Surcharge:
Most localities tax revenue generated from cover charges and gratuities and banked by “the house”. You can configure your Restaurant Manager system to track this income as sales revenue and then calculate the taxes owed on these earnings.
Configuring your system to track and calculate tax on cover charges and basic gratuities involves three different Setup Forms:
If the tax applied to food sales is the same as the tax applied to gratuity earnings you need not access the Tax Table Setup Form. However, if gratuity earnings are taxed at a different rate than other sales revenue, you must create a new tax type to apply to the gratuity earnings:
To create a Group Type category for tracking gratuity income as sales revenue:
To configure the system to account for gratuity earnings as taxable income:
Special Gratuities are setup differently. Detailed Instructions can be found under the topic: Special Gratuities Setup Form
The following options will have a bearing on how taxes are calculated determined by the function being used or how the function may be recorded on various reports or sales receipts. Some of these functions may not apply to your business. Use the [Search settings button to find options on the Station Configuration Form.
For example, if a check is $100.00 and discounted 20% to $80.00, the system will use $80.00 when computing the tax. Also, whenever a price adjustment is made, or a 2 for 1 discount or line item discount is applied, the system will use the “final” price of the item when performing tax computations. For example, if an item is $12.95, and the price is changed either via a price adjustment or line item discount or 2 for 1 discount, the system will use the new price when computing the tax.
If the option to “Use discounted prices when computing tax” is UN-checked, the system will always use the original item prices when computing tax. In the examples of the previous paragraph, in the $100.00 check that is discounted to $80.00, the system will use $100.00 to compute tax. Also, when computing tax for the $12.95 item, the system will use $12.95 as the price basis regardless of the final price of the item.
Restaurant Manager is capable of handling GST and PST tax for the province of Ontario, Canada. This includes special casing for beverages, prepared food, and baked goods.
Configuring Restaurant Manager to handle Ontario taxes requires a few additional steps over and above the normal tax set up procedures. Read above for a full description of tax set up. The succeeding sections only describe the additional steps required for taxes in Ontario, Canada.
The information contained herein is subject to change and may or may not apply to other jurisdictions in Canada. Consult your local tax authority for verification and updates.
Ontario has two taxes: a Goods and Services Tax (GST) and a Provincial Tax (PST). Taxes are applied differently depending on the type of goods sold. There are 5 categories for types of goods. The following table lists the 5 categories and their corresponding tax rates as of December 4, 2000.
|
|
GST Tax |
GST Threshold |
PST Tax |
PST Threshold |
|
Soft Drinks |
7% |
0.00 |
8% |
4.01 |
|
Baked Goods |
7% |
0.00 |
8% |
4.01 |
|
Prepared Foods |
7% |
0.00 |
8% |
4.01 |
|
Alcohol |
7% |
0.00 |
10% |
0.00 |
|
Retail |
7% |
0.00 |
8% |
4.01 |
There are two special exceptions that apply to GST and PST. They are described below:
Exception 1: Baked Goods
Whenever the quantity of baked goods is greater than 5 (regardless of the price), neither GST nor PST tax is applied to the baked goods. The price of the baked goods, however, still applies toward meeting the 4.01 threshold and does affect whether PST is applied to the Soft Drinks and Prepared Foods.
Exception 2: Soft Drinks
When a transaction is less than the PST threshold and the transaction consists of soft drinks only (i.e., no Baked Goods or Prepared Foods), then PST tax applies even though the threshold is not met.
To handle all the Ontario tax requirements, you must set up 4 taxes in Restaurant Manager™ – 1 GST tax and 3 PST taxes (Setup->Settlement->Tax Tables):
|
|
Percentage |
Threshold |
Tax Type |
|
GST |
7% |
4.01 |
Canadian GST |
|
PST Food |
8% |
4.01 |
Canadian PST |
|
PST Retail |
8% |
4.01 |
Standard |
|
PST Liquor |
10% |
0.00 |
Standard |
A separate Retail PST is required because it does not count towards the 4.01 threshold applied to food and beverage items. A separate Liquor PST is required because it must appear separately on the guest check and has a different percentage than the others. The “Tax Type” for PST Liquor and PST Retail should both be set to “Standard” because the special exceptions for Baked Goods and Soft Drinks do not apply.
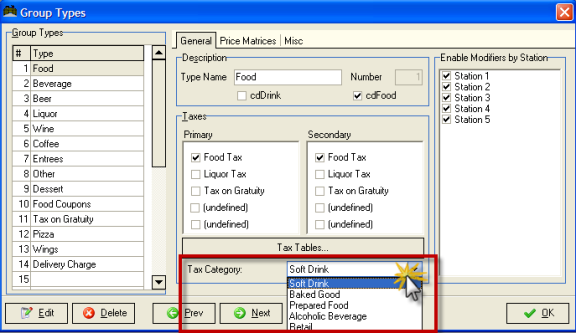
In addition to the above, you must define tax categories for each “Group Type” in Restaurant Manager™ (Setup->Menu->Group Types). For each group type, select a tax category from the drop down list (see screen shot below). Also on the “Group Types” setup screen, apply GST tax to everything, but only apply one of the three PST taxes as appropriate.
When processing sales in the POS Module there are various ways to override the tax defaults defined in the BackOffice Module. In other words from the POS Module you can manually change how taxes are applied to any given transaction.
You can use the Taxable Function Button to process tax-free transactions:

If you have defined a special Revenue Center for tax free transactions, you may use the Revenue Centers Function Button to switch to this tax free Revenue Center:
**NOTE: You can configure your system so the POS Function Buttons mentioned above appear at the base of the Order Entry Screen rather than on the secondary screen accessed by touching the [MISC] button. Use the POS Function Buttons Layout Screen to select where various Function Buttons should be displayed.
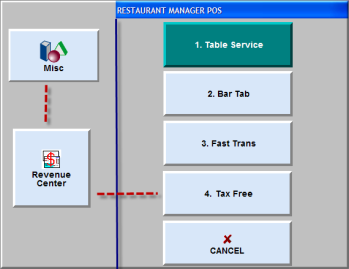
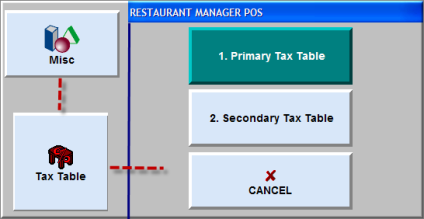
If your system is configured with both a Primary and a Secondary Tax Table you can switch between them on any given transaction using the Tax Table Function Button (as long as the Smart Tax feature was not enabled when you opened the order):
You may also change the Revenue Center to which a transaction is linked. When you select a Revenue Center that uses a different Tax Table than the default Revenue Center, the taxes applied to the transaction will automatically change along with the Revenue Center, itself.