(continued from Payments Settlement)
ASI has designed the in-house accounts module to be flexible, providing a number of setup options to fine tune the way accounts are issued and used. Up to 99 account types can be defined in the guest account module and almost an infinite number of accounts can be added. The accounts module can be used for almost any purposes where you will allow a customer to charge, issue credit, or debit an account (gift card).
The accounts module allows for security in both issuing and redemption of accounts. You can also configure your system to mask account numbers or force using a card with a magnetic stripe.
Restaurant Manager uses “account types” to distinguish between different sets of accounts. The functionality of each Account Type (and the individual accounts it holds) is determined through the different options settings programmed in the BackOffice Accounts module. For example, a “Gift Certificates” account type can be programmed to print a voucher on a designated printer when issuing the gift certificate. The list below offers the different types of account types that can be used with the Guest Account Module:
Following are guidelines on configuring the Accounts module for common account types.
Special mention should be made to debit account types. A debit account type is where a customer pre-pays in advance. This includes Gift Card, Gift certificates, and other pre-paid type of accounts. Restaurant Manager does not recognize the creation of these accounts at the POS as a sale: Restaurant Manger does record these accounts when it is created. In fact, a “No Sale” display screen will appear when issuing a debit account type (e.g. Gift Card) at the POS on transaction where the issuing a new account is the only transaction. Restaurant Manager employees the standard accounting practices of debiting the account which will appear as a negative dollar amount. If time the account holder using his account a positive dollar amount is applied until the balance has been reached in full.
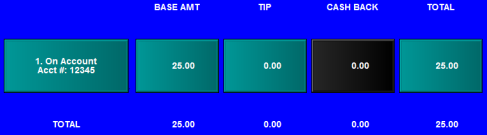
An example would be a cashier is issuing a new Gift Card at the POS for $50. The amount on the settlement screen will appear as a negative. The payment method will appear as a positive. (See below illustration).
Issuing Gift Card
![]()
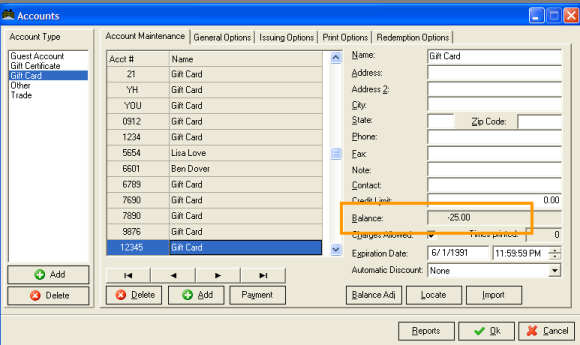
On another visit, if the account holder uses just $25 to pay for their guest check. The new balance amount will be negative $25(credited). However, to avoid confusion, Restaurant Manager will show the balance and the amount being applied as a positive at the POS.
Redeeming Gift Card
The Account Setup form will display the balance as a negative. (See next image)
It is important to understand how accounts are report on the Server Revenue Report. The report itself is meant a snap shot of server’s sales for a session used for balancing when doing server banking. At top of the revenue report the is a section the displays Payment Data, The On Account line will merge all account transactions using both accounts redeemed and accounts debited (sold or payments made at POS). Separate transactions are listed below on the “Detailed Order Listing” section.
In the illustration below, we have a sample of Revenue Report with the two different sections. In the Detailed Order section, you can see we redeemed an On Account form of payment. Below this transaction we also sold a Gift Card for $50 and used cash to pay for it. The difference between the two transactions is $2.40, which is reflected on the On Account payment line in the Payment Detail section. Restaurant Manager uses standard accounting practices when calculating this total. Note: the cash due reflects the cash used for the payment of the Gift Card. It is suggested that you enable the Detail Order Listing option on the Server Report in the Station Configuration.

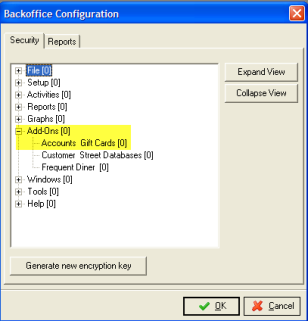
To access the Accounts Module, open the RM BackOffice program and select [Accounts & Gift Cards] under the Add-ons menu option. The Accounts module main form will appear.

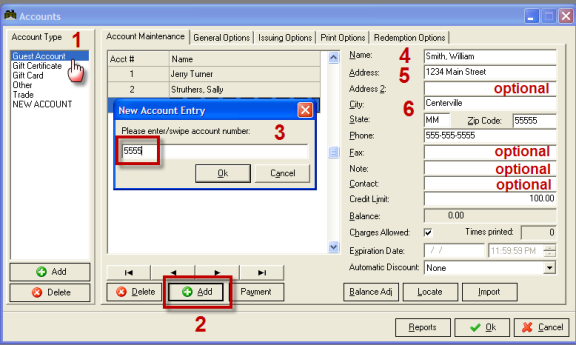
On the left is a list of the Account Types defined. You can add or delete Account Types by use of the buttons at the bottom of the list. You select an Account Type by clicking on the account type of interest. The individual accounts listed under the Account Maintenance tab is filtered according to the Account Type selected (highlighted.) The setup option tabs are also tied to the currently selected Account Type, allowing you to individually tailor the functionality of each Account Type.
The fields for each account type on this setup form are organized under five tabs:
Important: make sure you have checked all security levels under the redemption tab. The security level should be equal only to the job class who will allow these operations (i.e. general manager/ owner). Example: A security level of “0” on the option “Security level for credit limit over ride” will allow all employees to over ride approved balances.
In addition, you have six more options under the “Account Maintenance” tab.
Note: To maintain backward compatibility the first account type is reserved for Guest Accounts and may not be deleted.
You may also restrict access to the Guest Account module in the RM BackOffice by going to Setup > BackOffice > [Administrator password] > Security Tab > Add-ons and add a security level to the Accounts Gift Card option.
By default Restaurant Manager comes with four Account Types. You may add, delete, or rename accounts. Use the "Delete" button to remove existing account types. Account types can only be deleted in order or in other words you can only delete the last account type. In the example below, a message appears when trying to delete the “Other” account type:

You can change the description of an account type by selecting the account type listed on the far left column and then click on the General Options tab. Enter the new name in the description column.
Use the [Add] button at the bottom of the Account Type list column to add a new account type. Clicking the [Add] button will automatically bring you to the “General Options’ tab where you can type in the name in the description field. From there you can enter the remaining account parameters under the other tabs.
The first account type in the Accounts module is preset to handle Guest Accounts. Guest Accounts allows you to create in-house charge accounts and post any transaction to any existing account.
Guest Accounts should be used like an accounts receivable package to track purchases and payments for each guest account. It includes reporting capabilities and generates invoices that cover any billing period you define.
NOTE: If you allow customers to settle their account balance at the POS Stations, you should also create a “Guest Account Payment” category on the Paid In Setup Form and activate the Paid In Receipt feature so that you can manually write the Guest Account number on the Paid In receipt when payment is made.
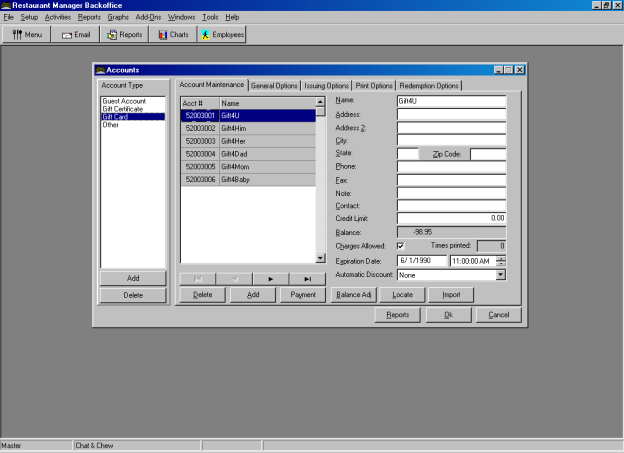
Transactions are posted to Guest Accounts from the POS Module but the accounts, themselves, are set up and managed from the Guest Accounts Setup Form:
Guest Accounts can be identified with any sequence of up to 10 characters. Thus, you can create an account number (or “code”) that begins with the current year or the first four letters of the customer’s last name, etc.
Existing Guest Accounts are listed in sequence on the left of the Guest Account Setup Form. The account codes are sorted first on number, then letter, and then on other special characters like dashes or spaces. Thus, 1234 comes before 98-001 which comes before A1234 which comes before SMIT-001.
The first step in adding a new Guest Account is assigning this Guest Account code.
NOTE: If you are not using any special codes to identify the Guest Accounts, but rather wish simply to number the accounts in sequence, you should scroll to the bottom of the Guest Account List and note the last code number on screen before pressing the "ADD" button to create a new Guest Account.
To add a new account, first select the account type that you wish the account to belong to. Next, click on the [ADD] button at the Account Maintenance screen base of the screen (do not confuse with the Add button on Account Type column). You will receive a “New Account Entry” prompt where you enter the new account number. Type in any sequence of up to ten characters in the account number field and press [OK] when finished.
Assuming we are creating a guest account, type the customer’s name in the [NAME] field. (It is recommended that you use the following format: [Last Name], [First Name], [M.I.])
You can either use your mouse or press [TAB] on the keyboard to move through the fields on this form entering all relevant information. (NOTE: The [PHONE] field holds only 12 characters so you must NOT USE parentheses when entering the area code.)
Click on the [Balance Adjust] button if you wish to create a starting balance for the account.
Caution should be used when doing split payments to multiple accounts. If the accounts have different discount rates, the rate of the last account will override the others. When automatic discounts are used, ASI recommends against doing split payments involving multiple accounts to avoid confusion in the discount rate.
Automatic discounts do not work with the on-line club interface (TAI interface).
The following is a description of the other field option located under the tabs selections for an account type. The field settings are universal and are applicable to all accounts under the account type.
Note: some local laws consider the unused balances of gift cards/certificates at the end of the expiration date to taxable income
Warning: Special care should be taken NOT to enable automatic numbering of guest accounts. If automatic numbering is enabled, you will not be able to make payments into existing accounts.
Most of the options under the tab are used primarily for Gift Certificates
Important: make sure you have checked all security levels under the redemption tab. The security level should be equal only to the job class who will allow these operations (i.e. general manager/ owner). Example: A security level of “0” on the option “Security level for credit limit over ride” will allow all employees to over ride approved balances.
To edit information in an existing Guest Account:
Click on the Add-Ons drop down menu and select the “Guest Accounts” option to call up the Guest Accounts Setup Form.
Scroll through the list on the left of the screen to locate the appropriate Guest Account Number OR click on the [LOCATE] button to locate a particular customer by name.
Type in the new information you wish to record and press the [OK] button located at the bottom of the form when finished.
NOTE: If you wish to record a payment or change the account balance, you must press the appropriate button at the base of the screen as described below.
If you wish to locate a particular Guest Account Number, simply scroll through the accounts displayed on the left of the Guest Accounts Setup Form until you see the account you wish to work with. If you wish to locate a particular customer by name: Press the [LOCATE] button at the base of the Guest Accounts Setup Form to call up the Locate Dialogue Box.
Type in the first or last name you wish to locate and press [OK]. Type the customer/account name that best matches the name you entered will appear on screen.
Click the [YES] button if the information displayed corresponds to the account you wish to locate or click on the [NO] button to find the next closest match to the information you typed into the Locate Dialogue Box. Notice in the illustration below that we type in a “J”. The all the accounts with a “j” in the name are displayed in the background.

To record payments and post them to an account:
Locate the account to which you wish to post a payment as described as described above: Locating an Account.
When the account is highlighted on the Account Maintenance tab list, click on the [Payment] button at the base of the screen. Enter the payment amount and click on the [OK] button. You have an option to enter in a note that will appear on the Account Detail Report. If processing several accounts at once, you can continue the process by entering in a new account number in Acct # field.
![]()
Account balances are automatically adjusted every time a transaction is posted to an account and every time a payment is recorded. However, there may be a need to adjust account balances (e.g. transaction posted to wrong account)
First you must locate the account you wish to adjust. When the account is highlighted on the Account Maintenance tab list, click on the [Balance Adj] button at the base of the screen. Enter the new amount and click on the [OK] button. You have an option to enter in a note that will appear on the Account Detail Report.
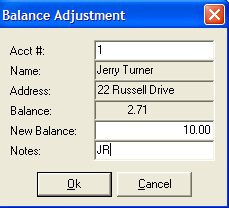
NOTE: For accurate record keeping, it is highly recommended that you note the initials of the person making the adjustment and the reason for the adjustment
Restaurant Manager only allows deletion of accounts with zero balances. If you wish to deny further charge privileges to a particular account you can uncheck the mark in the Charges Allowed field. You must set an account balance to zero in order to delete it. To delete an existing account: First you must locate the account you wish to delete. When the account is highlighted on the Account Maintenance tab list, click on the [Delete] button at the base of the tab.
Restaurant Manager can issue invoices for any period within the current year. Invoices can be printed either from the RM Reports module or within the Accounts Setup form. More information on using the report module can be found in the document: RM Reports Guide. To issue account invoices from the Accounts setup form follow these steps:
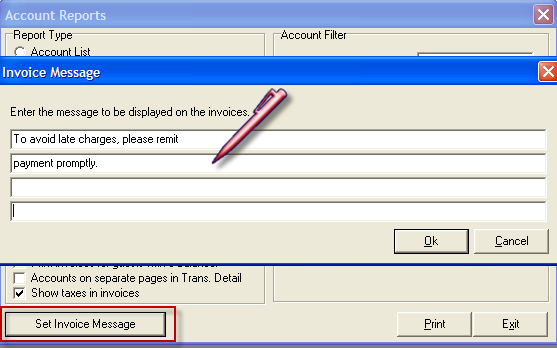
If you wish to print a special message on the invoice, click on the “Set Invoice Message” button at the bottom of the Account reports form and type in up to four lines of text. (The Invoice Message appears on the upper left-hand side of the invoice.)
There are several station configuration options you may need to apply:
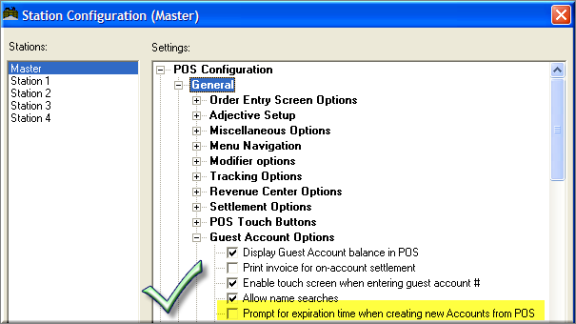
Display Guest Account balance in POS- This option determines whether guest account balances are displayed in the POS program. If disabled, then only account names are displayed. If enabled, the account balance will appear when confirming account at redemption and when selecting the [Acct #] function button in the MISC options of the Order Entry screen and the [Account Info] function button in the MISC options of the Main Status screen.
Print invoice for on account settlement- Automatically prints an invoice when settling on account
Enable touch screen when entering guest account #- This option determines whether the touch screen is active when entering a guest account number. If this option is checked, then an alphanumeric keypad is displayed on screen to allow the user to enter a guest account number using the touch screen. If this option is unchecked, the system will display a message asking the user to swipe a card. In either case, swiped cards, or keyboard entries are always accepted. This option affects all account types including gift cards and gift certificates.
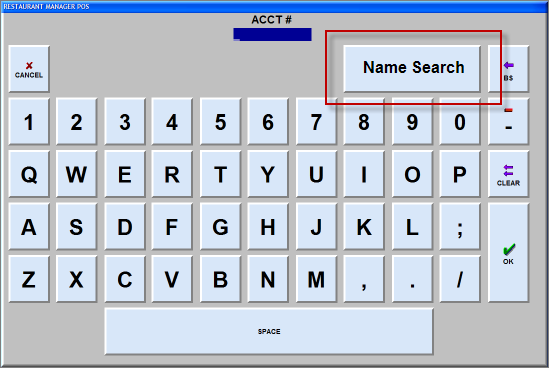
Allow name searches- Enable this option to allow searching for guest accounts by name. A "Name Search" button is displayed when the system prompts for account number entry. If this option is not checked, the "Name search" button does not appear.
Prompt for expiration time when creating new account from POS- Enable this option if you wish to prompt for expiration TIME (as well as DATE) when creating a new account from POS. If left unchecked, it will only prompt for the DATE. Note: you must also check the option to "Prompt for expiration date" in Accounts setup under "Issuing Options."
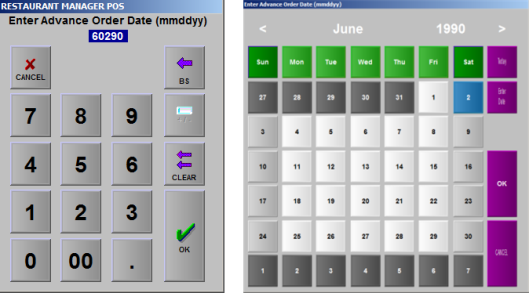
Pop- Up Calendar- You may want to enable this station configuration if you rather have a Pop Calendar dialog box appear on screen (right side of image below. If disabled, a standard keypad will appear for date entry (left side of image below)
Require confirm when selecting date on calendar- When a user clicks on a date on the pop-up calendar, enabling this option forces the user to click on the 'Ok' button before actually selecting the date.
Note: the calendar option affects other date related functions such as Advanced Orders.
Following are suggestions on how to configure the Accounts options for use with Gift Certificates. The sub-titles mirror the descriptions on the setup tabs in the Accounts module.
First, you will have to create a new Account Type to handle Gift Certificates. To create a new Gift Certificate Account, click on the [ADD] button. The NEW ACCOUNT type is appended to the list box showing all the Account Types.
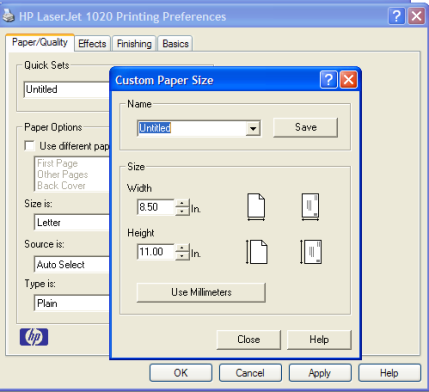
Go to the printer properties on the local machine and set the paper size parameters in the Printing Preferences. You will also want to set the feed source as manual.
You can access the template editor by selecting the “Pint Options” tab on the Accounts Setup form. You will need to enable the “Print Voucher” setting to activate the other fields in this tab. You will probably want to select the Primary Output printer before getting started with the editing templates. Click on the arrow next to the Primary Output Printer field and select the printer you will be using.
The Template Editor allows you to select and layout the information printed on Gift Certificates. The paper used to print gift certificates can be any size supported by your printer. However, in most cases you will use standard pre-printed gift certificate forms. These come on letter sized paper, 3 to a page (8.5” by 3.66”) and are perforated to allow easy separation of each certificate. To use them with Restaurant Manager, you must first separate the Gift Certificates along the perforations so that they can be fed to the printer one at a time, just as you would with envelopes.
You can select one of the three available template pre-loaded in the RMWIN folder. Click on the [Select Template] button. The available templates are:
To launch the Template Editor, click on the "Design Template" button under the Print Options tab. The screen below will appear:
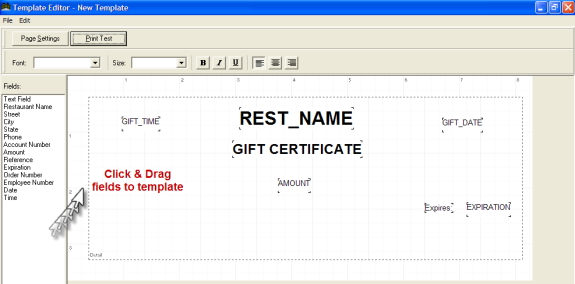
The list on the left contains the printable variables for the gift certificate.
You can test the template settings by using the [Print Test] option at the top of the template form. You can also set the page settings for the test in the [Page Settings] function also located at the top of the form.
In a typical configuration, a laser or ink jet printer will be used to print gift certificates. This printer will be connected to one of the computers on the network. If you wish to issue gift certificates from multiple stations, you must share the printer so that it may be accessed from those stations. Also, since the Accounts module does not provide for saving specific printer settings (tray to use, paper size, etc.) we recommend you define a printer specifically for use with gift certificates (“GCPrt”, say). You should keep the name of the printer to 8 characters or less to avoid sharing problems associated with long printer names.
Once you have configured the Accounts Module to handle Gift Certificates, you can perform all Gift Certificate handling from the POS.
To issue a Gift Certificate:
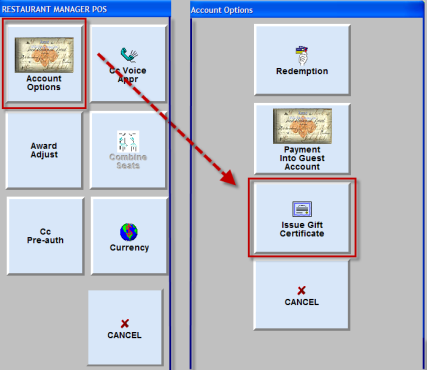

At this point a screen showing a summary of the Gift Certificate settings appears:
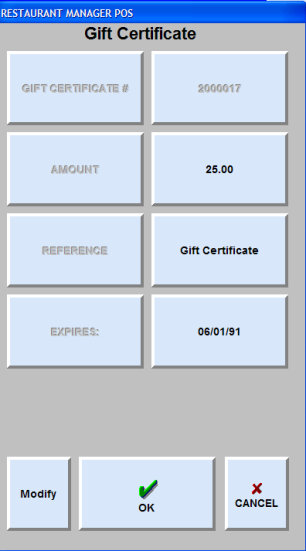
By selecting the “Modify” button you can change any of the previously entered settings. Otherwise select the OK button to continue issuing the Gift Certificate.
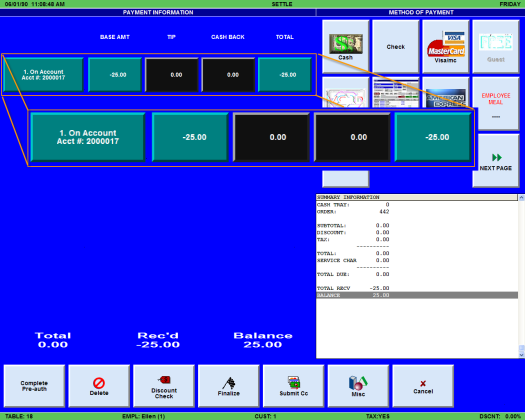
On selecting OK, Restaurant Manager automatically applies the credit amount to the newly created Gift Certificate account as a negative On Account form of payment entry (see screen below).
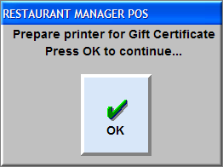
After finalizing the order a prompt will appear allowing you time to prepare the Gift Certificate for the printer. Hit the [OK] button when you are ready to print the certificate.
The following sections outline the steps to issue and redeem a gift card or certificate. The steps outlined use examples for a typical setup. The prompts for either a gift card or certificate may vary depending how you have configured each account in the Accounts Setup Form, station configuration, and the POS Function Button Layout Form.
There are two ways to issue or add to the balance (increment) of a gift card at the POS. One is using the legacy method of opening an order and accessing the Account Option is the Settlement screen. This is ideal for adding a Gift Certificate to an existing order. The other method is Issue/Incremental function button at the POS. The "Issue /Incr GC" function button can be used to issue or increment a gift card from the Module main status screen (i.e. Table Module) of from within an open order. The advantage to this function it streamlines the process without the use of macros.
Note: Gift cards created from a Module's Main Status screen are processed using Fast Transactions.
Gift card prompts and behavior using the Issue/Incremental function are configured in the Account Module. Please refer to the instructions outlined in the previous section" Managing Account Types." for setup. You will still need to add the "Issue/Incr GC" function button to both the Main Status and Order Entry screens. Adding the function button is performed within the POS Function Button Layout screen. You can either add the "Issue/Incr GC" function button to the main Function button row if you intend to use this function on a frequent basis or to the Misc option screen for infrequent use. You will also want to add the "Issue/Incr GC" function button to the main Function button row in the Settle screen if you want to add multiple gifts card purchases to an guest check.
To issue a Gift Card to an existing order:
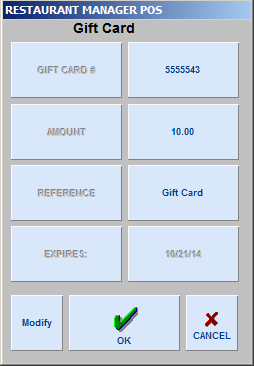
At this point a screen showing a summary of the Gift Card settings appears:
By selecting the “Modify” button you can change any of the previously entered settings. Otherwise, select the "Ok" button to continue issuing the Gift Card.
On selecting "OK", Restaurant Manager automatically applies the credit amount to the newly created Gift Card account as a negative On Account form of payment entry (see screen below).
If you are adding a gift card to an existing with menu items on the order, proceed with adding a payment (next step) or hit the "Cancel" button to exit the Settlement screen if you plan on adding more menu items.
You can create a new order and add a gift card a module's Main Status screen using the "Issue/Incr GC" function. This method is used when a customer just wants to purchase gift card(s) or to increment a balance. To issue a Gift Card from the main Status screen:
At this point a screen showing a summary of the Gift Card settings appears:
By selecting the “Modify” button you can change any of the previously entered settings. Otherwise select the OK button to continue issuing the Gift Card.
On selecting "OK", Restaurant Manager automatically applies the credit amount to the newly created Gift Card account as a negative On Account form of payment entry (see screen below).
At this point you can continue to add more Gift Card to the check (using the "Issue/Incr GC" if added to Settlement screen) or proceed to settle the order (next step).
To issue a Gift Card to an existing order using the legacy method:
At this point a screen showing a summary of the Gift Card settings appears:
By selecting the “Modify” button you can change any of the previously entered settings. Otherwise, select the "Ok" button to continue issuing the Gift Card.
On selecting "OK", Restaurant Manager automatically applies the credit amount to the newly created Gift Card account as a negative On Account form of payment entry (see screen below).
If you are adding a gift card to an existing with menu items on the order, proceed with adding a payment (next step) or hit the "Cancel" button to exit the Settlement screen if you plan on adding more menu items.
To redeem a gift card/certificate:


On entering the gift certificate account dollar amount, the main settlement screen will return, showing an “On Account” form of payment that corresponds to the redeemed gift certificate. At this point you can add other forms of payment if required to complete the settlement (split payment), or select the “Finalize” button to complete the settlement.

First, you will have to create a new Account Type to handle Prepaid Account. To create a new Prepaid Account, click on the [ADD] button. The NEW ACCOUNT type is appended to the list box showing all the Account Types.
Most of the configuration options are identical to those set under Guest Accounts. Only the options that are set differently are documented below.
The options used under the Account Maintenance will be the same for Gift Cards. However, you will want use the Credit Limit field to place a dollar maximum amount for allowed charges.
Same procedure described under Gift Card/Certificates.
Issuing Prepaid Cards is essentially the same as issuing Gift Certificates, save for the way the account number is entered (by swiping the card through the Magnetic Stripe Reader), and the elimination of the certificate printing.
To redeem a gift card:
RM provides the ability to specify an expiration date and time for any account. Since gift cards and gift certificates are implemented as accounts, they too can be programmed to expire at an exact date and time.
If you create new accounts (i.e., issue gift cards and/or gift certificates) from POS and you wish to specify an expiration date/time, then you must check the option “Prompt for expiration date” in RM BackOffice >Add- Ons->Accounts & Gift Cards. This option is under the “Issuing Options” tab. With this option checked, the POS will prompt for an expiration date when issuing a gift card or gift certificate.
Note: If “Prompt for expiration date” under “Issuing Options” tab is grayed out, click General Options tab and check the box “Enable expiration dates.”
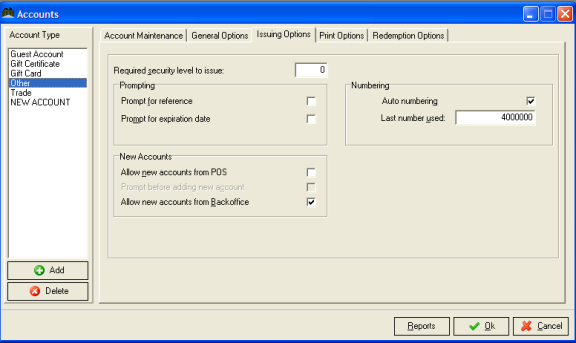
If you wish to prompt for an expiration time in addition to the date, then you must check the option “Prompt for expiration time when creating new Accounts from POS,” located under RM BackOffice->Setup->Station Configuration.
With this option checked, the POS will prompt for an expiration time immediately after prompting for the date. If you do not check this option, then the expiration time is assumed to be 23:59:59 (the end of the expiration date).
You may view and/or modify the expiration date / time from RM BackOffice->Add-Ons->Accounts & Gift Cards, under the “Account Maintenance” tab.
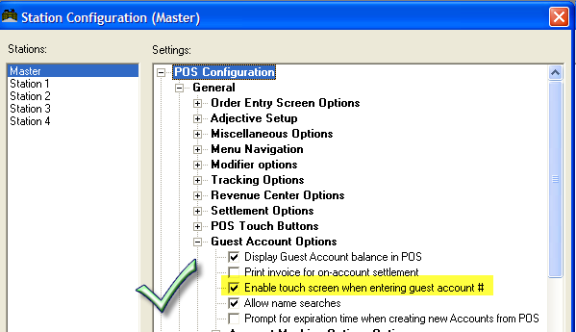
If you issue gift cards, or if your guest accounts are issued magnetic cards with their account number, you may choose to disable the touch screen when entering the account number. This forces the user to swipe a card, rather than use the touch screen to enter the account number.
This option is provided for protection against employee fraud. If an employee knows a valid gift card number or account number (or if they correctly guess a valid number at random), they can easily settle to that account by choosing “On Account” payment type. If a transaction is paid for in cash, the employee can thus settle using “On Account” and pocket the cash.
To prevent this from happening, go to RM BackOffice->Setup->Station Configuration, and uncheck the option “Enable Touch Screen on Guest Accounts.”
You can issue reports on all existing Guest Accounts from the Guest Account Report Setup Form and from the RM Reports Module. More information on using the report module can be found in the document: Reports User's Guide.
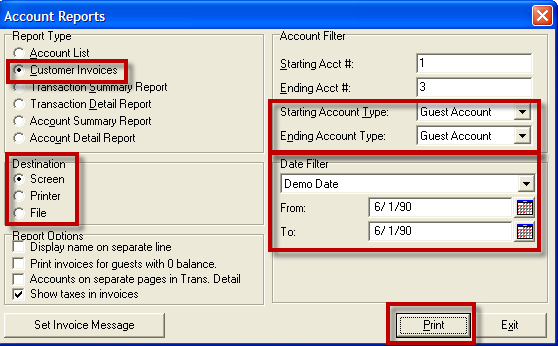
The Account Report form can be accessed by the [Reports] button located at the bottom of the Accounts Setup form. This The Account Report form is organized into four sections:

This section lists a selection of reports to issue. Below is a list and a brief sample of the reports.
Account List Report- Lists Customer name, account type, Address, City, State, Zip Code and Current balance

Customer Invoices Report- Print all relevant customer information for billing purposes. See Sample Invoice.
Transaction Summary Report- Lists a summary of individual transactions including date, time of transactions. Also shown is Account number, account type, name, POS order number, amount of transaction, balances, and notes entered.

Transaction Detail Report- This report lists individual transaction details including date, time, order number, where the transaction was posted and any menu items associated with the transaction (if posted at the POS). The report will list transactions in the order they were posted.

Account Summary Report- Report summarizes general information by account type.
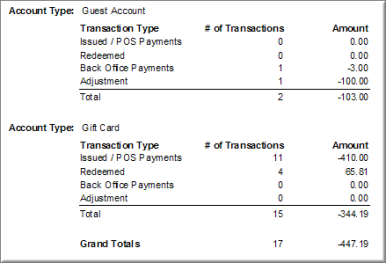
Account Detailed Report- This report lists a per transaction summary of general information broke down by Account Type

NOTE: More examples of each report type appear in the “Overview of Reporting Capabilities” booklet.
Click on the check boxes in this section to indicate whether you wish to send the report to the printer, the screen or save it to file. If you wish to view an account transaction history, you should issue the Detailed Report to Screen.
This section contains options affecting the information printed on reports.
Use the fields in this section to filter the accounts that are included in the report. Reports can be filtered on the macro level by using the Starting and Ending Account Type filters. Click on the arrow down functions next to the fields to select the account type range sequenced.
Click on the down arrow beside the date filter field to select any date range within a given year. If you select the “Set Manually” option, you must type the desired date range in the date fields. If you wish to print invoices for a subset of the existing accounts, type the appropriate range of accounts using the Starting and Ending Acct # fields in the Account Filter section.
If you have information on existing Guest Accounts in another software package, you can import that information into your Guest Accounts Module. To do so, you must first export the existing data in ASCII format. Then, to import the ASCII data into Restaurant Manager:

NOTE: Importing a Guest Account file will overwrite any guest account information that has already been recorded in the Guest Account Module. It is recommended that you import data only when setting up a new system.
ASI Centralized Gift Card Interface is ideally suited for multi-location businesses, allowing you to issue gift cards that are redeemable from any location. All gift transaction activity is available online at http://www.rmgiftcards.com, by use of an assigned user name and password.
Setup instructions can be found on the ASI website on the Dealer’s Tech Support page: Centralized Gift Card Dealer Manual. User instructions can be found on the same page: RM Centralized Gift Card Users Manual
The Gift Card interface forms part of ASI’s credit card interface program, RMCCWIN.
For information on how to setup centralized gift cards see the Restaurant Manager’s Installation Guide.
To view the remaining balance on a gift card, press MISC from the main POS screen, and choose the option "Gift Card Balance". The system will prompt you to enter the gift card number, or swipe a gift card. The gift card balance will then be displayed on screen. Note- this option applies to on-line gift cards only.