(continued from Session Management)
The basic Restaurant Manager application includes interfaces to standard hardware devices such as printers, cash drawers and magnetic stripe readers. Interfaces to specialty devices such as fingerprint readers, scales or bar code scanners may be purchased separately and added to the basic application.
Before you can configure these interfaces, however, you must first connect each device to the appropriate POS Workstation or Manager Workstation and ensure it is fully operational on the general Windows network. Only after confirming the device works properly on the network should you use the Station Configuration Setup Form to configure the Restaurant Manager software to recognize and work with the device.
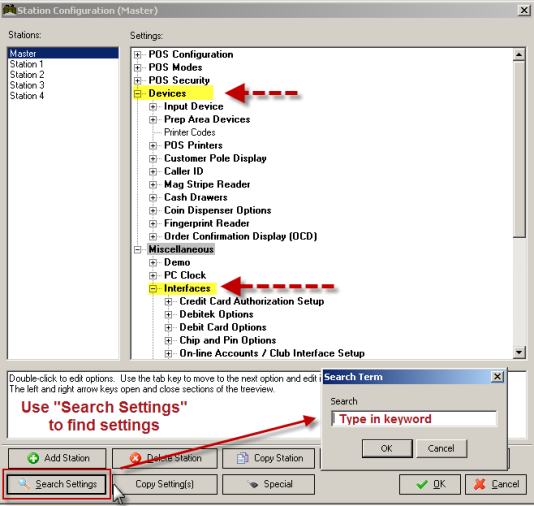
Standard and specialty devices are both configured on the Station Configuration Setup Form under the “Devices” and the “Interfaces” headings found in RM BackOffice > Setup > Station Configuration:
Station Configuration Screen:
Most of the devices that work with the Restaurant Manager POS System are configured under the “Devices” heading of the setup form. But some, like scales and kitchen display systems are configured in the “Interfaces” section. The best way to find the settings that control a particular device is to use the [Search Settings] button at the base of the Station Configuration Setup Form.
The devices listed below are configured with settings that appear under the “Devices” heading on the Station Configuration Setup Form:
Keyboards are usually attached to POS Workstations where staff takes delivery calls over the phone. The keyboard is useful for typing in the name and address of callers. No special configuration is required within RM BackOffice Module to use keyboards when entering customer information. However, some restaurants find the need to have the keyboard de-activated on numeric pop up screens. The default for this setting is false. However, there may be some instance where you may want to use the keyboard to enter numeric values (foreign currencies) and you must enable this function to do so.
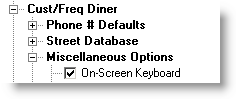
This function is not be confused with an onscreen keyboard. To activate this onscreen keyboard on you must use the [Search Settings] button to find and activate the following setting on the Station Configuration Setup Form for the station highlighted on the Stations List:
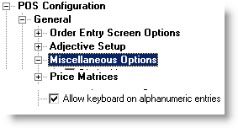
For security reasons, Restaurant Manager by default does not recognize keyboard input. But you may use the [Search Settings] button to find and activate the following settings for particular POS Workstations:
This option enables / disables the PC keyboard on the pop-up alphanumeric keypad. The keypad is used for various purposes such as entering guest account numbers, and finding menu items. The advantage of enabling this option is so you can use a standard PC keyboard, but the disadvantage is if you swipe an employee badge, the password is displayed on screen for everyone to see.
This option allows you to use a keyboard only for numeric data entry.
POS Printers are attached directly to POS Workstations and can be used to print guest checks, sales receipts and credit card receipts as well as POS reports such as Employee Time Slips, Flash Reports, etc
You may use the Report Module to customize the POS Reports that print at the POS Printers. And you may use the Guest Check Editor to customize the format of the guest checks and sales receipts printed by the POS Printers.
You may also configure POS Printers to serve as back-up printers in the case that certain prep area devices fail.
The Station Configuration Setup Form includes options for interfacing your Restaurant Manager POS System to different models of POS Printers. At any given POS Workstation you may default to different POS Printers when printing receipts for special payment types such as credit cards, on-account charges, and hotel room charges. You may also default to a different POS printer for transactions linked to a “Delivery” Revenue Center.
Use the [Search] button on the Station Configuration Setup Form to locate and configure the following “POS Printer” settings for the station highlighted on the Stations List:
Setup > Station Configuration
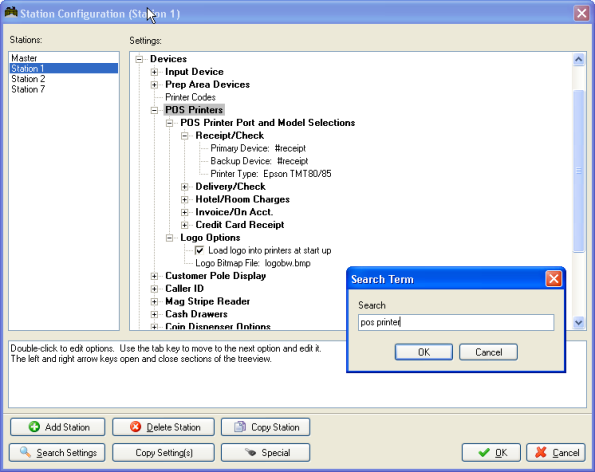
Restaurant Manager allows you to define up to five different POS Printers. The "Receipt/Check Printer" highlighted in the screenshot above serves as the main POS Printer and is the only POS Printer which will print POS Reports.
There is no need to configure alternative POS Printers unless you wish to print certain guest checks and sales receipts at POS Printers that are not physically located near the POS Workstation. Each of the POS Printers listed below the Receipt/Check Printer will print a guest check or sales receipt when a transaction meets the specified criteria:
For each of the POS Printers listed above you may use the following settings to indicate the port to which each POS Printer is attached and the type or model of the printer you are using:
If you are using thermal or other types of printers capable of printing graphics, you may wish to print the restaurant logo on the Guest Check or Sales receipt. To do so you must first activate the Logo Options on the Station Configuration Setup Form:
Load logo into printers at start-up-Use this setting to configure the Restaurant Manager system to load a bitmap of the logo into the printer each time the system is turned on.
Load Bitmap File- Use this setting to identify the location of the logo bitmap file. It is recommended that the bitmap file be stored in the same folder as the Restaurant Manager application files.
Logo sizes should not exceed 400X200 in size. Monochrome (black & white) bitmaps must be used when using thermal printers capable of printing only black.
After activating the Logo options you must also access the Guest Check Editor to format where on the page the logo should appear.
Restaurant Manager includes the necessary software to drive a KDS system in real time. Although we currently only support MicroPlus’ KDS, other systems may be added to the list in future releases. Additional information is available in the next topic.
Minimum configuration:
Maximum configuration:
OR
Dedicated computer with MicroPlus’ Interface card (2, 4, and 8 port versions available)
Two programs are provided by ASI to interface to the KDS system: KDSSetup.exe and KDSSpool.exe. The former is used to configure the interface for each monitor being driven. The latter is used to actually spool out the information to the KDS System. This architecture is very similar to that used in Restaurant Manager’s printer spooler interface.
Real Time KDS need to be enabled. This is configured in the Station configuration. There is a few other configuration settings that you may wish to consider under the Real time KDS Interface in Station Configuration:
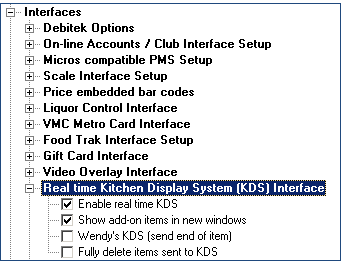
Using the [Search Settings] button at the bottom of the Station Configuration form, type “Enable real time KDS” and configure the following settings if applicable.
Determine KDS architecture: How many monitors you need to drive, and the equipment options from MicroPlus (MPADS, computer with interface card.) In our example, we will be driving two monitors, MON 1 and MON 2, via use of 2 MPADS connected to COM 1 and COM 2 on the Server.
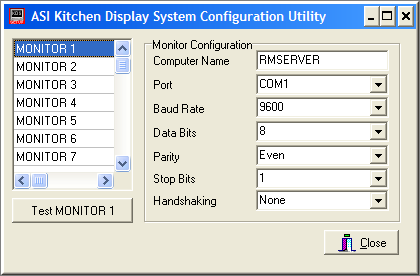
Run ASI’s KDS Setup program and configure the Monitor parameters. In our example:
Monitor 1:
Connect the MPADS to the assigned ports (com 1, com 2, for our example)
Configure MPADS (See MPAD documentation) to respond to their designated monitor numbers (1 for COM 1, 2 for COM 2)
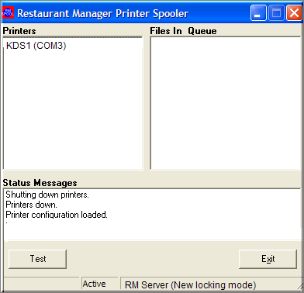
Run Restaurant Manager’s KDS Spooler program on the Fileserver from the working directory. Check there are no errors displayed upon startup by maximizing the KDS interface program (on the task bar)
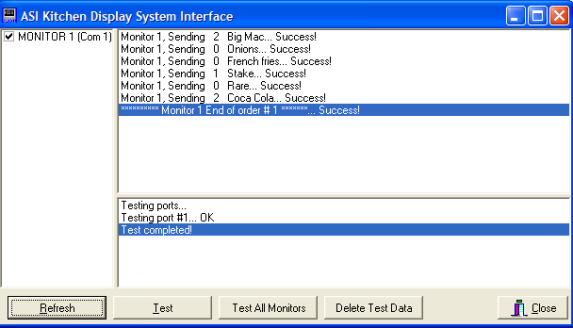
Test monitor(s) are working properly by use of the TEST button on either the setup or spooler program.
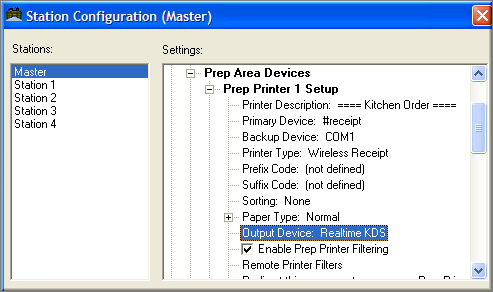
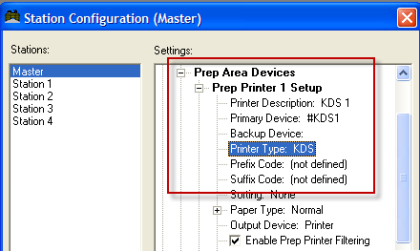
From RM BackOffice specify the prep area output to a Kitchen Display Monitor by selecting the Realtime KDS option in the combo box under Station >Devices >Prep Printers >Output Device. In the example screen below, Prep Printer 1 has been assigned to the KDS system (by default, as Monitor 1.) Note that you can mix the output to prep areas. For example, you could have a prep-area printer at the bar for printing drinks, and a KDU in the kitchen for food orders. Note also that the Primary, Backup device settings are ignored in this mode. You should blank these out to avoid confusion.
KDS Batch Mode operates differently than Real Time KDS. Where KDS Batch Mode does not use the KDS Spooler, instead, KDS Batch Mode utilizes The Restaurant Manager Print Spooler. You will not be able to utilize “Show items in new windows” function nor “fully delete items sent to KDS”.
In batch mode, the KDS will get the order when it is finalized on the POS terminal. So the Cheeseburger, Fries, Med Coke will be displayed on the KDS screen all at one time.
For Batch Mode KDS, Restaurant Manager is compatible with the MicroPlus KDS system. MicroPlus can be reached at: 919-816-9222.
RMSpool is used to send data to the KDS. The KDS is setup like a printer in Printer Spooler setup program (SPLSETUP.EXE). Click add printer. Enter the name of the KDS monitor. Enter the name of the computer the KDS will be attached to. Printer type should be COM/LPT printer. Go to the drop down box for Ports and choose the proper Com Port. Port settings should be set as:
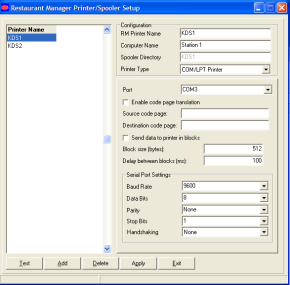
When the program is started it checks the configuration file to see which printers are assigned to the computer the program runs on.
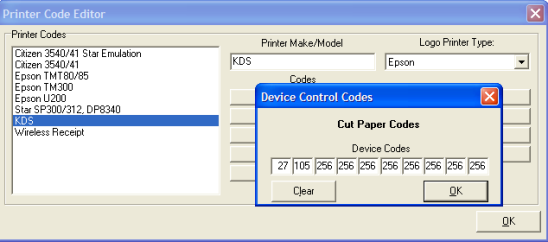
When using the KDS in batch mode, the first thing you need to do is to create a printer type. In BackOffice Module, under station configuration, select master. Go to printer codes and add a printer type called KDS (To do this, select a blank field and enter a name under Printer Make/Model field). This will create a generic printer. The only printer codes that are required to be changed are cut paper codes. The MicroPlus KDS uses the Epson code set.
The master station configuration gives your KDS monitors a unique name. For example: KDS1, KDS2 .The names are only used for identification purposes. Under menu setup when you assign menu items to prep area printers these names will appear under the prep printer list. Click on the primary device and choose the KDS monitor that corresponds with this prep area. Click on printer type and choose KDS. This is the printer type you defined.
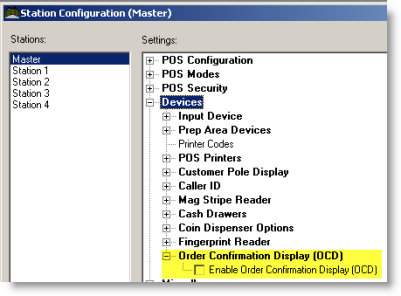
The Station Configuration Setup Form includes a setting that allows you to interface your Restaurant Manager POS System with certain models of Order Confirmation Displays (also known as OCDs or “Scoreboards”), including the Accuview OCD by Texas Digital Systems.
Use the "Search Settings" button on the Station Configuration Setup Form to locate and configure “Order Confirmation Display” at the station highlighted on the Stations List:
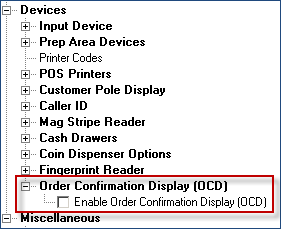
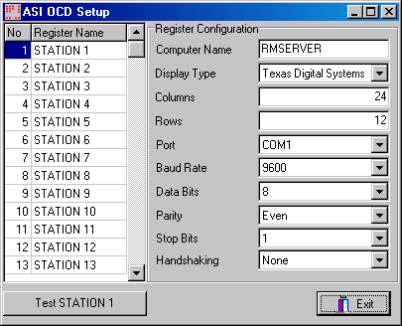
For each station that outputs to an OCD, highlight the station of interest and enter the appropriate information on the right.
For the computer name, enter the name of the computer running OCDSpool.exe. Then choose the display type and enter the remaining communications parameters.
Once the parameters are configured, execute OCDSpool.exe on the computer (or computers) specified in OCDSetup.
The Station Configuration Setup Form includes options for interfacing your Restaurant Manager POS System to different models of customer pole displays.
Setup > Station Configuration
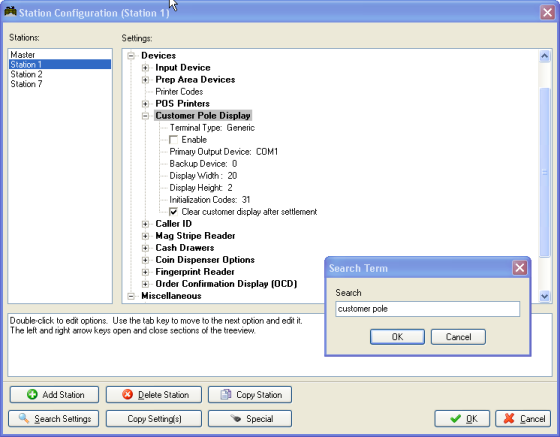
Use the [Search] button on the Station Configuration Setup Form to locate and configure the following “Customer Pole Display” settings for the station highlighted on the Stations List:
- Panasonic
- IBM 4695
- Javelin
- IBM Sure POS 500
- Partner Tech CD7220 (Use generic setting)
- Posiflex TP-3000 (Use generic setting)
- Posiflex PD 2500 (Use generic setting)
- Posiflex PD302 (Use generic setting)
If you are configuring the system to work with a model not listed above you must set the Terminal Type to “Generic”.
ASI constantly tests new hardware and the most up to date certified hardware list can be found on the Dealer page of the ASI website.
It is suggested that you leave the Primary Output Device blank (remove com 1 setting) if you are not using a customer pole display. Changing the “output” setting will insure against device conflicts
By default the customer display is NOT cleared once a transaction is finalized, so that the “change due” number is visible until a new transaction is initiated.
To force the clearing of the display at the end of a transaction, check the box found at Setup->Stations->Devices->Customer Pole Display->Clear Customer display after settlement.
Caller-ID is an optional module (hardware interface). Used primarily for phone-in and delivery orders, Caller ID expedites the ordering process while adding accuracy. Accuracy is important as the customer phone number is directly linked to the customer and is used for recalling and tracking orders.
ASI’s Restaurant Manager provides an interface that bridges the Caller ID provided by the phone company, a Caller ID unit needed to convert the information, and the Restaurant Manager software. Restaurant Manager’s Caller ID Interface must be purchased separately as part of the ‘Hardware Interface”. Restaurant Manager interfaces with practically any caller ID unit that outputs the caller id information via a standard RS232 serial port. Instead of typing in the phone number, the user can touch the appropriate phone line button on the screen to enter the phone number automatically. This saves time and reduces errors.
Currently, ASI’s Caller ID Server program is pre-configured to work with two different Caller ID boxes:
CallerID.com –Whozzcalling
Telecomp
ASI is constantly updating its list for certified product vendors and certified hardware. It is best you consult these lists to verify the current status of a vendor and product.
To take advantage of the Caller ID interface, you must also configure your system to prompt for a phone numberwhen opening a new order.
To enable the Caller ID feature of Restaurant Manager you must do the following:
- Caller ID Settings
- Rmcidwin
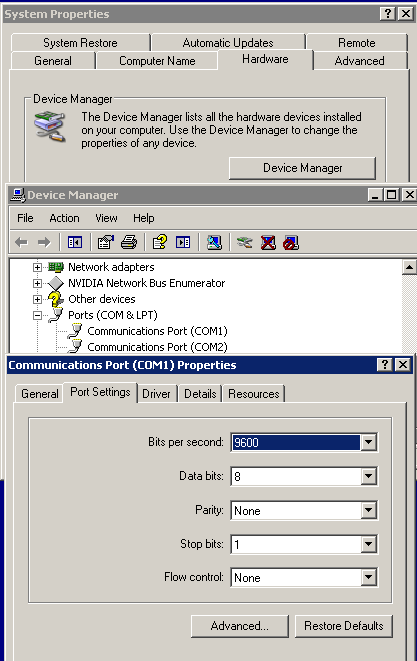
- Com Port properties in Windows Device Settings
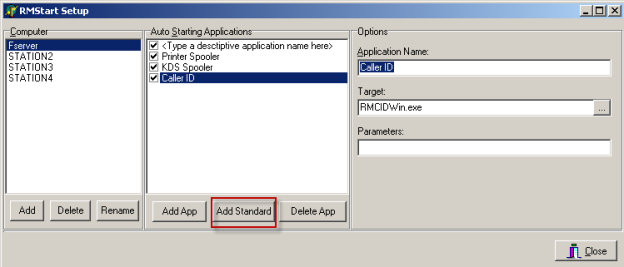
Note: The Rmcidwin executable should be installed in the RMStart program.
Below is a list of Caller ID settings found in the CallerID executable (File> Settings):
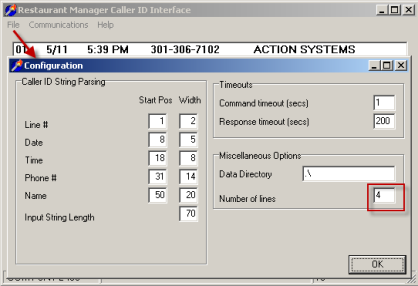
Start Pos- Indicates the beginning of field to be decoded
Width- Indicates the length of the field
Input String length- The total number of characters in one line of caller id information. This number is used as a check for valid data
Data Directory- Leave this blank, or insert a period followed by a backslash
Number of Lines- Enter the number of lines the caller id hardware is
PROBLEM:With Whozz Calling Caller ID, keep getting "Incorrect Length. Modem length is: 62, Configured length is: 70
Please configure your Called ID String Parsing settings under File ->Setup". Settings appear to be correct.
SOLUTION: Try the following:
- Start POS Width
- Line # 1 2
- Date 8 5
- Time 18 8
- Phone # 31 14
- Name 56 15
- Import String Length 70
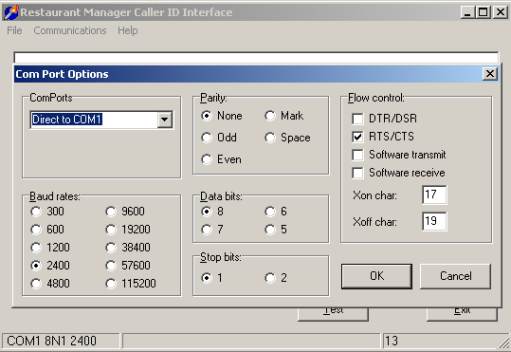
Check to make sure the ports settings between the caller id device, Rmcidwin match, and Windows match in Device Manager > Ports
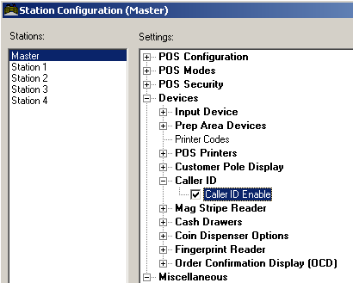
Enable Caller ID in RM BackOffice > Station Config > Devices. Caller ID must be enabled on all stations where orders are taken and Caller ID will be used.
The Caller ID Interface executable must be installed on the computers with the caller id device attached. The interface will not work if Rmcidwin.exe is not installed on the local machine. Rmcidwin can be installed using one of two methods:
Magnetic Stripe Readers are devices used to swipe credit cards in systems configured to do online credit card authorizations. Magnetic Stripe Readers may be used to read employee ID cards in Systems configured with Enhanced Password Control.
Use the [Search Settings] button on the Station Configuration Setup Form to locate and configure the following “Mag Stripe Reader” settings for the station highlighted on the Stations List:
- Go to the DOS prompt.
- Swipe a card through the magnetic swipe card reader and, on a pad of paper, note the password encoded on the card as well as the number printed on the face of the card.
Before attempting to process credit cards, you should swipe a credit card at the DOS prompt (or in Note Pad) and verify that the information conforms to the following specifications:
For track 1:
- % Marks the beginning of track 1
- ^ 1st caret delimits card # and Name
- ^ 2nd caret delimits Name and Exp date
For track 2:
- ; Marks the beginning of track 2
- = Marks exp date (track 2)
RM first tries to use track two information. If there is an error, or if there is no track two, then track 1 is used. Normally, track two offers the best discount rates.
Sample Swipe containing both track 1 and track 2 information:
%b4356024104123456^smith/jack^9907101000008100256000000?;4356024104123456=99071010000025681?
In this example, track 1 starts at the beginning and continues thru the first question mark (?). Track 2 starts at the semicolon (;) and goes to the end of the swipe. Note: this should be one continuous string of information with no carriage returns. The string may wrap to a second line (as it does in this document), only because the entire string does not fit on a single line.
Some MSR’s output a carriage return and line feed after each track so the sample swipe above comes thru on two separate lines as follows:
%b4356024104123456^raff/jack^9907101000008100256000000?
;4356024104123456=99071010000025681?
If your MSR is outputting two lines as shown above, then you must configure RM to expect this format. Go to Setup >Station Configuration >Interfaces>Credit card Authorization Setup. In the Input options section, check the box “Carriage Return after each track.”
If your MSR does not conform to either of the above formats, refer to the MSR user’s manual and configure it so it does. If it is not possible to do so, contact ASI to get a list of compatible suppliers.
There is two other setting that must be configured if using a Mag Stripe Reader in conjunction with credit cards. Under Setup >Station Configuration >Interfaces>Credit card Authorization Setup you must enable the option “Magstripe Reader present”. You may also want to adjust the Magnetic Stripe reader Time Out.
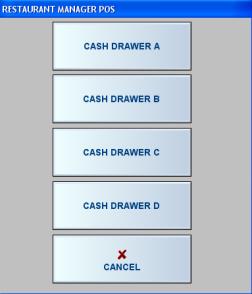
Before configuring your system to work with Cash Drawers you must understand the difference between a Cash Drawer and a Cash Tray:
When a POS Workstation is configured with cash drawers your Restaurant Manager System will default to using Cashier Banking to the track transactions settled at that POS station. If servers responsible for their own banks may also be settling transactions at this same POS Station, you must configure the station to handle both Cashier and Server Banking.
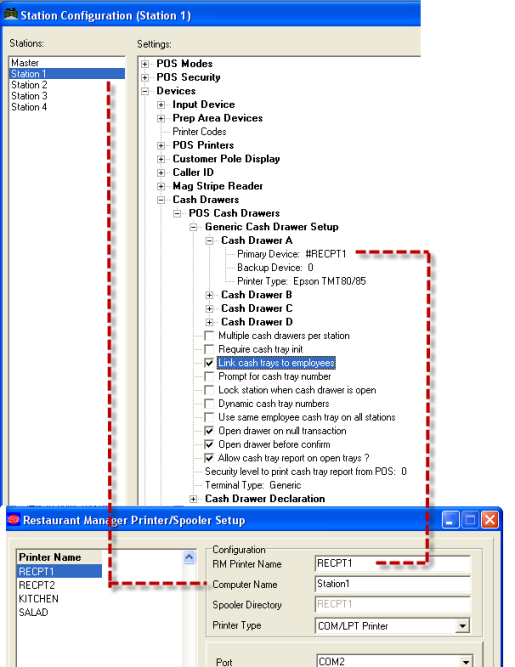
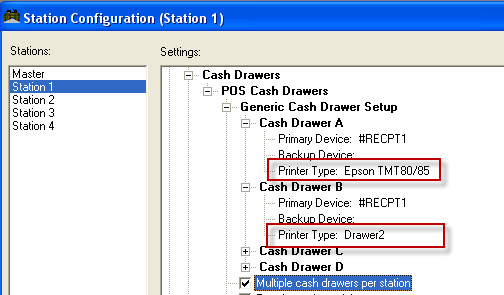
Restaurant Manager can operate up to 4 cash drawers per POS Workstation; each is identified by a letter from A to D. Under the Generic Cash Drawer Setup you must define a Primary Device (printer named in RMSpool). A Backup Device should only be assigned if another drawer is physically connected to the printer (multiple drawers). And, if the cash drawer is plugged into the POS Printer, you must also indicate the name Printer Type (model) of the POS Printer.
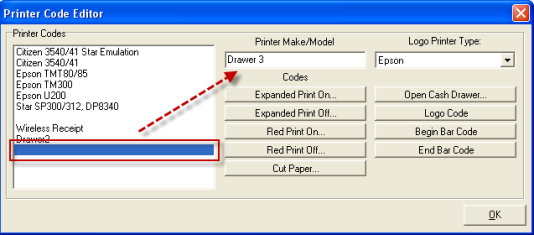
(In other words, if your cash drawer plugs directly into the serial port of the computer, then you must create a dummy printer with the appropriate control codes to open the drawer.) A list of printer codes can be found here: Printer Codes
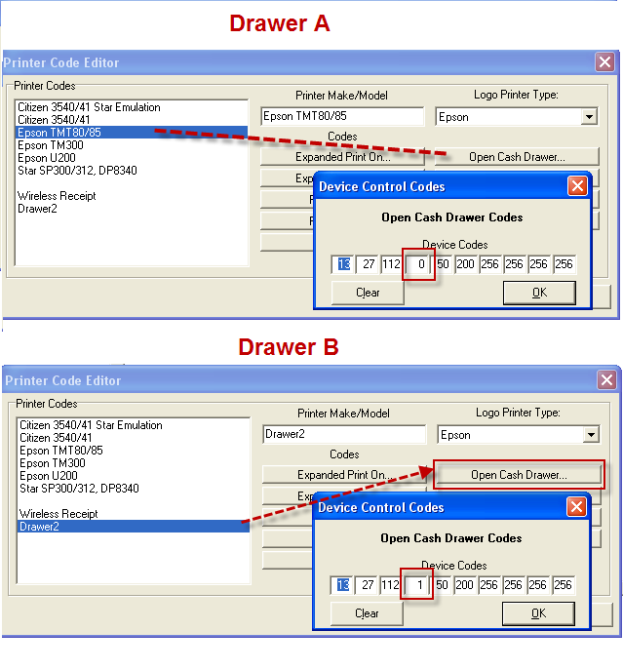
Some printers have the ability to drive two cash drawers. If you have two drawers connected to the same printer, then you must define two “different” printers on the Printer Codes Setup Form. For example, if you are using a Citizen 3541 printer as your POS Printer then you must define both a "Citizen 3541 Drawer 1" and "Citizen 3541 Drawer 2" printer on the Printer Codes Setup Form. The control codes will be identical for these two printers except, one printer will trigger Cash Drawer A, and the other will trigger Drawer B. This is detailed further in the section: Multiple Drawers Configuration
If you have attached multiple Cash Drawers to the active POS station, then this setting must be activated along with the other required settings described in Multiple Drawer Configuration.
You may manually access this pop-up screen from any POS Status Screen touching the [Cash Tray Options] Function Button and then changing the drawer to which a cash tray has been previously assigned.
If your establishment has more than one employee operating out of the same drawer and wish to balance from a single cash tray report: you might want to disable this function. If not enabled, then the system will set the employee to 0 (or not defined). Having this option disabled will remove the restriction of having an employee to finalize the tray logging out. This is ideal for nightclub and Quickservice environments.
If you intend to allow both Cashier Banking and Server Banking at the same station you must enable this setting and disable “Require Cash Tray Init”, even if there is only a single cash drawer attached to the station. This will ensure that transactions settled by servers are linked to a dummy cash tray (“0”) and do not appear on the cash tray report for the actual cash tray.
If the cash drawer does not connect to a printer but, rather, is plugged directly into the port, then you must create a dummy printer on the Printer Codes Setup Form and enter the appropriate codes under the Open Cash Drawer Option.
Below are the station configuration settings for cash drawer declaration:
Your restaurant may have a policy in place that restricts the amount of cash Restaurant Manager offers two methods that will warn when a cash drawer reaches a pre-defined amount of cash allowed in the drawer. One method is using the Station Configuration setting "Maximum cash allowed in drawer" to set a cash limit. This method will warn users at the POS that the drawer is near or exceeded a cash limit. You can set parameters to allow an employee to continue to ring orders or require a manager intervention. The second method is to use RMAlerts to send a text message or email to a list of recipients when a defined cash limit has been bet met. Both methods can be used simultaneously.
The following is a list of Station Configuration that will define the amount of cash to be in a cast tray and the behavior of the POS when the cash level has been met. Note: a cash drawer must be initialized for the following settings to apply:
Employees must use the Money Drop function to reduce cash amounts in cash trays once this cash threshold is met
RMAlerts can be used to monitor cash amounts in cash drawers. This method of monitoring cash levels in drawers differs from the method, described in the section above, where it will not hinder sales at the POS. Rather this method will sent a email or text message to a pre-defined list of recipients. Please review the RMAlert User and Setup Guide for instructions on how to configure this specific alert.
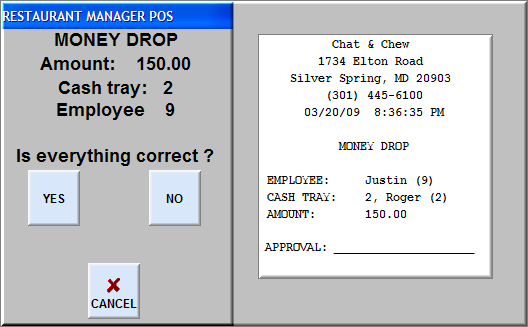
To avoid carrying excessive amounts of cash, cashiers or bartenders can make periodic money drops. In Restaurant Manager, money drops are treated like Paid Ins and are shown on the cash tray report. Since money drops affect the cash tray report, a cash tray must be initialized in order to perform this option. To record a money drop:
Once you complete the process above you will receive a confirmation prompt and then a receipt will print out you can have the employee sign.
Multiple Cash drawer will require extra configuration. You will have to set up a printer type for each drawer used in the “Printer Codes” setup form under the “Device” heading in Station Configuration. You can use the default cash drawer code for the first drawer (A). In our illustration we will be setting up drawers based on an Epson TM 80/85 or like printer.
…as well as the following POS Security setting
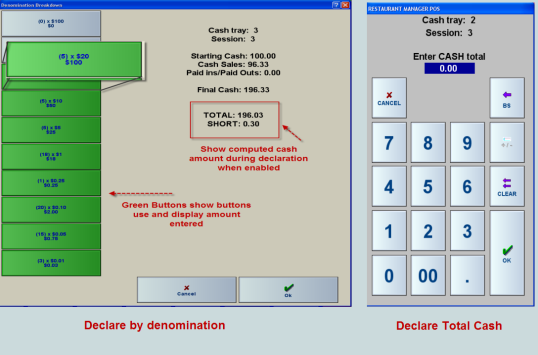
Cash declaration can be done by declaring by individual denominations (e.g., # of $20's, $10's, $5's, $1's, quarters, dimes, nickels, and pennies). This method act similarly to a calculator. Example: If you have 5 twenty dollar bills, you would press the twenty dollar bill button and enter 5 in the prompt. Restaurant Manager will calculate this amount to $100 and add it to the total cash figure. If declaring by denomination, you must set the denomination values for your local currency in RM BackOffice > Settlement and Tips > Denominations
Clicking the Add button on the Denomination Form will add a denomination row at the bottom of the list. type the numeric amount of the denomination on the new created row. You can select a row on the denomination list to edit an denomination. Delete a denomination by first selecting the denomination on the list and then click the Delete button on the form.
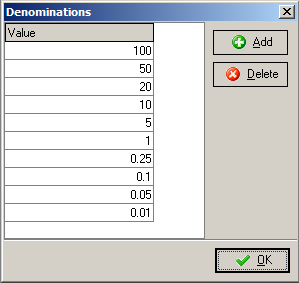
Note: Denominations on the list can not be sorted. Denominations must be added in the exact order you wish them to appear on the Declaration screen.
Restaurant Manager may be configured to work with coin dispensers manufactured by Telequip.
Use the "Search" button on the Station Configuration Setup Form to locate and configure the following “Coin Dispenser” settings for the station highlighted on the Stations List:
If being used in Canada, the coin dispenser can dispense Canadian $1 and $2 coins. To enable this option, create a file called BIGCOINS.TXT in the rmwin folder. If that file exists, the system will dispense $1 and $2 coins as needed.
Additional manufacturer instructions can be found at: http://www.telequip.com/customer-service.html. Additional RM instruction can be found at our website: Coin Dispenser Interface
In systems configured with Enhanced Password Control it is recommended that Fingerprint Readers are used (in place of numeric passwords or Employee Badges) to identify employees each time they use a POS station to process an order. When fingerprint readers are used, each employee’s fingerprint(s) must be scanned into the Employee Database and all POS Workstations must be configured with Fingerprint Readers.
Use the [Search] button on the Station Configuration Setup Form to locate and configure the following “Finger Print Reader” settings for the station highlighted on the Stations List:
You can configure the system to work with an integrated unit Terminal Type from the drop down list. If you are using a fingerprint reader from Digital Persona (or any other brand of integrated unit, you must select the “Generic” option.
The Station Configuration Setup Form includes a setting that allows you to interface your Restaurant Manager POS System with certain models of Order Confirmation Displays (also known as OCDs or “Scoreboards”), including the Accuview OCD by Texas Digital Systems.
Use the [Search Settings] button on the Station Configuration Setup Form to locate and configure “Order Confirmation Display” at the station highlighted on the Stations List:
Station Configuration > Devices
The devices listed below are controlled by settings listed under the “Interfaces” heading on the Station Configuration Setup Form. Other Interface configuration settings listed under this heading are described in the section on Interfaces to Third Party Applications.
Restaurant Manager interfaces to weighing scales conforming to the NCI standards.
Any base menu item can be configured to automatically read the scale when it is selected at the POS. In the RM BackOffice, options are available to define container weights which are then associated to the corresponding menu items.
Scale Installation- RM communicates with scales via serial ports. Simply connect the serial cable to the designated port on the POS workstation. You can check the latest Certified Hardware List on the ASI Dealer website for approved hardware.
Interface configuration- Enable and configure the scale interface under Station Configuration->Miscellaneous->Interfaces->Weigh Scale.
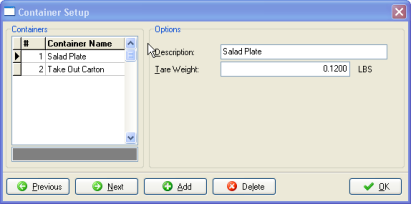
If you select certain menu items by weight and use the scale interface to generate the price of these items, you must access this setup form to define the tare weights of the containers in which the items are weighed. The containers defined in this setup form will be applied at the menu item level in the Menu Setup under the “Advanced Tab” of a menu item.
Setup > Menu > Containers
You may also want to adjust the number of decimal places when displaying or printing quantities. use the station configuration option "Number of decimal places for displaying/printing quantities". This option defines how many decimal places are displayed and printed in the POS module for items having non-integer quantities. For example, if this option is set to 2, an item has a quantity of 1.2345, the POS screen will display 1.23, and that is also what will print on the guest check as well as the kitchen printers.
Restaurant Manager has several options for liquor management: Scannabar, FreePour Controls Inc., and Berg Liquor Pour Controls. Where special menu consideration should be given to all three systems, only Berg requires a special hardware setup due to the natural of how the software and hardware interacts with Restaurant Manager. Detailed instruction can be found in documentation on the ASI website on the Dealers’ Tech Notes & Manual page: Berg Interface.
Cards are a cashless solution used primary for vending and catering operations in the UK. There are three setup areas that will need to be addressed:
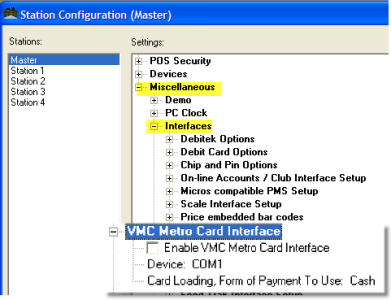
The Station Configuration Setting for VMC Metro Card is found under Setup > Station Configuration using the [Search Settings] button and typing in “VMC”. Use the following settings:
Card Loading, Form of Payment to Use- The default setting is cash. A new payment must be setup in Methods Payments within RM BackOffice if you are not using “Cash” as a form of payment and reflected here.
Device- Change the setting to match the com port the device is connected to on the local machine
Changes must be made on all stations using the VMC device.
Station Configuration >Miscellaneous > VMC Metro
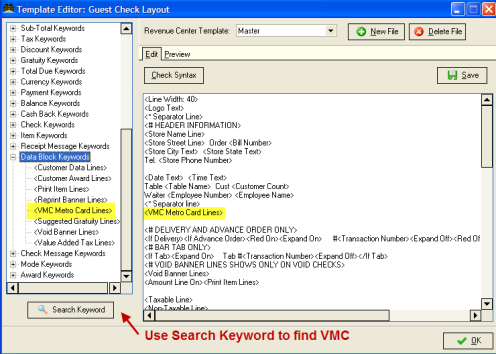
If you are printing guest checks in conjunction with VMC you may want to consider the placing the information on the guest check. Use the Guest Check Configuration Editor to place the VMC Keyword strategic the guest check.
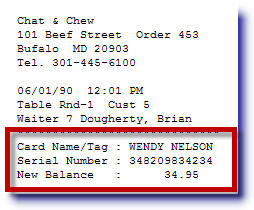
The information on the receipt might look something like this:
You will probably want to set up a different form of payment from cash if you wish to track VMC separately. Follow the instructions detailed in the section Method of Payments.
The video overlay option of Restaurant Manager allows you to monitor the activity on one or more POS stations via a separate camera system. By combining the output of real time video cameras with the video overlay system, you can view text overlaid on top of a live video feed. So you could for example, watch a bartender on a video camera with text overlay that shows the buttons he is pressing and/or items he is ordering.
Aside from cameras and video recording and displaying equipment, you will need special video overlay equipment, capable of overlaying text on a video image. The current certified vendor is Teletec Systems Inc. You may also find the video overlay equipment from other sources. However, ASI technical support may be very limited.
In the past Restaurant Manager was compatible with Transaction Verification Services (TVS), now a division of Honeywell, makes several units that are compatible with Restaurant Manager. Their web address is http://www.honeywellvideo.com.One unit that has been tested and certified with Restaurant Manager is the TVC-2066S.Make sure to specify the “S” suffix as it denotes serial input. In addition, order a unit with firmware revision F-188.00, designed for “Restaurant Management.”This unit offers single channel video with text insertion.
An alternative unit would be the TVC2110, which handles up to 10 video inputs. This unit requires the Register Interface (TVC 1030A).Honeywell can give you a complete quote with cameras, monitors, recorders, etc, or you can just use their text overlay equipment and get the video equipment from an alternate source. Again, you may also find the video overlay equipment from other sources.
Video overlay is an optional module of Restaurant Manager. You must purchase this option in order to use this feature. To enable the video overlay feature go to RM BackOffice >Setup >Station Configuration using the [Search Settings] button, type “Video Overlay”, and check the option “Enable video overlay.”
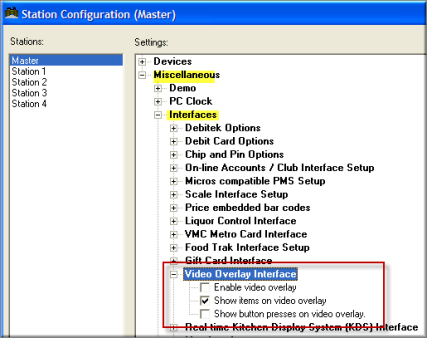
You can optionally enable (or disable) the display of items ordered or actual button presses or both. In addition, the following information is always displayed:
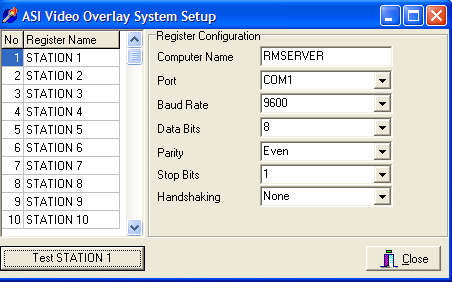
After configuring these options, you must configure the video overlay spooler using VOSSetup.exe. VOSSetup displays the following screen. For each POS station you wish to monitor, enter the computer name and appropriate COM ports.
Next you must execute VOSSpool.exe on the computer that is connected to the video overlay equipment. You can put this executable in the “Startup” folder or as an RMStart command so it executes automatically each time you boot up the machine. VOSSpool displays the following status screen. As it runs, it echoes the text overlay information on its status screen.
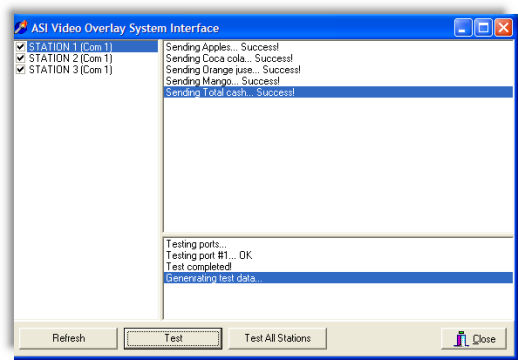
You can enable/disable one or more stations by checking/un-checking the check box next to the Station #.To test the interface, highlight the station of interest on the VOSSetup screen and press the button “Test Station <n>.”On the VOSSpool status screen, you should see some test data and it should appear as overlaid text on the live video image.
The information sent to the video overlay unit is formatted as follows:
Code<09>Description<09>Amount<09>Quantity<09>Register Number<09><13><10>
Numbers shown in angle brackets represent ASCII characters.
“Code” is a two character string as follows:
Invalid com port number: xx- Valid com port numbers are 1 thru 8.
Sending took more than two seconds. Flushing the output buffer! - VOSSpool tried to write a command in the COM port but it took too long so the spooler gives up
Failed to send: <Reason> - <Reason> will contain the exact error message why the send failed
“Synchronizing data. Please wait...” - When CMLock is locked by some other program VOSSpool will display this message until CMLock is released (used in RM Index, Sessopen etc.)
No monitors found for this workstation! - Upon startup no monitors/registers were found that correspond to the current computer ... run VOSSetup to configure some registers(s) for this computer.
Testing ports... - Upon startup each of the ports of each register is being tested to see if it "works" - open and close.
If you have trouble, try disconnecting the serial input from the video overlay and plugging it into a serial printer. Then from the VOSSpool program, press the “Test” button. You should see output on the printer.
To test the video overlay capability on a TVC2066, plug a telephone into the phone jack on the front of the unit, press 8# to put the unit into self test mode. You should see text overlaid on the video. Press “8*” to disable self test mode.
Check the date of VOSSPOOL.exe. It should be dated 6/30/05 or later. Some newer models of the TVC video text inserters require additional control codes that are only supported in VOSSPOOL versions dated 6/30/05 or later.
Real Time Kitchen Display is the Restaurant Manager optional interface where a monitor is used to replace or compliment a prep area device. These units can be used in bars, kitchens, or other destination areas where food and beverage is prepared. The monitor can be touch enabled or order on the screen can be manipulated using a keypad. Restaurant Manager provides an interface between POS software and the Kitchen Display device. A list of certified hardware can be found on the ASI website in the document: Certified Hardware. Detailed instructions for installation can be found in the document: Real Time KDS. A supplemental enhancement has been created and is available from Crystal Mind in Egypt and must be purchased separately.
Some Restaurant Manager reports can be printed from the POS Module(s) on the 40 column POS Printers attached to POS Workstations. However, most reports are printed from the BackOffice Module and are printed on the printer attached to the Manager Workstation:
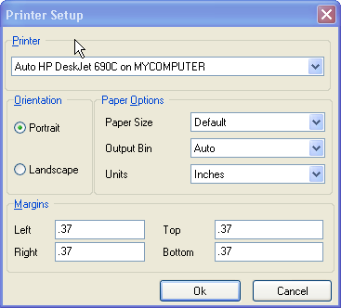
To configure RM BackOffice Module to work with printer attached to the Manager Workstation, select the "Printer Setup" option from the "File" drop down menu and follow standard Windows procedures.
File > Printer Setup