(continued from Point of Sale Operations)
The Point of Sale process is organized into "sessions" which are numbered in sequence. When you first begin using Restaurant Manager, the session number is set to 1. This number is automatically incremented with each new session.At the beginning of each business day, you must "OPEN" a session, and at the end of the day. Before closing a session, the following criteria are required:
Restaurant your system may be configured to manual close a session, utilize the guided EOD process, or implement an automated process requiring limited user interaction. Restaurant Manager may require a password depending upon your system configuration.
The session status is displayed at the top of the main POS screen. It shows the session number and whether the session is open or closed. This information is shown in all POS modes (Tables, Tabs, Delivery, Reservations, and advanced orders).
When opening and closing sessions, the information displayed on screen is stored in a file called SESSOPEN.LOG. The status text for each open/close operation is appended to the file in plain text format. This information can be reviewed using a standard text editor.
The "SESSION OPEN/CLOSE" function is accessible both from the Windows BackOffice and the POS Status Screen. To perform Session Open/Close Operations in the BackOffice go to Activities > session > Session Open/Close. The same function can be performed at the POS by pressing the [MISC] button at the base of the Status Screen, then select the [SESSION OPEN/CLOSE] option and follow the instructions on the screen.
You may do so by selecting [SESSION OPEN/CLOSE] from the BackOffice program or close the POS module from any POS station as a described below:
To close the session from a POS Station, select [MISC] followed by [SESSION OPEN/CLOSE], and follow the instructions on the screen.
After entering the bank deposits, Restaurant Manager will proceed to close the session. Depending on the options installed in your system, Restaurant Manager may perform one or more of the following actions:
Food Trak Interface.
A blinking message is displayed as these actions occur.
Restaurant Manager can only open a Session only after the previous session has been closed. You can initiate the Open session process by pressing the Session Open/Close buttons either in the RM BackOffice Module or at the POS station.
The End of Day function is a step by step guide to insure a proper Session Close. Pressing this button in the [MISC] function of the Main POS Status screen will trigger successive prompts for the following:
The steps for the EOD process may vary depending how they were setup in the Station Configuration. This process can also be automated or run from the back office computer.
Running the EOD function is achievable using one of three methods: manually at the POS station, from the RM BackOffice, or run automatically using a scheduler.
EOD can be found in RM BackOffice > Setup > Station Configuration > Miscellaneous > End of Day. By default, when you execute "RMPOS EOD" it will take on the station configuration settings of station 1 and immediately start the end of day process. The EOD process can be custom tailored to run differently at each station by changing the station configuration settings for each station. Keep in mind; this only applies to running the EOD process manually at the stations.
The following sections explain the various settings used to control the prompts during the EOD process.


See the next section on Brute Force End of Day for specific programming details
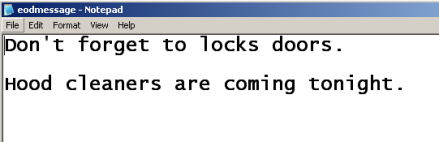
This option allows the user to execute commands before and/or after the EOD process. Commands such as running reports, having helpful daily reminders in the form of text messages appear, etc. may be run using executables or batch files.
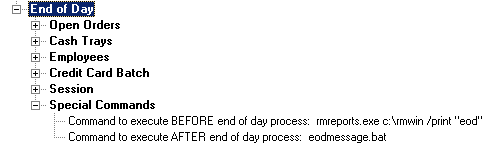
In the screen shot above, we have entered an executable to print EOD reports using RM Reports before the EOD process. In addition, we entered a .txt message command utilizing a .bat file at the end of the process. Below is the text message:
To view the end of day log for a specific session, choose [MISC] from the main POS status screen, and choose the option “View EOD Logs.” A prompt allows the option to specify a session number, and the end of day report displays on screen. The report is printable by choosing the [Print] button on the report screen.
Note: A list of EOD log reports may also be found in the Rmwin directory (EODxx.log)
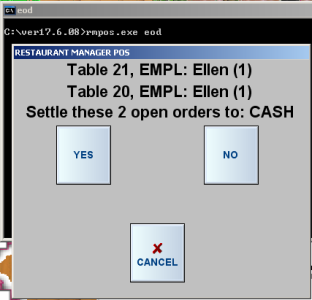
The end of day process (EOD) handles the task of closing any open checks and logging out employees as well as closing the session. The problem is, certain transactions (e.g., those with unsettled credit cards, or payments that do not match the base amount) are not finalized during the EOD process. In the scenario, the sessopen process is not able to close the session and the restaurant is not able to run the business the following day. This could lead to problems the next day where employee are unable to clock in since the session was never closed.
Restaurant Manager (V19) has a station configuration option for EOD that will brute force close all open transactions to cash to avoid these problems. Brute Force End of Day will attempt to do the following when there is a transaction that has no been closed in the outlined :
Any transaction that is closed using the Brute Force option will be reported in the EOD Exceptions detail report found in the RM Report Module Session reports folder. Note: the EOD Exceptions details can be added to the Session Summary (arf) report using the "Blocks to display" filter.
The following EOD Station Configuration settings need to be used to for successful Session Close and subsequent reporting. Use the "Search Setting" button in the Station Configuration Form and type "EOD" to locate the EOD options. Note the options enabled/disabled below assume the user will not be present for the EOD operation
Open Orders
- Process open orders- enabled
- Settle open orders to- Cash
- Ask before settling open orders- disable
- Print Guest Check for open orders- enable or disable
- Continue on Error- enabled
Cash Trays
- Check for open cash trays- enabled
- Cash tray finalization method- Automatic
- Continue on error- enabled
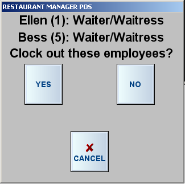
Employees
- Clock out employees- enabled
- Prompt before clocking out employees- disable
- Edit login data- disable
- Continue on error- enabled
Credit card batch- All settings are optional with the exception of "continue on error'. This setting should be enabled
Session
- Session Close- enabled
- Suppress prompts during session close- enabled
- Brute force end of day- enabled
Special Commands- All settings are optional
Any transaction that is closed using the Brute Force option will be reported in the EOD Exceptions detail report found in the RM Report Module Session reports folder. Note: the EOD Exceptions details can be added to the Session Summary (artf) report using the "Blocks to display" filter.
The only way to automatically Open or Close a Session is to use a third party scheduling software. Several excellent programs are available including Windows built in scheduler, Solways (Freeware), and Cobian Backup (also Freeware and highly recommended for backups AND automatic sessions.
Regardless of which scheduler you use, you must point to the location of the executable file that controls the Session Open procedure. This usually means typing the following path in the task pane:
C:\rmwin\Sessopen.exe
You must also enter a “NoAsk” parameter to suppress prompts associated with the Sessopen.exe. If these prompts are not suppressed the process will pause indefinitely waiting for user input. For most schedulers you may append the “NoAsk” parameter to the path as follows:
C:\rmwin\sessopen.exe noask
In scheduling applications like Solway, however, that include a separate parameter field, the NoAsk parameter must be entered separately in this parameter field.
Restaurant Manager can handle both cashier banking and server banking. Cashier banking requires that you have at least one cash drawer connected to your system (POS Station). The cashiers handle ALL settlements and are responsible for balancing their cash tray at the end of the shift.
Restaurant Manager has several ways to incorporate cashier banking. You can have the cashier initialize a cash tray and link it to an employee for tighter controls. Perhaps you establishment has more than one employee utilizing a single drawer. In this circumstance, you may choose to initiate a cash tray without linking it to an employee. In the most casual of environments, you may not even have to initiate a cash tray. If you are not sure, your Reseller can help you decide.
Restaurant Manager can manage up to 99 cash trays per session. When configured, cashiers are not allowed to clock out of the system until they "CLOSE" their cash tray and declare the final cash tray balance. The Cash Tray report, accessed from "Session Operations" provides figures for cash tray reconciliation.
NOTE: An important System Configuration parameter for cashier banking is "Require Cash Tray Init." This parameter should be set to "YES."
In a server banking system, cash trays are not required as waiters and waitresses carry their own banks. Servers enter their employee number (passwords) when opening tables. Restaurant Manager keeps a tally of sales for each employee. The "Revenues" reports print when an employee clocks out, showing their sales broken down by method of payment. The information on the revenues report provides reconciliation for servers.
NOTE: Cashier banking and server banking can be used simultaneously; however strict operational procedures must be established. When mixing cashier banking and server banking, servers MUST NOT settle their transactions at a cashier terminal.
Restaurant Manager assigns the server number when a table is opened and the cash tray number at the time of settlement. If a server opens a table and enters his/her employee number, then settles the check at a cashier terminal, the money for that check is added to both the cashier's tally and the server's tally. Either the cashier or the server will end up short depending on whether the money went into the tray, or into the server's bank. To avoid this situation, it is important for servers NOT to settle their checks at a cashier station.
Another way this may be handled is to enable “Dynamic Cash Trays” in Station Configuration and have the cashier initialize a cash tray. In this scenario, the cashiers ticket will close to the assigned cash tray and the servers will close to a dummy tray (0). This will ensure that server tallies are kept separate from cashier tallies.
Cash tray options provide facilities for cashiers to initialize and close out their cash trays and to declare their starting and ending cash tray balances. These options are typically required when using cashier banking and some sort of strict controls are wanted. To access Cash Tray Options, press [MISC] from the main Point of Sale screen, then select [Cash tray Options].

IMPORTANT: Do not confuse the term CASH TRAY with CASH DRAWER. A cash drawer refers to the physical hardware that contains the cash tray. The cash tray is assigned a number and is tied to the employee that initialized it. During the course of a session there can be several cash trays associated with one Cash Drawer, depending on the number of cashier shifts. See the Station Configuration section for more information on Cash Drawers and Cash Trays,
To initialize a cash tray, select the option [1. Initialize Tray]. Restaurant Manager will ask for a cash tray number and if configured, an employee number, and the starting amount in the tray. For the starting amount, enter the total amount in the tray including cash, checks, credit card vouchers, etc.This procedure only initializes the tray on the station where it is performed
If the station is shut down, or re-booted for any reason, the cash tray number is automatically restored when the station is brought back on line. Restaurant Manager will continue adding to the previous cash tray tally.
Cash trays must be closed at the end of a shift or day. To close out a tray, select option [2. Finalize tray] from the [Cash Tray Options] menu. Restaurant Manager will ask for the cash tray total. This prompt is for cash purposes only. Your system can be configured to declare a total amount or declare by denomination. You can also configure your system to prompt for NON-cash forms of payments. This is the total of all forms of non-cash payments check, credit cards, guest accounts, etc. This number is printed at the bottom of the Cash Tray Report. Discrepancies between the declared amount and the theoretical amount (based on sales) are shown as an "Over" or "Short" at the bottom of the cash tray report. You can also configure your system to display running over/short and cash total during the declaration process.
RESTAURANT MANAGER does not allow duplicate cash tray numbers in the same session. Therefore, once a tray is closed, the same tray number may not be used until the next session.
To see the cash tray activity for the current session, select [3. Show Tray Info] on the Cash Tray Info menu list. Restaurant Manager will display a window showing the tray numbers that have been used during the session and the employee (or cashier) assigned to each. To the right of the employee number, the tray status is shown as either "OPEN" or "CLOSED."
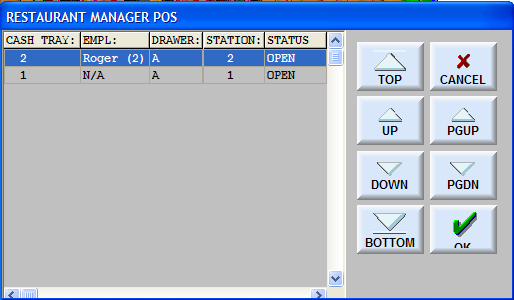
This terminology is not be confused with the drawer actually being open or closed. Instead, an "OPEN" tray is one that has been initialized, but not yet closed out.
Normally, Restaurant Manager automatically opens the cash drawer at the time of settlement; however, the drawer can be opened for other reasons. For example, to give change to a customer, or a cash tray shift change, etc.).
Restaurant Manager has two options to open a cash drawer:
Open Drawer (Cash Tray Options)- From the "Cash Tray Options" screen, select option [4. Open Drawer]. This option may be password protected. Note: a cash drawer will not open for an employee that does not have a cash tray assigned when having “Require cash tray Init” enabled.
Open Cash Drawer (Function Button)- this option will allow any employee with adequate security level to open a cash drawer. Security levels for this function button are assigned in the Function Button Layout Screen Setup Form. This method does not require an employee to have an cash drawer assigned and is not limited to linking a drawer to an employee.
You may want to balance the cash tray at the end of the shift, session, or to conduct a spot check. You will want to use the “Cash Tray” report to balance. From the [Cash Tray] Options screen select option [5. CASH TRAY REPORT] You will receive a prompt asking for a cash tray number. Enter in the tray number and then select where you want the report to print: screen or printer. If printer is chosen, the report will print to the local POS station printer. If screen is chosen, you may still print the report by selecting the “print” option within the screen.

A cash tray report for any tray can be run as many times throughout a same session no matter if a tray is still open or has been closed. Cash tray totals are reset upon closing a session. Cash tray totals for previous session must be run through the RM Report module.
You may want to edit cash tray totals if mistakes were made during the declaration and/or initiation process. To initiate the process, from the [Cash Tray Options] list, select option [6. View Trays]. Pressing this button will bring about a screen that displays cash tray number, employees assigned to the drawer, station number where the drawer was assigned, the cash declared and the “Open/Closed” status. The display screen also shows the drawer letter assigned if multiple drawers are implemented (this will default to “A” if not implemented).
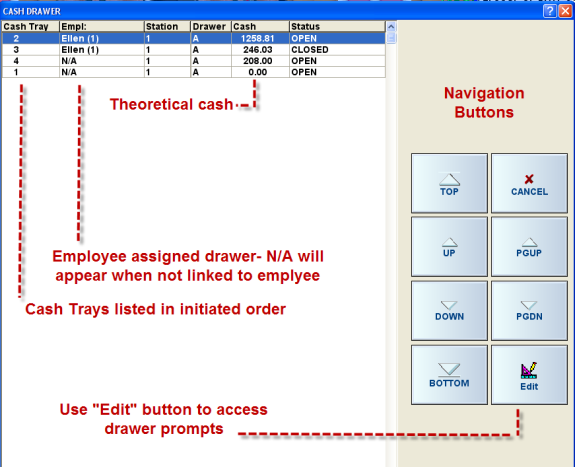
Use the navigation buttons on the right side of the screen to scroll up and down to select the cash tray to be edited. Press the [Edit] button once the selection is highlighted. Your first prompt will be for editing cash totals. Enter in the new amount using the declaration method configured. Hit the [OK] button once the dollar amount has been entered. Again, if configured, the next prompt will be for NON-cash totals. Follow the same step for entering dollar amount.
The “View Tray” function cannot be password protected. Only the Cash Tray function button can be password protected. It is recommended that “blind” be implemented for simple a theft prevention measure. To aid in the process the process of blind balancing you can suppress the editing of the cash tray totals creating a .txt file called " NOCTEDIT.TXT" and add it to the RMWIN directory. The content of the .txt file does not require content.
When multiple drawers are physically present at a POS station and has been configured so, this function allows the cashier to move their cash tray to another drawer if needed. This function appears on the [Cash Tray Options] menu only when “Multiple cash drawers per station” is enabled in Station Configuration. From the "Cash Tray Options" screen select option [7. CHANGE DRAWER]. Enter in the cash tray number in the prompt, press [Yes] in the conformation prompt, and then select the new drawer letter associated with the drawer you want to move the tray to.

During cash tray declaration, Restaurant Manager can optionally display the cash due amount. This amount takes into account the starting cash in the drawer, the cash sales, and paid-ins and paid outs. Enable the option "Show computed cash amount during declaration" located in RM BackOffice >Setup, Station Configuration>Devices > Cash Drawers > Cash Tray Declaration if you want this information to be displayed when finalizing cash trays. The cash tray declaration screen will appear as follows:

The “Paid Ins/Paid Outs” shows the total of all paid-ins and paid outs performed at that cash tray. If the paid-ins exceed the paid outs, then the number will be positive (e.g., it increases the cash amount that should be in the drawer). If paid outs are greater than paid-ins, then the number will be negative and decreases the cash amount.
If you prefer a blind declaration (e.g., the cashier does not know the amount that should be in the cash tray), then you should disable the option.
In a normal (non 24-hour) operation, Restaurant Manager requires all transactions to be settled, cash trays must be finalized and employees clocked out in order to close the session. In a 24-hour operation, this may not be feasible. To accommodate 24-hour operations, Restaurant Manager provides several configuration options under Setup->Station Configuration->Miscellaneous->Session.
When a 24 hour operation is enabled, Restaurant Manager will allow starting a new session at any time. If a session is already open, it is automatically closed, before opening the new one. In addition, all cash trays are automatically finalized with a declared amount of $0.00, any open tickets are transferred to the new session, and employees can be optionally left on the clock or clocked out and immediately clocked back in for the new session. The procedure for opening a new session is identical to non 24-hour mode and can be done from either a POS terminal, or from the BackOffice.
Although the session change can occur at any time, it is recommended that it be done at the same time each day and at the same time as a shift change. If you want your cashiers to declare their ending cash tray balance, then they should manually finalize their cash trays prior to starting a new session.
Because the 24-hour changeover requires modifying key data in Point of Sale, the POS stations are held in a locked state while the changeover occurs. As the session change is occurring, the POS stations will display the following message:
“Restarting RMPOS, please wait …”
Once the session change is complete, the POS stations will automatically shut down and restart themselves.
The only condition that will prevent opening a new session in 24-hour mode, are credit card transactions that are authorized, but not finalized. This is by design to ensure that the credit card batch stays in agreement with the Restaurant Manager session reports. If you are using on-line credit card authorization, you must finalize all credit cards before starting a new session.
The End of Day process is just one of several different methods RM can close a business session (Session). The EOD is configurable to allow user intervention or processed automatically. The main purpose of the EOD function is to insure several criteria are met before closing a Session adding accuracy to financial numbers. In addition, EOD has the capabilities to aid closing employees’ complete routine tasks by having task list appear or having reports run automatically.
The EOD program will allow you the choice to close orders or leave them open. You can customize cash tray options and employee log out procedures including the option to Edit Login Data for accurate labor figures. If using Mercury Payment Systems you can compare RM CC batch information to Mercury Batch information before settling a batch to eliminate errors. The EOD program can also be programmed to run a report to validate the session closing procedures where done properly and include messages to remind closing staff of pending chores that must be performed.
Proceed with the operation just as you would if you’d begun the operation from the POS Module, answering each prompt that appears on screen.
From the View Session Data screen you can view data from all Sales Sessions, including a current open session. You can also edit the Revenue Center to which a particular transaction has been assigned, change Bank Deposit amounts, exclude certain transactions from Sales Reports, or re-print guest checks.
Activities > Session > Session View
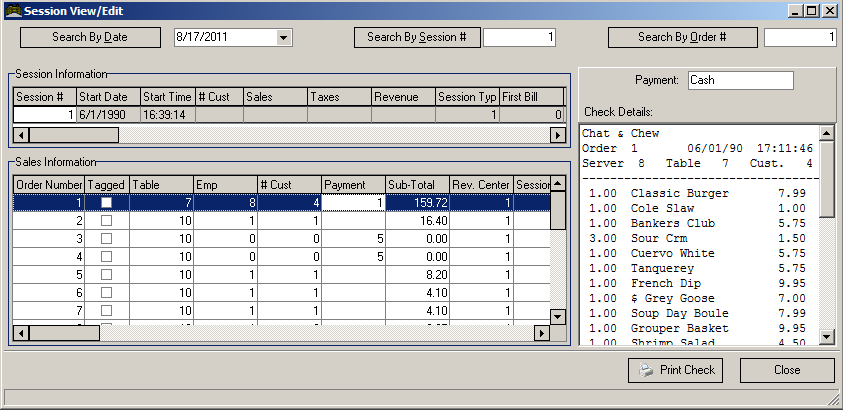
The section on the upper left displays all the sales sessions in your RESTAURANT MANAGER database. Use the scroll bar at the base of this section to view 38 columns of data relating to each session. Use the scroll bar at the right of the section to view the various sessions OR use the Search By session # button.
The section on the lower left displays all the orders generated during the sales session highlighted in the Session Information area above.
Use the scroll bar to the right of the Sales Information area to view the various orders generated during this sales session. Or, to quickly find a particular order, you may type the order number in the Search by Order # field at the upper right of the screen and then click on the  button beside this field.
Use the scroll bar at the base of this section to view 42 columns of data relating to each order.
You may double click on any transaction to call up the Edit Order pop-up screen below which is useful for editing key data fields or tagging a transaction.
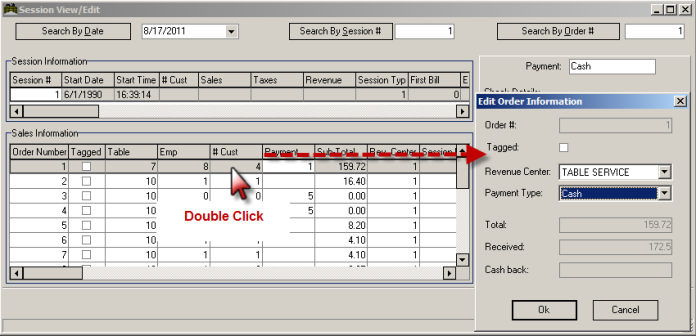
Note: The "Allow item editing in Session View" option (Setup > BackOffice> Reports tab) must be enabled to make edits permanent.
You may wish to edit any of the following data fields

From the session view screen locate the order of interest and press the “Print Check” button.
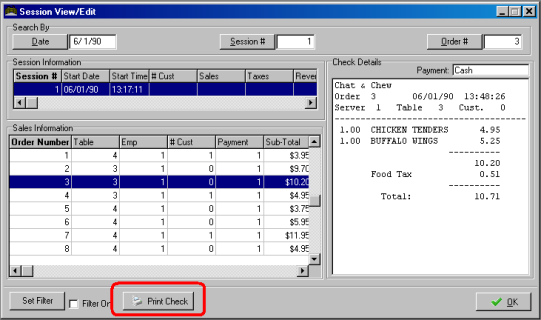
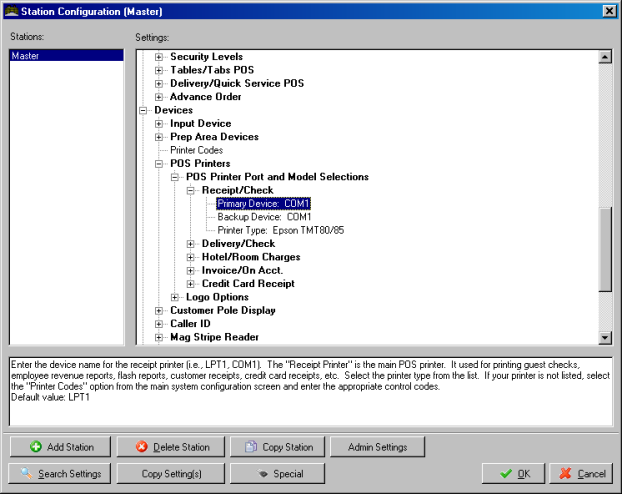
The check will be printed on the device defined in the “MASTER” station configuration.
Note- you are not permitted to print checks from the back office unless they are first settled from the POS program.
Find Session- Type a Session Number in the white field beside this button and then click on the button to highlight a particular sales session on the Session List.
Find Order- Type an Order Number in the white field beside this button and then click on the button to highlight a particular order within the Sales Session that appears beside the Find Session button.
Set Filter- Click on this button to access the Session Filter screen from which you can filter the orders from a particular session that are displayed in the Order List. If you decide to filter the Orders List, you must be sure to mark the [FILTER ON] checkbox, too.
From the Session View/Edit screen you can filter the orders that are displayed on the Order List in the Session View screen. Use the column headings to find an order or a particular amount, all orders handled by a particular employee, etc. Information is sorted in ascending or descending order when clicking on a column header. You can also filter by clicking on a heading and using the down arrow to choose specific data information.
Activities > Session > Session View > Received Column
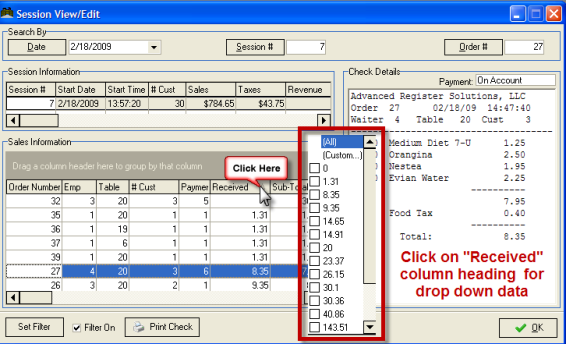
You can also filter date by dragging a column heading into the “drop area”:
In the example above, we dragged the “Emp” column heading into the “drop area”. Click on the (+) next to an employee name to obtain more detailed information for the employee.
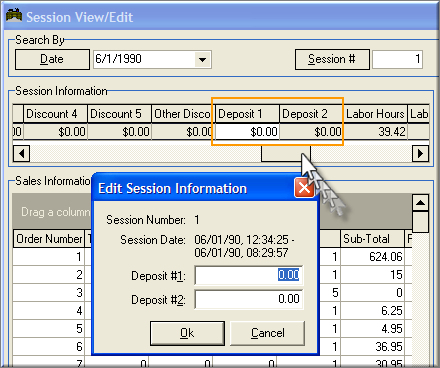
Restaurant Manager allows you to record up to two bank deposits at the close of each Sales Session. If you did not record the Bank Deposit Amount when closing of a Sales Session, or if you recorded the wrong amount, you may edit the amount from the Session View Screen.
Click on the “Activities” drop down menu and select the “Session View” option.
Locate the session for which you wish to change the Bank Deposit Amount(s) by either:
(continued in Configuring Peripherals)