(continued from Reports Graphs)
The hospitality industry is a highly completive market. Analyzing data in real time is critical in understanding how your business is performing and to improve the effectiveness of business operations. In today’s market, looking at reports at the end of the night or the next day will not suffice. Understanding the critical nature of real time information, ASI has responded by offering a suite of programs designed to help you compete.
The Session Monitor function shows ASI long standing commitment to providing real time data. Using the session Monitor, you can view real time labor costs and sales averages in a variety of formats.
Real Time Counters is highly configurable and allows you to track items used in real time. This offering is similar to inventory but unlike inventory, requires very little to effort to setup and maintain.
RM Info Center is a graphical program that allows you to follow labor, sales, out-of-stock quantities, and specified tracked items. In addition, RM Info Center provides customizable drill down reports suited for you individual needs.
Covered in separate documentation, ASI also provides for remote real time monitoring with offering such as:
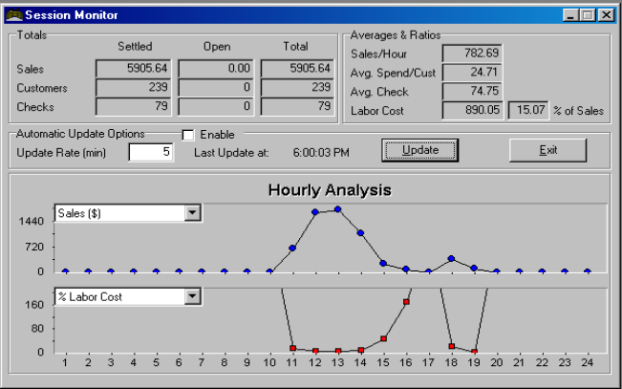
From the Session Monitor screen, Restaurant can show a wide variety of real time data on a current POS session. The data is displayed in numerical format at the top of the screen and in graphical format at the base of the screen.
Activities > Session Monitor
The Session Monitor allows you to track important variables such us %labor cost and Average spend in real time.This screen is organized in four sections:
Totals-This section displays totals for both settled checks and open orders.
Averages and Ratios-This section displays key sales statistics that our system calculates automatically.
Automatic Updates- Mark the “Enable” checkbox in this section to automatically update this screen with the most current data from the POS Module. Then use the Update Rate field to enter how frequently the automatic updates should be calculated.
You may also click on the update button in this section to instantly update the data displayed, regardless of the automatic update rate entered in the field described above.
Hourly Analysis- Use the two graphs in this section to view a graphical analysis of a variety of sales data. Simply click on the down arrow in the field on the upper left of each graph to select one of the following options:
The Counters functionality was developed to provide restaurant operators real time consumption snapshots for selected "counter" items”. Counters can be tracked for any purpose needed including but not limited to a current shift. This functionality is especially useful in a bar environment to help facilitate 'Spot Checks', end of shift inventories, and also for comparative reporting with “Third Party” Liquor/Beverage control systems. Typically, a number of selected items such as Bottled Beer (not brands), Oz's of Draft (for each line), Bottled Water, pop and/or Juices, and especially Dollars of Liquor (for Liquor System comparison Like Berg, AZBAR and others) are counted at the end of a bartender's shift and compared to the consumption report obtained at the POS. In some cases, at the preference of the restaurant/bar or to meet the needs of an existing tracking system, each individual unique brand or item may be defined for more specific tracking.
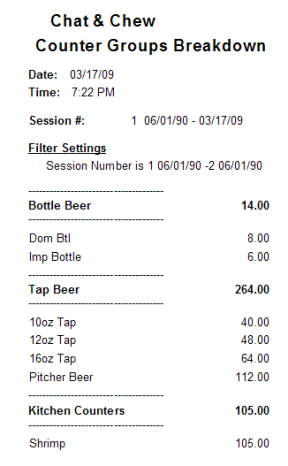
Counter Items form part of Counter Groups to allow the selection of counters by operational area in the business. For example, “Bar Counters’ and “Kitchen Counters”. Counter Items might be domestic bottle beer belonging to a parent counter called Bottle Beer.
Another powerful use would be for easy tracking the usage of key high-cost food items such as Steaks, Seafood, etc without the need for a full Vendor/Item/Recipe/Invoice based Perpetual Inventory system.
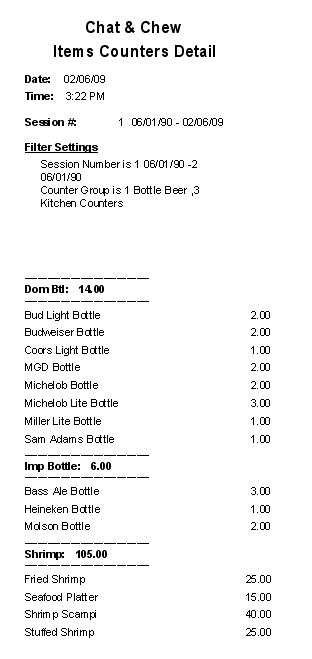
The POS automatically logs menu items rung up in real time, making the necessary adjustments for deleted items and voided checks. Reports can be taken at the POS or the RM Report Module. The reports can be customized to specify POS Station, Employee, Revenue Centers, etc. for enhanced tracking. Four reports are dedicated to the tracking of counters. Item Counters
Any check that is voided is treated as if the items were never ordered. For example, if you order 3 beers, and run a report, it will show 3 beers sold. But if you void the check, then the count will go back to 0. To retain the count of items sold, the user must settle to "Guest." This functionality is similar to inventory depletion in RM Inventory ("voids" do not deplete inventory, but "Guest" does). In summary, any void is treated as if the transaction never happened.
This feature requires the optional “Inventory Control” Module. Real Time Counters cannot be used without the module
There are three areas that require configuration
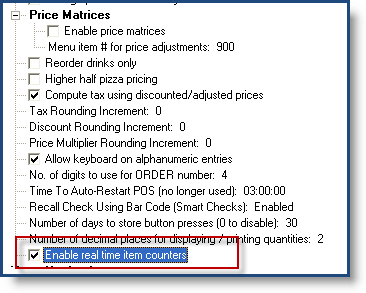
Real Time Counters must be enabled for the Counters to register at the POS and transfer information in the associated reports. In the RM BackOffice go to Setup > Station Configuration > and type “Enable real time item counters” using the [Search Settings] button at the bottom of the Station Configuration form. Enable the option “Enable real time item counters” by placing a check in the option box. You must enable this function on all POS stations where you intend to use counters.
Counters can be configured in a number of ways. Much like setting up a menu in Restaurant Manager, the main premise of Counters relies on hierarchal groups. The main group called “Counter Groups” contain “Counter Items”. Counter Items, in turn, contain menu items. Counter groups and counter items must be assigned in the “Counter Setup” form. Menu items can be assigned within the “Counters” setup form and in the “Counters” tab within the “Menu Item” setup form. Or you can use “Modify items belonging to this group” function on the “Menu Group” setup form when doing large scale menu changes.
All counter groups and counter items are created, deleted or changed in the Counter Setup form. The setup form is found in RM BackOffice under Setup > Menu > Counters Setup. The form contains three main sections:
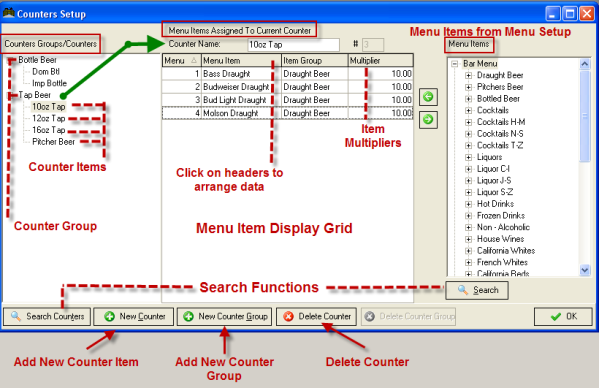
This section of the Counter Setup form lists Counters Groups and Counter Items in a menu tree format. All Counter Items are list below the parent group. Counter Groups are added using the [New Counter Group] button and removed with [Delete Counter Group] button both located at the bottom of the form. The [Delete Counter Group] remains inactive until you select a counter group from the list. Names for both counter groups and items can be changed by selecting the desired item and typing in the new name in the “Counter Name/ Counter Group Name” field at the top of the form. This field toggles depending on which counter type (groups or items) is selected. Counter Items are added using the [New Counter] button and removed with [Delete Counter] button both located at the bottom of the form. The [Delete Counter] remains inactive until you select a counter group from the list.
This list all items assigned to a counter item. Information listed in this section can be sorted by clicking on the column headers and reversed by clicking on the header a second time. This section is broken down into four sections:
This section contains a menu tree identical to the tree found on the left side of the Menu Setup form. You can add all menu items belonging to menu group to a counter item by selecting a group from the menu list and use the left arrow to move it over or by dragging it over. To add specific menu items to a counter item, open up the menu group with the “Menu Items” list and use the left arrow after selecting the menu item or drag the item over. Items can be removed from the “Menu Items Assigned” section by using the same process to add items. You can search for menu items using the [Search] button and type in the name.
New menu items must be added in the Menu Setup form before it can be added in Counters
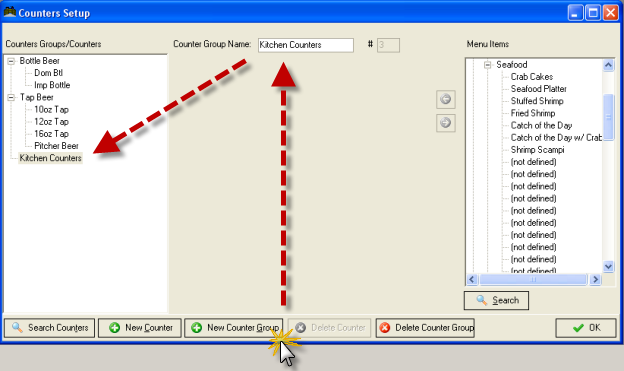
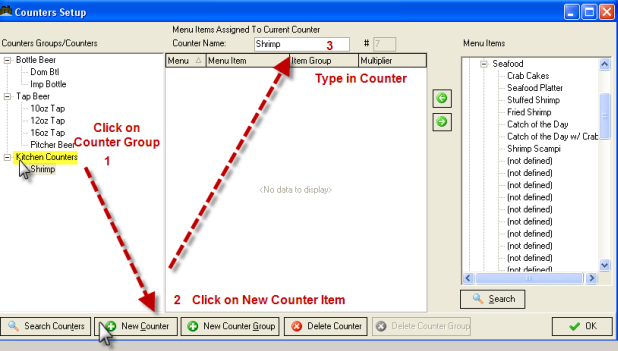
Step One- Create Counter Group
For our example we will be using the demo program. We are going to set up a counter group called “Kitchen Counters” and create a sub-set of counter Items called “Shrimp”. To start,, in the Counter Setup form, we will click on [New Counter Group] at the bottom of the form and the type in “Kitchen Counters” in the “Counter Group Name” field at the top of the form.
Step Two- Create Counter Item
Next, click and highlight the new group, “Kitchen Counters” located on the “Counters Group” menu tree (left side of form). Select the [New Counter] button on the bottom of the form once our new group is highlighted. Type “Shrimp” in the “Counter Name” field.
Step Three- Add Menu Items to Counter Item
Click and highlight the new counter item, “Shrimp”. Scroll down the “Menu Items” menu tree and expand the “Food” menu and then the “seafood” menu group. Drag over menu items Seafood Platter, Stuffed Shrimp, Fried Shrimp, and Shrimp Scampi - into the “Assigned” (middle) column.
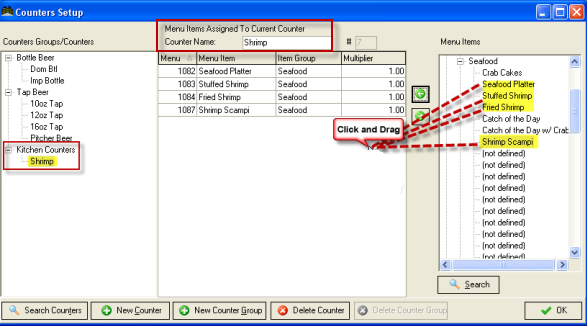
The last step to our setup is to adjust the “Multipliers” in the “Multiplier” column to reflect the portion measurements we want to track. We do this by clicking on the cell in the “Multiplier” column corresponding to the menu item and enter the numeric value. In our example, we know the Seafood platter has three shrimp, the stuffed shrimp has 5 shrimp, Fried Shrimp has 5 Shrimp, and the Shrimp Scampi has 8 shrimp.

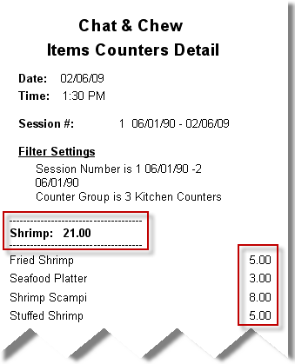
If we were to order one of each of the entrees listed the Item Counter Detail Report will give a break sold in each entree and the Counter Group total will be 21 (3+5+5+8).
Counter Groups and Counter items must be configured in the “Counter Setup” form. However, Restaurant Manager allows alternative methods to add a menu item to Counters. Specifically you can add a menu item to counters either using the Counter Tab in the “Menu Item Setup” form or using the [Modify items belonging to this group] function on the “Menu Group Setup” form.
The Counter Tab is found in RM BackOffice > Setup > Menu > Menu Setup > Menu Group > Menu Item. The “Counters Tab” is to the far right.
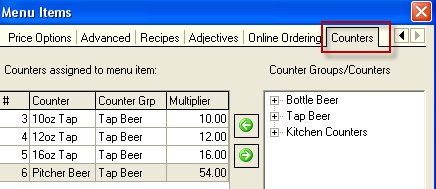
The process of connecting a menu item to a counter item is reversed. Since we have already selected a menu item, we will be selecting a counter item from the “Counter Groups/Counters” column on the right. To add a counter item to a menu item, expand a counter group from the listand click and drag (or use left arrow) to move the counter/s into the “Counters assigned to menu item” column. You can add adjust the multipliers as discussed earlier. Note that the counter display grid columns have changed:
# Column- reflects the counter number setup in the Counter setup Form
Counter- Name associated with the counter item
Counter Grp- name associated with the Counter Group
Multiplier- Multiplier-this field is where you enter the measurement unit that will appear in the counter report
Information listed in this section can be sorted by clicking on the column headers and reversed by clicking on the header a second time.
The Counter Tab is found in RM BackOffice > Setup > Menu > Menu Setup > Menu Group >Modify items belonging to group.
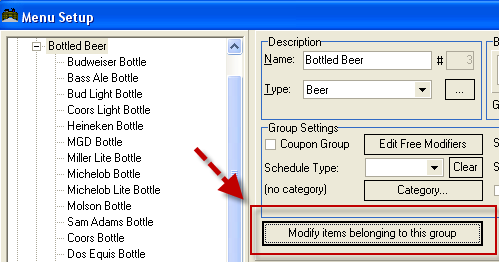
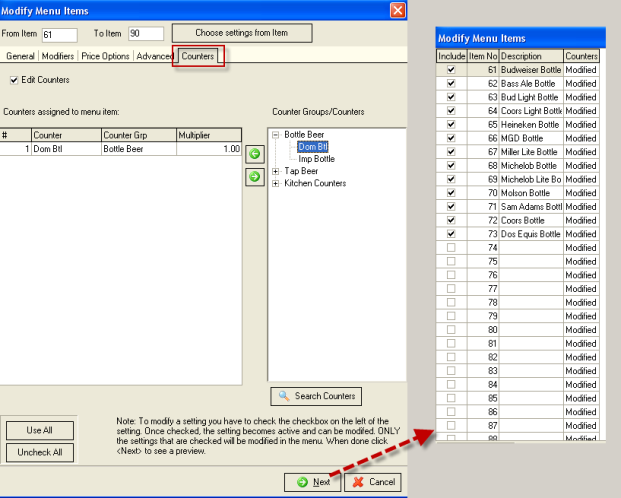
Click on [Modify items belonging to group] once you have selected your menu group. Select the “Counters Tab” in the “Modify Menu Items” form and then enable the “Edit Counters” option. Note that the counter display grid columns have changed:
# Column- reflects the counter number setup in the Counter setup Form
Counter- Name associated with the counter item
Counter Grp- name associated with the Counter Group
Multiplier- Multiplier-this field is where you enter the measurement unit that will appear in the counter report
Information listed in this section can be sorted by clicking on the column headers and reversed by clicking on the header a second time.
Similar to the Counter Tab on Menu Item Setup, the process of connecting a menu item to a counter item is reversed from the Counters Setup form. . Since we have already selected a group of menu items, we will be selecting a counter item from the “Counter Groups/Counters” column on the right. To add a counter item to a menu item, expand a counter group from the list and click and drag (or use left arrow) to move the counter/s into the “Counters assigned to menu item” column. You can add adjust the multipliers as discussed earlier. However since this is a group function we must complete the process by Clicking on [Next] at the bottom of the form and then include(mark box in field column) or exclude the menu items you want to apply the changes to.
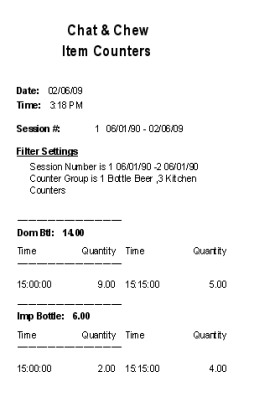
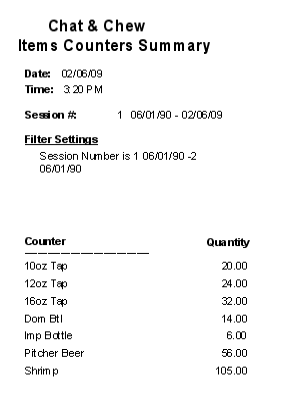
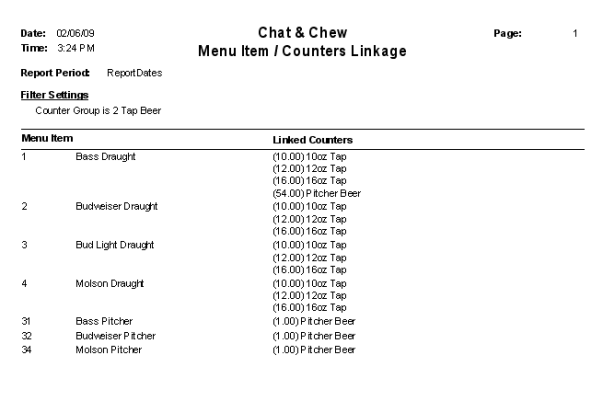
Reports are the final output to measure the data input. Restaurant manager has created four reports to track Real Time Counters:
The 40 column reports can be run at the POS using and all reports can be run from the RM Report Module if you have a standard 80 column printer. Reports can be filtered by station, employee, counter groups; counter items etc to best meet your needs. More information on running reports can be found in: RM Reports Guide found in >Start >Programs> Restaurant Manager Folder.
RMInfoCenter is a multi-level tool allowing you to view, track and report the operational information recorded by Restaurant Manager. Included with every installation, this module reflects a more dynamic method of observing data in real time when compared to conventional static reports. RMInfoCenter is made up of 3 core components: Monitors, Graphs and the Dataminer. The Monitors shows real time information that allows managers to make operational decisions while the restaurant is in session. Graphs facilitate the analysis of data, and the Dataminer allows you to arrange and organize information in virtually an unlimited number of ways.
Note: you may automatically start RM Info Center every time the RM BackOffice Module by enabling the "Start Info Center Automatically" option under Setup > Backoffice > Reports tab (admin password required).
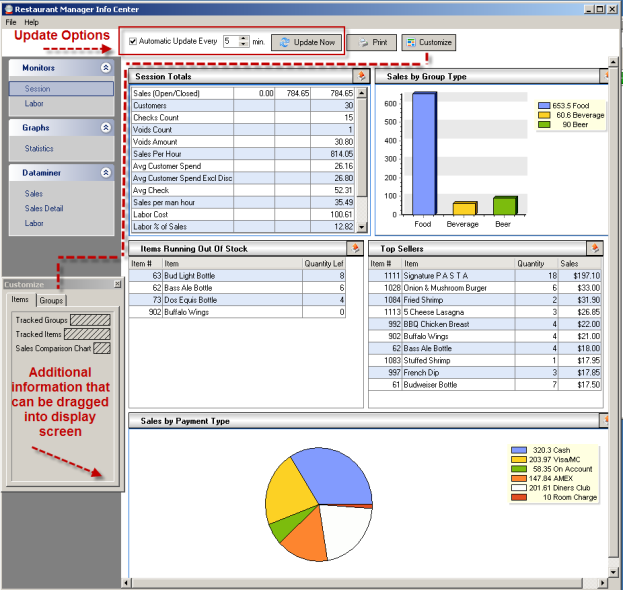
The Session Monitor is designed to show information on a real time basis in an easy to read format. The information displayed can be updated automatically in one minute increments using the “Automatic Update Every” option. You can also update information using the [Update Now] function button located at the top of the screen. Up to eight informational display areas can be viewed at a single glance and can be organized in a number of ways using the [Customize] function.
RM InfoCenter Session Monitor Screen
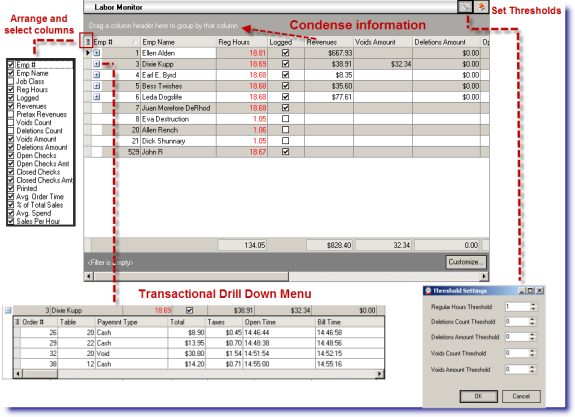
In the Labor section of Monitors you can view real time hours, revenues, voids, deletions, along with other vital statistics. You can choose and arrange data columns according to your preferences. You can drill down transactional information by clicking on the (+) next to an employee’s name. You can further sort information on the Labor monitor by clicking on any column heading or dragging a column heading into the field setting on the top of the monitor. Warning threshold can be set using the wrench icon in the right hand corner of the Labor Monitor. When thresholds are achieved the print on the monitor will turn red alerting you that action might be needed. This function is perfect for employees reaching daily overtime, deletions, or voids. And of course, the monitor can be printed at any time.
RM InfoCenter- Labor Monitor
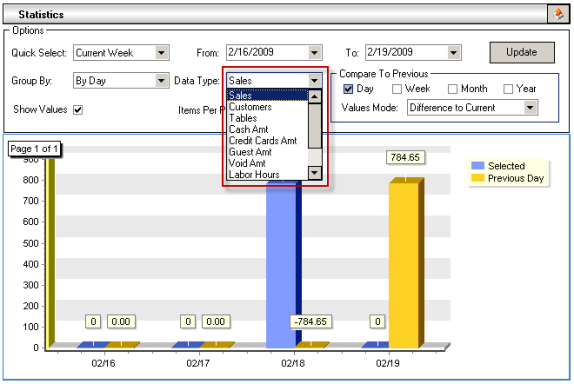
The Graphs section of RM Info Center lists statistical data in a graph format that can be configured by dates. The “Quick Select” contains preset time period along with the option for manual dates. This option allows the user to choose a specific time period to view. The “Group By” field will arrange the data on the graph by day, week, month, or year. The “Data Type” field allows you to choose the type of information displayed on the graph. You can select sales, customer counts, table counts, labor hours, and much more as data to display. The “Compare to Previous” field settings allows you to compare current totals to relevant previous periods. Comparison selections included day, week, month, and year. The values mode under the “Compare to Previous” field settings will show numeric values associated with the bars on the graph. The “Show Values” must be enabled for the numeric information to appear on the graph.
RM InfoCenter- Graphs
The Dataminer provides another format to discern sales and labor data. You can arrange data by selecting information fields and drag it into the appropriate area. The available fields are located on a “Field List” and are broken down into two categories:
Data Field- marked with a blue diamond
Column Fields- marked with a green arrow
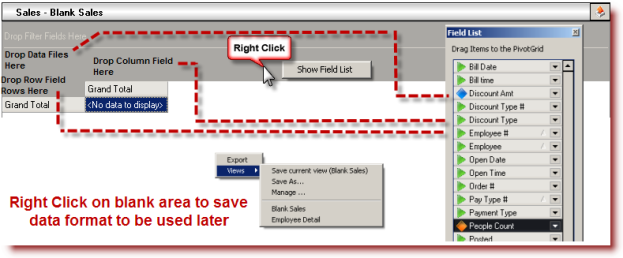
Information can be arranged in columns or rows by dragging data fields in the appropriate designated areas. Once the data is arranged in to a satisfactory position the user can save the information by right clicking on a blank area of the display, select “Save As”, and type in the desired name. The information will be saved into the apposite Dataminer heading for later use.
Filter settings at the top of the form are used to delineate time periods. You can filter both by session or date. You can also universally sort data using the “Sort Field” or sort data at the by clicking on column headings.
Restaurant Manager offers several other industry leading method to monitor and report your restaurant remotely. Select one of the hyperlinks below to obtain more information from the ASI website: