(continued from Communicating with Prep Area)
Restaurant Manager allows you to discount transactions in a variety of ways. Most discounts and coupons are manually applied to transactions from the Order Entry Screen. Some discounts may also be applied from the Settlement Screen. Other discounts are automatically applied to transactions based on time of day, the type of items on the order, or the type of customer who places the order.
Most discount and coupon amounts must be configured in the RM BackOffice Module. However, there are some POS Function Buttons that allow you to change prices on the fly right from the Order Entry Screen without doing any BackOffice configuration:
When configuring these various discounts in the RM BackOffice Module, it is highly recommended that you configure password protection for them all. When discounts are configured with password protection you may identify the employee that applied certain discounts on the following reports:
Discount amounts are detailed on the following reports
You can also track discount details using the RM Info Center.
The Status Bar on the Order Entry Screen displays information on percentage discounts already applied to a given transaction. Percentage discounts are also summarized on the Summary Info Area of the Settlement Screen.
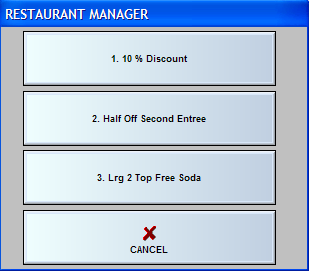
The Order Entry Screen includes POS Function Buttons that allow you to manually apply the following discounts to a give transaction:
Restaurant Manager possesses one of the easiest programmable promotions/coupons programs in the industry in terms of back office coupon set-up and POS application. Features include capabilities for Bar-coding, Date sensitivity, Minimum/Maximum values, and true 2 for 1’s, and purchase requirements. Each coupon can have its own set of criteria based on any number of requirements.
The Coupon feature is well suited to handle other promotions that do not require coupons. Happy hours, pre-fix meals, and wine flights are a few of the promotions restaurants and bars may offer are now capable of being handled in Restaurant Manager’s “Coupons” and promotions.
Note: Coupon schedules are restricted by the time at which the coupon is applied.
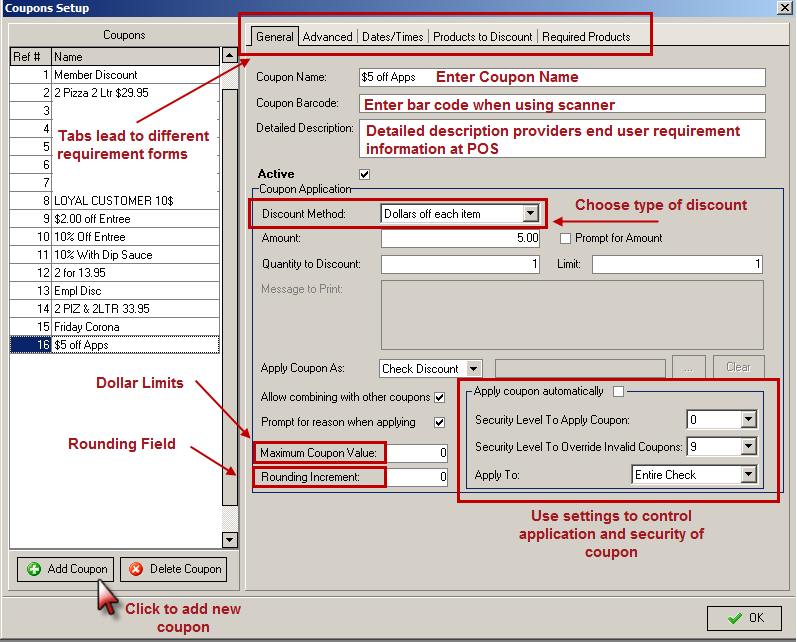
The coupon configuration is located in RM BackOffice under Setup > Settlement and Tips > Coupons
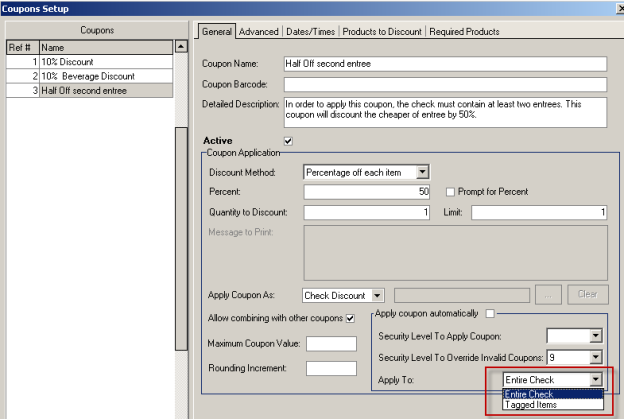
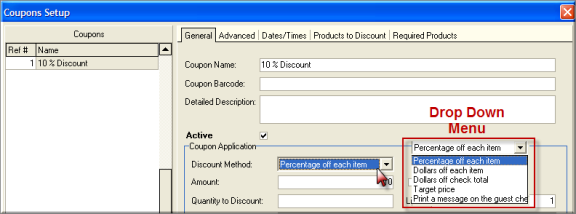
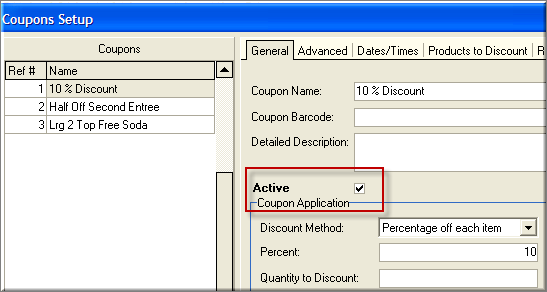
The “General” tab screen allows the user the most basic coupon requirement functions. It is in this form where you add the coupon name, bar code, and can enter a detailed description of product requirements. Descriptions entered in this field will pop up automatically at the POS if defined coupon requirements have not been met during a transaction. In addition, coupons are activated or deactivated in this screen. Additional coupon limitations are placed using the “Coupon Application” settings. The drop down box offers various discount methods including percentage or dollars off each item, dollars off total check, target price, etc. The "Prompt for reason when applying" allows for auditing of coupons and provides a consumption mechanism when using RM Inventory.Price rounding increments, maximum dollar values and security levels are more settings found on this form page.
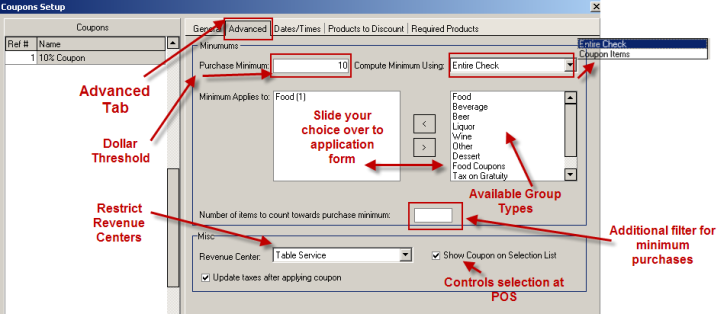
The controls under the [Advanced Tab] in the coupon setup form provide the end-user additional restrictions. Coupons can be further restricted by purchase minimums, group types, revenue centers, and number of items purchased. Note the option “Compute Minimum Using”- this feature differs from the “Apply To” option under the “General Tab”. The “Apply To” function under the “General Tab” gives the option at the POS to apply the coupon for the entire check or allows to the user to “tag” items. See the section on Advanced Tab Settings for more detailed information.
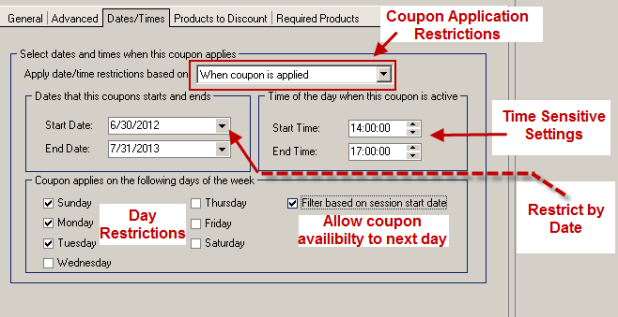
Coupons have the capability of scheduling by date, time and/or day of week. By default, coupons are available at all times. This function is usable for Happy Hours and various other time/date driven promotions.
This data entry field is used if a coupon or promotion has a specific target to discount and should be used to identify the target. Products to discounts are identifiable as menu items, menu groups, group types, courses, and categories.
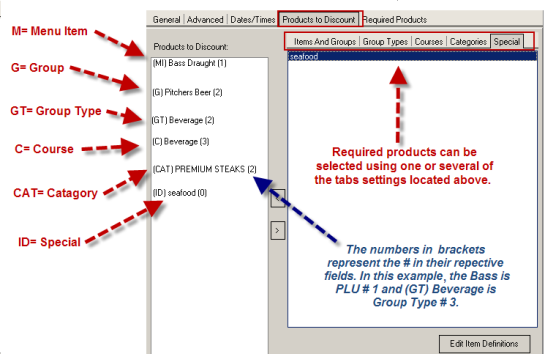
More information that is detailed may be found in: Products to Discount
Some coupons require that a specific menu item be purchased in order to qualify the giveaway. An example might be; buy one entree and get a dessert free. In most circumstances, two sets of requirements will be needed to achieve the goals of this coupon type. In the example mentioned, the first requirement set should contain a list of all entrees. This can be done by using “Items and Groups” ,”Group Types”, “Courses”, “Categories”, or identifying item definitions in the “Special” tab.
More information that is detailed may be found in: Products to Discount
Before getting into the details, let us see how one could use a coupon to apply a 10% check discount. From the coupon setup form, press the [Add Coupon] button at the bottom of the form. Enter a name for the coupon and the number 10.000 in the [Percent] field. For this example, you can leave everything else at the default setting.
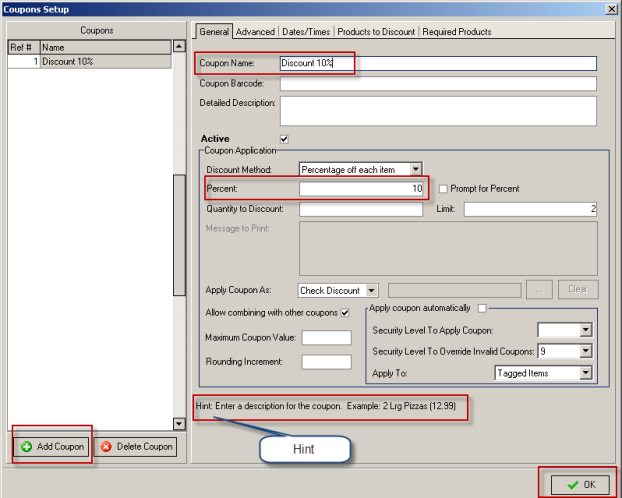
That is all there is to it. Press [OK] to save the coupon. The coupon is now usable at the POS.
Notice that there is a hint at the bottom of the coupon setup form. The hint is context sensitive which means that it gives information on whichever field is active. If you are unsure about any of the fields in the coupon setup form, highlight the field of interest and the hint will display additional information to help you.
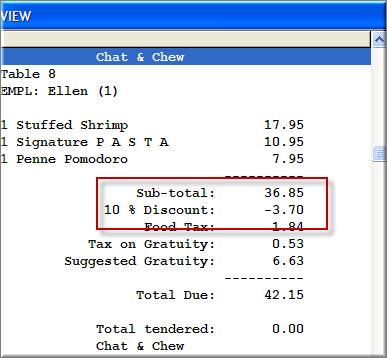
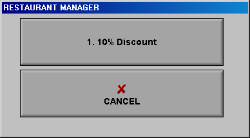
Now, let us apply the coupon. From the point of sale program, create a new order with several items and press [Misc] > [Coupons]. A pop up window will display showing all available coupons. Choose the [10%] Discount.
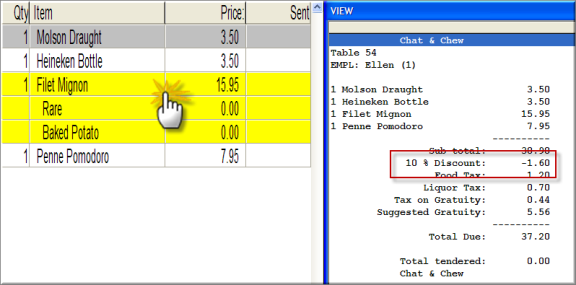
To see the effect of the coupon, you can either print the check, or click on the running sub-total displayed at the bottom left of the screen.
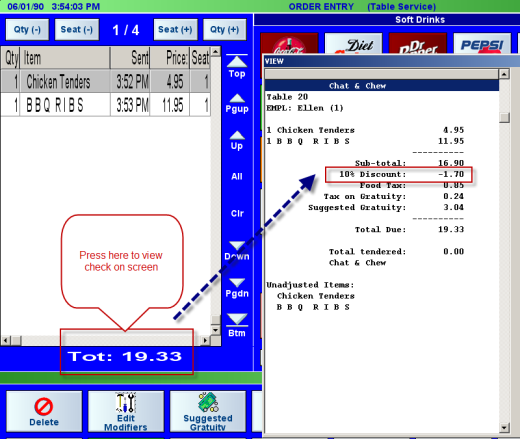
Above, after touching the running sub-total, the “view check” screen displayed, showing the coupon for a 10% Discount and the amount of the coupon.
Note: Touching the Running Total will apply automatic coupons if a coupon criterion has been met.
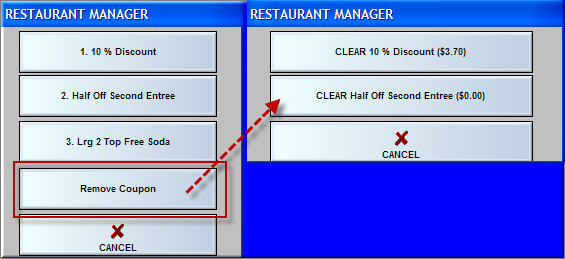
Press the [Misc] > [Coupons] again to cancel a coupon. You will see an option labeled [Remove Coupon].
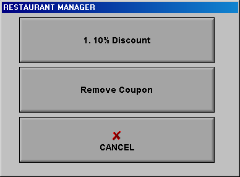
If you choose that option, the POS program will display all coupons applied to the current order, and allow you to choose the one you wish to remove. In this example, there was only one coupon applied presenting you with only one choice after pressing [Remove Coupon]
Coupons can be programmable to discount specific items. To illustrate, let us create another 10% discount, but let us make it apply to beverages only. Follow the same steps as the previous example -- [Setup] > [Settlement and Tips] > [Coupons] > [Add Coupon] and enter the coupon name and percentage.
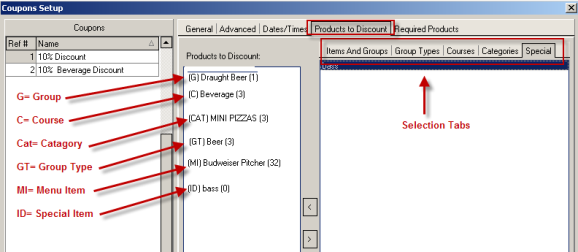
We are going to set up a 10% discount to beverages only. Click the [Products to Discount] tab near the top of the form.

To narrow down the list of products, we must drag and drop the appropriate items from one or more of the tabbed lists at the right of the form. In our example, we just want the discount to apply to beverages. The easiest way to accomplish that is by clicking the [Group Types] tab and choosing [Beverage].
Now the discount will be applicable to beverages only. Notice that the letters [GT] precede the word [Beverage] as a reminder that it is a “Group Type.” Click [OK] to save the coupon and it is ready to go.
Notice that there is a great deal of flexibility in specifying items. Not only can you drag and drop group types, you can choose menu groups, or menu items, courses or categories. You can also be very specific by using special items (more on this later).
Some coupons require specific items ordered to be valid. For example:
Buy one entree at regular price and get half off a second entree of equal or lesser value
This type of coupon is not valid unless there are at least two entrees on the order. Because the coupon requires two entrees, the coupon definition must have two required items.
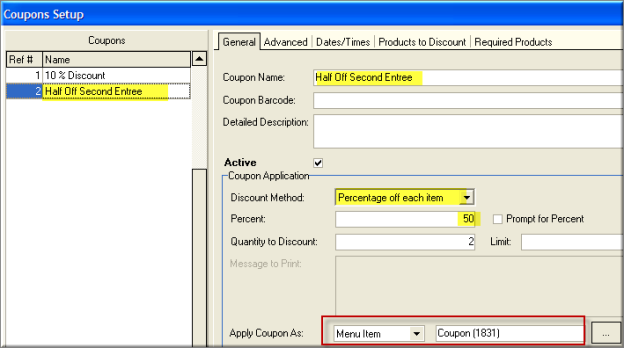
Let us go ahead and work through this example to see how to set it up. From the coupon setup form, press [Add Coupon].

Enter the coupon name and a detailed description of the coupon. Next, to get half off, enter “50” for the percent. Also, enter the number “1” in [Quantity to Discount]. This restricts the discount to one of the two entrees. Without this restriction, the coupon would discount BOTH entrees by 50%. By default, the system will automatically discount the “cheaper” entrée.
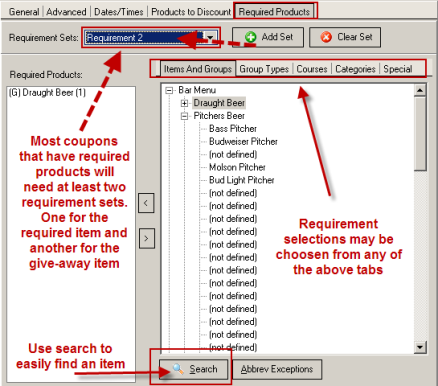
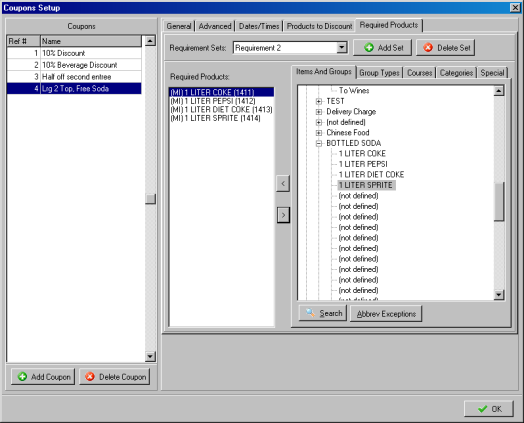
To avoid the coupon from applying to any type of item, including appetizers, drinks, etc, we must restrict the coupon to entrees only. We will use the [Required Products] tab to achieve the desired results. Required products definition are similar to “Products to Discount,” but with the added concept of “Requirement Sets.” Each Requirement Set defines a single required product. In this example, there are 2 required products, both of which are entrees. Therefore, we must create 2 Requirement Sets.
To create a Requirement Set, click <Add Set> near the top of the form. Just like Products to Discount, there is tremendous flexibility in specifying Required Products. Click on the “Items and Groups” tab, find the menu groups that correspond to entrees and drag them into the [Required Products] window.
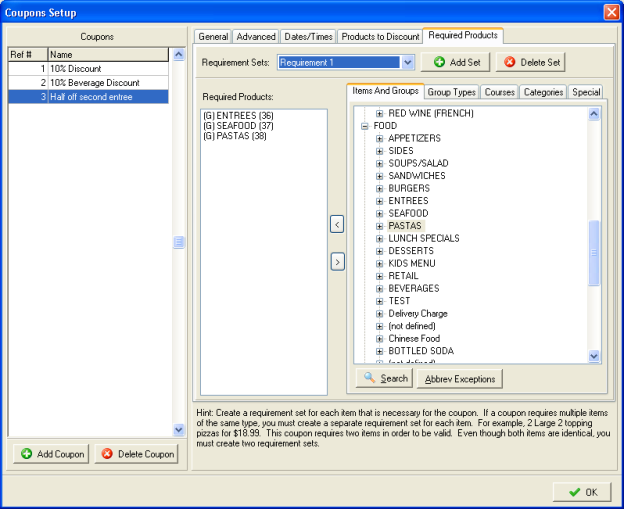
You should see something similar to the above. To complete this coupon, you must repeat this process for the second entree (click [Add Set] to create Requirement set #2, and drag the Entree groups as described above). Click [OK] to save the coupon.
Understand that there could be more than one way to specify a required product. In this example, we could have specified an entree by expanding the groups, and dragging the actual menu items into the Required Products window. The advantage of using the menu group is not only is it simpler, but as entrees are added or removed from the menu, there is a better likelihood that the coupon will work properly with the newly added items without having to re-program the coupon.
Note: If there are multiple entries in a “Required Products” list, a match with any one of the entries will fulfill the requirement.
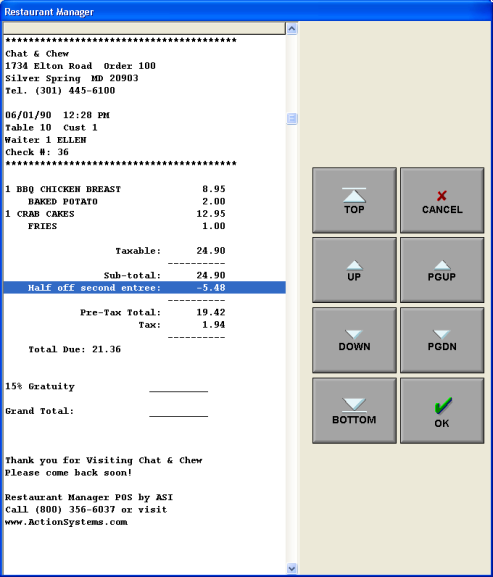
Let us go to the POS module and see how this coupon works. We will start by creating a new check and ordering just one entrée (not two). The below screen is displayed while attempting to apply the coupon at this point.
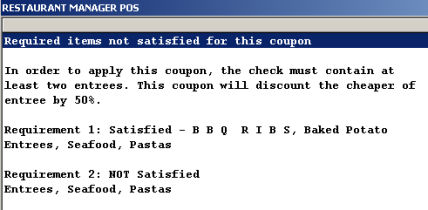
This screen is for informational purposes only and displayed whenever one or more Required Products are not satisfied. The screen shows that BBQ Chicken Breast satisfies the first requirement, but since two entrees are required, the coupon fails. Note also that the “Detailed Description” is displayed to give the operator additional information regarding the coupon.
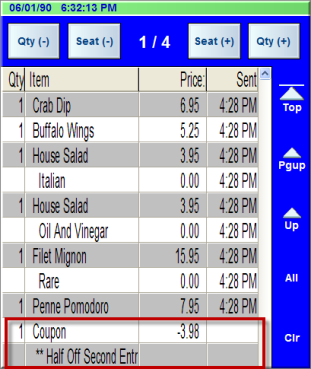
Let us order another entree and try again. After ordering Crab Cakes, apply the coupon to the check. This is the resulting [View Check] after applying the coupon.
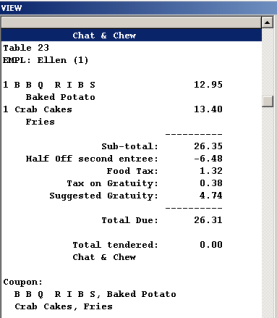
Notice that the BBQ Chicken Breast is priced at $12.95 (including the Baked Potato), while the Crab Cakes is $13.40 (including Fries). The cheaper of the two items is the BBQ Chicken Breast, so the coupon uses that item to compute the discount (50% of $10.95 = $6.48).
To illustrate an important concept regarding coupons, let us now delete the Crab Cakes from the order. Displayed is the following message:
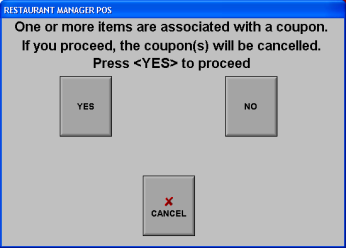
Having applied the coupon to the Crab Cakes, if you delete it from the order, the system will automatically cancel the coupon. The system will do the same if you transfer the item to another check, do a price adjustment, or attempt to discount the item. Because these operations either remove the item, or alter its price, the coupon is no longer valid and automatically canceled.
Note: On operations that transfer ALL items, such as Transfer Items from the Main tables screen or Transfer to Table from within a tab, any applied coupons remain in effect. It is only when doing partial item transfers that coupons are cancelable.
There is an important difference between this coupon and the two coupons in the previous sections (10% check discount, and 10% beverage discount). Because this coupon has “Required Products”, its value computes when the coupon initially is applied and never recomputed after that. The 10% Check Discount and the 10% Beverage Discount described in the previous sections have no required products and therefore apply to all items on the check. During the process of adding or removing items from a check, the value is automatically re-calculated.
Another distinction between coupons with Required Products and those without is the behavior of automatically cancelling the coupon when attempting to delete or alter an item. In addition, coupons with required products cannot apply to items that have been price adjusted, or item discounted. The following table summarizes these key differences.
|
|
Coupons WITHOUT Required Products |
Coupons WITH Required Products |
|
Coupon value automatically recomputed when items are added or removed |
Yes |
No |
|
Coupon automatically removed when items are deleted or adjusted |
No |
Yes |
|
Can apply coupon to items that have been price adjusted or discounted |
Yes |
No |
Table 1 - Difference between coupons with and without Required Products
Understand, as items are added or deleted, or if the check changes in any way, coupons without Required Products constantly re-compute. Each time the coupon is re-computed, it must scan the entire check to determine the new value of the coupon and its impact on the taxes. This scanning and re-computing takes time and could cause sluggish POS response, particularly on large checks with lots of items. If the system response is objectionable, it may be preferable to apply these sorts of coupons at the end of the transaction (e.g., during settlement).
The View Check window shows information that may be helpful when applying coupons, particularly those WITH required products. We will add a few items to the above order and press the running subtotal to display the “View Check” screen.
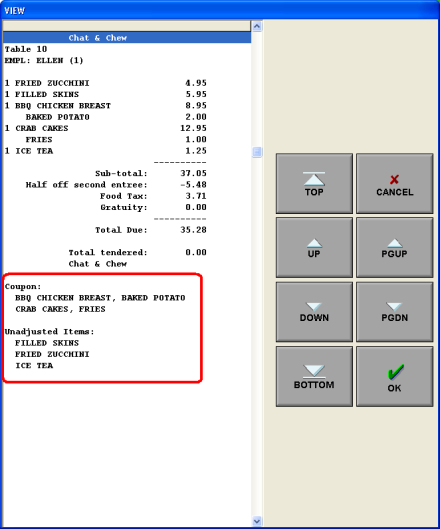
Notice the circled portion at the bottom of the View Check window. It shows all the items on the current order and their status. This shows the coupon applied to the BBQ Chicken Breast and the Crab Cakes. Therefore, these two items are no longer eligible for other coupons with Required Products. If you attempt to apply a coupon and the system does not allow it, this window may provide a clue as to why the coupon is failing (e.g., some items ordered could have previous discounts or used on another coupon).Notice also the items in the “Unadjusted Items” list. These items are unadjusted and therefore are eligible for use with other coupons.
One final point before moving on -- in this example, the coupon required two entrees. In addition, after applying the coupon, there were exactly two entrees on the check. What happens if there are more than two entrees when applying the coupon? The answer is the coupon will take the first two entrees that it finds.
If this is not the desired behavior, then the coupon is changeable so it applies to tagged items rather than the entire check. In other words, the operator would have to tag the two entrees before applying the coupon. This approach does require the extra step of tagging, but it has the advantage that the operator can specify the exact items for applying the coupon. The setting to change the tagging behavior is located in the [General] tab in Coupon Setup > [Apply To] drop down box in the lower right hand side of the screen.
For now, do not worry about the other settings in “Coupon Application”; they will be described in detail later.
Coupons using item definitions for required products were applying the menu items "1st half" and "second half" as part of the required products. For example, a medium 3 topping pizza would be as follows:
Example 1
|
Med Pizza |
10.00 |
|
Pepperoni |
2.00 |
|
Pineapple |
2.00 |
|
Mushroom |
2.00 |
When there are half toppings, a 3 topping pizza might look as follows:
Example 2
|
Med Pizza |
10.00 |
|
Pepperoni |
2.00 |
|
--- 1st Half |
0.00 |
|
Pineapple |
2.00 |
|
--- 2nd Half |
0.00 |
|
Mushroom |
2.00 |
The pizza in example 2 was being counted as an item with 5 modifiers (e.g., it was counting the 1st Half and 2nd Half modifiers). This was an undesirable application. After this change, any modifiers with zero price are skipped.
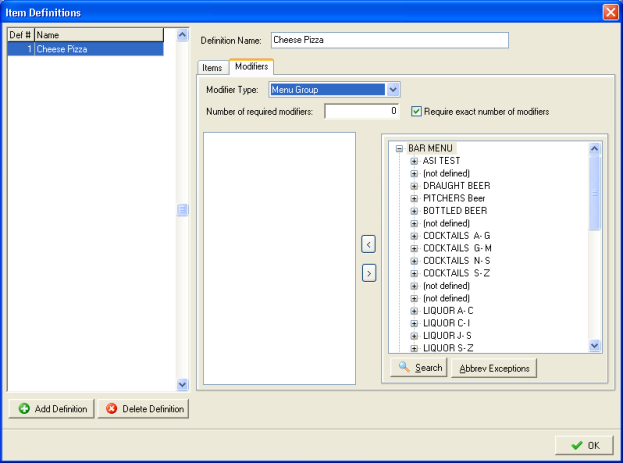
In the examples thus far, the Required Products pertained to the base item only and put no restrictions on the type or number of modifiers associated with it. There may be times when you want to be more specific in selecting not only the item, but the modifiers as well. Consider the following example:
Coupon: Buy a Large 2 topping pizza and get a free 1 liter bottle of soda.
This coupon has two required products, a large pizza with 2 toppings, and a bottle of soda. The bottle of soda is easy enough, but what about the Large 2 topping pizza? When this coupon is applied, you want to ensure that the check contains a large pizza and it has two toppings on it. We will use Item Definitions to accomplish the requirements.
To create this coupon, we start by defining a coupon with 100% discount and setting the Quantity to Discount equal to 1. This is the same as “one free item.”
Next, click on the [Required Products] tab, click on [Add Set], and create a Requirement Set. Click the [Special] tab under required products, then click [Edit Item Definitions].
The Item Definition form displayed below.
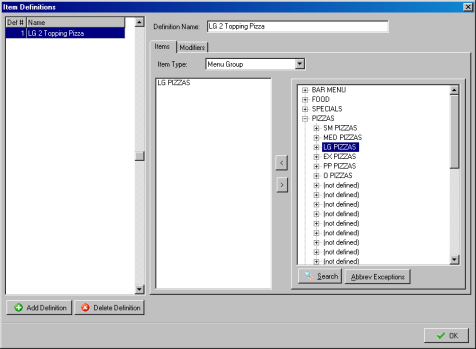
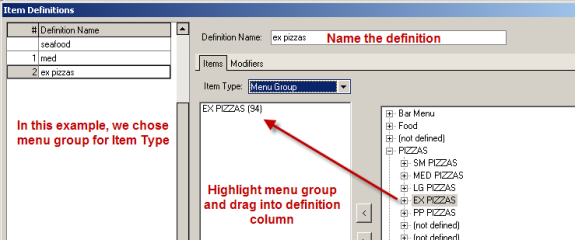
Let us create an item definition for a large 2 topping pizza. First, click the [Add Definition] button and enter a definition name.
An item definition consists of a base item and modifiers. In this example, the base item is the Large Pizza and the modifiers are 2 large pizza toppings. Let us start with the base item, the large pizza.
The “Item Type” field provides flexibility on how you can specify the base item. Perhaps the easiest method in this example is by “Menu Group.” Click on the [Items] drop down field and choose “Menu Group” from the drop down list. Next, navigate the menu tree displayed at the right of the screen, find LG PIZZAS, and drag it into the item list.
At this point, the item definition is comprised of the items in the LG PIZZAS group, so any large pizza will satisfy the requirement. However, we want to restrict the coupon to large pizzas that have 2 toppings.
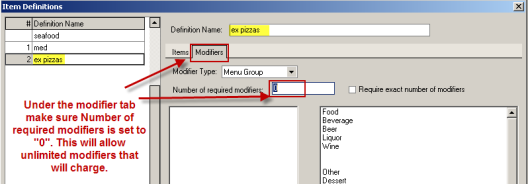
Click on the [Modifiers] tab and enter the number 2 as the [Number of required modifiers].
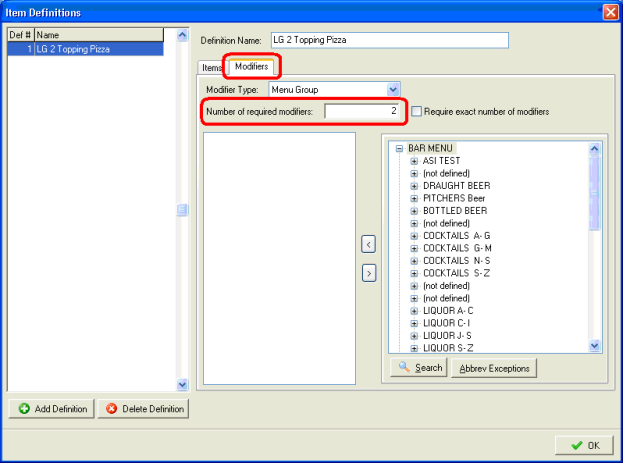
Now, only pizzas with two modifiers will qualify. However, a pizza modifier could be a whole topping, half topping, or even a combo, so this may or may not be what you want.
Note: when computing the number of modifiers, the system only counts those that have a non-zero price.
Notice the blank window in the middle portion of the screen. It can function to narrow down the types of modifiers that qualify towards the item definition. When the window is blank, then any modifier will count as long as the price is not zero. To illustrate how to use this window, let us assume we want to allow “Whole Toppings” only.
Choose “Menu Group” in the [Modifier Type] box. Next, navigate the menu tree at the right, find “LG WHOLE TOPPINGS” and “LG WHOLE TOPPINGS 2” and drag them into the Modifier window.
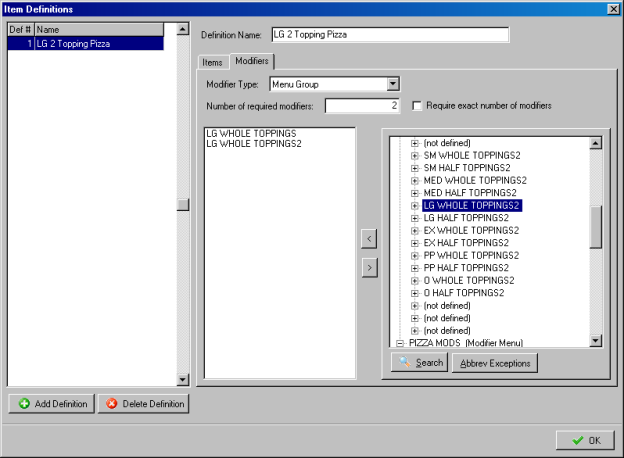
The item definition is complete. In order for an item to satisfy this item definition, the base item must be a large pizza and it must have two modifiers from either the LG WHOLE TOPPINGS group or the LG WHOLE TOPPINGS2 group.
Notice the check box [Require exact number of modifiers]. This option determines whether “extra” modifiers are allowable. For example, do you want a 3 topping pizza to qualify as a 2 topping pizza? If you want to enforce the exact modifier count, check this option. With it checked, any pizza with MORE than 2 toppings will not qualify.
Now that we have an item definition for a Large 2 topping pizza, we can get back to our example: Buy a Large 2 topping pizza and get a free 1-liter bottle of soda.
Click [OK] to save the item definition and return to the coupon setup form. Click [Add Set] to create a new requirement set. The new item definition will appear in the [Special] tab. Drag it to the [Required Products] window.
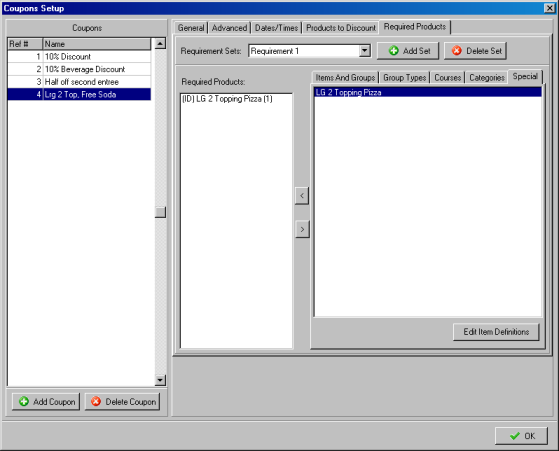
Click [Add Set] again and drag the items corresponding to the 1-liter sodas.
In this example, there is no need to define the “Products to discount.” Remember at the beginning of this section, we set up this coupon to apply 100% discount and to apply it to one item only. Since a 1-liter soda is always cheaper than a Large 2 topping pizza, the system will automatically apply the discount to the 1-liter soda (the cheaper item).
Before leaving this topic, there is an important concept pertaining to the check box, [Require exact number of modifiers]. Not enabling this function, extra modifiers are allowable but they not used in the discount computation. The following coupon example illustrates:
Coupon: Large two topping pizza for $12.00
This coupon is different from the previous examples in the sense that it attempts to set a specific price of the item after the coupon is applied. This type of coupon uses “Target Price” as the discount method.
To simplify things, let us assume all prices are in round numbers as follows:
Large Pizza: $10.00
Large Topping: $2.00
So, a large 2 topping pizza is normally $14 (10+2+2). However, with the coupon, the pizza is $12.00 so the coupon will have a value of -$2.00 (i.e., it deducts $2.00 from cost of the pizza).
Now, if the same coupon is applied to a large 3 topping pizza, it will honor the $12 price tag on the pizza and the first two toppings, but the 3rd topping is NOT part of the coupon and is charged the normal price. Therefore, after the coupon, the 3 topping pizza will be $14.00 -- $12 for the special, plus $2 for the third topping.
Let us look at one more example before moving on to the next topic. This example will illustrate some key advantages of using Item Definitions, particularly when modifiers are involved. Consider this coupon:
Pizza Special: Two cheese pizzas for $15.
Let us assume, in this example, that a Cheese pizza is $8, and toppings are $1. Therefore, the regular price of two cheese pizzas with no toppings is $16. After the coupon, it becomes $15 ($1 discount).
This coupon has two required products, both of which are pizzas, but there is more than one way to define the Required Products. They can be entered either as “Item Definitions”. Alternatively, they are definable by using any of the other methods in the Required Products screen (i.e., Items and Groups, Group Types, Courses and/or Categories).
There are two key benefits of using an Item Definition. First, you can restrict the coupon to cheese pizzas only (e.g., only those with no toppings). To do that, simply create an item definition, and set the “Number of required modifiers” to zero, and check the option [Require Exact number of modifiers].
With these settings, you are essentially saying that you do not want to allow any modifiers; therefore, any item with a modifier, such as a “Cheese pizza with pepperoni and mushroom,” does not qualify. Therefore, the Item Definition gives you the ability to be more specific about what if any modifiers are allowable and/or required.
On the other hand, if you uncheck the option [Require exact number of modifiers], then any Cheese pizza will pass, regardless of the number of toppings it has. Nevertheless, there is a subtle, but very important advantage of defining the pizza using an Item Definition. That is, the modifiers will retain their price when the coupon is applied. Let us look at some concrete numbers to clarify this difference. Let us say we apply the coupon to the following order:
|
1 Cheese Pizza |
$ 8.00 |
|
$ 1.00 |
|
$ 1.00 |
|
1 Cheese Pizza |
$ 8.00 |
|
$ 1.00 |
|
|
------------- |
|
Total |
$19.00 |
Remember, the coupon is for 2 cheese pizzas for $15.00. Now, if the Required Products are not defined using an item definition (e.g., they are defined with Items and Groups, Group Types, Courses and/or Categories), this is what the coupon will do.
|
1 Cheese Pizza |
$ 8.00 |
|
$ 1.00 |
|
$ 1.00 |
|
1 Cheese Pizza |
$ 8.00 |
|
$ 1.00 |
|
|
-------- |
|
Sub-total |
$19.00 |
|
Pizza Special |
$ -4.00 |
|
|
-------- |
|
Total |
$15.00 |
This is clearly, what we do not want as we have just given away 3 toppings at no charge. The coupon lumps the toppings into the base item price and does whatever it needs to achieve the $15 target price. On the other hand, if using item definitions, the coupon would do the following:
|
1 Ex Large Cheese Pizza |
$14.99 |
|
$ 3.00 |
|
1 Ex Large Cheese Pizza |
$14.99 |
|
$ 3.00 |
|
|
-------- |
|
Sub-total |
$35.98 |
|
Pizza Special |
$ -9.98 |
|
|
-------- |
|
Total |
$26.00 |
Notice that the coupon honors the original purpose (2 cheese pizzas for $20), but the toppings are not included in the coupon and are therefore charged the normal price.
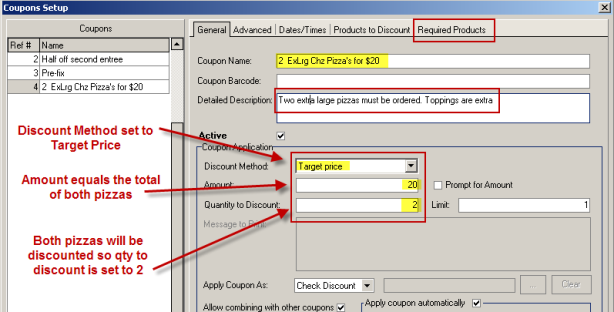
To set this coupon up we will go to the “Coupon Setup” form. Our goal is to discount two extra large cheese pizzas but we want to allow the addition of chargeable toppings. Enter in the coupon name after clicking on “Add Coupon”. In this example, we put the name in “2 ExLrg Chz Pizza’s for $20” in the “Coupon Name” field. In the “Coupon Application” area, we set our “Discount Method” to Target Price. We enter $20 for the discount amount. In addition, we set the “Quantity to Discount” to “2”. By entering “2” in this field, we insure that both pizzas are discounted. If “1” were the number entered, only one pizza is discounted. It is important to remember that when choosing “Apply coupon automatically” that the coupon will only apply once and will not repeat automatically if more pizzas are chosen. Manual application is required to repeat the use of the same coupon if the limit is set higher than “1”.
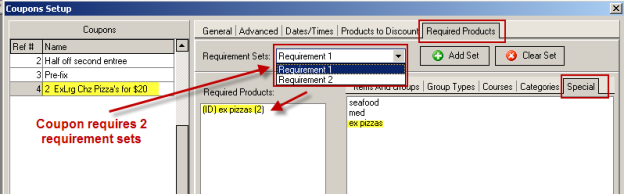
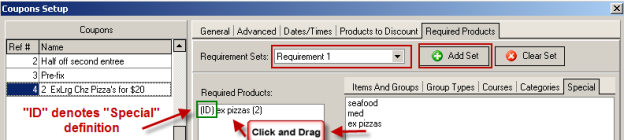
This coupon requires that two products are rung at the POS to be valid. As mentioned in other example we must set these items up under the “Required Products” tab. For this to work we must have two requirement sets defined for each pizza despite the fact they are the same.
This type of coupon is also going to require the user to set up the required products under the “Special” tab. In this field, we click on the [Edit Item Definitions] button to create our requirement set. We Click on the [Add Definition] button and enter the name in the “Definition Name” field. Under the “Items” tab, we will select the “Menu Group” option in the drop down menu of “Item Type”. Click on the desired menu group on the menu tree to the right and drag it into the column to the left. In our example, we selected “Ex Pizza” and moved it into the “Items” column. We are allowing all pizzas under the “Ex Pizzas”, regardless of crust, when choosing this method. We could limit the size and crust by opening the “Ex Pizza” group further and select a specific crust.
Now we must deal with the modifiers. Remember, that we want to allow the addition of modifiers but want them chargeable. Under the “Modifier” tab, we will make sure that the “number of required modifiers” is set to zero and the “Require exact number of modifiers” is not checked. This will allow an unlimited amount of modifiers to be added at the POS.
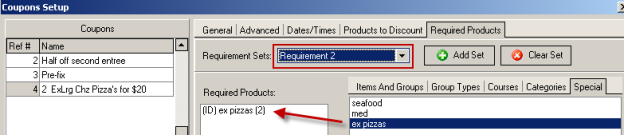
We must now apply “Special” definitions to our requirement sets. After creating our definitions, we click on the [OK] button to re-enter our “Required Products” screen. By default, “Requirement 1” will appear in the “Requirement Sets” field. You will drag the new definition created into the “Required Products” column. Now you must add the second definition for our coupon to work. Click on the [Add Set] button and repeat the process of dragging the item into the “Required Products” column.
Requirement Set 1
Requirement Set2
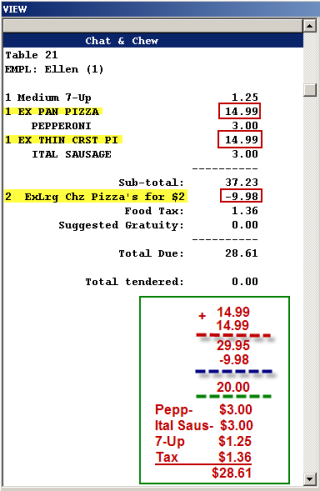
Let us see how this applies at the POS. In the example below, we have rung up an Extra Large Pan Pizza with Pepperoni, an Extra Large Thin Crust Pizza with Italian Sausage, along with a 7-up. The example breaks down how the ticket is calculated.
Coupons are capable of being schedules by date, time and/or day of week. By default, coupons are available at all times. If you wish to restrict when a coupon is used, click the tab labeled “Dates/Times.”
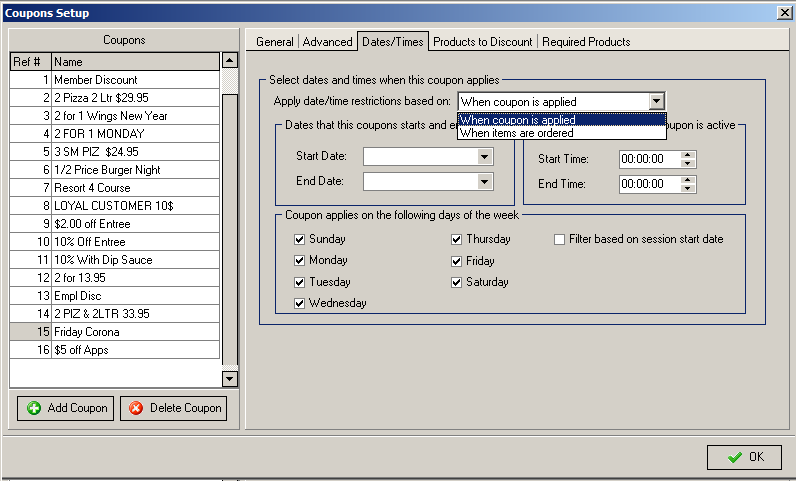
It is permissible to have coupons that are valid across midnight(see Filter based on start date). For example a coupon that is valid from 10 PM until 2 AM would have Start Time = 22:00:00 and End Time = 02:00:00. Whenever the end time is BEFORE the start time, the system will assume the time range crosses midnight.
Note that it is possible to override any of the above scheduling restrictions with a manager security level. For example, coupons not valid on Tuesdays are still applicable on Tuesday with a manager password. For additional information, see Security settings in “Coupon Application Settings.”
A number of settings can affect how coupons are applied. In the previous examples, we touched briefly on a few of those settings. In this section, we will delve a bit deeper and look at each of the coupon application settings.
There are 5 discount methods as described below.
Some coupons apply a discount to all items on the guest check while others may apply to specific items only. Two factors control this behavior. First, the [Apply To] setting near the bottom of the form (described later), and secondly, if the coupon has [Required Products], then it will only discount those items that fulfill the “Required Products.”
If the Discount Method is “Target Price” then the coupon will take on whatever value is necessary to achieve the Target Price. For example, consider the following coupon:
Family dinner special: 2 Large Cheese pizzas, choice of French fries or onion rings, large dinner salad, and 1 liter soda for $24.99. This coupon has 5 required products – 2 pizzas, fries or onion rings, a salad and a bottle of soda. When applying the coupon, it will first verify that all the required products are present, and then it will add up the prices of the required products and take on a value to achieve the desired target price. For example, if the required products add up to $26.99, then the coupon will have a value of -$2.00.
If the Discount Method is “Print a message on the guest check,” you must enter a message in the [Message to print]. The text you enter prints on the guest check as long as the coupon conditions are satisfied.
Here is an example of a coupon that would print a message: Order any two entrees and get 10% off your next visit. The message might read something like this:
Congratulations! For being a valued customer, next time you come back to see us, we will take 10% off your entire order. Just keep this receipt and present it to the cashier when checking out.
You can control where the message is printed using the Configurable Guest Check Editor in RM BackOffice. The keyword that prints the coupon message is <coupon lines>.
Be aware that once the coupon is applied, the message is printable once and only once. It does not matter if you are printing the check for the first time, or doing a re-print, after the coupon message is printed, it will not be print again. If you need to re-print the coupon message, then you must apply the coupon again. Also, note that once the message is printed, you will not be able to cancel the coupon.
Field name will change depending on the discount method selected above. If the Discount Method is a percentage, then the amount entered represents the percentage discount. For the other discount methods, this option defines a dollar amount. If the “Discount Method” is [Print a message on the guest check], the value entered in this field will be ignored.
If this option is checked, the system will prompt for the amount when the coupon is applied. For example, if you have an open food discount where the amount varies from one order to the next, check this option to have the system prompt for the amount. Use this option with caution; dishonest employees could possibly abuse it.
This parameter controls the number of items that are discountable when applying the coupon. By default, it is set to 0, which means to discount all items associated with the coupon. Let us clarify this with an example.
Coupon: Buy two appetizers at regular price and get 25% off a third appetizer.
This coupon has 3 required items, but only one will be discounted, therefore, the Quantity to Discount should be set to 1. By default, the system will automatically apply the discount to the cheapest appetizer. Any other items on the check such as beverages, desserts, etc, that do not satisfy the coupon requirements (e.g., those that are not appetizers) are ignored.
An item having a zero price is ignorable also when this option is set. Consider this coupon:
Get one free beverage with any purchase of $10 or more.
This coupon is giving away one free item – a beverage. To ensure that the coupon applies to a priced beverage and not water that is zero priced; the system will find the cheapest beverage that has non-zero price and apply the discount to it.
This parameter can function to limit the number of times that a particular coupon is applicable to a given order. The default setting is 1, which means that the coupon can be applied only once. You can increase this number to a value greater than 1, or set it to 0 to allow a coupon to be applied unlimited times to a given order.
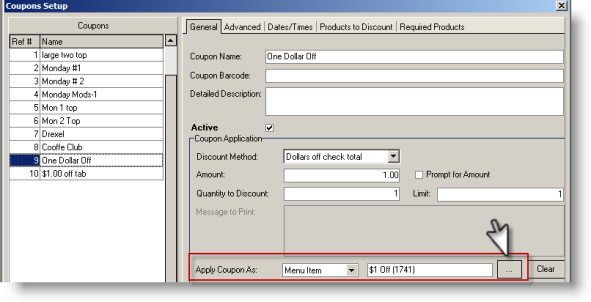
This option controls the method in which discounts are applied. There are two choices: Check Discount and Menu Item.
If a coupon is applied using the Check Discount method, it will appear on the guest check as an amount that is deducted from the sub-total.
If a coupon is applied using the Menu Item option, the system will actually ring up an item on the check with negative price and add it to the order. Το use this option, you must first create an item in menu setup as a placeholder for applying the coupon. The menu item needs only to have a name as a basic requirement. However, you will have to play special attention to how the tax is being applied to the menu group (via the group type) or the "Taxable" setting under the Price Options tab. Once the menu item is configured, choose the item by clicking the ellipsis control as shown.
When this coupon is applied, it will appear on the order entry screen as shown:
Notice the Coupon Name added to the item appears as a “Special Instruction”.
The choice of whether to apply a coupon as a Check Discount, or as a Menu Item depends on the specific application and the reporting needs. The default setting and the preferred method is to apply coupons as a Check Discount. Coupons applied in this fashion reflected accurately in the Back office “Discount Reports”.
The setup is slightly more complicated, but configuring a coupon as a Menu Item has the advantage that the item can be split if needed. This can be useful when dealing with split checks or coupon application when VAT taxes are being applied.
The drawback of applying a coupon as a menu item is that the coupon amount does not display in the Back office “Discount Reports”. In order to get reports for coupons applied as menu item, you must run reports that show item sales.
This option controls whether the coupon is usable in conjunction with other coupons. If the option is NOT checked, then after the coupon is applied, no other coupons are allowable. In addition, the system will not allow the application of this coupon if another coupon is already applied. Special consideration should be given to items with 100% discounts. Negative pricing may occur if another coupon is allowed to discount the same item. See the section on Multiple Coupons on the Same Check for more details.
Coupons can be used for many reasons besides simple discounting. As example, a coupon may be used for manager meals or to record spillage. Enabling this option will affect a prompt at the POS with a list of application reasons.The list of reasons are configured in the Reason for Applying Coupon Setup Form.
Note: the "Consumed" option on the Reason for Applying Coupon Setup Form can be is used to distinguish items that are consumed versus those that are not when using RM Inventory.
This option defines the maximum dollar value that a coupon can have. For example:
Buy any two entrees and get a third entree at no charge up to $12.99
To define this coupon, enter $12.99 as the Maximum Coupon Value. When the coupon is applied, the system will look for 3 entrees and if the cheapest one is $12.99 or less, it will set the coupon value equal to the price of the cheapest entrée, but if it is more than $12.99, the coupon will be set to $12.99 exactly.
Note: The default value of zero means there is no upper limit on the coupon value.
By default, coupons round to the nearest penny, but you can use this option to round to the nearest nickel or quarter. Enter the rounding increment here (.05=nearest nickel, .10=nearest dime, .25=nearest quarter). The default value of zero means round to the nearest penny.
There may be times when you do not want to rely on the server to manually apply a coupon; instead, you would like the system to apply a coupon automatically provided the coupon conditions are satisfied (e.g., required products are present and the coupon is scheduled). Check this option to make a coupon automatic and have it apply to every guest check.
Automatic coupons have the following special rules:
Security Level to Apply Coupon-This option defines the security required to apply the coupon. Note, for automatic coupons, the security level is assumes the default to be zero.
Caution should be given to the amount of automatic coupons applied. Having large amounts of automatic coupons may result in slow performance at the POS as the system will constantly scan for coupon criteria. In addition, special consideration should be given in establishments that frequently use the split check function. Split checks may have an adverse effect on coupons applied automatically depending on the criteria set
This option defines the security level required to apply “invalid coupons.” For the purposes of this option, an invalid coupon is one where any of the following conditions exist:
Note: this setting cannot be used to override the “Required Products” associated with a coupon. If one or more required products are missing, the system will not allow the coupon application under any circumstance.
This option controls whether a coupon applies to the entire check, or just tagged items. In most cases, it is preferable to set this option to “Entire Check,” which simplifies the application of the coupon as it relieves the operator of the burden of tagging items when applying the coupon. If the coupon has “Required Products,” the system will automatically scan the check and locate the items that satisfy the “Required Products.”
There is an advantage however to using “Tagged Items.” That is, it allows the operator full control on which items to apply a coupon to. Consider the following example:
Buy any entree at regular price and get 20% off a second entrée of equal or lesser value.
If there are exactly two entrees on the order, then it does not matter how this option is set. The only way to apply the coupon is to apply it to both of the entrees on the order. In that case, applying the coupon using the “Entire Check” setting is more efficient as the operator does not have to deal with tagging the entrees.
However, it does make a difference if there are more than two entrees on the order. If the coupon configured is set to apply to the “Entire Check”, the system will automatically choose the FIRST TWO entrees when applying the coupon. Whereas, if set to “Tagged Items” the operator can choose any two entrees and not necessarily the first two. Be aware, if the operator tags MORE than two entrees, the system will choose the first two.
If your coupons have a bar code, they can be applied by bar code scanner, rather than using the touch screen. To use this feature, your system must include the optional “Scanner Interface” module of Restaurant Manager.
To program the system to accept a bar coded coupon, simply scan the bar code in the Barcode field in coupon setup.
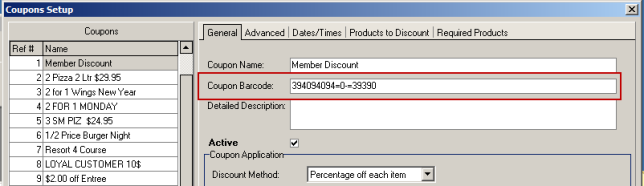
Move the cursor to the Coupon Barcode field and scan the coupon. You should see the bar code appear in the field. After defining the Barcode field, you can apply the coupon in POS by scanning the bar code at any time from the order entry screen. Note that all the settings that apply to normal coupons also apply to bar coded coupons (security settings, required products, etc). If the scanner is not able to read a bar code because it is faded or damaged, you can apply a bar coded coupon the same as a normal coupon (e.g., by using the touch screen).
Most establishments using barcode coupons do so for security or to prevent misapplication. You will want to configure the following settings if security is your criteria:
To access the advanced settings, click the [Advanced] tab at the top of the coupon setup form.
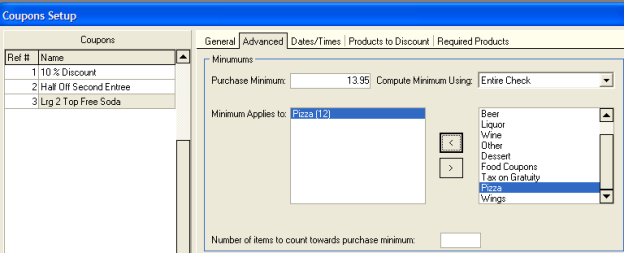
Purchase minimum defines the minimum dollar amount for which a coupon is valid. For example, Receive 10% discount with any purchase of $50 or more. Because this coupon is only valid on checks that are $50 or more, enter 50.00 in the Purchase Minimum.
There is some flexibility in deciding which items are included when computing the purchase minimum. The option “Minimum Applies to” usage is to restrict the purchase minimum to one or more group types. For example, “Get a free margarita when you spend $100 or more in beer and/or liquor”- to restrict the purchase minimum to specific group types, drag the appropriate group types from the list on the right, into the area labeled “Minimum applies to.” Note: if you leave that area blank, then all group types are used when computing the purchase minimum.
The option “Compute Minimum Using” usage may apply for further restrictions on the items for computing the purchase minimum. If you choose “Entire check”, the system will include all items on the check that meet the group type restriction above.
If you choose “Coupon Items” then only those items that are part of the coupon are included in the computation. If a coupon has Required Products, then only those items that fulfill the coupon requirements are included in the Purchase Minimum calculation (also subject to any group type restrictions as described above).
This option’s usage can restrict the number of items counted towards the minimum. Consider the following example:
Coupon: Buy one entree at $25 or more, and get 10% off a second entree of equal or lesser value.
This coupon has two required items (both entrees), but when computing the purchase minimum, we only want to count one of them. For this example, we would set the value of this option to 1.
Note: When using this option, the system automatically counts the MOST EXPENSIVE items.
This is in contrast to how the system chooses items to discount. Remember that when discounting items, the system automatically chooses the cheapest ones, but when computing the purchase minimum, it uses the most expensive.
Note: when computing the purchase minimum, tax is not included.
This option enables the user to restrict coupons to a specific revenue center. For example, 10% discount on all carry out orders between 3 and 5 PM.
This option controls whether a coupon will appear in the selection list when applying coupons from the Order Entry screen. Generally, it is a good idea to enable this option; however, if you have a large number of coupons and want to reduce screen clutter, you may want to disable this option for automatic coupons and/or coupons with bar codes.
This option controls whether the coupon will affect the taxes. For example, if an item is $10 and a coupon reduces the price to $9, do you want to compute tax on $10 or $9? Check this option if you want to compute the tax on the amount AFTER the coupon is applied (e.g., compute tax on the discounted amount). Keep in mind that tax laws vary from place to place, so make sure you understand you local tax laws when setting this option.
Note: VAT taxes are not updated when using coupons when the setting "Apply Coupons As" is configured as Check Discount. In other words, the VAT is computed on the pre-coupon amount and not the discounted amount regardless of the Update Tax setting. A Workaround for this can be found in the next under the section Coupons and VAT Taxes.
Note: If a coupon’s application is as a menu item (see “Apply coupon as” setting), this option is ignored and the system will follow the tax characteristics of the menu item. When the coupon configuration is set to print messages on the guest check (see “Discount Method”), the option setting is ignored.
Use this function to associate a coupon with third party loyalty interfaces. When selected, the POS system will scan available coupons offered by third party programs. The coupon number in the RM Coupon Setup Form will need to match the coupon number assigned in the third party interface. Coupons associated with third party interfaces should not be available on the Selection List.
Coupons are treated the same as other discounts for the purposes of computing automatic gratuities. There is a station configuration option that determines whether gratuity computation uses the amount before or after a coupon is applied. The option is “Compute gratuity using.” In addition, you have the option of setting it to “Un-discounted amount” or “Discounted amount.”
You can disable a coupon by un-checking the “Active” box in coupon setup. The coupon will still be visible in the back office reports, but is not applicable to any checks.
Coupons are applicable to items that have quantity greater than one, but there are some special considerations. Let us consider a check that contains 2 orders of chicken fingers. Different methods may be employed to place this order:
1 Chicken Fingers
1 Chicken Fingers
Or
2 Chicken Fingers
In the first case, you can apply one coupon to each order of chicken fingers. Therefore, if you have a coupon that takes 50% off one appetizer, it could be applied twice; once to the first order of chicken fingers and another to the second.
However, when the chicken fingers order method is “2 Chicken Fingers,” then only one coupon is applicable to the order. Once the coupon is applied, the item becomes marked, and is not usable with another coupon. In most cases, you probably would not apply more than one coupon on a particular order, but if the need arises, then you must remember to enter the items individually.
In the BackOffice [Menu Setup], there is an option to make any given menu item non-discountable.
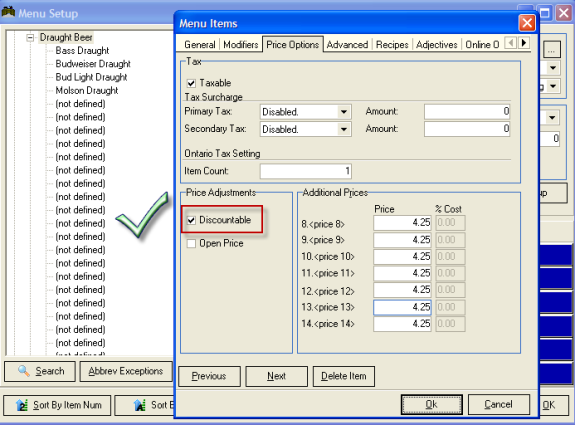
By default, all items are “Discountable.” If you want to make an item non-discountable, simply uncheck the “Discountable” option in the menu- set-up form of a menu item under the [Price Options] tabs.
Coupons that apply a percentage discount will skip over the non-discountable items (e.g., discounts will not apply to those items). Generally, this is the desired behavior if a coupon applied is to the entire check.
However, if a coupon has required products, this behavior may lead to undesirable results. For example, consider the following coupon:
Buy one large 2 topping pizza and get a free liter of soda.
If the “Liter of Soda” is a menu item that is marked as non-discountable, it may cause the coupon to fail. The coupon will try to apply 100% discount to the item, but since it is non-discountable, the item will retain its full price. For these types of coupons, it is best not to mark the items as non-discountable (e.g., leave the items at their default setting with the “Discountable” option checked). The same problem can occur on coupons that apply a fixed dollar discount on items.
Depending on how the system configuration, it may be possible to apply more than one coupon on the same check. In fact, it is even possible to have multiple coupons apply to the same item. When multiple coupons apply to the same item, the system will use the original full price of the item when computing the coupon value. For example, say you have an item that is $10, and you apply two coupons to it. Both coupons are 10% off. When computing the price of the item, the system will do the following:
|
Base Item: |
$10.00 |
|
Coupon 1 10% off |
$ -1.00 |
|
Coupon 2 10% off: |
$ -1.00 |
|
|
-------- |
|
Final Price |
$ 8.00 |
Notice that both coupons take 10% off the original base item price. An alternative approach would be the following (this is NOT how the system works):
|
Base Item |
$10.00 |
|
Coupon 1 10% off |
$ -1.00 |
|
|
-------- |
|
Price 1 |
$ -9.00 |
|
Coupon 2 10% off |
$0 -.90 |
|
|
-------- |
|
Final Price |
$ 8.10 |
You will need to add the keywords <Coupons Lines> to the Guest Check in the Configurable Guest Check Editor if you have set up a coupon to “print a message on the guest check” as a discount method.
In some cases, the application of multiple coupons (or coupons in conjunction with a check discount) can result in the check total becoming negative. For example, if the check total is $10.00 and two coupons are applied, one for 10% off and another for 100% off, it will result in a final price of -$1.00:
|
Check total |
$ 10.00 |
|
Coupon 1 10% off |
$-10.00 |
|
Coupon 2 100% off |
$ -1.00 |
|
|
-------- |
|
Final price: |
$ -1.00 |
To avoid this situation, the second coupon (100% off) should be applied to the check first, and the option to “Allow combining with other coupons” should be UN-checked. After the 100% coupon is applied, it prevents the application of other coupons that might cause the check total to go negative. This is especially important when using automatic coupons. Applying the coupon for 100% discount effectively disables any automatic coupons from being applied to the same check.
Special consideration should be given to creating and applying coupons in an environment where Split Checks are common place. Restaurant Manager suggests you test coupons carefully to insure the desired results in every scenario. Splitting a check may affect the criteria used to apply a coupon. Example: a dollar off coupon with the criteria of $10 spending minimum, a limit to apply only to one check, and is automatically applied. In this case, the coupon is applied to a check before the split. After the check is split into two, the total one is above 10 dollars and the second is below ten dollars. In this scenario, the coupon will only apply to the first seat on the split check and would not be applied to the second check. If your establishment performs Split Checks on a frequent basis you might want to consider the following:
VAT taxes are not updated when using coupons when the setting "Apply Coupons As" is configured as Check Discount. In other words, the VAT is computed on the pre-coupon amount and not the discounted amount regardless of the Update Tax setting. A workaround for this is to set a coupon to apply as a Menu Item.It is important to mention that there is at least one drawback to this method. When applying a coupon as a menu item, the coupon amount will not display in the Back office “Discount Reports”. You must run reports that show item sales in order to get reports for coupons applied as menu item.
If a coupon is applied using the Menu Item option, the system will actually ring up an item on the check with negative price and add it to the order. Placing a negative menu item on the check will produce a negative VAT.
When the Write-On application accesses an order, it replaces the date/time of the items with the "current" date/time. For coupons that have a date and/or time filter, it could cause undesirable behavior. Example: You have a coupon that is valid from 2-3 PM. You order an item at 1 PM; the coupon is NOT valid for this item. If you load that order on Write-On at 2:30 PM and send it, it will replace the time of ALL items to 2:30. Now the original item, which was ordered at 1 PM now has a time of 2:30 and is eligible for the coupon.

Note in the illustration above we have placed a 10% VAT on a post coupon $10 item. The item price is adjusted to be $9.09 and 10% tax on that is $0.91 to equal the $10.00 total.
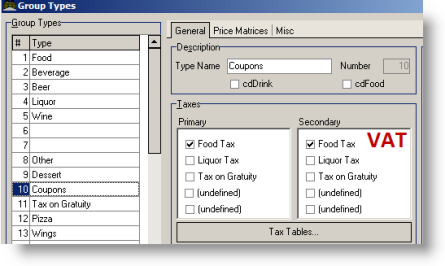
Το use this option, you must first create an item in menu setup to be used as a placeholder for applying the coupon. The menu item needs only to have a name as a basic requirement. However, you will have to play special attention to how the tax is being applied to the menu group (via the group type).The group type and menu item must be associated with a VAT tax for this to work properly. Make sure the tax being used is set as a VAT in the Tax Table (typically the Secondary Tax Table). In addition, the menu item being used for the coupon must have the "Taxable" setting enable (Price Options tab).
Once the menu item is configured, choose the item by clicking the ellipsis control as shown below.
The basic premise to coupons is to deduct an amount from the guest check. A negative value coupon does the exact opposite: it adds a monetary amount to the guest check. Negative value coupons may be used as an alternative to apply a service charge or gratuity when extreme factors demand so. As example: a ten percent gratuity may only apply to food items and have a maximum value of up to $20.00. In such a scenario the traditional method of applying a service charge will not work.
To set up such a service charge via a coupon similar to the example above we would use the following steps:
You can verify the coupon results by testing at the POS.
Warning: Gratuities implemented using Coupons will affect gratuity reporting and tracking (e.g. they will not show on gratuity reports or columns on any report listing gratuities/Service Charges). Instead, you will have to use Coupon Reports with proper filtering to track information when using this method.
Coupons can take the form of dollar, check and line item discounts or be printed. Coupons can be applied one of three ways:
Most coupons are most commonly configured to automatically detect what items should be discounted. In this circumstance, ring all menu items and then press the [Coupon] button:
Pressing this button will trigger a prompt where you can select a specific coupon:
You can verify the coupons application by pressing on the running total at the bottom Detailed Order View Area. In the illustration below we applied the 10% percent to the total check and rounded to the nearest nickel (global discount):
You can remove the Coupon by pressing the Coupon button a second time and select the [Remove Coupon]:
You will be prompted to remove a specific coupon if more than one coupon has been applied.
The process of applying a manual coupon is exactly the same as the step above but with the added steps of having to tag the items to be coupon on the Detailed View Check Area. This type of coupon may involve a pre-fix menu on a large check where others are ordering off the menu. This may also involve a promotion where the higher of the two items will be discounted. By default, Restaurant Manager will always seek the lower price of two items to discount so the coupon will have to be designed to enforce the tagging desired items to be couponed.
In the example below, we are tagging the more expensive of the two item entrees (Filet Mignon) and verifying by touching the running check total of the Detailed View Check Area:
Restaurant Manager is designed to send a message to the POS if the parameters of the coupons have not been met. If you receive such a message when applying a coupon, you have two choices:

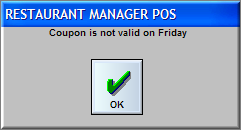
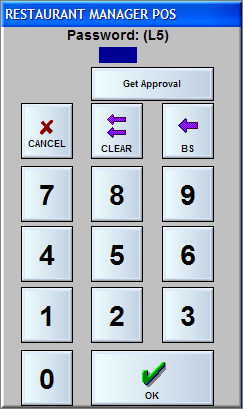
The manager may choose to override the coupon’s criteria. To do so, press the [OK] on the prompt. Next, enter in the password to override the coupon’s security.
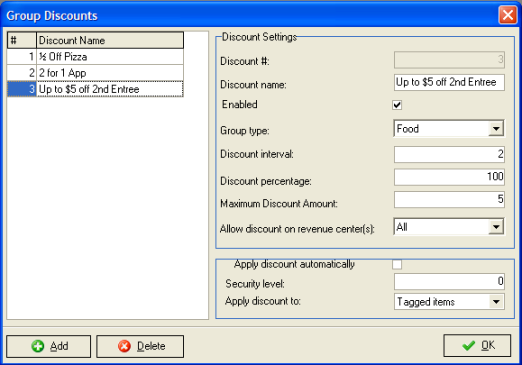
Group discounts provide the ability to discount items at regular intervals. Here are a few examples:
Group discounts are flexible, can be use to handle a variety of special discounts, and provides another alternative to using Coupons. However, Coupons do offer more flexibility and security. Group Discounts can be applied automatically or manually and can apply to the entire guest check, or just items tagged in the “View Check” area of the order entry screen.
Discounts are applied to the lowest priced items first. For example, let’s say you offer every 4th pizza for free. If a customer buys 8 pizzas, then the two cheapest ones will be set to zero price. When comparing prices to find the cheapest items, the POS program will include all modifier prices along with the base item. For example, a Small Cheese Pizza ($8.00), with Pepperoni ($1.00) and Sausage ($1.00) is considered a $10.00 item. This is the price that is used to compare it with the others when searching for the lowest priced items.
The Group Discount Form allows you to configure your system to generate discounts based on special promotions and coupons. Special promotions that may be configured on the Group Discounts form include offers such as:
Coupons and discounts defined on the Group Discount Form are not manually applied to a transaction from the Order Entry Screen. Rather, these discounts and coupons are added to an order automatically whenever the items on that order meet the conditions defined on the Group Discount Setup Form.
Note: Split checks may affect the application of group discounts. Example; If you have a buy one entree and get one free group discount. By splitting the check, you remove the criteria needed to satisfy the discount since there is now only one entree on the new check.
To manually apply a group discount, first order several items, then press MISC, Group Discounts from the order entry screen.
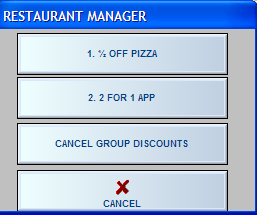
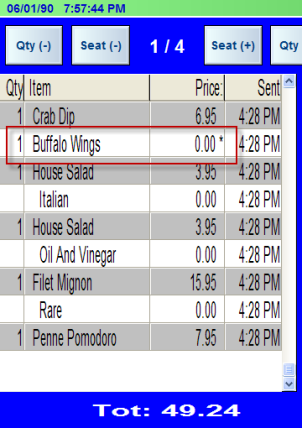
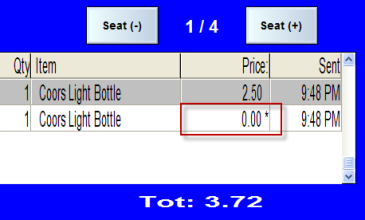
Choose the appropriate group discount from the list. After applying the discount, the discounted items will appear with an asterisk next to their price.
When applying a group discount (whether automatic, or manual), the following items are skipped (i.e., are not considered when applying the group discount):
In some cases, the group discount may break up items with quantity > 1. For example, if you give every 4th pizza free, and order Quantity 10 of the same pizza. Applying a group discount to the 10 Pizzas will result in the item being split into Qty 8 pizzas, and another item with Qty 2 pizzas. Then the group discount is applied to the Qty 2 pizzas.
Group discounts are non-cumulative – that is, you cannot apply multiple group discounts to the same item. The last group discount will override any previous group discounts that were applied to the item.
Though you cannot apply multiple group discounts to the same item, it IS permissible to apply more than one group discount to a check provided the “Group Types” are not the same. For example, “Every other beverage free” can be applied on the same check as “Every 4th pizza free” because Beverages and Pizzas are in different group types. Both these group discounts can be applied to the same check either manually or automatically without the risk of interference.
RM allows for the application of an upper dollar limit on each group discount. This feature can be useful for handling coupons that have upper limits. For example, “Up to $5.00 off the purchase of any two entrees.” To apply an upper limit, simply enter the dollar amount in the group discounts setup form.
Enter the upper limit in the field marked “Maximum Discount Amount.” If you do not wish to apply an upper limit enter the number 0, or enter a very large number such as 999999999.
Note: Restaurant Manager will do the best it can to apply the upper limit exactly, but it may be subject to rounding errors when items are ordered in multiple quantities. For example, if you order Quantity 3, of a particular item, apply a group discount; the result may be subject to rounding errors of a penny or two.
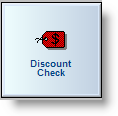
In addition to percentage discounts, Restaurant Manager provides the option to apply a discount for a specific dollar amount. Once again, the Dollar Discounts do not offer the flexibility of Coupons. Dollar Discount can only be applied on Group Type where Coupons can target specific menu groups and items. Dollar discounts are set up on the same form as percentage discounts (RM BackOffice >Setup > Settlement and Tips >Discounts). To configure fixed dollar discounts, click on the tab “Fixed dollar discounts.”
Check the “Fixed” option if the discount amount is always the same. If this option is NOT checked, then the POS program will prompt for the discount amount each time it is selected.
If you want the discount to affect the tax computation, you must choose a group type to which the discount is applied. The POS program will deduct the discount amount from the chosen group type before computing tax.
In the POS program, dollar discounts are applied in the same fashion as percentage discounts. To apply a dollar discount on a check, choose the “Discount Check” option from the order entry screen. The POS program will display all percentage and dollar discounts in a selection window. Choose the desired discount to select it.
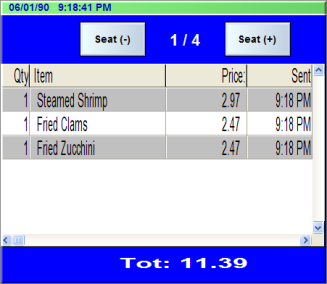
Note that you can only apply a single percentage discount per check. Applying a second percentage discount overrides the first. But you can apply multiple dollar discounts on the same check. To view all the discounts applied to a given check; touch the running subtotal, just below the check item display.
To cancel a discount, choose the “Discount Check” option again. If there are any discounts applied to the current order, the POS program will display an option “Clear Discount.” If there is only one discount applied, then it will be cleared. If there is more than one discount, the POS program will display a selection window allowing you to choose which discount to clear.
Note, when discounting specific items (Discount Items rather than Discount Check), only percentage discounts are allowed. You are not permitted to apply dollar discounts to specific items. Dollar discounts can only be applied to the entire check.
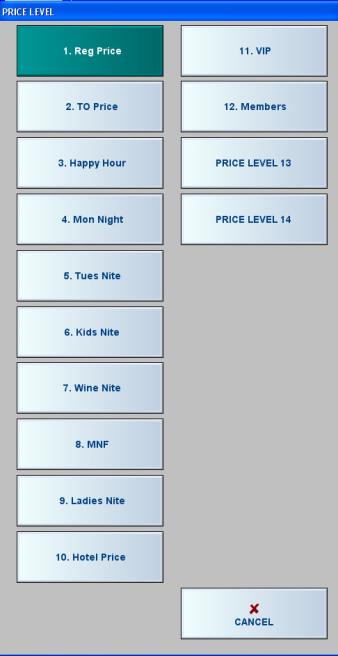
Price levels are used for a variety of functions where one menu item may have different prices Examples may include happy hours, revenue center based pricing ( dine in vs. takeout), or preferential pricing ( club members vs. non club members). Restaurant Manager supports up to 14 price levels. With these, a restaurant has the flexibility, if needed, to define up to two (2) price levels for each day of the week.
Price Levels are defined in the Price level Schedule form and applied at the menu item level in the Menu Setup form. Price Levels may be configured to be automatic or manual.
Price Level definitions and schedules are configured in the RM BackOffice under Setup > Menu > Price Schedules. When defining the Price Level Schedule itself the user simply needs to click upon the date / time cell or highlight a group of cells and then right click to display the drop down choice box listed below.
To accomplish the task of making the choice is simply highlighting one of the presented price levels and clicking on it to set it for the selected option area.
RESTAURANT MANAGER has ability to designate / define up to fourteen (14) different price levels for a given item within the menu definitions. Sometimes a numeric system can be confusing. An alternative method for determining price levels is to name them. This can be done in the Restaurant Manager BackOffice by going to SETUP > MENU > PRICE SCHEDULES.
To name/rename a price level, click on the Edit Price Levels button on the bottom of the Price Levels Schedule setup form. Upon the Price Level’s description entry, it (the description) will activate for usage from within RM BackOffice immediate. The price level descriptions will default to the assigned number if the price level description is left blank.
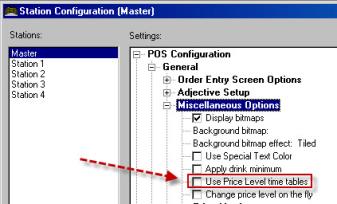
If you desire to apply price levels automatically you must enable this function in the RMWIN BackOffice Station Configuration form. The option is found under the Miscellaneous Options. To enable this feature, click on the field setting box- “Use Price Level time tables.”
There may be circumstances where you need to manually over ride Price Level changes or simply wish to manually apply Price levels instead of automatic application. First, you must disable “Use Price Level time tables” in the station configuration. In addition, price levels must be configured.
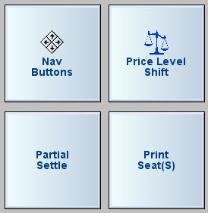
There are two methods to manually apply price levels. The first method is to use the [Price Level] button in the MISC screen of the POS main status screen. This method will put the POS in a static Price Level state until manually changed. This will affect only the POS where this change is made and must be repeated at other station if desired. The second method is to use the [Price Level] button typically found in the [MISC] screen of the Order Entry Status screen. This method will temporarily change the price level for only one menu item at a time and must be used for each menu item ordered within the order. This method is best used when over riding a current price level and is suggested to be a manager function.
To statically change a price level at the POS:
Repeat the process to revert back to the original price level or in selecting a new price level.
Use the [Price Level] button within the MISC screen of the Order Entry status screen to over ride a price level or apply a price level to a single item within an order.
Continue the process by choosing the desired price level as shown below:
Restaurant Manager has provided an intuitive approach for price levels changes when an open order is static at the time of change. For example, let’s say happy hour goes from 5-6 PM. If an order is started at 5:59 PM, and the server (or bartender) finishes entering items at 6:03 PM, the items ordered after 6 PM would be charged the happy hour price, even though happy hour was over when the items were entered.
This is especially problematic when using fast transactions with auto repeat mode turned on. Let’s say the bartender completes an order at 5:59 PM. With auto repeat mode on, the system will automatically start a new order at 5:59 PM. Because happy hour is still active when the order is started, happy hour pricing will apply for the duration of the order. If the system is idle for 20 minutes, then a customer orders something at 6:19 PM, the transaction will be priced at happy hour pricing.
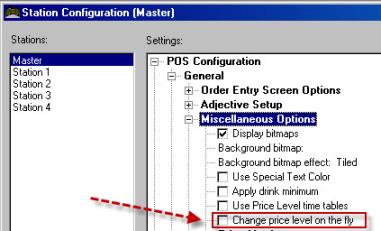
To overcome this problem, RM provides an option in Station Configuration called "Change price level on the fly." With this option checked, the system will change the price level as soon as the new price level takes effect – even in the middle of an order. If you are using fast transactions with auto repeat mode, it is recommended that you enable this option.
Some restaurants charge different prices depending on the revenue center. For example, an additional 50 cents per item on carry out orders, or an additional $1 per item for room service. This can be handled by changing the price level based on the revenue center.
To configure price levels by revenue center, you must first decide which price levels to use. For example, you might use price level 1 for “normal” eat-in orders, and price level 2 for delivery orders. Next, you must enter the appropriate pricing in menu setup for the price levels of interest.
Next, open the “Revenue Center” setup form in the back office.
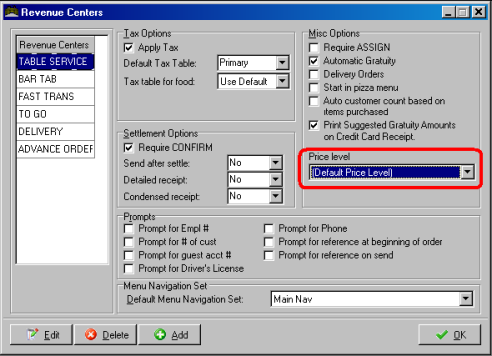
By default, each revenue center is configured to use the “System Default” price level (described in more detail below). To choose a different price level for any given revenue center, highlight the desired revenue center, click on the “Price Level” control and choose the desired price level. All transactions using this revenue center will automatically default to the chosen price level.
Note, if you change the revenue center in the middle of an order (e.g., after items have already been entered), the system can automatically update the prices of the existing items, or leave them unchanged. The option that controls this behavior is located in RMWIN >Setup >Station Config, “Update item prices when changing the revenue center.” This option can be set to “Yes,” “No,” or “Optional.” If set to “Optional” the system will display a “Yes/No” option dialog before making adjustments. Note that any items that have been changed using price adjustment and/or discounts will not be affected when adjusting the prices.
If a revenue center is set to use the system default price level, then the price level used will depend on the Station Configuration setting “Use price level time tables.” If this option is enabled, then the price level is defined in RMWin->Setup->Menu->Price Schedules. There, you can change the price level based on a predefined schedule (e.g., happy hour pricing from 5-6 PM every Tuesday and Thursday). If Price level time tables are NOT enabled, then the price level can be changed manually from the main POS screen, under MISC options.
Regardless if a revenue center is using a specific price level or the system default, a momentary price level change can be applied to any item. To apply a momentary price level change, choose the option “Price level Shift” located in the MISC options in the order entry screen. After choosing this option and selecting a price level, the next item ordered (along with all its associated modifiers) is priced at the selected price level. The price level is automatically returned back to its normal state immediately after the item is completed.
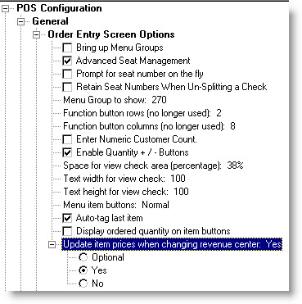
There may be the need to change prices when changing revenue centers. If you use different price levels for different revenue centers, this option will determine whether item prices are updated when the revenue center is changed. If set to "No," then changing the revenue center in the middle of an order will only affect the price of items that are ordered AFTER the revenue center change. Any items that were ordered before changing the revenue center are left at the previous price level.
To enable this function you can go to Station Configuration in the RM BackOffice and go to “Update item prices when changing revenue center and choose one of the three options listed in the picture below:
To set-up the price levels of an item, go to the RM BackOffice (RMWIN) and click on the menu button. Select the item that you want to set the price levels to. Once the item is selected, you should see the following screen:
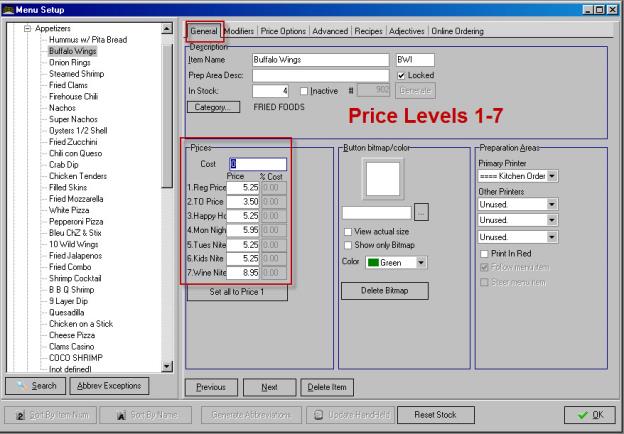
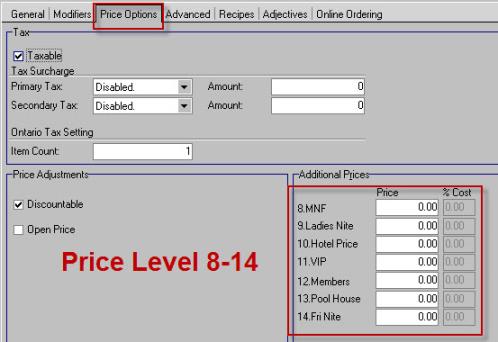
On the “General” tab, you can change the first 7 price levels for the item. To set price levels 8-14, click on the “Price Options” tab. After clicking, you should see the following screen
After setting the different price levels, you can now schedule when and what price level is going to be in use via BackOffice -> SetUp -> Menu -> Price Schedules.
Standard percentage discounts may be defined on the Discounts Setup Form and then used from the POS Modules to apply discounts to individual items or to an entire check. The percentage amount of any standard discount may be fixed or you may configure the system to prompt for the percentage amount when the discount is applied.
You may exclude certain categories of menu items from specific discounts. For instance, a restaurant that offers an Employee Discount might not apply this discount to items with a Group Type of “Alcoholic beverage”. Individual Menu Items may also be configured as “Non-discountable”.
Use the Discounts Setup Form to create an unlimited number of pre-defined percentage discounts:
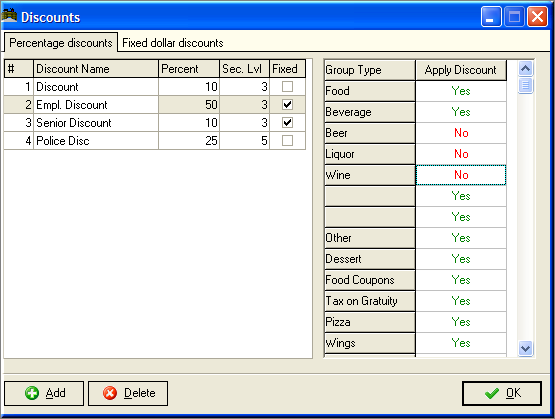
Use the [Add] button at the base of the form to add blank fields for configuring new discounts. Then use the following fields to configure the new discount:
NOTE: The “Fixed” column DOES NOT allow you to create fixed price discounts. See the section on coupons for instructions on configuring discounts of a fixed amount.
On the right of the setup form are fields for excluding certain types of items from the active (highlighted) discount:
You may apply a standard percentage discount to all the items on any given order by touching the [Discount Check] Function Button:
When you touch the [Discount Check] button a pop-up screen appears listing all the percentage discounts pre-defined on the Discounts Setup form:
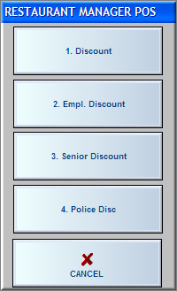
Usually you need only touch the appropriate discount to apply it to the order. If, however, the discount has been password protected, a password prompt will appear before the discount is applied:

If the Order Detail Area has been configured to the new price after the items have been discounted
Standard percentage discounts are not applied to Items that have been configured as Non-Discountable on the Menu Setup Form or to Items that are categorized with a Group Type that is excluded from a given discount.
The [Discount Check] Function Button is accessible from both the POS Order Entry Screen and the Settlement Screen. But the exact location of the button on each POS Screen is determined by configuration settings on the POS Function Buttons Layout Form.
To apply a percentage discount to one or more items on a given order, tag the item(s) you wish to discount on the Order Detail Area of the Order Entry Screen. Then touch the [Discount Item] Function Button:
When you touch the [Discount Item] button a pop-up screen appears listing all the percentage discounts pre-defined on the Discounts Setup form:
Usually you need only touch the appropriate discount to apply it to the selected items. If, however, the discount has been password protected, a password prompt will appear before the discount is applied:

If the Order Detail Area has been configured to display pricing an asterisk appears alongside the price of any item that has been discounted:
Standard percentage discounts are not applied to Items that have been configured as Non-Discountable on the Menu Setup Form or to Items that are categorized with a Group Type that is excluded from a given discount.
The [Discount Item] Function Button is accessible from the POS Order Entry Screen but the exact location of the button is determined by configuration settings on the POS Function Buttons Layout Form.
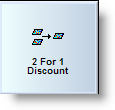
To apply a 2 for 1 discount to one or more items on a given order, tag the two like items you wish to discount on the Order Detail Area of the Order Entry Screen. Then touch the [2 for 1] Function Button:
When you touch the [2 for 1] button a pop-up screen appears asking to confirm the items being discounted:
Usually you need only touch the [2 for 1] discount button to apply it to the selected items. If, however, the discount has been password protected, a password prompt will appear before the discount is applied:

If the Order Detail Area has been configured to display pricing an asterisk appears alongside the price of any item that has been discounted:
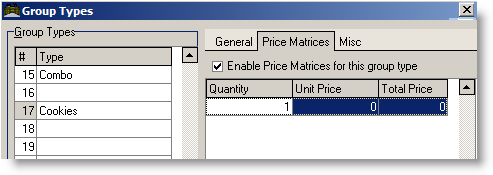
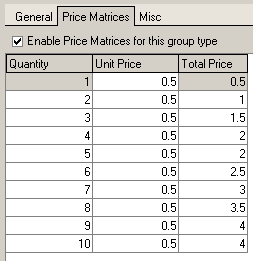
Use Price Matrices to price items based on quantity sold. For example, let’s say you sell cookies for 50 cents each, but every 5th cookie is free (buy 4 get 1 free). This scenario is easily accommodated with price matrices.
Use the following steps to configure Price Matrices:
Scenario: A restaurant sells cookies for 50 cents each, but every 5th cookie is free (buy 4 get 1 free).
- Select the “Price Matrices” tab
- Check the option “Enable Price Matrices for this group type.”
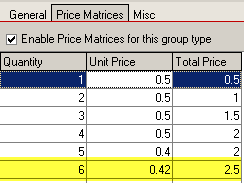
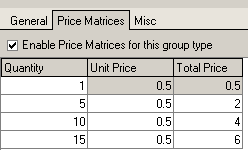
Define the price matrix. Assuming the cookies are 50 cents each, the price matrix in this case should be set as follows:
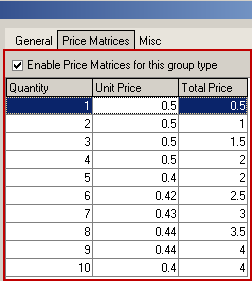
The price of the first four cookies is straight forward. Since the fifth cookie is free, it reduces the unit price per cookie to 40 cents – five cookies for $2.00 comes out to 40 cents per cookie.
The sixth cookie adds another 50 cents; therefore, 6 cookies for $2.50 works out to 42 cents per cookie. Similarly, 7 cookies for $3.00 comes out to 43 cents per cookie and so on. The table above stops at quantity 10, but you should fill out the price matrix up to the maximum quantity of cookies you would expect to sell on a single transaction.
Hint: Use Custom Groups to consolidate items with different matrices onto one page.
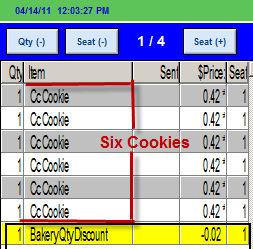
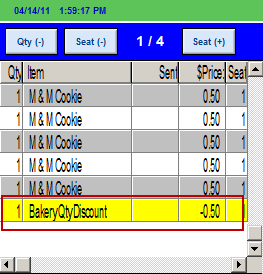
Whenever dealing with multiple quantities, rounding errors can come into play.In the example above , consider the price for 6 cookies. Six times 42 cents per cookie comes out to $2.52, two cents extra. If you charged a penny less per cookie (41 cents), then the total would be $2.46, four cents too little.
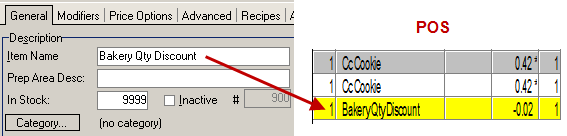
To compensate for rounding errors, Restaurant Manager will automatically insert a menu item on the check and adjust the price as necessary to achieve the correct total price. For the six cookie example above, Restaurant Manager will insert an item with a price of minus 2 cents (-.02) to compensate for the 2 cent rounding error.
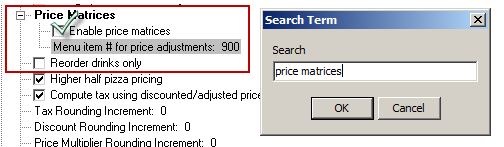
By default, Restaurant Manager uses menu item 900 for the rounding adjustment: the very last item in the first menu block. If necessary, the wording for default menu item is changed by going into the Menu setup Form, find menu item 900, and entering a new description in the Item Name field. The description will appear on the POS screen as well as the printed guest check.
If you wish to use a different menu item for rounding adjustments, you can change it via the option “Menu item # for price adjustments” which is located just below the option “Use Price Matrices” in Station configuration.
Note: Menu item price adjustments can not be deleted at the POS once added to the order. However, deleting all menu items associated with a price matrix will result in a zero priced adjustment.
An alternative method for quantity based pricing is to use "Constant"item prices. This method is identical to the price matrix mention at the start of this section; with the exception that the unit price is fixed at dollar amount regardless of the quantity sold. In the illustration below, the fixed unit price is 50¢:
Restaurant Manager will adjust the price of the “Bakery Qty Discount” item as necessary to achieve the correct “Total Price.” The corresponding screen shot of the Order Entry screen appears below.
The advantage of this approach is the item price is constant and “free” items (i.e. cookies) are tracked in the “Bakery Qty Adjustment” item. Running a report on the “Bakery Qty Discount” item will give an immediate dollar value of “free” items that were given away.
Another advantage of this method is the price matrix does not need to have an entry for every quantity. Because the unit price is constant (50 cents each), the price matrix only needs to contain the discontinuities (i.e., the “free” cookies). Therefore, you can achieve the same result with the following “simplified” price matrix:
For the “missing” quantities, the POS program will automatically use the price from the next lower quantity. For example, if someone buys 6 cookies, the POS program will use the “Qty 5” unit price for the 6th cookie. Since the unit price remains constant, it will correctly charge 50 cents for the 6th cookie.
It is permissible to use more than one price matrix at a time. In fact, you can utilize a different price matrix for each and every group type. Restaurant Manager will count up the items for each group type and apply the appropriate price matrix. Items in different group types are tallied separately; however, they all use the same price adjustment menu item.