Previous Topic "Requirements"
NETePay Installation
You need to install several applications (follow the directions on the NETePay web page). You will be prompted to restart the server after installing all application. It is important that you restart the system when prompted. Important: NETePay must be installed and running on the same computer running RM Gateway Supplemental Setup (RMCCWIN).
The instructions in this section have been generalized. Please consult NETePay's instruction guides for specific installation and trouble shooting instructions.
Download NETePay Applications
Download the NETePay applications using the hyperlink below:
http://www.datacapepay.com/downloadmenu/
Some of the applications to download will vary depending which operating system you are using. The main applications to download are:
-
MSDE or SQLExpress Datacap Instances. MSDE is for XP Pro installations. There are three SQLExpress Datacap Instances options that are Windows operating system dependent. It is important that you choose the correct application.
-
DSIClientX- This installs the standard ActiveX control that integrated software uses to communicate with NETePay.
-
EPay Administrator- This installs an application that allows viewing/sorting and reporting on transaction activity recorded in NETePay database. It also performs batch functions for editing and settlement.
-
NETePay- The option is processor dependent. Select the processor option from the "Get" menu listed on the screen. Unless instructed otherwise, you will need to download the Terminal option of for the processor's software.This download will install the NETePay payment server software.
Note: You must be logged in as an ‘Administrator’ to install NETePay and all of it’s components. Installations performed when logged on as another user with rights less than "Administrator" will not operate correctly. Follow all the prompts for installation of all applications.
Configure NETePay
On the first program launch after installation (double click “NETePay” icon on the computer desktop), NETePay must obtain a license file over the Internet from Datacap’s PSCS (Payment Systems Configuration Server) system. When NETePay detects that a serial number is required, it presents the following dialog:
-
Click ‘Obtain Serial Number’ to enable NETePay to contact PSCS for a serial number.
-
If NETePay is unsuccessful in obtaining a serial number, it will present the following dialog:
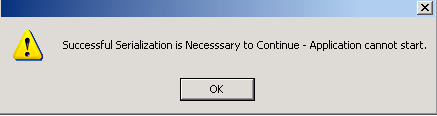
Click ‘OK’ and NETePay will close. Failure to successfully obtain a serial number means that NETePay was not able to contact Datacap’s PSCS server over the Internet to obtain a serial number. Assure that the Internet connection is operating properly by using the default web browser on the machine where NETePay is installed to contact www.datacapsystems.com. If you are successful in contacting Datacap’s website, close the browser, restart NETePay and click ‘Obtain Serial Number’ again. If you continue to experience difficulties in obtaining a serial number, assure that there are no firewall or DNS issues.
- If a parameter file has been created on Datacap’ PSCS server for the merchant account:
- Click ‘Setup’ drop down menu.

- Select ‘Merchant Parameters’ You will then see the following screen:
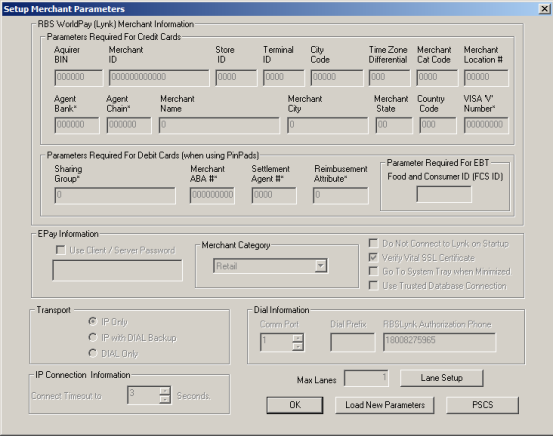
The setup screen displays the current values for the merchant parameters which are all 0’s indicating that merchant parameters have not yet been loaded from Datacap’s PSCS server.
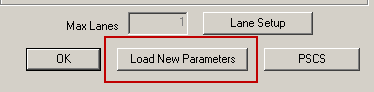
- Click the “Load Parameters” button in the Setup Merchant Parameters window (bottom of screen).
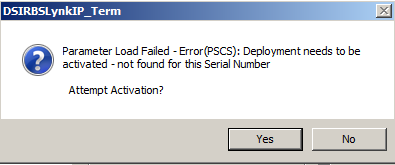
- Click ‘Yes’ to attempt activation and you will see the following screen:
-
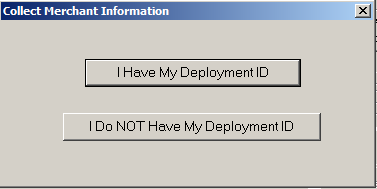
To continue, you must verify that a Merchant Deployment has been created. The Deployment ID is typically an eight character code that has been assigned to the merchant’s parameters. In the new Gateway process, ASI will issue you a deployment ID. If you have a Deployment ID for the merchant, click ‘I Have My Deployment ID’.
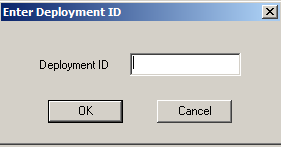
- Enter the Deployment ID and click "OK"
NETePay will display a screen with merchant demographic data including restaurants name and address.
- If the displayed information correctly identifies the merchant site, click ‘Yes, This is the Correct Merchant’
If the displayed information is not correct for the merchant site, click ‘Cancel’ and retry entry from the beginning
- If NETePay successfully retrieves the parameters associated with the entered Deployment ID from the PSCS server, you will see the following dialog:
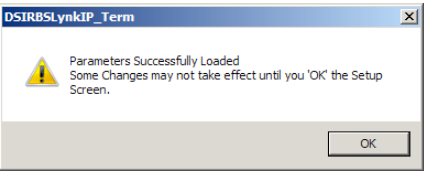
- Click ‘OK’- NETePay will automatically load the parameters and activate the software.
- Exit the NETePay application
Add NETePay to Startup
NETePay must be running on the computer running RM Gateway Supplemental Setup (RMCCWIN) to process credit cards. Therefore, you must configure the system to start NETePay when the system reboots. You can use one of two methods to start NETePay at start up:
-
Add the NETePay executable directly into Windows startup folder. This method is preferable as it will be running prior to RM Gateway Supplemental Setup (RMCCWIN) starting (RM Gateway Supplemental Setup (RMCCWIN) will look for NETePay at start up. In addition, you can configure the NETePay short cut to run minimized.
-
Add the NETePay executable in to RMStart. The NETePay executable should be placed before RM Gateway Supplemental Setup (RMCCWIN) in the startup list.
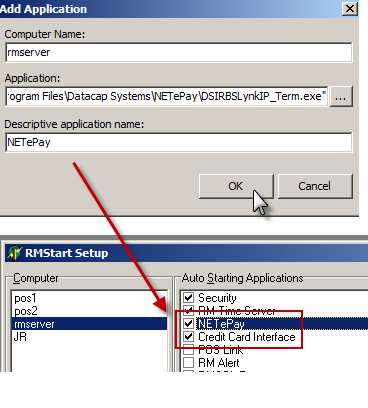
Note: the NETePay executable is located in C\Program Files\Datacap Systems\NETePay\DSIxx_term.exe. “xx” represents the different processor used (i.e RBSLynkIP = Wordpay)
Next Topic "Restaurant Manager Setup"