Return to Previous Topic: Pre-Installation
RmNetMon (.exe) is the primary component used to facilitate redundancy in Restaurant Manager POS. The application needs to be loaded locally on each POS station (or a back office computer, if using a dedicated server) on the network. This application serves several purposes:
Again, RmNetMon must be installed on POS stations and the alternate server. RmNetMon comes included with the RM installation package. This can be found in the rmwin directory under the redundancy sub-folder. You will need to copy this sub-folder and paste it into all POS stations and alternate computers local c drives.
Prior to configuring RmNetMon, you want to remove any Windows ‘Start’ folder shortcuts to RM programs on the station computer. RmNetMon will handle all the start up tasks. However, after you are done configuring RmNetMon, you will want to include RmNetMon.exe in the Windows Start folder in addition to place a shortcut to the program on the desktop.
Setup Hint: After configuring your first station, you can copy the redundancy folder and install it on all stations using the same settings with the exception of the alternate server computer. This computer will need separate options configured as outlined in the sections below.
Configuration options are found in the RmNetMon are found in the setup screen this screen is accessed by clicking on the RmNetMonSetup.bat in the Redundancy subfolder within the rmwin directory. You have two options for installation:
Setup Hint: After configuring your first station, you can copy the redundancy folder and install it on all stations using the same settings with the exception of the alternate server computer. The alternate server computer will need separate options configured as outlined in the sections below.
Note: Only one computer should be designated as the alternate server.
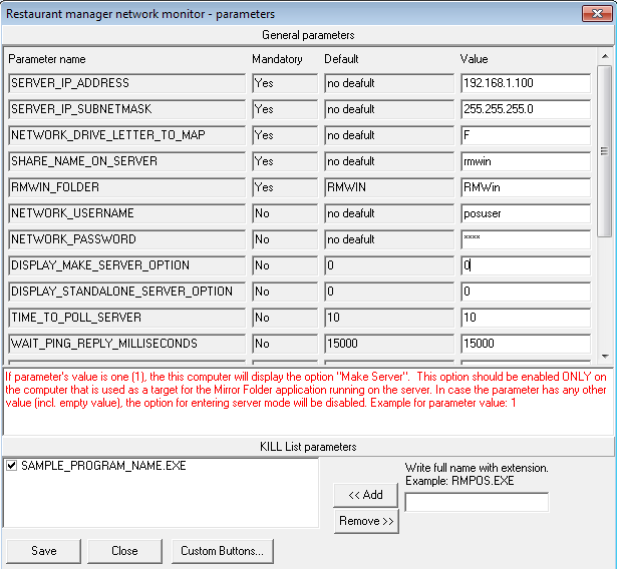
Each parameter is entered under the Value column. Note: in most cases you can use the default values. The exception is when a computer will be used as an alternate server. In this case you will want to pay attention to the Display Make Server and Local Path options. After you have configured RmNetMon, make sure you use the "Save" button before you exit.
Use the following steps to configure to modify default settings to match your system.
Server IP:. Type the local network rmserver IP address (example: 192,168.1.100)
Server IP Subnetmask: Type the rmserver subnet address (example: 255.255.255.0)
Network Drive Letter to Map: Type the mapped drive letter (F is recommended, though you may use any letter)
Sharename on server:Type the rmwin directory share name on the rmserver. Typically this will be "rmwin"but may differ depending on your naming conventions.
Rmwin Folder: Typically this filed is left empty unless RMWIN is not the shared folder
Network Username : type the Windows user account name created on the server with the administrator/shared permissions. Note: the user name and password should be the same on the alternate server.
Network Password: type the Windows user account password created on the server with the administrator/shared permissions. Note: the user name and password should be the same on the alternate server.
Display Make Server Option: Use the default "0" option on all computers (POS stations) except for the alternate server computer. Enter "1" on the alternate server computer. Entering "1" will display the "Make Server" button on the RmNetMon screen, "0" will hide the button.
Display Standalone Server Option: Use the default value of "0". If parameter's value is one (1), the this computer will display the option "Standalone Server". This option should be enabled ONLY on the computer that is used as a target for the Mirror Folder application running on the server. In case the parameter has any other value (incl. empty value), the option for entering standalone server mode will be disabled.
Time to Poll Server: Use the default setting of "10". This option determines the time interval in seconds for checking whether the server is online or not
Wait Ping Reply Milliseconds: Using the default setting of "15000"( 15 seconds). This setting determines the time interval for checking the presence of the server in LAN by "ping"-ing the server's IP address. If the site is subject to frequent brown out, you can change this setting to increase the time interval in milliseconds (example for parameter value: 3000 milliseconds equals 3 sec.
Check Method: Use the default value of "3".This option specifies the method used for checking whether the server is online. The parameter can have the following values: 1, 2 or 3. If the parameter value equals 1 the presence of the server is verified through a "ping" to the IP address. If the value equals 2 the presence of the server is verified by a "ping" and attempt to create a file on the server. If the value equals 3 the presence of the server is verified only by an attempt to create a file on the server. If the parameter value equals 2 or 3 and the server goes offline, the time for recognizing the problem is much longer in comparison with the first method (1 - ping only)
Access Password: The default value is "password". This option determines the password used for accessing some of the options in the program like "make server" and "unmake server" The password is stored (visible to the user) in the "INI" type file of the program and serves more as a protection against accidental access to the program and provides no real security access.
Alternate Server: use the default setting of "ALTSERVER". This option sets the name of the temporary (alternate) server. Used when the actual computer (temporary server) works in "server mode"
Local Path: This setting should be left blank on all POS stations with the exception of the alternate server computer. For the alternate server, you need to type the name and path of the local folder containing the rmwin files on the temporary/alternate server computer (temporary server) to be used in server mode.This parameter is not used in normal operation (outside "server mode"). Example: C:\RMWIN
Stand Alone Path:This setting should be left blank on all POS stations with the exception of the alternate server computer when standalone mode is used. Local folder on the this computer (temporary server) which contains POS while running in stand alone mode. Parameter is not used in normal operation (outside "standalone mode"). Example: C:\STANDALONE
Auto Switch Server Minutes: Use the default setting of "0". This option determines the time interval in minutes for the actual computer to enter "server mode" (to become alternate server) AUTOMATICALLY. It is not recommended that you use a setting other than the default.
Is Minimize Button Visible: If parameter's value is "1", the button "MINIMIZE" on main screen is visible. The default value is "0"- not visible.
Run Kill List Before RMStart- If parameter's value is one "1", then RmNetMon will kill all applications in "Kill List" before RMStart is executed. Otherwise will not.Default value "0" - don't kill. It is recommended you use the kill list.
You will need to create a list of executables if you have entered "1" in the "Run Kill List Before RMStart" option. All applications in "Kill List" will be terminated before RMStart is executed this preventing the message "Application already running" or the same executable from running twice when a new set of executables is used in "server mode". Most of the programs in the kill list will be RM executables and will be the same as programmed in RMStart. However, the programs in the kill list may not be limited to RM executables, there may be third party software that needs to run that you may wish to include.
Use the following steps to add programs to the kill list:
As a rule of thumb, enter the same executables for a POS station that are used in the RMStart for the same station. Below are a list of common programs used:
|
|
|
|

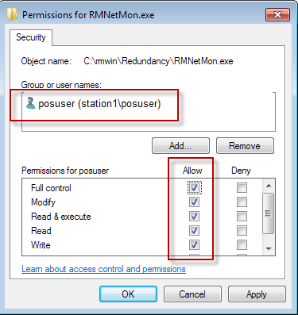
You will need to make sure RmNetMon.exe has the correct administrative privileges assigned. Use the following steps to insure RmNetMon runs smoothly:
Note: Do not use the "Run this program as an administrator" under the Compatibility tab. Enable this option only after clicking "Change Settings for all users".
While in the RMNetMon.exe Properties: Click "Security" tab. Verify the administrative Windows user account used to log-in the computer is present under the "Group or user names" list. Add the Windows user account name if not present and assign appropriate permissions.
You will need to add RMNetMon.exe in the Windows Start folder after you have finished the configuration steps . In addition, you will want to place a shortcut to the program on the desktop.
You can customize the RmNetMon screens to add specific instructions and your resellers contact information. There are three files installed in the redundancy folder by default:
Different sites may have very different troubleshooting steps depending on size of install and the types of equipment used, so you may simply edit these files to suit each specific install or use them as they are.The rtf files may be easily edited with Windows Word Pad.
The Trouble file contains a default set of instructions for troubleshooting problems in the event of a system failure. These instructions can be customized to provide specific instructions on exactly what steps should be taken.
The "Support‟ file contains information on contacting your technical support services and the should be customized with your resellers contact information.
You may want to customize the background screen to add your logo, change colors,, etc. You can either change the existing image or add your image. If adding your own image, the name must be exact the exact same as the default (RMNetMon_BKGND.JPG) and the image size should be 1024 X 768.
Below is a screen shot of the troubleshooting checklist as it would display when the rmserver is unavailable:

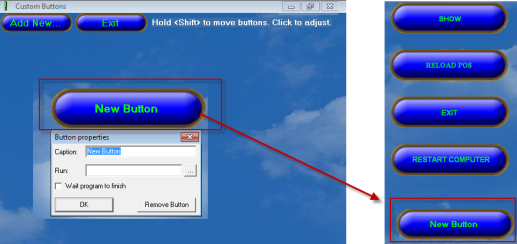
You can add buttons to the default RmNetMon screen beyond the basic default buttons. You can add buttons using the following steps:
Go to Next Topic: Configure Alternate Server