Continued From "RMSQL Export Setup Form"
Scheduled Data Export Updates
You must first configure time and data parameters before running a scheduled data export. Setup needs to be done only once unless there is a need to change the export parameters. Once the parameters have been configures, all you need to do is initiate the export process by clicking on "Start Scheduled Export" button on the RMSQL Export screen.
Setting Up Scheduling Parameters
The following is a summary of steps for scheduling automated data exports:
-
Open the RMSQLExport (.exe) utility
-
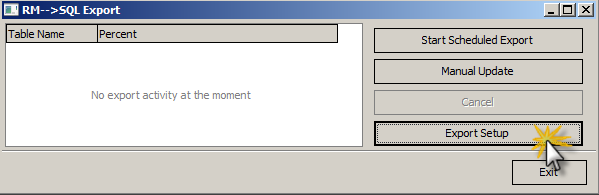
Select the "Export Setup" option on the RMSQL Export default screen.
-
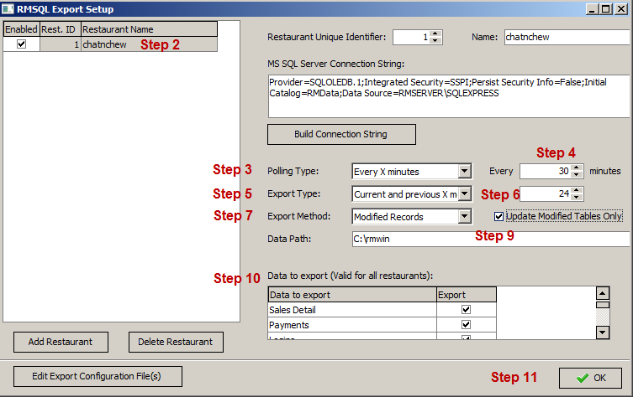
Select the restaurant to schedule on the Restaurant List on the left side of the form.
-
Using the drop down menu on the Polling Type option to choose the export time period (i.e. minutes, hours, or days).
-
Click on the "Every" field to enter the polling type incremental time. Example, if "Every X minutes: is the polling type, enter 30 in the field box if you wish data export every thirty minutes.
-
Click on the Export Type and choose the data to be exported for a time period (i.e. current month).
-
Click on the field box next to the Export Method to enter the number of past months worth of data you wish to export. Note you only need to configure this field if Current and previous X Months is the export method.
Example: On January 20th, 2012 the user enters 24 in the field box to the right of the Data Export field. The system will send data to Report Services for all months dating back from January 2010 including the current month.
-
Choose Modified Records for the Export Method if you have already exported data (typically done during the initial setup process).
-
Enable the Update Modified Tables Only if the export method is Modified Records.
-
Enabled or Disable database fields to be export (or not) in the Data to export section.
-
Click the OK button to save changes. You will be redirected back to the default RMSQL Export screen.
Proceed to the next section for instructions on how to start the Data Export schedule.
Starting Data Export Schedule
Once the parameters for a scheduled data export have been configured you will need to start the schedule. Scheduled data exports are initiated within the default RMSQLExport (.exe) Utility screen. Use the following steps to start a scheduled data export:
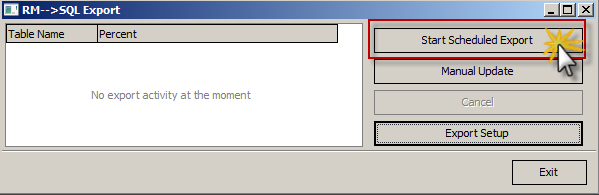
- Select the "Start Scheduled export" button on the RMSQL Export default screen.
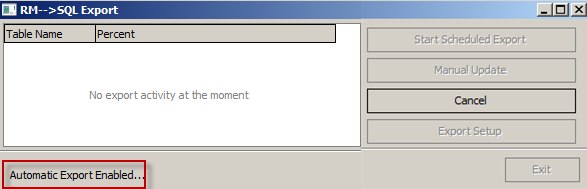
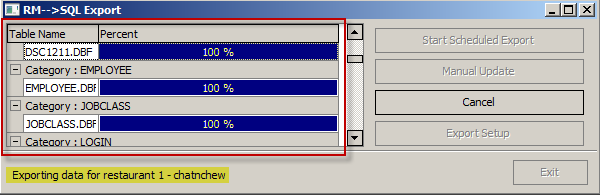
Notice the "Automatic Export Enabled" message at the bottom of the form after selecting the "Start" button(pictured below). This confirms the process has been enabled.
Shortly after you will see the progress bars for each database being exported:
- Click on the Minimize button on the top right corner of the form. The RMSQLExport utility must remain running to export data for the scheduled parameters. Closing the form will cancel the export data export. Repeat steps 1 and step 12 if you accidentally close the RMSQLExport utility.
RMSQL in RMStart
Stated earlier, RMSQLExport needs to be running to push the data export to Reporting Services. Consideration must be given to having the RMSQLExport to automatically start when the server computer is restarted. It is recommended that the RMSQLExport executable be included in the list of Restaurant Manager programs included in RMStart for the server computer. Use the steps outlined below to include the export utility in RMStart:
-
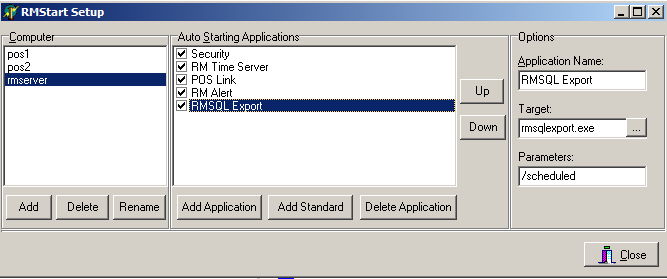
Open RMSTARTSETUP (.exe)- The RMStartSetup Form is accessed within the rmwin folder or by going to Windows Start > Programs > Restaurant Manager Version 18.xxx > Central Program Control.
-
Select the server computer (i.e. rmserver) on the computer list
-
Click on the [Add Application] button below the Auto Starting Applications window.
- In the Add Application dialog box use the following settings:
Application- type "rmslqexport.exe" or use the ellipsis button to browse to the rmwin folder and select "rmslqexport" application
Parameters- type "/scheduled". This setting will start the scheduled export.
-
Enter the application name in the Application Name dialog box under the Options section of the form.
-
Click "Close" to save changes and exit the RMStartSetup form.
Note: you can also use a batch file with the following command:
"c:\rmwin\rmsqlexport.exe /scheduled"
The "C" in the command represents the drive where the rmwin folder resides.
Next Topic "Manual Data Export Updates"