Return to Previous Topic: Configure Alternate Server
The last step in the redundancy installation process is to configure RMStart for the Alternate Server, program RMSpool to for printers to reconnect to a new computer in the rmserver fails, and to install the mirroring software. The Mirror software job is to copy files updated files in the rmwin folder and send them to the backup rmwin folder on the alternate server computer in real time. Using the RMMirror.ini file provided by ASI will minimize the mirroring software setup process.
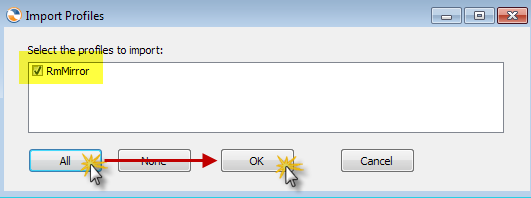
On the rmserver computer click" Start" , "All Programs", Under the Restaurant Manager programs folder run Central Program Control (RmStartSetup)
1. If you have not already defined your station and server entries in RmStartSetup, do so now. After you have added rmserver and all stations, proceed to step 3.
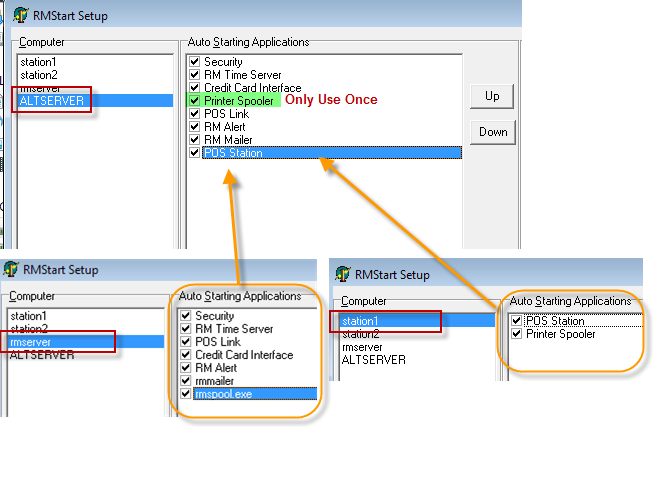
2. Click Add to add a new computer. For the computer name enter ‘ALTSERVER’
In this step, if you are using a POS station as the backup server, add ALL of the applications that are defined to run on RMSERVER, and add all of the apps that are defined to run on the station that is designated as the backup server. If you are using a backup server PC that is not a POS station, simply add the same apps as the rmserver computer.
Example: If you have designated STATION 1, to be your alternate server, and the following apps have been defined in RmStartSetup for STATION1 and RMSERVER, make a note of those apps such as the following:
Rmserver: Security, Time Server, Credit Card Interface, Poslink, Printer Spooler, RMAlertd, RMMailer,
Station1: POS Station, Printer Spooler
Now add ALL of those apps to the ALTSERVER in RmStartSetup:
Ex: Security, Time Server, Credit Card Interface, Poslink, Printer Spooler (RMSpool), POS Station. Note: you do NOT add Print Spooler twice.
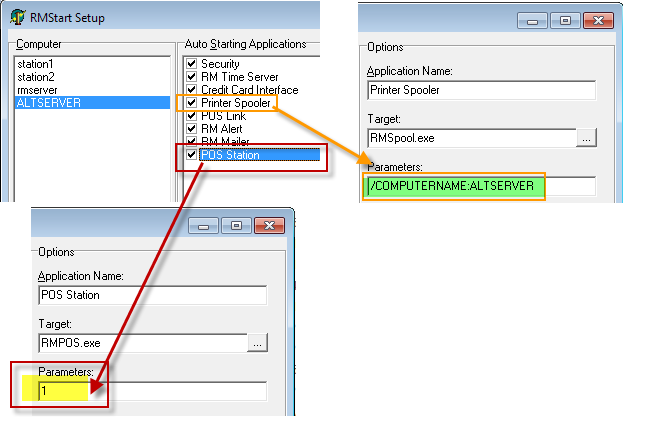
If you are using a POS station as an alternate server you will need to make additional adjustments to the POS Station and Print Spooler apps in RmStartSetup. Adjust the parameters fields for the following applications as follows:
POS Station: type the number that corresponds to the Station# that is acting as the backup server. Example, if the alternate server is also STATION1, then the parameter for POS Station = 1
Printer Spooler = /COMPUTERNAME:ALTSERVER Note: Type the exact text /COMPUTERNAME:ALTSERVER. Do not substitute
In a redundancy environment, it is important that IP Printers should be used for all remote prep printing. To best explain this, lets take a look at how printing works with Restaurant Manager Redundancy. Lets assume your alternate server will be a POS station, and it normally drives its own receipt printer, RECEIPT1. And lets also assume your primary server (rmserver computer) drives 3 kitchen printers: Expo, Salad, Grill. If Station1 must take over the role of Alternate Server in an emergency then we need to have Station1 drive all four of the printers- The 3 kitchen printers, along with the stations receipt printer. Because RMSpool.exe normally services printers based on the computer name, we would lose partial functionality if we loaded it in redundant mode using one of those two computer names (Station1 or rmserver). If we loaded RMSpool as Station1, it would only be servicing RECEIPT1 & no kitchen printers. Or, if we loaded RMSpool as rmserver, we would have our prep printers, but we would not have RECEIPT. But, by loading RMSpool with another computer name (not a real computer on the system, just another name) it can service all of the printers required to give full functionality. So we re-create each one of our printers that must be serviced during redundancy and assign a computer name of ALTSERVER to each of those printers. If you notice back in the RmStartSetup section, this is why we have RMStart loading RMSpool with the parameter: /COMPUTERNAME:ALTSERVER
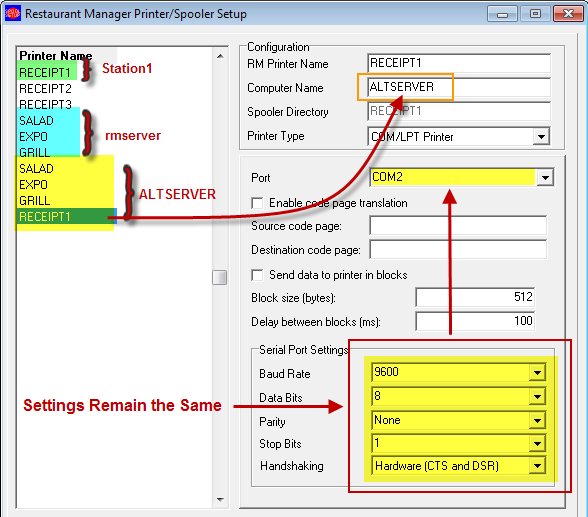
Run Print Spooler Setup (splsetup.exe). If you have not yet defined all of the printers you will be using in your system, please do so now.
Repeat this for ALL printers that were configured for the main server.
As you can see in the image below, all of the printers that Station1 will be servicing have been added again with a computer name of ALTSERVER.
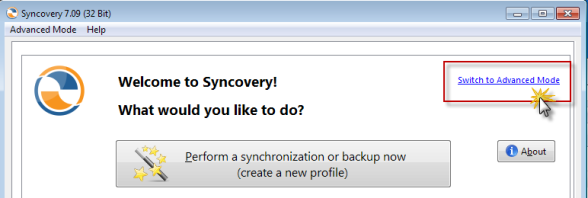
Currently, Syncovery is the only ASI approved mirroring software. Please see the appendix section that covers the ordering process of this software. The rest of this section will cover the installation process of Syncovery on the rmserver computer.
Prior to Syncovery installation the following steps should;d have been completed:
Download Syncovery File Synchronizer (www.Syncovery.com) latest version.
NOTE: You may install the software in 30 Day trail mode with no key required. To purchase a license for Syncovery please see the end of this document for special RM pricing.
Do not proceed with installing Syncovery until the criteria above has been completed.
As of 2/27/2015 the most current exclusion files for rmmirror are:
err*.*; *.hld; *.log; *.ntx; *.req; *.spl; *.txt; security.dbf; linklock.dbf; - *cmlock.dbf; *.sem; invlock.dbf; RPTTRG.DBF; MAILLOCK.dbf; RmAlertD.Lock
You may add other inclusions at your discretion. Exclusions must be placed under the [ExcludeMasks] line and must be separated by a semi-colon (;)
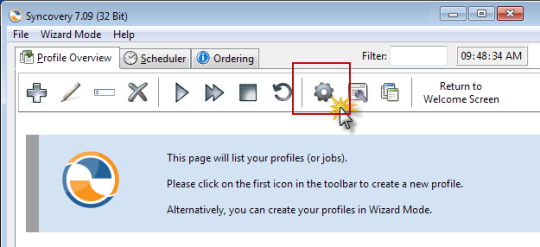
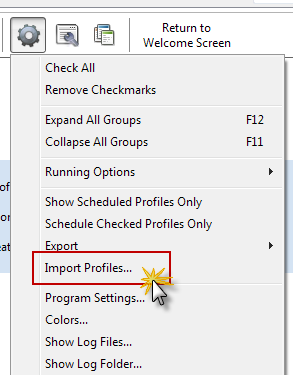
Install the file mirroring software on rmserver computer using the following steps:
The interface should now look like the image below:
Note: Syncovery will start automatically as a service when the rmserver computer starts.
Go to Next Topic: Testing RM FailSafe