Your Restaurant Manager system can be used to track hours worked and calculate payroll, including overtime. To use the timekeeping features all employees must clock in and clock out from the POS Status Screen. Additionally, the following should be configured:
Important: In 2014 mandatory gratuities (Auto Gratuities) will need to be handled differently than regular tips. In fact, the IRS considers “automatic tips” service charges that should be considered part of the employee’s regular, non-tip wages. This topic is covered in the section: Auto Gratuities as Wages
NOTE: Regardless of whether or not you implement automated Work Schedules, you can always adjust login and logout times after a pay period is ended and re-print the Payroll Report as many times as necessary.
Standard procedures dictate that all Employees use the EMPL Function Button to clock in when they report to work and clock out when their shift is over. There are many configuration settings that control how this operation works.
The clock in operation may be password protected. But if it is, every employee must be assigned a <clocked out> Security Level greater than or equal to the Security Level assigned to this operation.
The configuration settings listed below control the clock-in and clock-out process.
There are also some POS Operations that give managers control over timekeeping procedures and errors (such as when employees forget to clock out before leaving or when certain employees might collude amongst themselves to clock each other in and out.)
You may configure your system to include multiple procedures in the clock-in and clock-out processes:
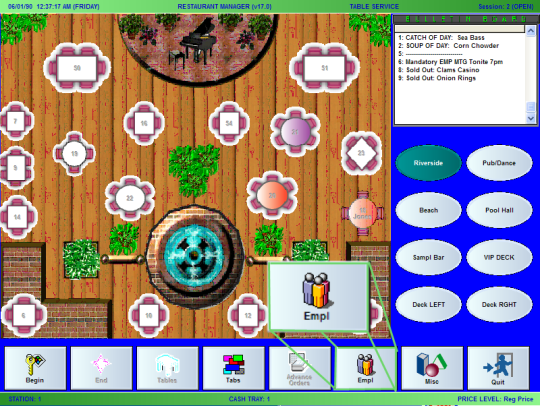
No matter how you’ve configured the clock in/out process, employees always begin the clock in/out process by touching the [EMPL] button at the base of any POS Status Screen:
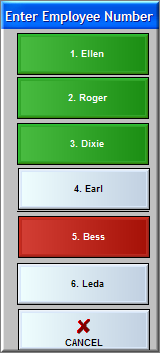
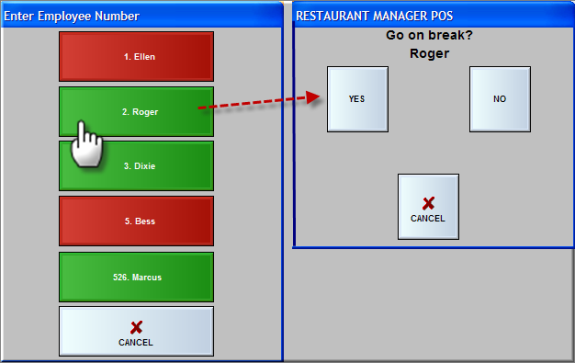
Each time someone touches the [EMPL] button, a list of active employees appears on touch screen buttons. Off-duty employees are listed on gray buttons, those currently on the job appear on green buttons, and employees on break appear on red buttons, as in the screen shot below:
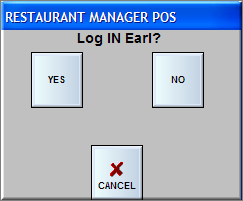
Employees clock themselves in (or out) by touching their name on this list and responding [YES] to the following prompt:
Restaurant Manager will then prompt the employee to identify themselves with the Employee ID your system has been configured to accept.
The "Clock-Out" process is very similar to the "Clock-In" process. Press the [EMPL] button at the base of the Status Screen. Restaurant Manager will prompt you to enter the Employee ID. If your system is configured to print a Revenues Report, Restaurant Manager will ask whether or not you wish to print this showing the revenue generated and tips earned by a specific employee during the current shift.
To finalize the clock-out you must enter the employee password or swipe an employee ID card.
Restaurant Manager provides a mechanism for implementing both paid and un-paid employee breaks. For both type of breaks you will use the [Employee Break] function at the POS. Once the [Employee Break] function button is pressed, the system will record the break hours for the employee. This function may also be used for the time period between two shifts in the same session and you want to balance both shifts with only one employee Revenue Report.
If employee breaks are used in your establishment, you will want to configure the employee break button to be on the Main Status screen. You will also want to configure your system to allow other employees to have access to other employee’s tables, if a full service establishment, so that service can continue for customers with active orders. The alternative is to have employees going on break to transfer tables to another employee.
Restaurant Manager is configured, by default, for employee unpaid breaks. Basically, Restaurant Manager will record the time period between the point where an employee presses the Employee Break function button both to start and end the break. So if an employee works an 8 hour shift and has a half hour break, the employee time record will show hours worked but only 7.5 hours paid in wages.
Pressing the [Employee Break] button will trigger a prompt where you can enter an employee number. If your system is configuration to show names, the screen will display a list of employees who are currently logged into the system. The list is color coded: Green buttons are employees logged into the system and available for breaks and red button represent employees currently on break. Selecting a name will bring about a confirmation prompt with the effected employee. Press the [Yes] button to continue or the [NO] button if you want to cancel the process. However, if you are using Enhanced Passwords, you simply need to enter your password and select the [Employee break] button and then press the confirmation prompt.
When the break time is over, press the employee Break button, choose the name and answer [Yes] to the confirmation prompt.
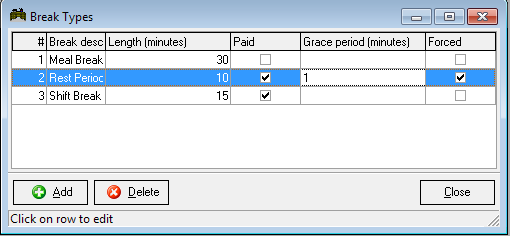
Restaurant Manager's Enhanced Employee Break functionality allows for paid, unpaid, and forced breaks. Enhanced Employee Breaks will require some additional setup in Station Configuration and in the Break Types Setup form.
There is only one setting needed to be enabled for Enhanced Breaks. You must enable the "Use Enhanced breaks" options under POS Configuration > Employee > Login Options. Note. You must enabled this option on every station.
You must configure employee break parameters when using Enhanced Breaks. Enhanced Employee Break parameters are configured in the Break Type Setup Form in the RM Back Office Module (Setup > Labor > Break Types). You can program from 1- 99 Break types. Break types are added using the "Add" button and removed from the form using the "Delete" button. Deleted breaks must be removed starting with the last one listed. You can not delete a break type the is not the last one listed: it will still appear on the POS list.
Adding a break type is a simple as clinking the "Add" button and typing the name of the break in the Break Description field.
Below are examples and outcomes for several different ways enhanced break can be configured.
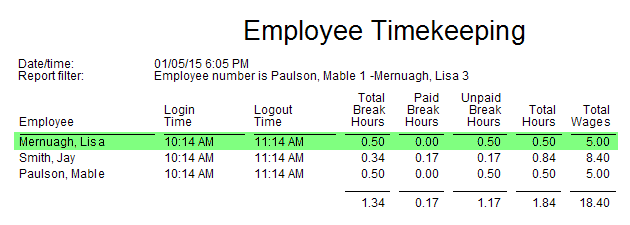
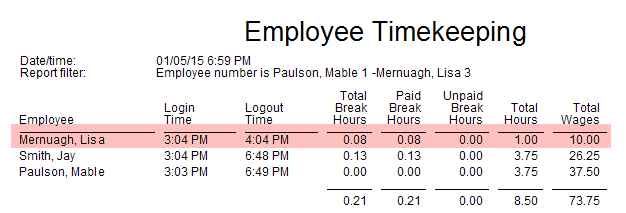
Break Type configured as follows: Length- 30 minutes, Paid- unchecked, Grace Period- none, Forced- unchecked. An employee log's in for 1 hour, takes a 30 minute unpaid break, and earns $10.00 an hour. In the sample Employee Timekeeping report (below) we can see that Lisa total break and unpaid break hours are .50 (calculated n hundredths) and the total wages are $5.00.
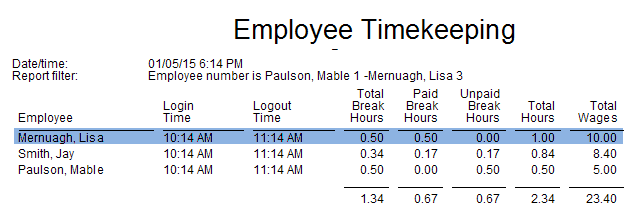
Break Type configured as follows: Length- 30 minutes, Paid- checked, Grace Period- none, Forced- unchecked. An employee log's in for 1 hour, takes a 30 minute paid break, and earns $10.00 an hour. In the sample Employee Timekeeping report (below) we can see that Lisa total break and paid break hours are .50 (calculated n hundredths) and the total wages are $10.00
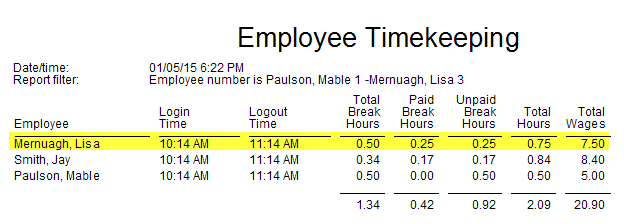
Break Type configured as follows: Length- 15 minutes, Paid- checked, Grace Period- none, Forced- unchecked. An employee logs in for 1 hour, takes a 30 minute break, and earns $10.00 an hour. In the sample Employee Timekeeping report (below) we can see that Lisa total break is 30 minutes ( .50 calculated n hundredths), paid break is .25 hours (15 minutes), and un-paid break hours are .25 and the total wages are $7.50. Even though Lisa to a 30 minute break she is only getting paid for 15 minutes of the break. In this example Lisa gets paid for three quarters of an hour: 30 minutes working plus 15 minutes paid break ($10 x .75 hours).
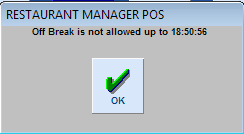
Break Type configured as follows: Length- 10 minutes, Paid- checked, Grace Period- none, Forced- checked. Employee goes on break at 18:40:56 (6:40 pm). The employee will get the following message if trying to log in prior to the forced time of ten minutes:.
The message box above will show the exact time the employee can come off of break. If a grace period of two minutes defined the time on the message box would have stated 18:48:56.
Break Type configured as follows: Length- 10 minutes, Paid- checked, Grace Period- 5 minutes, Forced- checked. An employee logs in for 1 hour, takes a 10 minute forced break, and earns $10.00 an hour. Five minutes (.08 hours calculated in hundredths) into the break the employee logs back in from break. In the report below we see Lisa is only paid for the 5 minutes she was on break.
If needed, Employee Breaks can be edited using either the Edit Login function at the POS or the Edit Login Data function in RM BackOffice.
Employee breaks are recorded on the following reports:
You have two options regarding clock-ins when using 24 hour mode. There is a Station Configuration setting allowing employee to be clocked out and then back in or not to clock out. In a cashier environment it is recommended that you enable the option to clock them out in and back in automatically. Using this option will start a new revenue report for the new session for all employees.
Managers have an option at the POS where they can log out employees outside of using the [Empl] timekeeping function button. The [Clock Out Employee] is the function you will want to use when wanting to clock out employees at the POS. The advantage to using this function is there is a greater selection of time out options available including:
Current Time- Allows the user to clock out the employee at the current at the POS.
Same as Login Time- Allow user to set the hours to zero. When used in conjunction with “Send e-mail when clocking out employee form MISC” Station Configuration setting, you can place the responsibility on the employee to inform the manager when they left and then edit their hours.
Schedule logout time- This is a legacy function for users with Quick Staffer.
Manual Entry- This function allows the user to clock out an employee either for a previous or future time typically within the same business day.
The Clock Out Employee function honors all prompts assigned to a job class assigned in the Job Classification form and in the Station Configuration. You cannot clock out an employee who has active order.
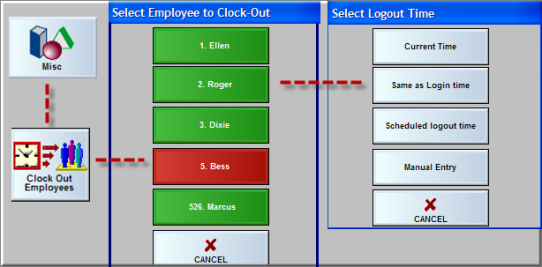
Clock-out Employees - If several employees have forgotten to clock out, the manager can clock them out by selecting MISC->Clock Out Employees from [MISC] in the Main POS Status screen. This option not only saves keystrokes over clocking them out one-by-one, it offers several options for entering the clock-out time. When using this option, the POS program displays a list of employees that are clocked in.
The Station Configuration Form allows you to set a security level for clocking in and out of the system. It is not recommended that you leave this security setting at zero. If you do, employees may freely clock-in their friends whether or not they’re actually on the premises. This option provides the ability for ALL employees to clock in or out of the system regardless of their security level, provided they enter their own password. To enable this option, go to RM BackOffice >Setup >Station Configuration and check the option “Always allow exact password for employee clock in/out.”
Regardless whether this option is enabled or not, if an employee wishes to clock in or clock out someone other than themselves, they must have a security level higher than the setting defined for the “EMPL” function in RM BackOffice > POS Function Buttons Layout.
An employee time sheet can be printed which shows all clock-ins (and clock-outs) for the current pay period. The time sheet provides a blank line for the employee's signature/approval. In addition the slip shows cumulative totals for tips entered from sales tips paid to others, and tips received from others. To print a time sheet, select [MISC] from the main POS screen, then select [TIME SHEET] from the pop up selection window. Restaurant Manager will ask for the employee number, and then print the time sheet on the receipt printer.
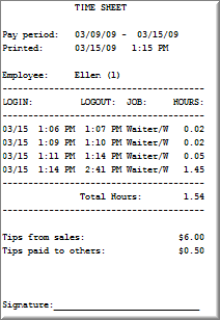
NOTE: The pay period is set from the Payroll Options Setup Form.
Restaurant Manager allows you to define Work Schedules for any or all of your employees. This function should not be confused with weekly employee work schedules that are posted. Rather, this feature is useful if you are using Restaurant Manager to calculate payroll. It allows you to improve the accuracy of your Payroll Reports by preventing early clock-ins and late clock-outs at the POS. It also provides control of individual employees who arrive chronically late.
An employee without a defined Work Schedule may clock-in and clock-out freely whenever arriving or leaving the work place. If an employee with a defined Work Schedule tries to clock-in or clock-out at a time other than the time specified in the schedule, Restaurant Manager will prompt for the Manager's Password.
You can define a grace period that will apply to all employees with defined "Work Schedules". A grace period is the number of minutes early or late that you will allow clock-ins and clock-outs WITHOUT prompting for the Manager's Password. See Login/Logout grace period (minutes).
Work Schedules for each employee are defined from the Schedule Setup Form:
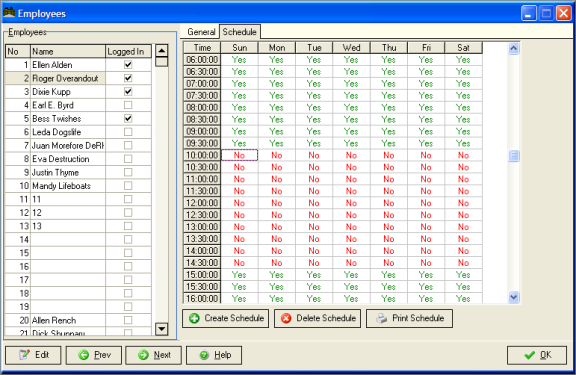
To define a Work Schedule for a particular employee:
Restaurant Manager can be configured to track and report tips in a variety of ways:
Important: In 2014 mandatory gratuities (Auto Gratuities) will need to be handled differently than regular tips. In fact, the IRS considers “automatic tips” service charges that should be considered part of the employee’s regular, non-tip wages. This topic is covered in the section: Auto Gratuities as Wages
Restaurant manager allows a server to enter in a tip based on sales. Restaurant Manager has the capability of tracking all tips but allows the employee to enter in all actual tip money received. Here is an example; Server 1 has $200 in credit card tips and tips out $50 dollars to various employees (bus staff, bartender, etc.). Here actual take home tips are $150. Server 1 will want to declare $150 in tips (depending on current tax regulations).
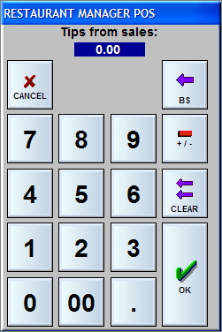
The tip prompt is configurable by job class in the Job Classification form. Employee can also use the Revenue Report to determine tips from sales if necessary. The “Declare tips from sales” prompt will occur during the employee log out process. Employee can also enter tips for any login within the current pay period using the [Declare Tip] function button found under the MISC function on the POS Main Status screen. Declared tips can be adjusted by management using “Edit login Data” found in RM BackOffice under Activities > Edit Login Data.
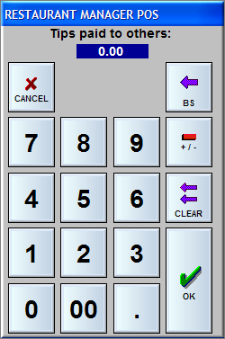
Restaurant Manager allows for the tracking of tips paid out to others. This ideal for accurate tip tracking and is necessary if you are participating in a government tip program. The information recorded only tracks that there has been a tip out and not the specific employee who the tip was paid out to.
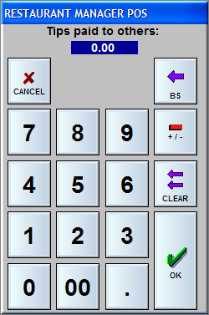
The tip prompt is configurable by job class in the Job Classification form. The “Declare tips paid to others” prompt will occur during the employee log out process. Employees can also enter tips paid to others for any login within the current pay period using the [Declare Tip] function button found under the MISC function on the POS Main Status screen. Declared tips can be adjusted by management using “Edit login Data” found in RM BackOffice under Activities > Edit Login Data.
Your system can be configured to enter and track “Tips received from others”. This function is used to track tips for employees that receive secondary tips (i.e. bartenders, bus staff, cooks, etc). Secondary tips are those not received directly from the customer. Instead, secondary tips are usually received from other employees.
The tip prompt is configurable by job class in the Job Classification form. The “Tips received from others” prompt will occur during the employee log out process. Employee can also enter tips received from others for any login within the current pay period using the [Declare Tip] function button found under the MISC function on the POS Main Status screen. Declared tips can be adjusted by management using “Edit login Data” found in RM BackOffice under Activities > Edit Login Data.
Restaurant Manager provides the option to allocate a portion of an employee’s sales and/or tips into a tip pool for other employees. Tip sharing information is printed on employee revenue reports and can be added to the employee’s cash due amount at the end of their shift.
Tip sharing can be configured independently for each job classification. In addition, the computation can be based on total sales and/or sales by group type. Here are a few examples:
For each job classification, you can define as many tip pools as desired. Each tip pool allows tip sharing from one job classification to another. For example, waiters share their tips with bartenders and runners, while bartenders share their tips with cocktail waitresses and runners.
To configure tip sharing, go to RM BackOffice >Setup >Labor >Job Classifications and highlight the desired job classification on the left, and click on the Tip Sharing tab on the right.
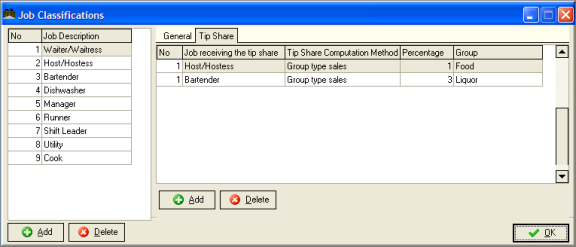
Click the [Add] button to add an additional tip pool to the current job classification. For each tip pool, define each setting as described below:
Job Class: Choose the job classification that is RECEIVING the tips. For example in the case of waitresses sharing their tips with the bartender, choose “Bartender” as the job class.
Computation Method: Choose the desired computation method. The tip share calculation uses this value as the base amount for computing the percentage tip share.
Percentage: Enter the percentage of the tip share. This percentage is multiplied by the value chosen by the Computation Method above.
Group Type: Select a group type for computing the base value of the tip share. Note: this is only used when the computation method is set to “Group Type.” This value is ignored for the other computation methods.
This process can be continued to add additional tip pools for each job classification.
Note: the tip sharing calculation is included on the employee revenue report only. It does not carry through to the back office reports or the accounting interface. Also, the tip sharing feature computes the amounts that each employee must contribute TO the tip pools at the end of their shift. The system does NOT divvy up the money in the tip pools and show how much goes to each employee.
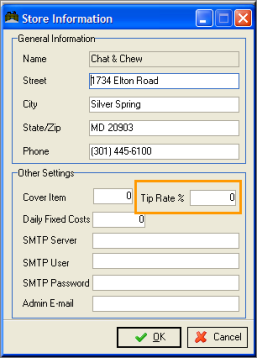
You can set and track a percentage of an employee’s sales if needed. This number can be used to audit against declared tips to make sure employees are in compliance with store policies. The percent is enter in the Store Information setup form located in RM BackOffice under Setup > General > Store Information > Tip Rate % field.
Tips can be tracked throughout the Restaurant Manger System. Below are some of the area and reports that can be used
At the POS
RM BackOffice
RM Info Center
Tip information can be obtained using the Labor Report under the Dataminer section of the RM InfoCenter program. You can customize and save a report to specifically track tips by employee. More on information on RM InfoCenter can be found under the topic: RM Info Center.
RM Reports Module
Individual transaction tips can be obtained using the following reports:
The following reports will list an assortment of cumulative tip categories for tracking and reporting purposes:
- Wage Summary
- Wage detail
- Activity Summary
- Activity Detail
- Job Class Detail
- Gratuities
- Employee Time Keeping
- ATIP Tips
- Employee Tips
- TRAC Tips
- TRDA Tips Employee Sales and Tip Totals
Before you can issue any payroll reports, you must define the pay periods, set over time rates, etc. The pay period is used to create the employee time sheets that are issued from the POS Modules. All clock ins and clock outs during the pay period will appear when an employee prints a time sheet. The pay period is also used to generate Wage Summary and Wage Detail Reports (with or without overtime calculations).
Changing the pay period does not affect employee reports, nor does it cause any data to be destroyed.
From the Payroll Options Setup Form you can define start & end dates for the pay period and calculate overtime.
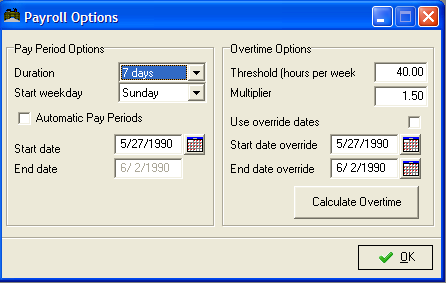
The fields that allow you to set Payroll Options are organized in two sections:
Duration- Click on the down arrow to the right of this field to select “Semi-monthly”, "7 Days" or "14 Days" as the duration of the pay period. In “Semi-monthly” mode, each month has two pay periods; one running from the 1st of the month to the 15th, and another from the 16th through the end of the month. The "7 days" option will calculate over time on a seven day period based on the Start Week Day, Start date , and Threshold settings. The '14 Days" will calculate over time on a seven day period based on the Start Week Day, Start date , and Threshold settings. The setting that you select will affect the "Current Pay Period" filter option in RM Reports and the Time Sheet function button at the POS.
Start Weekday- Click on the down arrow to the right of this field to select the day of the week on which you wish to begin the pay period. This field is used simply to validate the start date of the pay period. Restaurant Manager will not allow you to enter a start date that does not begin on the correct day of the week.
Automatic Pay Periods- Check this box if you wish to set a new pay period automatically
Start Date- Type the date on which you wish to start the pay period. This date will be overridden if you activate Automatic Pay Periods.
End Date-Type the date on which you wish to end the pay period.
Threshold (hours per week)- Type in the number of hours (usually 40), which should serve as the threshold at which overtime pay takes effect. Any hours worked by an employee during a single week of pay period in excess of the Overtime Threshold are multiplied by the Overtime Multiplier (below).
Example: if the pay period duration is set 14 days and the threshold hours is set to 30 the system will calculate overtime 30 hours per week. In our example we have the Payroll Option settings configured as follows:
- Pay Period = 14 days
- Start weekday = Sunday
- Start date = 10/3/2015
- End date = 10/16/2015
- Threshold (hours per week) =30
The first week should calculate any overtime for hours over 30 between 10/03/2015 and 10/09/2015. On the 1st Sunday of the second week (10/10) the system will reset so the second week should calculate any overtime for hours over 30 between 10/010/2015 and 10/016/2015.
Note: overtime would not be paid until hours logged over 60 hours each week if the threshold hours were set for 60 hours and the pay period was set to 14.
Overtime Multiplier- Type in the multiplier rate Restaurant Manager should use to calculate overtime pay. By default this field should is set to 1.5 which corresponds to time and a half for overtime. If “OT Rate” is set under the Employee Setup Form, this multiplier is overridden.
Multiplier 2- This field is used for California or other similar stated the calculate overtime at a different rate after seven consecutive days of work. Note: Daily Overtime must be enabled in Station Configuration for overtime Multiplier 2 to take effect.
Use override dates- Check this box if you are going to manually calculate a pay period using the fields below.
Start date override- Enter date that your pay period began on.
End date override- Enter the date the pay period began on.
Calculate Overtime- Click on the [CALCULATE OVERTIME] button after setting the appropriate pay period options to calculate overtime pay for a given pay period. You should execute this option whenever you Edit Login Data for a previous pay period as well as when calculating overtime for the current pay period. Pay close attention what dates are entered.
Note: It is recommended that you calculate only one week at a time. If your threshold is set to 40 hours and you calculate a two week time period, any hours in the second week over forty hours will be calculated as overtime.
In most states, overtime is calculated at 1.5 pay for time worked above 40 in a work week. However, there are some states like California, Oregon and Colorado that calculate overtime on a daily basis. Below is a statement taken from the State of California Division of Labor Standards Enforcement (DLSE) Overtime web page that outlines thier overtime criteria:
Restaurant Manager will accommodate California Overtime (and similar states) when enabling "Daily Overtime" on all station in Station Configuration. When Daily Overtime is enabled, then overtime is computed using the following rules:
The overtime rate is computed as a weighted average to yield the correct total pay. For example, if someone works 14 hours on a given day, everything after 8 hours is paid at 1.5 times and everything after 12 hours is paid at 2 times; so the employee will earn a total of 6 hours overtime, 4 hours at 1.5 times, and 2 hours at 2 times. If the base hourly rate is $5.00/hr, then the overtime pay will be:
|
4 hours (OT hours 8 - 12)@ $7.50/hr |
= $30.00 |
|
2 hours (OT hours 12-14) @ $10/hr |
= $20.00 |
|
|
----------- |
|
|
$50.00 total |
Restaurant Manager does not show these individual overtime periods. Instead, it will combine these periods into a single overtime period with a weighted average of the hourly rate to yield the correct total wages. In this case, Restaurant Manager™ will show 6 hours overtime at $8.33/hr.
In the United States, the states of California and Colorado require additional steps to calculate overtime. Ple0ase see the following documents for more information:
NOTE: If there are errors in any Wage Reports or Time Slips, you can make adjustments to the actual dates or times worked by a particular employee from the "Edit Login Data" screen (as discussed below) and then re-issue another report for the same pay period.
Restaurant Manager allows you to adjust the login and logout day or time for any employee on your payroll. These adjustments will affect both the Payroll Report and other Sales Reports.
If you have defined Work Schedules for your employees, it is unlikely that you will need to adjust the hours or job classification code(s) that are used to calculate payroll. However, Restaurant Manager allows you to make adjustments to the days, hours & job classification code(s) or any employee, regardless of whether you may have defined a Work Schedule.
To adjust the login or logout data on a particular employee, select the "Edit Login Data" option from the "Activities" drop down menu. See screen below.
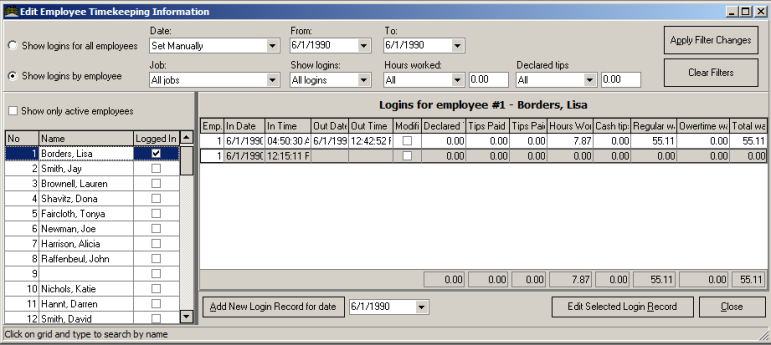
Use the following fields to filter employees displayed in the Login's section of the form:
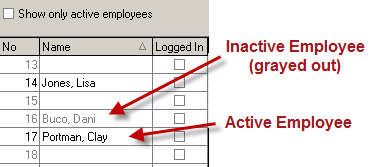
Editing Time- One Employee at a Time- Click on “Show login by employee” and select the employee from the Employee List directly below. You can sort employee information by number or name by means of clicking on the column heading in the Employee List Column. Once an employee is selected, only their information will be displayed on the Login/Out section of the form. Note: inactive employees are grayed out on the employee list section
Editing Multi Employees- Same Time Period- Click on the “Show logins for all employees”. You can then sort by date and job type.
Show only active employees- use this function to display only those employees marked active in the Employee Setup Form. In other words, inactive employees and blank cells will no longer appear on the employee list when enabled. Note, this function is only available using the "Show logins by employee" function.
Dates- Click the down arrow on the “Dates” field to choose from pre-set dates (i.e., Today’s Date or Yesterday’s Date) or set this to “Set Manually” and enter the start and end dates of the period you wish to review and press [Set Filter].
Job Type- Click the down arrow on the “Job Types” field to choose from pre-set job classifications (i.e. waitress, bartender, cook, etc.) and press [Apply Filter Changes].
Show records- This field option allows you to filter records that have not been edited (Not Modified) or records that have already been edited (Modified) or you can use the default setting “All”.
Hours- You can further filter employees displayed by filtering hours. Click on the down arrow next to the field setting and select one of the options:
- Is greater than
- Is less than
In the field setting next to the two options mentioned directly above you can enter in the hours you wish to filter with. So, if you enter in “is less than” and use 20 hours, the records listed below will only display employee that have 20 or less hours accumulated for the period set using the date filter.
Declared Tips- You can further filter employees displayed by filtering declared tips. Click on the down arrow next to the field setting and select one of the options:
- Is greater than
- Is less than
In the field setting next to the two options mentioned directly above, you can enter in the declared tips you wish to filter with. So, if you enter in “is less than” and use $100 in declared tips, the records listed below will only display employee that have $100 or less declared tips accumulated for the period set using the date filter.
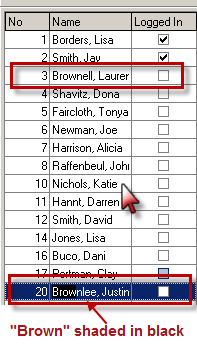
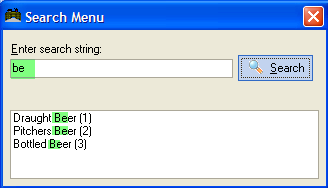
Use the scroll bar to navigate the Employee List . Search for a specific employee by clicking on any row on the employee list and type a name in the format it was entered. Hint:the system will search for entries in alphabetical order starting from the row the user initially clicked on. Search result will be highlighted in blue and criteria matching typed entries will by shaded in black. Example: clicking on row 10 and typing "Brown" will bring the user to employee 20 (Brownlee, Justin) despite employee 3 (Brownell, Lauren) being first alphabetically. For the reason is suggested you start your search by clicking on employee 1.
When activated, this field will display all employees who match the criteria entered in the filter fields. You can select the desired record and either double click on the line or select the [Edit Selected Record] button to edit the record.
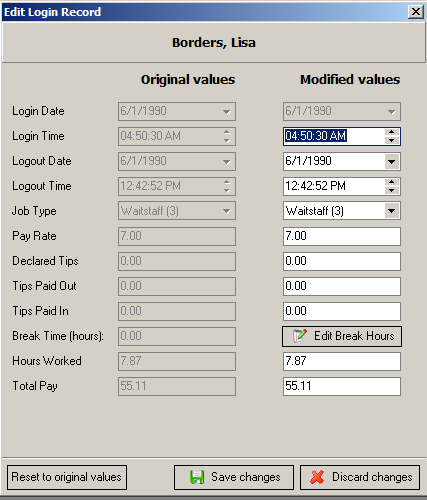
You can now select and edit information in any active field. You will notice there are two columns: Original and Modified. You can use the original field as a base in the event a mistake has been made will modifying. This form allows you to change the following:
If total hours are your only interest, you can enter in total hours worked and the logout times will be adjusted automatically. In addition, data in the “Total Pay” field will be adjusted automatically as you make your changes. The [Discard Changes] button on the bottom of the form will set the Logout Time and Date to be the same as the Login time and Date thus making the “Hours Worked” and “Total Pay” fields zero. Hit the “Save Changes’ button to save your changes and exit the form.
In the event you make a mistake after making a change (i.e. you inadvertently entered data for a wrong employee), use the [Reset to original values] button to restore the original timekeeping settings for the employees record.
Note: You will see warnings such as “Login time is later than logout time!” This is to help you to be more careful in editing the Login/Out Record. If this message appears, edit the time appropriately and save you changes again.
Restaurant Manager allows for adding the hours for a complete shift for a previous day in the event the employee completely forgot to punch in or out. Use the Date field at the bottom of the form to enter the date for the missed shift and then click on the [Add New Record for selected date]. Using this button will affect the following confirmation prompt:
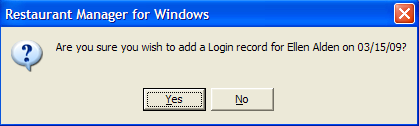
Answer [YES] to continue the process and fill in the fields as described above.
Employee timekeeping data can be modified before and/or after an employee clocks out of the system. This option can be used for making corrections when employees forget to clock in or out, or if they clock in under the wrong job code. To modify employee login data, choose the [Edit Login] function button under MISC options in the main POS area. The POS program will display a scroll window showing the login’s for the current year.
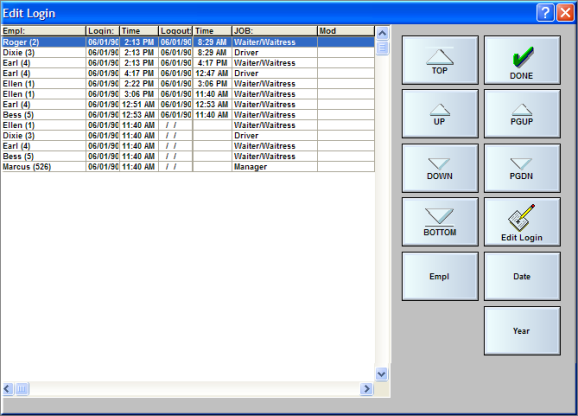
Use the Arrow buttons on the right of the scroll window to locate the login of interest. You can also use the [Empl], [Date] or [Year] [function buttons displayed on the screen to filter down the information. When the correct login is highlighted, press the button “Edit Login.” The following box is displayed to allow modification of 1 or more of the timekeeping parameters.
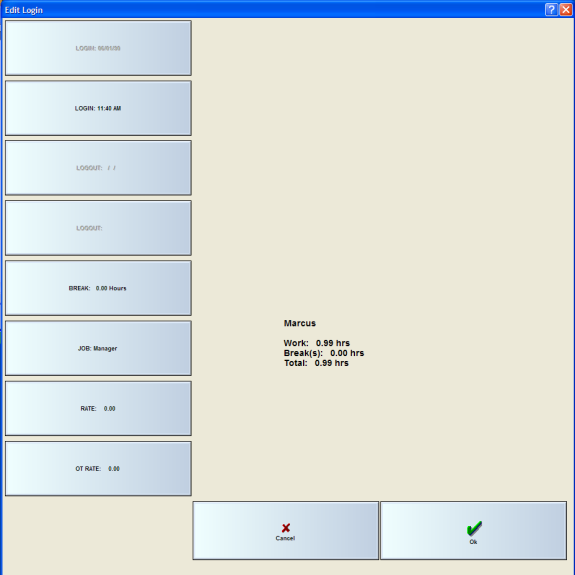
If the shift is over (i.e., the employee has already clocked out), the “Logout time” is enabled; if not, the time is blank and the button is disabled. To change any of the data, just press the corresponding button.
When editing the “LOGOUT” time, if you enter a time that is earlier than the LOGIN time, the system will assume that a midnight crossing has occurred and will automatically adjust the “LOGOUT” date to the day AFTER the LOGIN date. After adjusting any of the parameters for a shift, an “X” is placed in the “MOD” column to indicate that the shift data has been modified.
Two options on the above illustration, Job Rate and OT Rate, are configurable to be displayed. You may want to disable these two options so employees do not see what others are being paid.
Employee Break
For businesses that do not pay their hourly employees for break time, Restaurant Manager can be used to record the in/out times for breaks. Rather than clocking out and clocking back in (which requires all the employee’s checks to be settled), the employee can go on break and return from a break without affecting his open checks. The employee wage reports are also adjusted for breaks taken.
An employee records the beginning and end of a break by use of the “Employee Break” under MISC in the main POS screen. If you wish to make this function more accessible, you can configure the button to appear in the main function area. See section Employee Breaks for more information.
Your system includes a wide variety of employee reports. You can print lists of employees; generate time slips, or issue reports detailing wages earned, hours worked and sales generated by individual or groups of employees.
The employee reports listed below can all be issued by selecting the “Labor” folder in the RM Report Module. The Report Module can be access using the “Report Interface” icon the RM BackOffice toolbar or selecting “Reports” on the menu bar and then click on Report Interface. These reports can also be accessed at the POS using the [Full Reports] function button located under the [MISC] function of the POS Main Status screen. For a detailed description and a sample print out of each report, see the Restaurant Manager publication entitled, “Reports User Guides”.
|
Wage Summary |
Employee Time Keeping |
|
Wage detail |
ATIP Tips |
|
Activity Summary |
Employee Tips |
|
Activity Detail |
TRAC Tips |
|
Job Class Detail |
TRDA Tips |
|
Job Class Summary |
Employee Sales and Tip Totals |
|
Gratuities |
|
When issuing an employee report, Restaurant Manager displays the reports filter on the form so you can filter the report before issuing it.
To issue an Employee List showing name and phone number for some or all of your staff, you must access the RM Report Module using the Report Interface icon on the BackOffice Toolbar or the [Full Reports] function button at the POS. There are two reports you can choose from under the “40 column POS Report” folder:
When issuing an employee report, Restaurant Manager displays the reports filter on the form so you can filter the report before issuing it.
You can configure your system to issue time slips and/or revenue reports from the POS Module when the employee clocks off the system. If your system is configured for Server Banking, you also access the Revenue Report from the RM BackOffice by selecting “Reports on the Menu bar and the clicking on “Revenue”.
One way to motivate your servers to sell more is to identify which menu items generate the best profit margins and offer an award to the server who sells the most of these items. To run a sales contest you must:
Menu Items may be added to or deleted from the Contest Setup Form as often as you wish. As soon as you add an item to the Contest Setup Form it will show up on all Employee Contest Reports, even when the reports covers a period prior to the date the item was actually added to the Contest Setup Form.
Sales contests are usually run over a specified period of time such as a week or a month. But you may also issue an Employee Contest Report on a single Sales Session.
Sales of Tracked Items also appear on two key POS reports. When employees clock out, they may print a Revenues Report that details the tracked items they have sold during the current Sales Session. And the Flash Report shows total sales of tracked items by all employees during the current Sales Session. You may also access contest information in the RM Report Module under the “40 column POS Report” folder by selecting the “Employee Contest” report.
Use the Contests Setup Form to identify the menu items or menu groups you wish to track as part of a sales contest:

To add a menu item to the Contest Setup Form in the RM BackOffice Module:
You can discontinuing tracking items at the POS by selecting the item/group and do one of the following:
Disable- Disabling the group/item will make it available for use at a futures date and while also giving you the ability to go back and retrieve data if needed.
Delete- You can delete a contest if the data is no longer needed. The information will no longer be available once the menu item/group has been deleted from a contest.
You can change the name of a menu item/group of a current contest by selecting the name on the list from the respective tab and click on the [Change] button:
ASI training mode can be used for training new employees. Training mode utilizes data in a “training” sub-directory and therefore any actions performed in training mode do not affect the sales figures for the live system.
Go to Setup >Labor >Training Mode to configure the training mode. The following dialog is displayed:
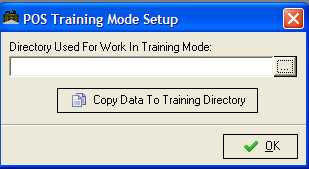
First, enter in the name of the training mode (i.e. training). Next, click on the [Copy Data to Training Directory]. Using this button will create a snapshot shot of the current data contained in the rmwin folder.
Note: it is important that you map the POS stations directly to the Rmwin folder.
Every time you make add an employee or make significant changes to your system you should update the training mode. The name of the directory should remain in place when re-entering the POS Training Mode Setup form. The only step to you need to update the training mode is press the [Copy Data to Training Directory] button on the form.
Note: Not all files are copied into the Training Directory (i.e. security.dbf)
You can enter access the Training Mode at the POS station under the [MISC] functions of the POS Main Status screen and select the [Training] function button. If the training directory is configured properly, the Title Bar will begin flashing to indicate that the system is in training mode.

While in training mode, the POS program has the following special characteristics:
The following interfaces are disabled:
To revert to “Live” mode, press [MISC] from the main POS screen and select the “Training” option again. You should receive the following message once upon re-entering the Live Mode