Restaurant Manager Paygistix Setup
Paygistix EMV setup for Restaurant Manager is a relatively easy process that should take no more than 30 minutes for an experienced user. Paygistx EMV setup for Restaurant Manager will involve the following:
- Configure RMCCWin- disable credit card processing
- Setup new EMV payment(s) - use EMV/NFC payment setting in Method of Payment Setup Form
- Configure Paygistix EMV using options in RM Gateway / Payment Processing Interface in Station Configuration.
- Configure Pre-Auth Options for CC Tabs
- Configure POS Function Buttons
Installing Restaurant Manager Software
All upgrade/update procedures should be followed. This includes closing all Restaurant Manager programs at the POS, RM Server computer, and doing a complete back up. This will require that the session be closed and all employees logged out. You should have the upgrade in advance of installation. When running the installation package, and if you are currently on v19.0, choose one of the two "Update current version" options when prompted. Choose on of the two Upgrade options if upgrading on any version prior to 19.
Paygistix setup for Restaurant Manager is a relatively easy process that should take no more than 15 minutes for an experienced user. It is important that you have all the information Payment Logistics has provided at the time of setup. Specifically, you will need the following:
- User name and password for each terminal- both user name and password are unique for each station
- Vendor ID- this will typically be a four digit number
- URL- in most cases this will be the IP of the server computer (i.e. http://192.168.1.10/8080/ ). If running a terminal on a server/POS computer use the IP loopback (i.e. http://127.0.0.1/8080/ )
This information is critical for the Station Configuration Setup.
Paygistix setup for Restaurant Manager will involve the following:
- Configure RM Gateway Supplemental Setup (RMCCWIN)- disable credit card processing
- Setup new EMV payment - use new EMV/NFC payment setting in Method of Payment Setup Form
- Configure Paygistix using options in RM Gateway / Payment Processing Interface.
-
Configure Pre-Auth Options for CC Tabs
-
Configure POS Function Buttons
RM Gateway Supplemental Setup (RMCCWIN)
RM Gateway Supplemental Setup (RMCCWIN) is not needed in for processing credit cards with Paygistix. Because of this, you will want to configure your system as follows:
- Disable credit card processing- open RM Gateway Supplemental Setup (RMCCWIN) and set the Credit Card Option's field "Credit Card Interface Type" to "disabled". The process will require an administrator password.
- Remove RM Gateway Supplemental Setup (RMCCWIN) from RMStart or similar command files used during Windows start up. RMCCWin is still needed to process 3rd party gift cards. Do not remove RMCCWin from RMStart if using 3rd party gift cards.
- Remove any client software used by other credit card processing systems at Windows start up.
It is important that these steps are performed prior to installing a new Restaurant Manager build when replacing another credit card processing system with Paygistix.
Forms of Payment Setup
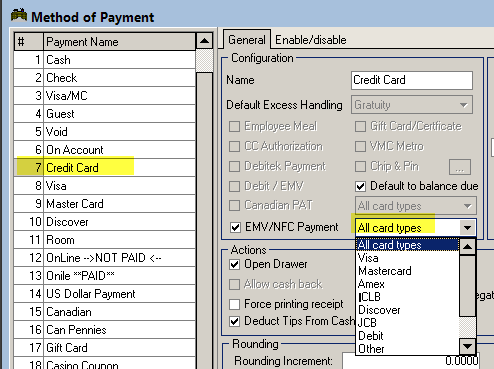
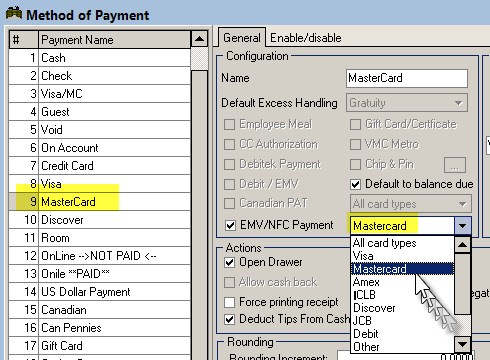
Forms of Payment setup for Vantiv EMV in similar to any other credit processing with two exceptions. The first exception is rather than using the CC Authorization option in the Method of Payment form, you will use the EMV/NFC Payment option. The second difference is you will want to use the drop down menu to the right of this option to define a card type rather than using Automatic Credit Card Detection.. Note: Payment type # 3, Credit Card, will not work with EMV. You should disable this method on all stations.
Naming Payments - Note Mastercard must be spelled as one word as well as Dinersclub.
Single Catch All CC Payment
You can setup a form of payment (Payment #3 Credit Card cannot be used for this) as a catch all if need. In this circumstance, you will use "All Card Types" option in the drop down menu.
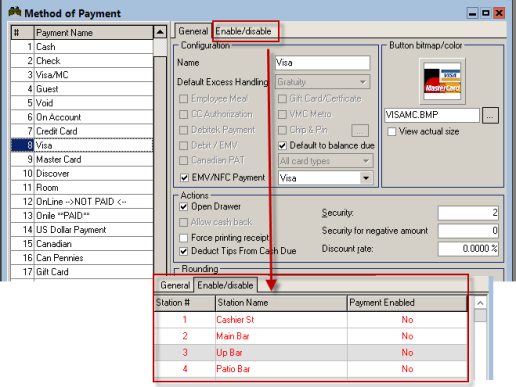
You will also want to setup a CC EMV payment type for each type of credit card (Visa, Mastercard, Amex, etc), enable the EMV / NFC Payment option, and select a card type using the drop down menu. You will then want to take each individual payment type and disable it with the exception of the catch all payment. This arrangement will make for a clean settlement screen while providing accurate settlement reporting.
Individual EMV CC Payments
If you do not want to set up a catch all payment method, you can create an individual payment method for each credit card type accepted. For each form of payment you must enable the EMV / NFC Payment option and select a card type using the drop down menu.
Debit Card Payment
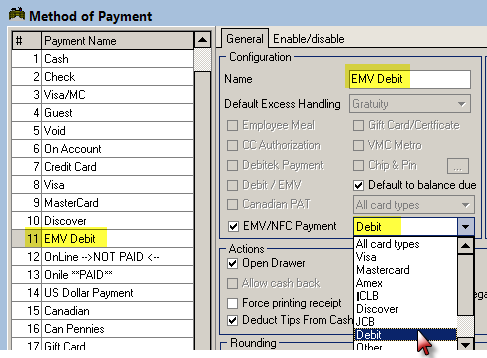
Chances are you never use this form of payment. We are creating this form of payment to prevent certain errors from happening. Create your form of payment , enable the EMV / NFC Payment option, and select the "Debit" option using the drop down menu.
Note: Debit card processing must be specifically requested at the time of ordering Payment Logistics. When ordered, Payment Logistics will configure the PAX devices to prompt for Debit or Credit.
Station Configuration Setup
Each station will have to be configured differently under the Paygistix Client Parameters under Credit Card Authorization because each PAX device associated with a station will have its own user name and password. In addition, settings for the Master Station Configuration will be different than the stations.
Master Station Configuration Settings
Use the following steps for the Master Station Configuration only:
- Click "Admin Settings" and enter Administrator Password
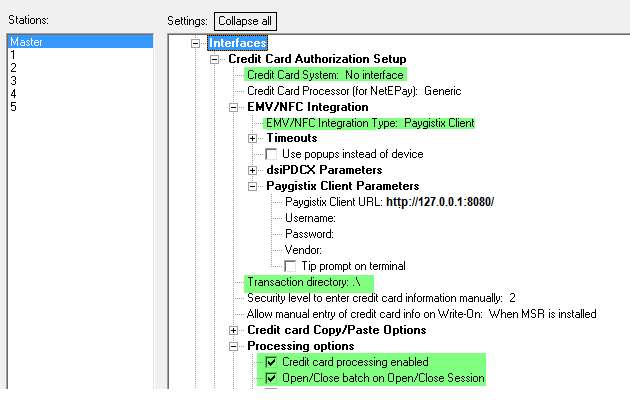
- Use Search button and use "NFC" in search field. Paygistix settings are under Interfaces > RM Gateway / Payment Processing Interface)
- Use the drop down menu on Credit Card System (under RM Gateway / Payment Processing Interface) and select "No Interface"
- Click on the plus next to "EMV/NFC" Integration to expand the menu tree and configure the following options:
- EMV/NFC Integration Type = Paygistix Client (this can be copied to all stations)
- Timeouts = Set the Timeouts as high as possibly convenient. For example, during CCTab, a setting of 10 could causes POS to timeout after ten seconds even when the device transaction succeeded. This means that the amount was actually charged to the card but is not reflected in the POS and will result in an unbalance batch.
- Use popups instead of device = This option is not used with PL's Server Client App
- Paygistix Client Parameters: - The settings under this heading should be left to their default settings. These options are only for stations with a PAX unit attached.
- Processing Options- configure the following options:
- Credit Card Processing - enabled (this can be copied to all stations)
- Open Close Batch on Open Close Session- enable if using Merchant Initiated Batch. Disable if using Payment Logistics Time Initiated Batch Close (this can be copied to all stations)
Station Configuration Settings
Use the following steps to configure all station configuration settings except for the Master Station.
- Click "Admin Settings" and enter Administrator Password
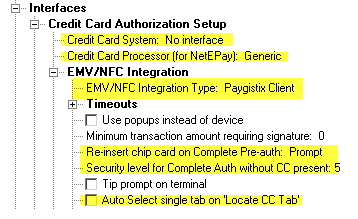
- Use Search button and use "NFC" in search field. Paygistix settings are under Interfaces > RM Gateway / Payment Processing Interface)
- Click on the plus next to "EMV/NFC" Integration to expand the menu tree and configure the following options:
- EMV/NFC Integration Type = Paygistix Client (this can be copied to all stations)
- Timeouts =Use default settings
- Use popups instead of device = This option is not used with PL's Server Client App
Minimum transaction amount requiring signature = This amount is the limit for requiring to print a credit card transaction or require a signature. For example, if sets to $15, then for any transaction under $15, RMPOS would not print a credit card slip or require a signature.
- Re-insert chip card on Complete Pre-Auth = Use default setting "Prompt". If using the CC Tab feature to pre-authorize credit cards, chip cards must be re-inserted into the chip reader on Complete Pre-auth in order to be EMV compliant. If the card it is NOT re-inserted into the reader, Restaurant Manager can still process the transaction using a token; however it will not be EMV compliant and the merchant assumes the liability in the event of a charge back. It is preferable to re-insert the card if possible, but that requires the customer to be on premise to present their card to the bartender or server. Setting this option to "Prompt" will provide the option to re-insert card for added liability protection, however the customer must present their card to the bartender or server again in order to complete the settlement process. This option only applies to all cards with a smart chip.
Security Level for Complete Auth without CC present = The default setting is 9. Enter the security level to permit closing a pre-auth EMV transaction with Complete Pre-Auth when a card is not present. Closing a transaction without a card present is considered to be non EMV compliant and the merchant will assume all charge back costs.
- Tip Prompt on Terminal = Optional. This option determines if the terminal will display a tip prompt when processing a sale. This may be preferred for customer facing devices but is not ideal for establishments were the EMV device is not present.
Auto Select single tab on "Locate CC" = When doing 'Locate CC Tab' (for tabs opened with EMV devices), RMPOS might wrongly open a Tab having the same last 4-digits belonging to a different customer. To prevent this, disable this option so that the user will need to touch to confirm the correct tab. This option affects NFC/EMV users only.
- Paygistix Client Parameters: configure the following options as follows:
- Paygistix URL = enter the IP of the server computer along with port 8080 followed by a forward slash. Example:http://192.168.1.100:8080/. (this can be copied to all stations). If running a POS station on the server computer use the IP loopback (http://127.0.0.1:8080/ ). Make sure that the firewall of the target machine is not blocking port 8080.
- UserName = provided by Payment Logistics. The user name will differ for each station.
- Password = provided by Payment Logistics. The password will differ for each station.
- Vendor = given by Payment Logistics (this can be copied to all stations)
- Tip prompt on terminal = default setting is disable. When disabled, you will enter tips at the POS station using the "Tip" button on the Settlement Screen at the POS. If enabled, the tip prompt will appear on the PAX unit directly after the card swipe. This setting is intended for customer facing units.
- Transaction Directory = use the default ".\" which causes Restaurant Manager to use the Restaurant Manager working directory. If you enter a different directory name, make sure to specify the drive letter and full path (this can be copied to all stations)
- Processing Options- configure the following options:
- Credit Card Processing - enabled (this can be copied to all stations where processing is allowed and a PAX device is present)
- Open Close Batch on Open Close Session- enable if using Merchant Initiated Batch. Disable if using Payment Logistics Time Initiated Batch Close. (this can be copied to all stations)
- Credit Card Receipt Options - configure the following option:
Always Print EMV Void Slip = Sites using signature capture unit (i.e. MT30) will want to enable this function if they have opt to not print CC Receipts.
- Add Tip Options - Enable "Wait for add-tip approval"
Configure Pre-Auth for CC Tabs
As stated in the Introduction and FAQ's sections, CC Tabs require PreAuths to be enabled. You will want to go into Station Configuration > Interface > RM Gateway / Payment Processing Interface > Credit Card Pre-Authorization.Configue the option under the menu branch as needed. At a minimum you will need to enable Credit Card Per-Auth, and set a default amount (i.e. $1.00) Prompts and repeat pre-auth can be disabled if needed. Note - Discard initial pre-auth does not apply to EMV.
Configuring Tips at the POS
The handling of tips will differ slightly when using the Paygistix interface. In most circumstances, tips are added when submitting an authorization, after submitting an authorization, and after finalizing a guest check. The three sections below will tell you how to configure the POS system to handle each scenario mention above.
Configuring Tips at Time of Authorization
In most cases, adding a tip at the time of authorization is performed in a quick service environment when the customer is present. The process outlined in this section does not include the circumstances where an automatic gratuity is being added. Since we are adding a constant tip amount prompt to the PAX device, this section applies to when the customer is entering a tip whether it be a counter service or pay at the table. In this circumstance, all you will need to do is enable the "Tip prompt on Terminal" under Paygistix Client Parameters in Station Configuration > RM Gateway / Payment Processing Interface. This option requires the use of an Administrator password.
Configuring Tips After Authorization
Adding a tip after authorization but before finalizing a transaction is common place for most full service restaurants and bars. In this circumstance you will want to enable the following settings:
- Require Confirm (Revenue Center setting)
- Warn if no tip adjustment (Station Configuration setting)
Configuring Tips After Finalization
Many establishments choose to submit credit cards, finalize for the base amount, and then return at a later time to enter a tip (i.e. after a restaurant has closed). This process will require disabling the "Require CONFIRM" in the Revenue Center Setup Form. Disabling this prompt will have the effect of automatically finalize the transaction when the bill has been paid in full. You will also want to enable the Revenue Center setting "Auto Finalize". You should consider adding the Adjust Tip function button to all POS Modes Status screens if the restaurant chooses to add tips after credit card finalization (see section below).
Configuring POS Function Buttons
There are two function buttons you may want to add to the POS
- Locate CC Tab - this function button will awaken the PAX unit. Once awakened, the employee can swipe the credit card in the PAX, which in turn, will communicate with the POS and open any tab associated with the swiped card.
- Adjust Tip - this function button will allow employees to adjust tips after a credit card payment has been finalized. The behavior of this function is controlled in station configuration under Revise by Employee and Tip Adjust options.
-
Complete Pre-Auth - you will want to add this function button to the Tab Settlement screen. All CC Tabs will require Pre-Auths to be processed. Therefore it will be necessary to add the Complete Pre-Auth to the Tab Settlement screen.
The function buttons above are added in the RM Back office Module under Setup > Screen Layouts > POS Function Button Layouts. The Adjust Tips function button can be added to all POS Mode Status screens. The Locate CC Tab function button can only be added to the tab Status screen.
Delivery Considerations
You might want to consider some of the following options if your restaurant does delivery or call in orders where you take card numbers over the phone.
Add Pre-Auth functionality to delivery- adding this option will help if it is common for customers to call back to add or adjust items after the initial call. The Pre-Auth will capture a predetermined dollar amount and the Complete Auth will finish the order when the driver is ready to go out the door. This will help prevent the order taker asking for a card a second time.
Enable Save/Restore loyalty module credit card info - this option will save a credit card number to a specific telephone number. Once the CC number has been recorded, it will save the employee time by not having to manually re-enter the number.
Note: all credit card transactions performed without a card is not present is considered to be non-emv compliant and liability remains with the merchant.
Closing a CC Batch
A restaurant with multiple stations is registered at Payment Logistics as one account (i.e., one Merchant ID) with MULTIPLE users. This is because each station will have separate user names per each device. Note that each station should be installed with a Paygistix client. Closing a CC batch can be performed through the Restaurant Manager POS System (Merchant Initiated) or through Payment Logistics (Time Initiated) . The later method will have to be arranged with Payment Logistics. Please read the section below to see which method will benefit the restaurant the best.
Merchant Initiated Batch Closing
Merchant initiated batch closing is the process where a CC batch is closed at a predetermined time through the restaurant Manager POS system. When the batch is closed, all transactions from all stations merge into one batch. Note that batch reports are not available when doing Merchant Initiated batch closing.
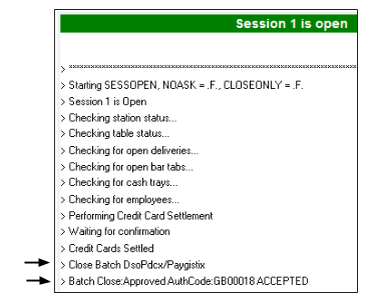
When "Open/Close batch on Open/Close Session" is enabled, the batch is closed when the session is closed. When this happens, the following is seen in the SessOpen screen:
Time Initiated Batch
Time initiated batch closing is when a CC batch is closed at a predetermined time and is initiated by Payment Logistics. You must contact Payment Logistics to have them set up the account to automatically close at the desired time. The benefit to Time Initiated batch closing is Payment Logistics will send an email to a predetermined restaurant email address that confirms the batch has been closed along with a credit card batch summary. This email will not go out if the time initiated batch fails or if the site uses the Merchant Initiated batch option.
To set-up for Time-Initiated Batch Close all station Restaurant Manager "Open Close Batch on Open Close Session" options should be disabled.
There may be time when the merchant needs to clear the batch (e.g., when the batch is not balanced). The following should be done:
- Log in to the Payment Logistics Merchant Portal
- Select “End of Day” then “Credit”
- Force to close the batch
